

How to implement api interface in php

How to implement the api interface in php: first install phpStudy and start it; then place the project code in the WWW directory; then create the database; finally write the interface and make network requests through routing.

Recommended: "PHP Video Tutorial"
Write a simple api (data interface) in PHP
1. Several tools or software required for writing interfaces (all win7 64-bit):
1.phpStudy, SQLyog and coding tools (sublime text/webStorm/vs code are all acceptable, Follow your own habits);
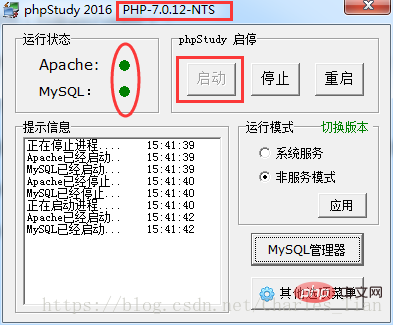
2. After installing phpStudy, open the software and click Start; if the displays on the right side of Apache and MySQL are both green, it means the service started successfully; Also pay attention to the start PHP service version, because different versions correspond to different node.js versions or SQLyog versions. If it cannot be turned on, you can solve it yourself on Baidu. Generally, you need to download the corresponding supported VC9 (32-bit and 64-bit) or VC11 (32-bit) bit and 64-bit).
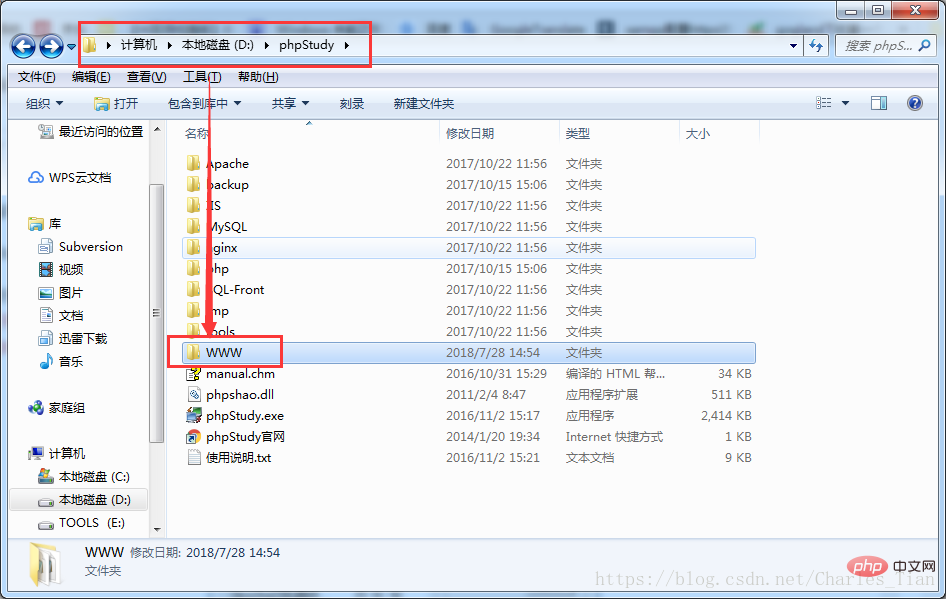
##3. Particularly important to note is that the project code must be placed in the WWW directory, which is where phpStudy is installed. Under contents. Mine is phpStudy/WWW. The new version of phpStudy may be different. Just search for a few more folders and find the WWW folder.
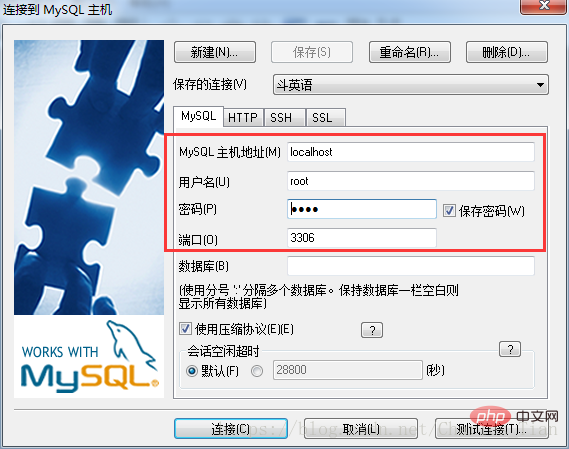
3.SQLyog: used to operate the database. The genuine version needs to be cracked (the cracking method is Baidu). After opening, the following window will pop up. There are four important pieces of information.
1) MySQL host address: just fill in localhost2) User name and password: both root by default3) Port: default 33064) Click the "Connect" button to enter (be sure to note: you can only click to connect after the mysql service is started, otherwise an error code 2003 will appear)
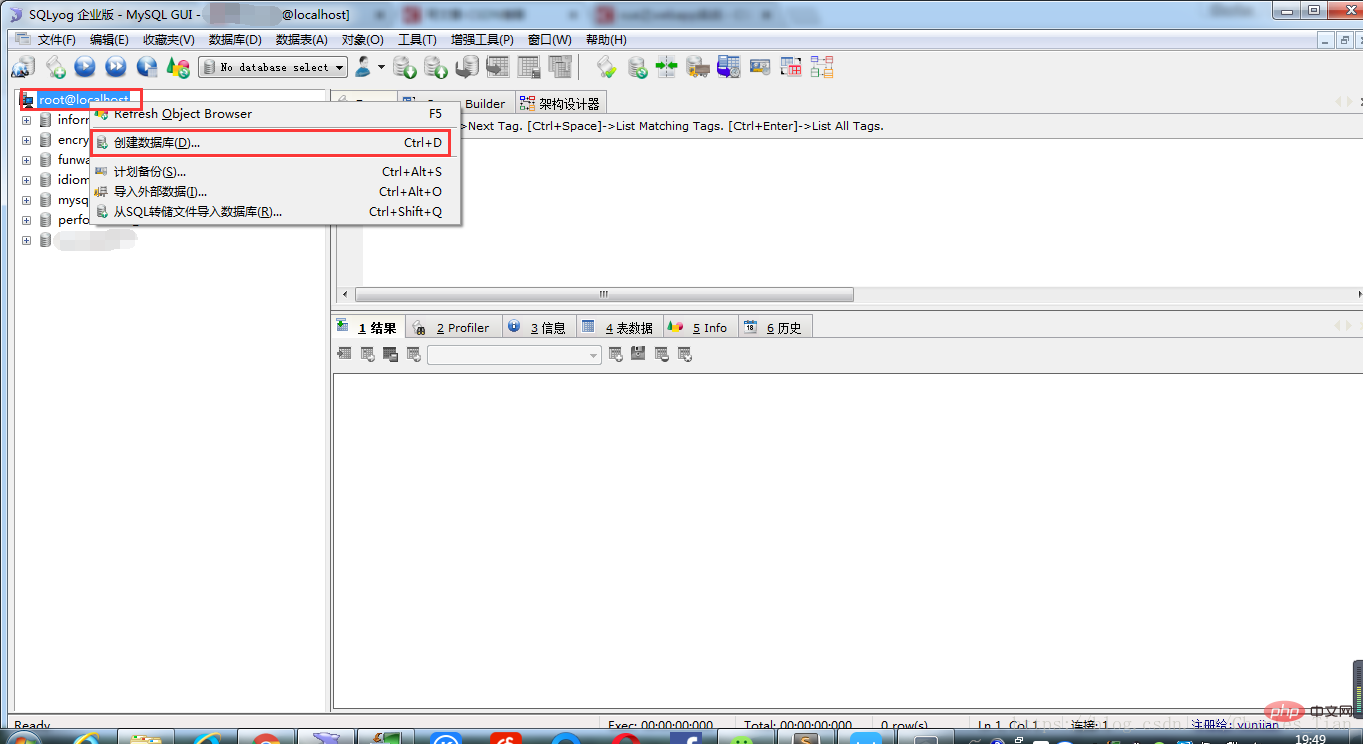
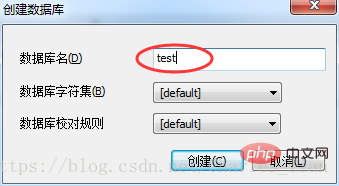
2. Right-click root@localhost in the upper left corner, and then select Create Database;
3. Then in the database name, Fill in your own data name;
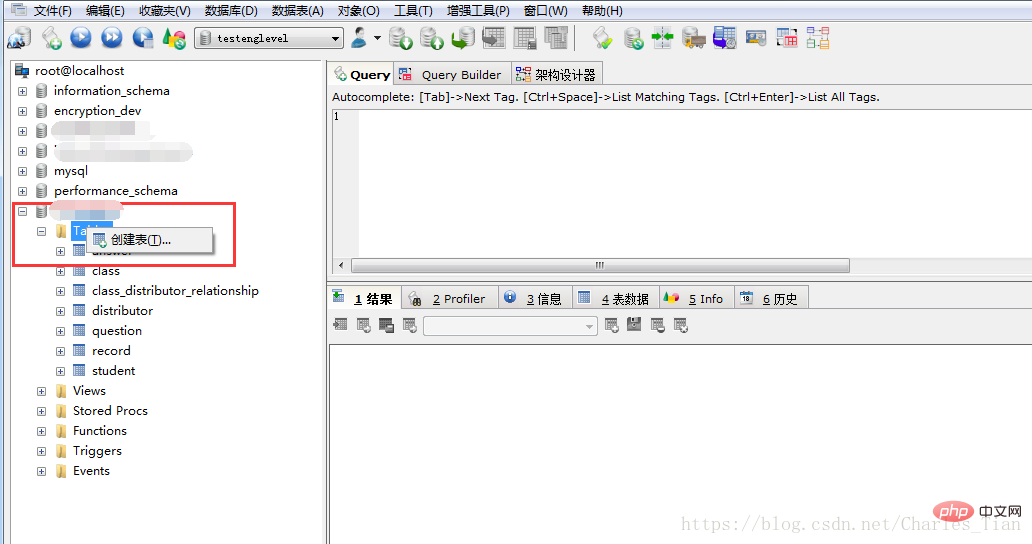
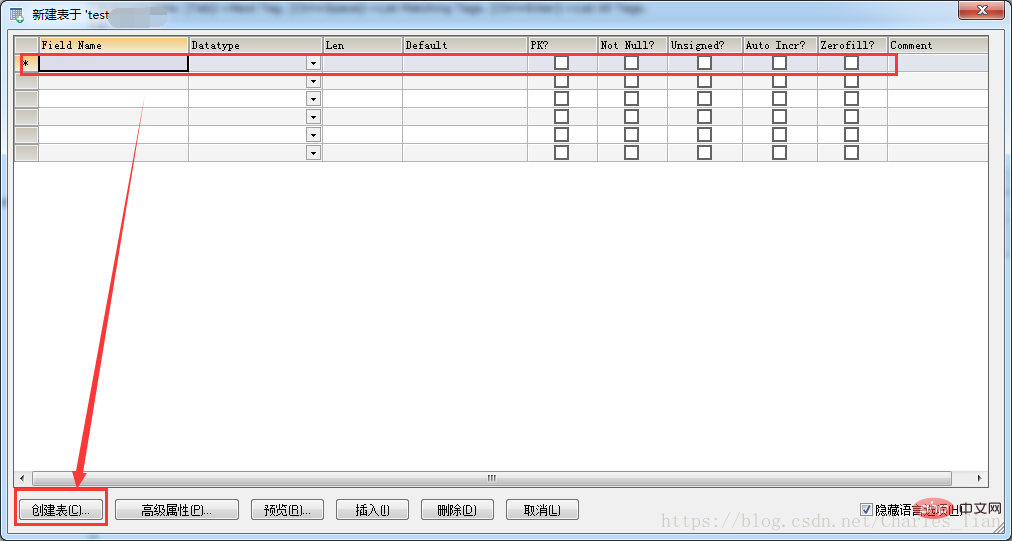
5. Click Create Table and the following box will pop up. Then fill in the field you want and the data type of this field in the form. The length, whether it is empty, what the default value is, etc. After filling in, click the create table in the lower left corner to create the table successfully;
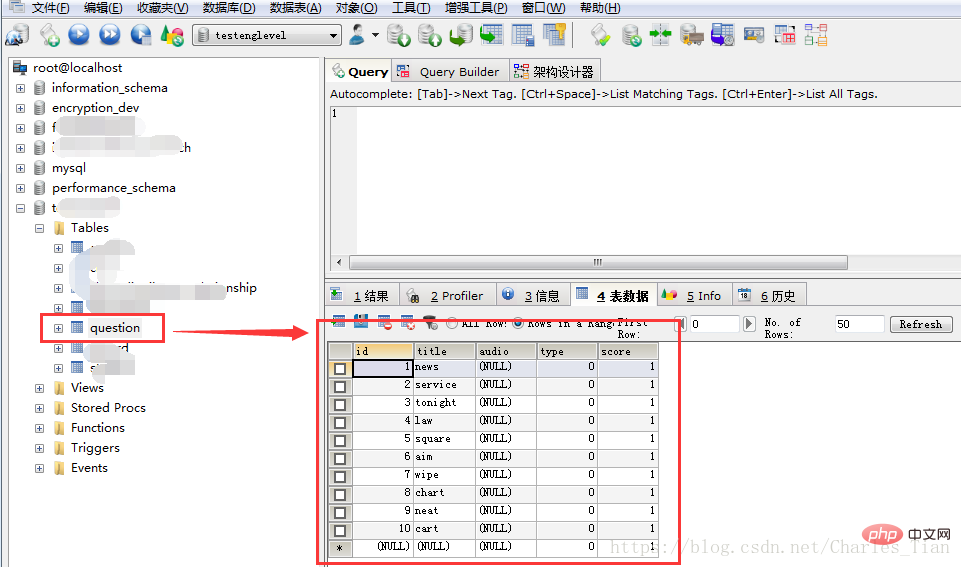
6. At first we must get the data, which is a get request, so we need to fill in some data in the table
2. Install the background development environment :
1. The blogger here uses the popular backend framework lavarel. You can directly manage the one-click download, and then unzip and install it; 2. After unzipping The folder is placed under the WWW folder under phpStudy. After opening phpStudy, directly enter in the browser: localhost/decompressed folder name/server/public/, and then press Enter to view Go to the following interface (the red box is my file path). If the following interface appears, it means that the development environment has been set up successfully.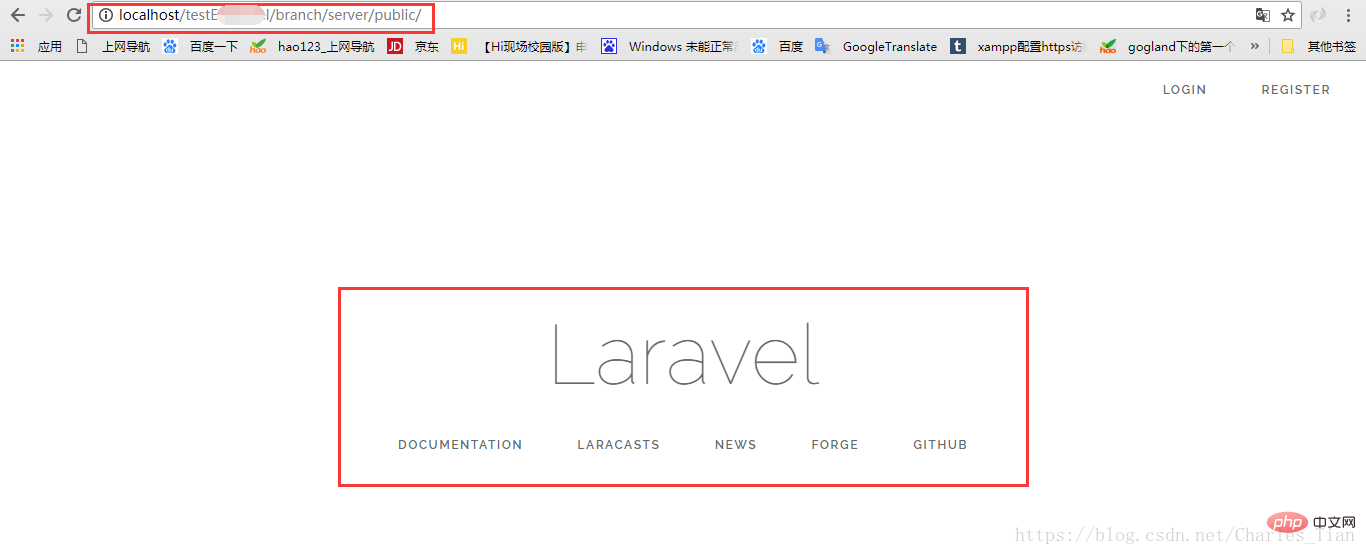
3. Formal writing interface:
1. First, connect to your local database (that is, the database just created in SQLyog). Drag the decompressed project into the editing tool (I use sublime text here), and then open the .env file, as shown below:
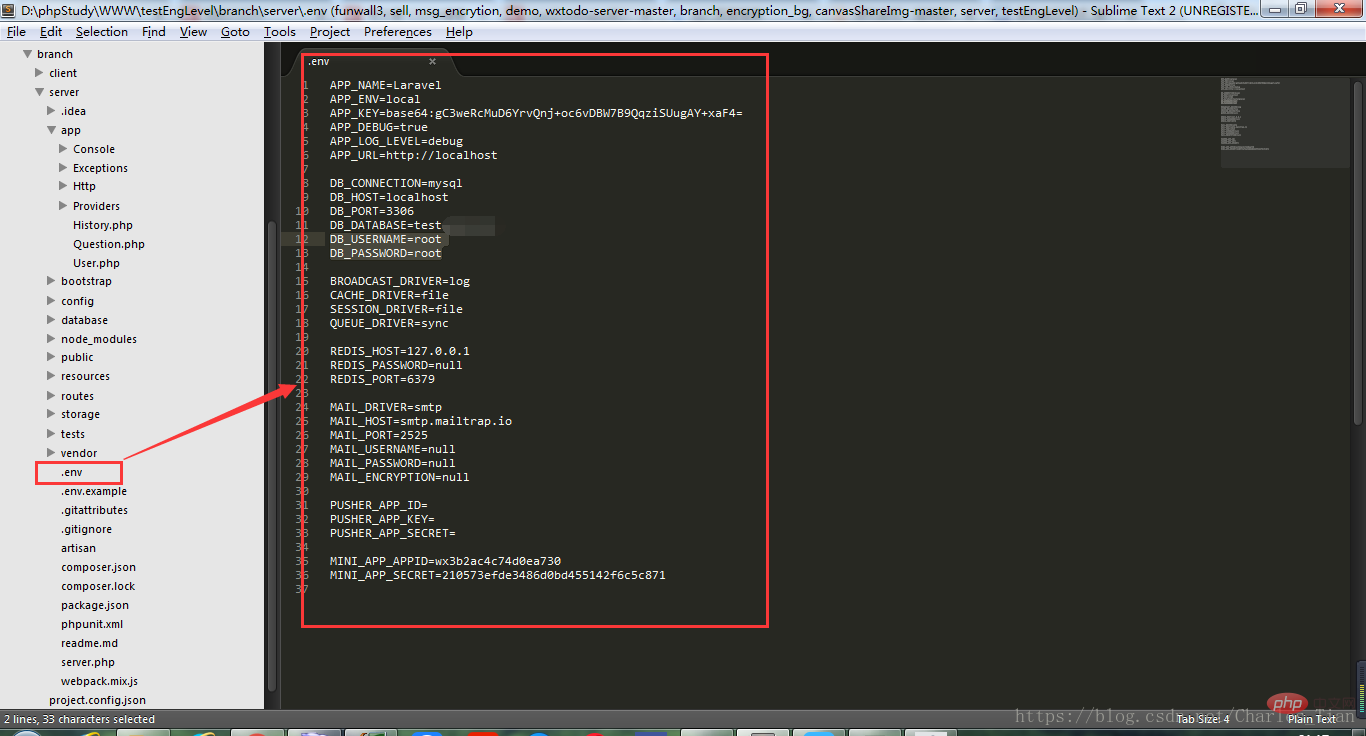
2. Then in Modify some configurations inside. In the picture below, the six configurations I framed must match those previously set, such as DB_CONNECTION=mysql; DB_HOST=localhost; DB_PORT=3306; that is, the connected database type, domain name, and port number. This is generally the default. It matches what we set before. The most important ones are the three in the oval box below:
DB_DATABASE=test; This is the name of the linked database. The test database we just created is the test database;
The following two are username and password: the default is root
DB_USERNAME=root
DB_PASSWORD=root

3. After connecting to the database, create a new Question.php file in the app directory to access the question data table;
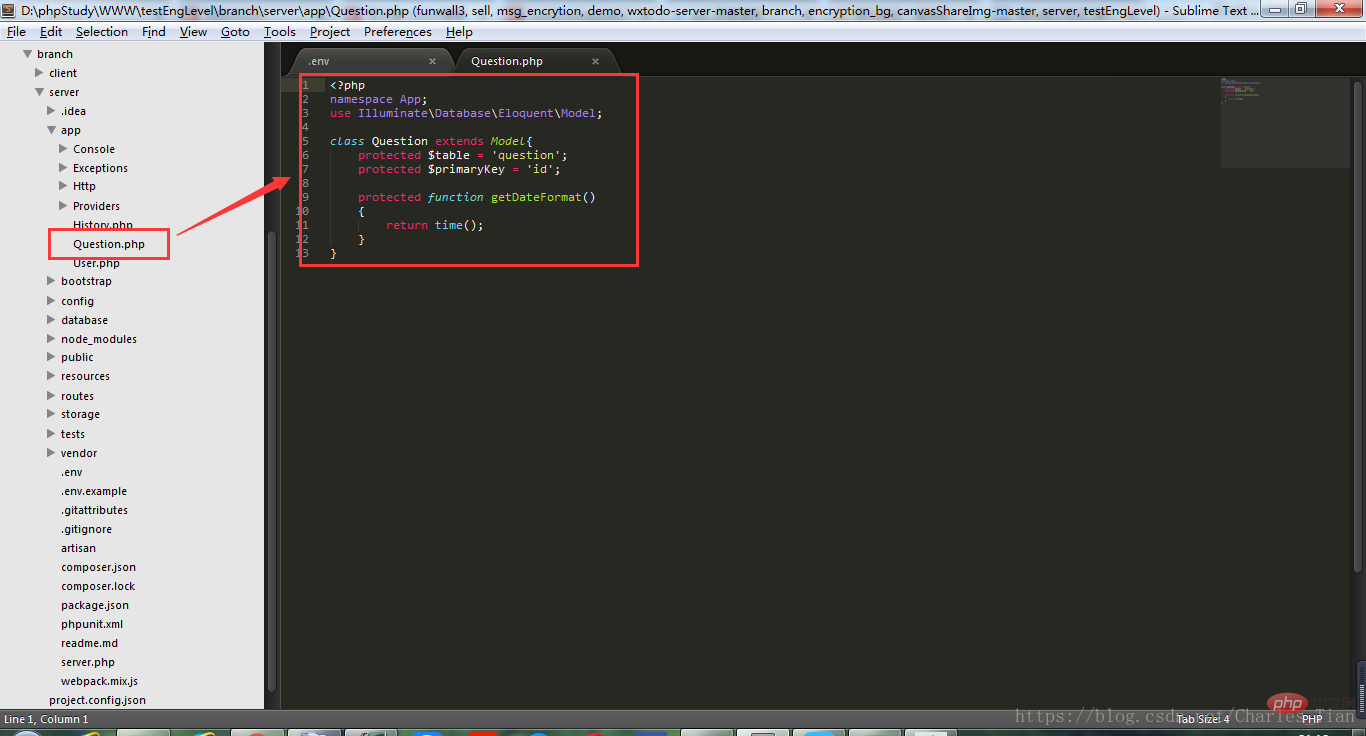
class Question extends Model{
    protected $table = 'question';//这里是访问question这个表
    protected $primaryKey = 'id';//这是访问question表必须要带的字段

    protected function getDateFormat()
    {
        return time();
    }
}4. Start writing the real meaning on the interface. Create a new QuestionController.php file in the app/Http/Controllers directory, and then write on it:
use App\Question means that you want to access this data for easy operation;
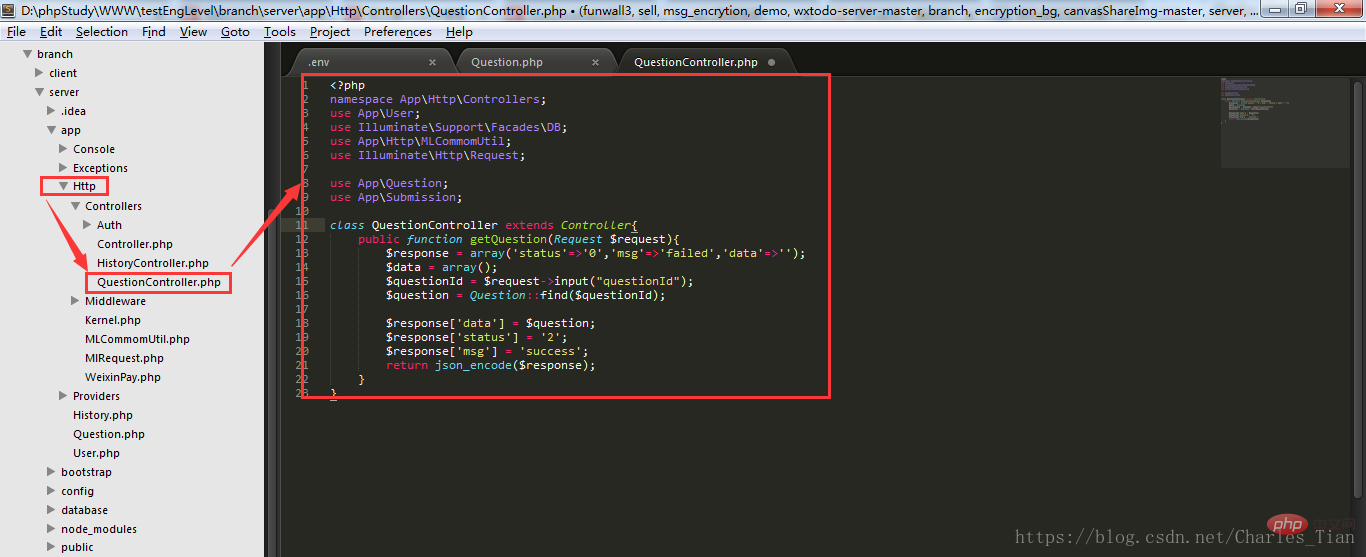
    public function getQuestion(Request $request){
        $response = array('status'=>'0','msg'=>'failed','data'=>'');
        $data = array();
        // 获取请求参数值
        $questionId = $request->input("questionId");
        // 根据参数值去向表里查找对应的数据
        $question = Question::find($questionId);
        // 查找完毕之后,把查找到的数据赋值给response下的data字段
        $response['data'] = $question;
        $response['status'] = '2';
        $response['msg'] = 'success';
        return json_encode($response);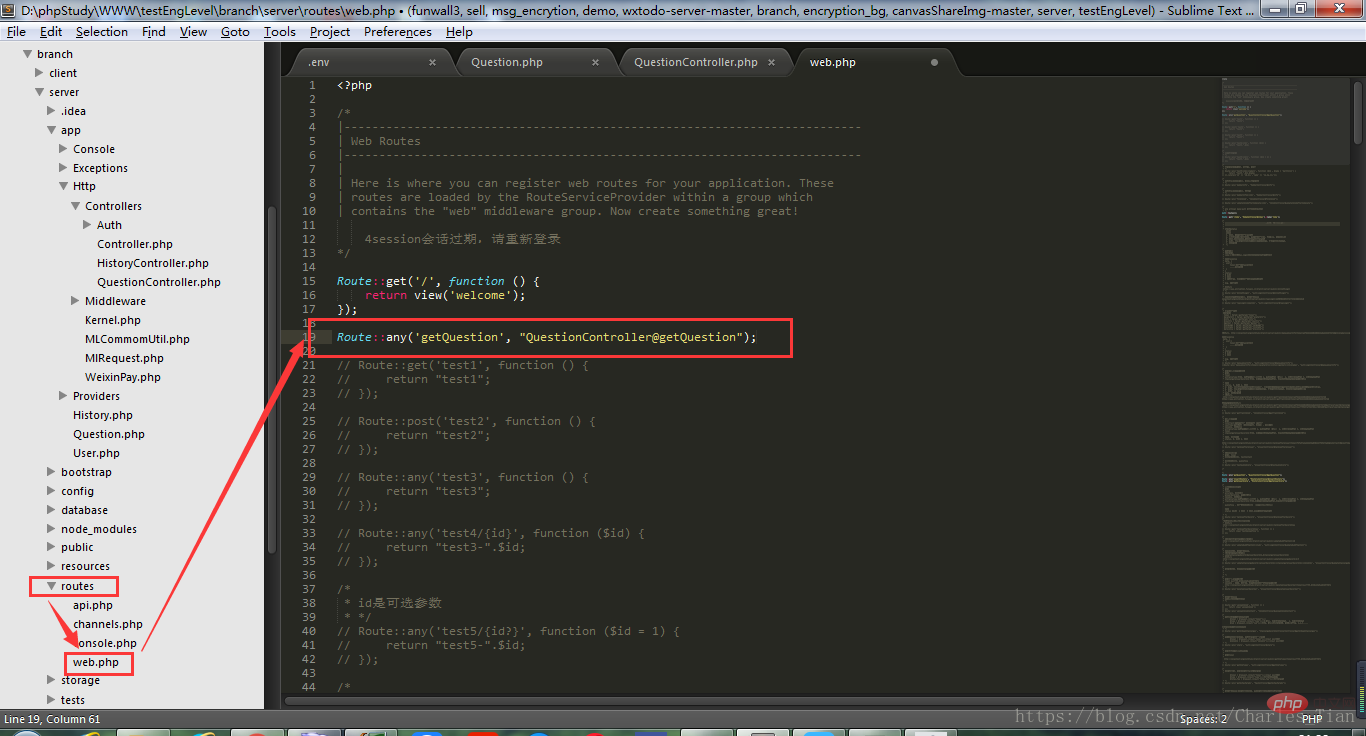
}5. After writing the interface, the network request is finally made through routing, so we also need to write in the web.php file in the routes directory:
Route::any( 'getQuestion', "QuestionController@getQuestion"); used to access this interface;
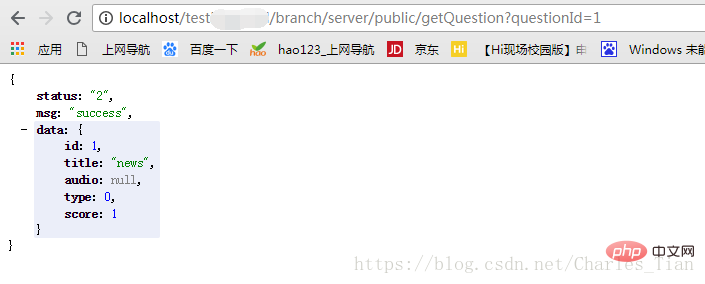
6. Test. The last step is to test whether the interface you wrote is available. You must remember to open the server before testing. In the browser address input field, enter:
localhost/decompressed folder name/server/public/getQuestion?questionId=1 to get the data returned by the background. At this time, you will find that the returned data is exactly the same as the data we filled in the table before, which means that you wrote the interface successfully.
4. In the above three major steps, it will definitely not be smooth sailing, and you will definitely encounter various problems. This time is also a test for yourself to find problems and problem-solving skills. However, the general background development process is like this, but it should be noted that this is a locally configured development environment and uses local data. Finally, if you want your work to be seen and used by others, you need to deploy your code to the server. At that time, various configuration issues will be different, so you need to change the local development environment to an online one. Environment, there will be a lot to learn here... I wish you all a happy study
The above is the detailed content of How to implement api interface in php. For more information, please follow other related articles on the PHP Chinese website!

Hot AI Tools

Undresser.AI Undress
AI-powered app for creating realistic nude photos

AI Clothes Remover
Online AI tool for removing clothes from photos.

Undress AI Tool
Undress images for free

Clothoff.io
AI clothes remover

Video Face Swap
Swap faces in any video effortlessly with our completely free AI face swap tool!

Hot Article
Hot Tools

Notepad++7.3.1
Easy-to-use and free code editor

SublimeText3 Chinese version
Chinese version, very easy to use

Zend Studio 13.0.1
Powerful PHP integrated development environment

Dreamweaver CS6
Visual web development tools

SublimeText3 Mac version
God-level code editing software (SublimeText3)
Hot Topics
 1389
1389
 52
52

 PHP 8.4 Installation and Upgrade guide for Ubuntu and Debian
Dec 24, 2024 pm 04:42 PM
PHP 8.4 Installation and Upgrade guide for Ubuntu and Debian
Dec 24, 2024 pm 04:42 PM
PHP 8.4 brings several new features, security improvements, and performance improvements with healthy amounts of feature deprecations and removals. This guide explains how to install PHP 8.4 or upgrade to PHP 8.4 on Ubuntu, Debian, or their derivati
 7 PHP Functions I Regret I Didn't Know Before
Nov 13, 2024 am 09:42 AM
7 PHP Functions I Regret I Didn't Know Before
Nov 13, 2024 am 09:42 AM
If you are an experienced PHP developer, you might have the feeling that you’ve been there and done that already.You have developed a significant number of applications, debugged millions of lines of code, and tweaked a bunch of scripts to achieve op
 How To Set Up Visual Studio Code (VS Code) for PHP Development
Dec 20, 2024 am 11:31 AM
How To Set Up Visual Studio Code (VS Code) for PHP Development
Dec 20, 2024 am 11:31 AM
Visual Studio Code, also known as VS Code, is a free source code editor — or integrated development environment (IDE) — available for all major operating systems. With a large collection of extensions for many programming languages, VS Code can be c
 Explain JSON Web Tokens (JWT) and their use case in PHP APIs.
Apr 05, 2025 am 12:04 AM
Explain JSON Web Tokens (JWT) and their use case in PHP APIs.
Apr 05, 2025 am 12:04 AM
JWT is an open standard based on JSON, used to securely transmit information between parties, mainly for identity authentication and information exchange. 1. JWT consists of three parts: Header, Payload and Signature. 2. The working principle of JWT includes three steps: generating JWT, verifying JWT and parsing Payload. 3. When using JWT for authentication in PHP, JWT can be generated and verified, and user role and permission information can be included in advanced usage. 4. Common errors include signature verification failure, token expiration, and payload oversized. Debugging skills include using debugging tools and logging. 5. Performance optimization and best practices include using appropriate signature algorithms, setting validity periods reasonably,
 How do you parse and process HTML/XML in PHP?
Feb 07, 2025 am 11:57 AM
How do you parse and process HTML/XML in PHP?
Feb 07, 2025 am 11:57 AM
This tutorial demonstrates how to efficiently process XML documents using PHP. XML (eXtensible Markup Language) is a versatile text-based markup language designed for both human readability and machine parsing. It's commonly used for data storage an
 PHP Program to Count Vowels in a String
Feb 07, 2025 pm 12:12 PM
PHP Program to Count Vowels in a String
Feb 07, 2025 pm 12:12 PM
A string is a sequence of characters, including letters, numbers, and symbols. This tutorial will learn how to calculate the number of vowels in a given string in PHP using different methods. The vowels in English are a, e, i, o, u, and they can be uppercase or lowercase. What is a vowel? Vowels are alphabetic characters that represent a specific pronunciation. There are five vowels in English, including uppercase and lowercase: a, e, i, o, u Example 1 Input: String = "Tutorialspoint" Output: 6 explain The vowels in the string "Tutorialspoint" are u, o, i, a, o, i. There are 6 yuan in total
 Explain late static binding in PHP (static::).
Apr 03, 2025 am 12:04 AM
Explain late static binding in PHP (static::).
Apr 03, 2025 am 12:04 AM
Static binding (static::) implements late static binding (LSB) in PHP, allowing calling classes to be referenced in static contexts rather than defining classes. 1) The parsing process is performed at runtime, 2) Look up the call class in the inheritance relationship, 3) It may bring performance overhead.
 What are PHP magic methods (__construct, __destruct, __call, __get, __set, etc.) and provide use cases?
Apr 03, 2025 am 12:03 AM
What are PHP magic methods (__construct, __destruct, __call, __get, __set, etc.) and provide use cases?
Apr 03, 2025 am 12:03 AM
What are the magic methods of PHP? PHP's magic methods include: 1.\_\_construct, used to initialize objects; 2.\_\_destruct, used to clean up resources; 3.\_\_call, handle non-existent method calls; 4.\_\_get, implement dynamic attribute access; 5.\_\_set, implement dynamic attribute settings. These methods are automatically called in certain situations, improving code flexibility and efficiency.
