

Vue.js Learning 2: Data-Driven Development

Vue.js Tutorial column introduces the data-driven development of Vue.js learning part two.

In the Vue.js framework, the way to interact with HTML page elements is not as direct as the native JavaScript interface. It is first embedded in a series of similar HTML element tags. Bind data to the Vue directive attributes of ordinary tag attributes, and then modify the display mode and content of page elements by modifying these bound data in JavaScript code. In terms of programming methods, we usually call this way of using changes in data content to drive the business operations of the entire program "Data-driven development". This part of the notes will record how to use data-driven development methods to complete data binding and event response to achieve basic functions such as controlling page elements and CSS styles.
Data Binding
In the previous 01_sayHello program, we now bind a name using template syntax in the <h1> tag For the data of sayHello, this template syntax is actually the syntactic sugar of the v-text instruction. In other words, the more standardized syntax of the <h1> tag should be:
<h1 v-text="sayHello"></h1>
Considering our traditional habit of writing HTML tags, use {{ data_name }} Such template tags will be more comfortable. Of course, the v-text directive sets the text content under the current element label. If you want to bind data to the attribute of the label itself, you have to use the v-bind directive. The specific syntax is to add the v-bind: prefix in front of the label attribute name to be set. For example, if you want to bind data to the src attribute of the <img> tag, you can do this:
<img v-bind:src="vueLogo" style="width:200px">
Also, v-bind# The ## directive also has an abbreviated form. You only need to add a : prefix before the label attribute name to which data is bound. In the previous 01_sayHello program, I used this form. After binding the data on the page element, you can create a Vue instance in the corresponding JavaScript script. This is the main.js file I used in the 01_sayHello program. content written in. At least the following two members must be defined in this Vue instance object:
- el
Member: This member is used to set the element container corresponding to the current Vue instance. , which is usually aelement. In some cases, it can also be the, - data
Member: This member is used to set the data bound in the page element. Its value itself is also an object in JSON format. Each of the objects Each member corresponds to an object bound in a page element. For example, in the previous 01_sayHelloprogram, I bound the two datasayHelloandvueLogo, You must set corresponding values for them in thedatamember of the Vue object.
01_sayHello program is currently only a one-way data display business. If you want to make it interactive, you also need to bind events to page elements. In the Vue.js framework, to bind an event, you must first register an event handler for the target element tag through the v-on directive. For example, if we want to use a button in the 01_sayHello program To control whether the <img> element is displayed or not, you can modify the index.htm code of the program as follows:
    你好,Vue.js


        <h1> {{ sayHello }}
![]()
- First of all, a
- v-show
directive is added to the<img>tag, which can be used to bind a Boolean type Data (that is,isShowhere) to determine whether to display the label where it is located.Then, a new button label is added to the page, and the - v-bind
directive is used to set thevalueattribute of the label. The value of this attribute is a condition An expression that will display different text based on the value ofisShow.Finally, use the - v-on
command (@is the abbreviation of thev-on:prefix of the command) for the new button The label registers a click event handler namedtoggleShow.
main.js, as follows:
const app = new Vue({
    el: '#app',
    data:{
        sayHello: '你好,Vue.js!',
        vueLogo: 'img/logo.png',
        isShow: true
    },
    methods:{
        toggleShow: function() {
            this.isShow = !this.isShow;
        }
    }
});- 首先,在 Vue 对象的
data成员中定义了之前绑定的布尔类型数据isShow,并将其默认值设置为 true。 - 然后,为 Vue 对象新增了一个名为
methods的成员。该成员用于设置页面元素中注册的事件处理函数,它的值也是一个 JSON 格式的对象。该对象的每个成员都对应一个已在页面元素中用v-on指令注册的事件处理函数。在这里就是toggleShow,该函数每次调用都会将isShow的值取反。
这样一来,当我们在 Web 浏览器中打开该应用程序就会看到之前的 Vue 图标旁边多了个文本内容为隐藏的按钮。当按钮被单击之后,图标就会消失,按钮上的文本也变成显示。之后,如果该按钮再次被单击,一切又会恢复原状。
用户输入
对于用户来说,除了触发事件之外,允许用户在运行时输入具体的数据也是一个应用程序必不可少的一项功能。下面将通过编写一个"待办事项"的程序来学习如何使用 Vue.js 框架实现能处理用户输入数据的应用程序界面。为此,我需要在code目录下创建一个名为02_toDoList的目录,并在该目录中创建一个名为index.htm的文件,其代码如下:
<!DOCTYPE html>
<html lang="zh-cn">
<head>
    <meta charset="UTF-8">
    <meta name="viewport" content="width=device-width, initial-scale=1.0">
    <meta http-equiv="X-UA-Compatible" content="ie=edge">
    <script defer="defer" src="../node_modules/vue/dist/vue.js"></script>
    <script defer="defer" src="js/main.js"></script>
    <title>待办事项</title>
</head>
<body>
    <p id="app">
        <h1>待办事项</h1>
        <p id="todo">
            <ul>
                <li v-for="( task,index ) in taskList">
                    <input type="checkbox" v-model="doneList" :value="task">
                    <label :for="task">{{ task }}</label>
                    <input type="button" value="删除" @click="remove(index)">
                </li>
            </ul>
        </p>
        <p id="done" v-if="doneList.length > 0">
            <h2>已完成事项</h2>
            <ul>
                <li v-for="task in doneList">
                    <label :for="task">{{ task }}</label>
                </li>
            </ul>
        </p>
        <input type="text" v-model="newTask" @keyup.enter="addNew">
        <input type="button" value="添加新任务" @click="addNew">
    </p>
</body>
</html>接下来,我会在同一目录下再创建一个名为js的目录,并在该目录下创建main.js脚本文件,其代码如下:
// 程序名称: toDoList
// 实现目标:
//   1. 学习 v-model、v-for 等指令
//   2. 掌握如何处理用户输入

const app = new Vue({
    el: '#app',
    data:{
        newTask: '',
        taskList: [],
        doneList: []
    },
    methods:{
        addNew: function() {
                  if(this.newTask !== '') {
                      this.taskList.push(this.newTask);
                      this.newTask = '';
                  }
                },
        remove: function(index) {
                  if(index >=  0) {
                      this.taskList.splice(index,1);
                  }
                }
    }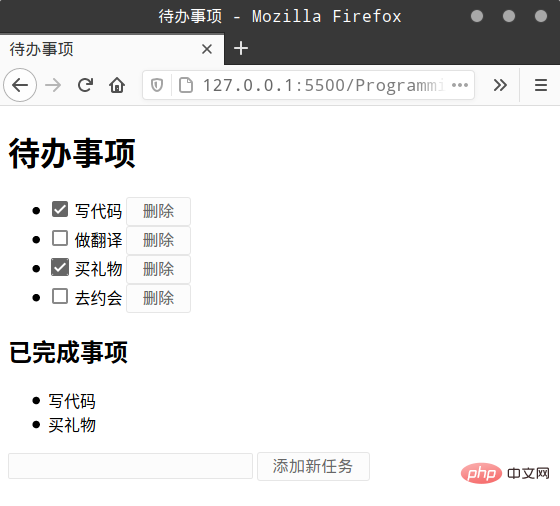
});下面来具体分析一下这个程序。在通常情况下,Web 应用程序在前端接受用户输入信息的方式主要有两种:第一种方式是用文本框元素来获取用户从键盘输入的信息。在 Vue.js 框架中,我们可以用v-model指令将<input type="text">标签绑定到newTask数据中,该指令与v-bind指令不同的在于,它是一种双向绑定。也就是说,v-model指令不止可以让 JavaScript 代码中对绑定数据的修改反映到页面元素中,也可以让页面元素获取到的用户输入数据同步到 JavaScript 代码中。在 JavaScript 代码获取到文本框中的用户输入内容之后,我们就可以通过事件处理函数addNew将其加入到一个名为taskList的数据列表中,然后将该事件处理函数注册给输入回车和鼠标单击事件。
第二种方式是用单选钮、复选框等选择性元素来获取用户用鼠标勾选的信息。例如在上面这个程序中,我在<p id="todo">元素中用v-for指令创建了一系列<input type="checkbox">,它们都提供v-model指令将自己双向绑定到了另一个名为doneList数据列表上。在 Vue.js 框架中,如果一组复选框元素被v-model指令绑定到了一个列表类型的数据上,那么当这些复选框被选上时,它们的value属性值就会被自动添加到这个被绑定的数据列表中。
为了证明被选中的复选框被加入到了doneList数据列表中,我还在页面中添加了一个<p id="done">元素,并对doneList数据列表进行了遍历显示。需要说明的是,用于遍历数据列表的v-for指令主要有两种形式:
-
When we only need to traverse the values in the list, we can write like this:
v-for="item in dataList", then the data list (Each item of data in dataList) will be read one by one by the iterative variable (item) during the traversal process. -
When we need to get the list value and its index in the list at the same time, we can write like this:
v-for="(item,index) in dataList", at this time, during the traversal process of the data list (dataList), the value of each item of data will be read by theitemvariable, and the index of each item of data will beindexVariable reading.
The last thing to note is that for the <p id="done"> element itself, I used the v-if directive, which The effect is basically the same as the previous v-show instruction. The only difference is: the v-if instruction will directly add or delete the element node where it is located on the DOM tree, while # The ##v-show command simply hides or displays the element through the style attribute of the element where it is located. In terms of execution efficiency, the v-show command is more efficient. Here, we set that when there is no data in the doneList list, the program will directly remove the <p id="done"> element from the page, and vice versa. Add this element to the page. Let’s take a look at the effect of 02_toDoList program operation:
## More related free learning:javascript(Video)
The above is the detailed content of Vue.js Learning 2: Data-Driven Development. For more information, please follow other related articles on the PHP Chinese website!

Hot AI Tools

Undresser.AI Undress
AI-powered app for creating realistic nude photos

AI Clothes Remover
Online AI tool for removing clothes from photos.

Undress AI Tool
Undress images for free

Clothoff.io
AI clothes remover

Video Face Swap
Swap faces in any video effortlessly with our completely free AI face swap tool!

Hot Article
Hot Tools

Notepad++7.3.1
Easy-to-use and free code editor

SublimeText3 Chinese version
Chinese version, very easy to use

Zend Studio 13.0.1
Powerful PHP integrated development environment

Dreamweaver CS6
Visual web development tools

SublimeText3 Mac version
God-level code editing software (SublimeText3)
Hot Topics
 1386
1386
 52
52

 In-depth discussion of how vite parses .env files
Jan 24, 2023 am 05:30 AM
In-depth discussion of how vite parses .env files
Jan 24, 2023 am 05:30 AM
When using the Vue framework to develop front-end projects, we will deploy multiple environments when deploying. Often the interface domain names called by development, testing and online environments are different. How can we make the distinction? That is using environment variables and patterns.
 What is the difference between componentization and modularization in vue
Dec 15, 2022 pm 12:54 PM
What is the difference between componentization and modularization in vue
Dec 15, 2022 pm 12:54 PM
The difference between componentization and modularization: Modularization is divided from the perspective of code logic; it facilitates code layered development and ensures that the functions of each functional module are consistent. Componentization is planning from the perspective of UI interface; componentization of the front end facilitates the reuse of UI components.
 Detailed graphic explanation of how to integrate the Ace code editor in a Vue project
Apr 24, 2023 am 10:52 AM
Detailed graphic explanation of how to integrate the Ace code editor in a Vue project
Apr 24, 2023 am 10:52 AM
Ace is an embeddable code editor written in JavaScript. It matches the functionality and performance of native editors like Sublime, Vim, and TextMate. It can be easily embedded into any web page and JavaScript application. Ace is maintained as the main editor for the Cloud9 IDE and is the successor to the Mozilla Skywriter (Bespin) project.
 Let's talk in depth about reactive() in vue3
Jan 06, 2023 pm 09:21 PM
Let's talk in depth about reactive() in vue3
Jan 06, 2023 pm 09:21 PM
Foreword: In the development of vue3, reactive provides a method to implement responsive data. This is a frequently used API in daily development. In this article, the author will explore its internal operating mechanism.
 Explore how to write unit tests in Vue3
Apr 25, 2023 pm 07:41 PM
Explore how to write unit tests in Vue3
Apr 25, 2023 pm 07:41 PM
Vue.js has become a very popular framework in front-end development today. As Vue.js continues to evolve, unit testing is becoming more and more important. Today we’ll explore how to write unit tests in Vue.js 3 and provide some best practices and common problems and solutions.
 A brief analysis of how to handle exceptions in Vue3 dynamic components
Dec 02, 2022 pm 09:11 PM
A brief analysis of how to handle exceptions in Vue3 dynamic components
Dec 02, 2022 pm 09:11 PM
How to handle exceptions in Vue3 dynamic components? The following article will talk about Vue3 dynamic component exception handling methods. I hope it will be helpful to everyone!
 A simple comparison of JSX syntax and template syntax in Vue (analysis of advantages and disadvantages)
Mar 23, 2023 pm 07:53 PM
A simple comparison of JSX syntax and template syntax in Vue (analysis of advantages and disadvantages)
Mar 23, 2023 pm 07:53 PM
In Vue.js, developers can use two different syntaxes to create user interfaces: JSX syntax and template syntax. Both syntaxes have their own advantages and disadvantages. Let’s discuss their differences, advantages and disadvantages.
 How to query the current vue version
Dec 19, 2022 pm 04:55 PM
How to query the current vue version
Dec 19, 2022 pm 04:55 PM
There are two ways to query the current Vue version: 1. In the cmd console, execute the "npm list vue" command to query the version. The output result is the version number information of Vue; 2. Find and open the package.json file in the project and search You can see the version information of vue in the "dependencies" item.
