TodayWeChat Mini Program Development Tutorial column records the pitfalls of WeChat Mini Program for everyone.

Recently participated in the development of the company's first small program. The development experience is basically similar to hybrid development based on webview. The official powerful API can be called, but There are also some pitfalls or places that you are not used to. This article records some problems during the development process from the perspective of practicality:
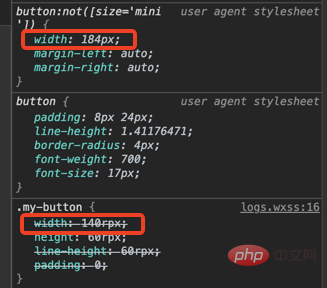
When using the button component, I found that setting the width in the class does not take effect. Paste the code below:
.my-button{  width: 140rpx;  height: 60rpx;  line-height: 60rpx;  padding: 0;
}复制代码After investigation with the WeChat debugging tool, we found that the style priority of the user agent is actually greater than the style class we wrote ourselves. This is basically impossible to happen in the browser

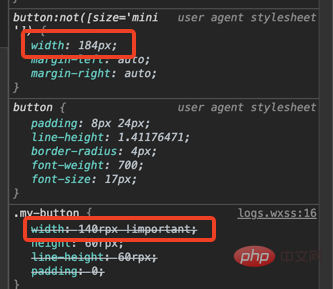
The solution is actually relatively simple. Just add the suffix !important or style="width:140rpx" to width. After modification Let’s take a look at the effect again:


After adding !important, the actual effect of the width is already in line with ours As expected, but the WeChat debugging tool still shows that the user agent style takes precedence. This should be regarded as a bug in the debugging tool.
Generally, basic components in UI visual drafts, such as buttons, have specific styles: for example, background color/font. Use the Component function of the mini program to encapsulate it into components, write default styles and receive external incoming classes, which can facilitate subsequent development.
React has<tag></tag>This way of writing, that is, the component receives the props without processing them, and only passes them transparently to the next component. But the mini program does not support this writing method (searching to no avail, and the official documentation does not explain it).
This means that we need to list all the parameters supported by the button component in properties:
properties: {
    classes: {
      type: String,
      value: '',
    },
    type: {
      type: String,
      value: 'default',
    },
    plain: {
      type: Boolean,
      value: false,
    },
    size: {
      type: String,
      value: 'default',
    },
    ......
},复制代码*Disabled*{
box-sizing: border-box;
}复制代码The above code will report an error when compiling because the applet disables this type of selector. A bold guess at the specific reason: Does this type of selector with a relatively wide scope conflict with the style isolation of custom components? ?
Then how to add a global universal style to the mini program? It seems that I can only manually write all the tags I use. Fortunately, there are ready-made codes on the Internet that can be posted:
view,scroll-view,swiper,swiper-item,movable-area,movable-view,cover-view,cover-image,icon,text,rich-text,progress,button,checkbox-group,checkbox,form,input,label,picker,picker-view,radio-group,radio,slider,switch,textarea,navigator,functional-page-navigator,image,video,camera,live-player,live-pusher,map,canvas,open-data,web-view,ad{  box-sizing: border-box;
}复制代码When encapsulating basic components, such as buttons, the following writing should be avoided:
onTap(e) {  if (!this.data.disabled && !this.data.loading) {    this.triggerEvent('tap', e.detail)
  }
},复制代码<button></button>复制代码
The components encapsulated in this way will trigger two tap events, one triggered by the applet itself and one triggered by triggerEvent.
You can change an event type that is not built into the mini program, such as click:
onTap(e) {  if (!this.data.disabled && !this.data.loading) {    this.triggerEvent('click', e.detail)
  }
},复制代码Preventing tap events from bubbling can also be solved:
<button></button>复制代码
For example, in a component, monitor a String type parameter. If it is not empty, the text label will be displayed, otherwise it will not be displayed:
// player.wxml<text>{{ leftText }}</text>复制代码// index.wxml<player></player>复制代码
This way of writing,## The #leftText field has obviously been passed, but the text tag is still not displayed. After changing the writing method:
// player.wxml<text>{{ leftText }}</text>复制代码InnerAudioContext is used to play audio. Pass it the onTimeUpdate callback to obtain the current playback progress.
seek method is called to jump to the specified position for playback, onTimeUpdate will no longer be called.
progressOnChange(e) {  if (this.properties.src && this.data.innerAudioContext) {    const innerAudioContext = this.data.innerAudioContext;
    innerAudioContext.pause();
    innerAudioContext.seek(innerAudioContext.duration * e.detail.value / 100);    setTimeout(() => {
      innerAudioContext.play();
    }, 500);
  }
},复制代码seek method, and then set a delay of about 500ms to call the play method.
onPlay, onCanplay 's statement is not very reliable. One of the solutions is this:
innerAudioContext.onCanplay(() => {  setTimeout(() => {    this.setData({      durationStr: secondToTimeStr(innerAudioContext.duration) || '--:--',
    });
  }, 500);
});复制代码setTimeout is appropriate to set, it is invalid on a real machine.
onTimeUpdate:
innerAudioContext.onTimeUpdate(() => {  this.setData({    durationStr: secondToTimeStr(innerAudioContext.duration) || '--:--'
  })
});复制代码onTimeUpdate every time, you can Self-implementation only counts once.
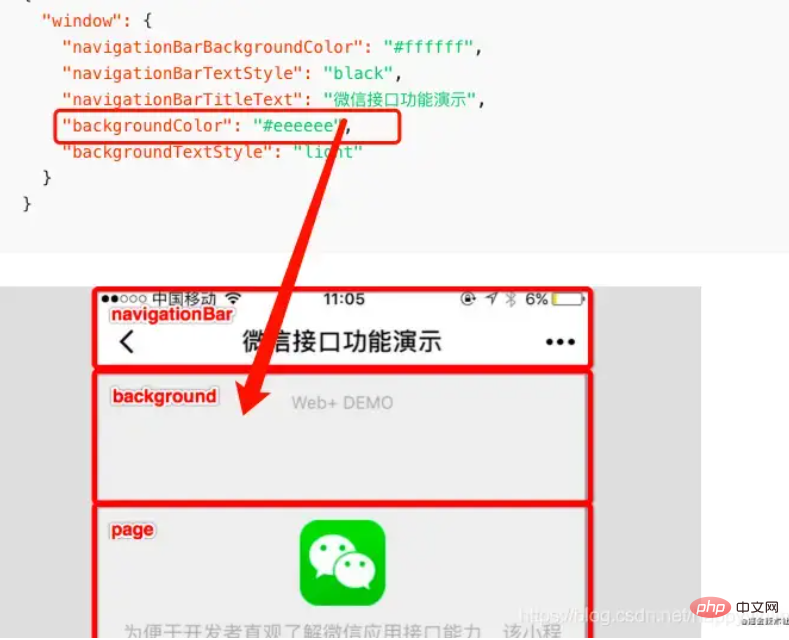
当前页面的json文件中有个backgroundColor字段,但是设置后无效,后面发现这个字段表示的不是可见区域的背景色,而是页面下拉时窗口的背景色。

如果需要设置页面背景色,可以通过page标签的样式设置:
page{  background: #f9fafb;
}复制代码待更新...
相关免费学习推荐:微信小程序开发教程
The above is the detailed content of Recording pitfalls of WeChat mini programs (development). For more information, please follow other related articles on the PHP Chinese website!
 How to buy and sell Bitcoin on okex
 Computer cannot copy and paste
 Introduction to common commands of postgresql
 Domestic Bitcoin buying and selling platform
 nginx restart
 How to solve the problem of no internet access when the computer is connected to wifi
 How to start oracle data monitoring
 insert statement usage