

What to do if the virtual machine does not recognize the USB device

Solution to the virtual machine not recognizing the USB device: 1. Open the service list and find the Vmware USB Arbitration Service; 2. Change the startup type of the service to automatic; 3. Start the virtual machine and open [USB Controller] ] option; 4. Check the [Show all USB input devices] option.

First, on the desktop of the computer where the virtual machine is installed, press the shortcut link Win R to open the run window.
(Learning video sharing: java course)
Then enter the command services.msc in the running window, press the OK button to open the service window
In the service window that opens, find the Vmware USB Arbitration Service item, and double-click to open its properties window

In the newly opened service properties window, click Startup Type Pull down the menu, select the "Auto" menu item, then click the Apply button
Then click the "Start" button on the window
to open the VM virtual machine, then right-click the system to be started, and click Select the "Settings" menu item in the pop-up menu
In the opened virtual machine settings window, click the "USB Controller" item on the left
Find "Show All" in the right window USB input device" item and select the check in front of it.

After starting the virtual machine and inserting the U disk into the computer, the U disk can be used normally in the virtual machine. Of course, other USB devices can also be used normally.
Recommended graphic tutorials: Getting started with java
The above is the detailed content of What to do if the virtual machine does not recognize the USB device. For more information, please follow other related articles on the PHP Chinese website!

Hot AI Tools

Undresser.AI Undress
AI-powered app for creating realistic nude photos

AI Clothes Remover
Online AI tool for removing clothes from photos.

Undress AI Tool
Undress images for free

Clothoff.io
AI clothes remover

AI Hentai Generator
Generate AI Hentai for free.

Hot Article
Hot Tools

Notepad++7.3.1
Easy-to-use and free code editor

SublimeText3 Chinese version
Chinese version, very easy to use

Zend Studio 13.0.1
Powerful PHP integrated development environment

Dreamweaver CS6
Visual web development tools

SublimeText3 Mac version
God-level code editing software (SublimeText3)
Hot Topics


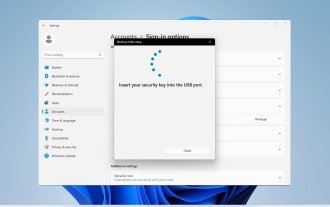 How to create and set up a USB security key on Windows 11
Sep 16, 2023 am 11:29 AM
How to create and set up a USB security key on Windows 11
Sep 16, 2023 am 11:29 AM
Protecting your PC from unauthorized access is crucial if you want to protect your files and personal data, which is why many people want to create a USB security key on Windows 11. This is the most secure authentication method, and in today's guide, we'll show you how to set it up properly on your PC. Benefits of Using USB Security Keys on Windows 11 Physical security keys provide the most secure two-factor authentication. They are immune to phishing attacks because they do not use an internet connection. Security keys protect your Windows accounts and most online accounts. Many security keys are compatible with Windows Hello. How to create mine from scratch on Windows 11
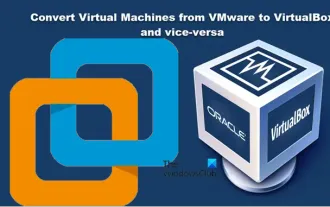 Convert VMware to VirtualBox and vice versa
Feb 19, 2024 pm 05:57 PM
Convert VMware to VirtualBox and vice versa
Feb 19, 2024 pm 05:57 PM
Virtual machines are an affordable way to experience and use multiple operating systems on a single computer. VMWare and VirtualBox are the two major brands in the virtual machine industry. You can easily convert a VMware virtual machine to a VirtualBox virtual machine and vice versa, giving you the flexibility to switch machines between them without having to recreate them. Migrating a virtual machine from VMWare to VirtualBox or vice versa is not complicated. Just follow the instructions below and it's easy to do. How to convert VMware to VirtualBoxVMwareVM is stored in .vmx format and then converted to .ovf, this is VirtualBox and VMWare
 How to install, configure and use the 'Windows Sandbox' feature
Feb 19, 2024 pm 01:00 PM
How to install, configure and use the 'Windows Sandbox' feature
Feb 19, 2024 pm 01:00 PM
Windows Sandbox is a feature built into the Windows 11 and Windows 10 operating systems that allows users to install and test unverified applications or visit websites in a lightweight virtual environment while protecting the main system from potential threats. Overall, this system provides a safe and isolated testing environment, similar to a virtual machine, but easier to use. Next, this article will introduce the detailed steps to install, configure and use the Windows Sandbox feature on Windows 11. Introduction to Windows Sandbox Features Windows Sandbox (also known as Windows Sandbox) is essentially a lightweight virtualization solution focused on providing efficient and secure virtual environments. compared to traditional
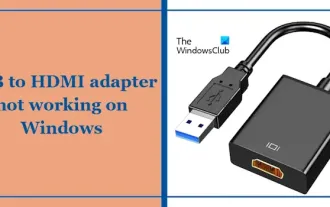 USB to HDMI adapter not working properly on Windows 11/10
Feb 19, 2024 pm 12:00 PM
USB to HDMI adapter not working properly on Windows 11/10
Feb 19, 2024 pm 12:00 PM
If you're having issues with your USB to HDMI adapter not working properly on Windows, it could be because of an outdated graphics card driver or a problem with the adapter itself. The following content will help you resolve this dilemma. Fix USB to HDMI adapter not working on Windows 11/10 Use the following solutions to fix USB to HDMI adapter not working on Windows 10/11: Update Display Adapter Driver Rollback Graphics Driver Unplug and Plug USB to HDMI Adapter Updated BIOS Let's get started. 1] Update Display Adapter Driver Issues may be caused by outdated or corrupted display adapter drivers. You can try downloading from the official website of the manufacturer
 9 Ways to Connect iPhone to Mac Without USB
Feb 02, 2024 pm 04:09 PM
9 Ways to Connect iPhone to Mac Without USB
Feb 02, 2024 pm 04:09 PM
The iPhone and Mac are two devices with different purposes, but with the integration of the Apple ecosystem, you get a unified user experience no matter which device you choose. If you have both an iPhone and a Mac and want to connect them without using a USB cable, the following can help you achieve this. Connecting iPhone and Mac without USB: Requirements Before connecting iPhone and Mac, the following requirements need to be met to ensure the connection works without problems: iPhone running the latest version of iOS Mac running the latest version of macOS Valid AppleID account iPhone and Macs can connect to wireless networks and/or Bee on iPhones
 How to solve the problem that win11 virtual machine cannot connect to the network
Jan 04, 2024 pm 07:00 PM
How to solve the problem that win11 virtual machine cannot connect to the network
Jan 04, 2024 pm 07:00 PM
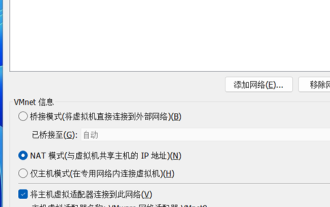
Many users have installed virtual machines on the win11 system after updating it, but many of them will be unable to connect to the network. So today I will bring you the solution to the problem that the win11 virtual machine cannot connect to the network. Come and see how to solve it. . What to do if the win11 virtual machine cannot connect to the network 1. First open the virtual machine and click "Edit - Virtual Network Editor - Restore Default Settings" in order. After doing this, it can be used. 2. In fact, in many cases it is due to changes in the network driver that the network cannot operate normally. You only need to reinstall the network module once! 3. If you encounter the problem that the network is suddenly cut off during use, even if the adapter has been configured correctly, the network will still be displayed.
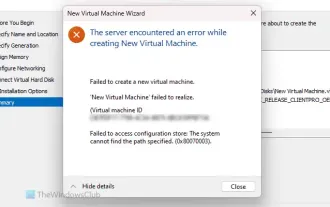 The server encountered an error, 0x80070003, while creating a new virtual machine.
Feb 19, 2024 pm 02:30 PM
The server encountered an error, 0x80070003, while creating a new virtual machine.
Feb 19, 2024 pm 02:30 PM
If you encounter error code 0x80070003 when using Hyper-V to create or start a virtual machine, it may be caused by permission issues, file corruption, or configuration errors. Solutions include checking file permissions, repairing damaged files, ensuring correct configuration, and more. This problem can be solved by ruling out the different possibilities one by one. The entire error message looks like this: The server encountered an error while creating [virtual machine name]. Unable to create new virtual machine. Unable to access configuration store: The system cannot find the path specified. (0x80070003). Some possible causes of this error include: The virtual machine file is corrupted. This can happen due to malware, virus or adware attacks. Although the likelihood of this happening is low, you can't completely
 Tips to solve the problem of insufficient and unstable USB port voltage on WIN10 computer
Mar 27, 2024 pm 10:41 PM
Tips to solve the problem of insufficient and unstable USB port voltage on WIN10 computer
Mar 27, 2024 pm 10:41 PM
1. On the computer desktop, right-click [This PC]. 2. On the pop-up menu, click [Properties]. 3. After entering the [System] page, click [Device Manager] on the left. 4. In the [Device Manager] list box, find [Universal Serial Bus Controller] and double-click (or click [>] on the left). 5. After expanding the [Universal Serial Bus Controller] list, right-click the item labeled [Hub] or [Hub]. 6. In the pop-up menu, click [Properties]. 7. On the [USBRootHub Properties] page, click the [Power Management] tab. 8. After opening the [Power Management] page, click the box or [Allow the computer to turn off this device to save power (A)] to uncheck the box. 9. [Allow the computer to turn off this device