Teach you to install Centos system through the network
下面由centos入门教程栏目给大家介绍通过网络安装Centos系统的方法,希望对需要的朋友有所帮助!
一、基础:
PXE(Pre-bootExecution Environment),预启动执行环境,运行在Client/Server的工作模式;
PXE Client会调用网际协议(IP)、用户数据报协议(UDP)、动态主机设定协议(DHCP)、小型文件传输协议(TFTP)等网络协议。
PXE Client存放在网卡的ROM 中。当计算机引导时,BIOS 把 PXE Client 调入内存中执行,PXE BootROM(自启动芯片)会发送一个UDP广播请求,向本网络中的DHCP服务器索取IP。
PXE的工作过程:
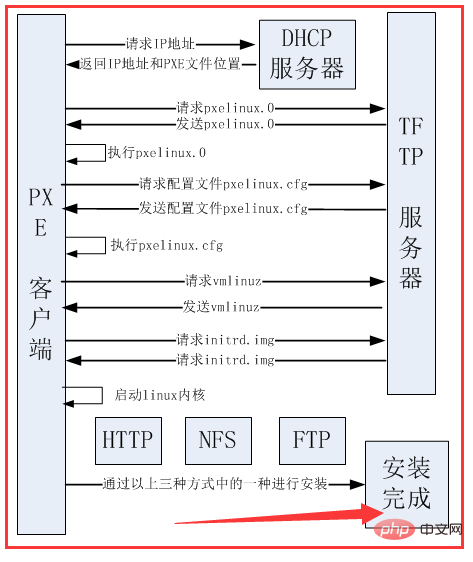
PXE协议运行的详细工作流程,请参考以下图文描述:
1. PXE Client 从自己的PXE网卡启动,向本网络中的DHCP服务器请求IP;
2. DHCP 服务器返回分配给客户机的IP 以及PXE文件的放置位置(该文件一般是放在一台TFTP服务器上) ;
3. PXE Client 向本网络中的TFTP服务器索取pxelinux.0 文件(在 PXE Client 的 ROM 中,已经存在 TFTP Client);
4. PXE Client 取得pxelinux.0 文件后之执行该文件;
5. 根据pxelinux.0 的执行结果,通过TFTP服务器加载内核和文件系统 ;
6. 进入安装画面, 此时可以通过选择HTTP、FTP、NFS 方式之一进行安装;
二、涉及软件安装及配置(syslinux、DHCP服务器、TFTP服务器、File server)
1、syslinux
通过网络引导Linux的引导文件是pxelinux.0,这个文件由syslinux程序提供。SYSLINUX is a suite of bootloaders。
通过yum install syslinux安装程序后,使用rpm -ql syslinux查看文件的时候,竟然没有显示pxelinux.0这个文件,以为自己安装程序的问题,后来才发现只是未显示而已,文件还是在/usr/share/syslinux/目录下,使用ls /usr/share/syslinux/就可以看到了。
将pxelinux.0复制到tftp目录: ~]# cp /usr/share/syslinux/pxelinux.0 /var/lib/tftpboot/
2、将安装光盘images/pxeboot/目录下的initrd.img、vmlinuz复制到tftp目录:cp images/pxeboot/{initrd.img,vmlinuz} /var/lib/tftpboot
复制isolinux目录下的三个文件至tftp目录:mnt]# cp isolinux/{boot.cat,vesamenu.c32,splash.jpg} /var/lib/tftpboot/
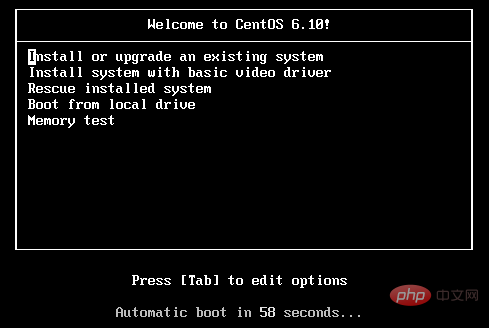
注:经验证boot.cat、splash.jpg可以不用复制;boot.cat不复制不影响启动,splash.jpg不复制显示菜单的时候没有背景图片(如下图)。
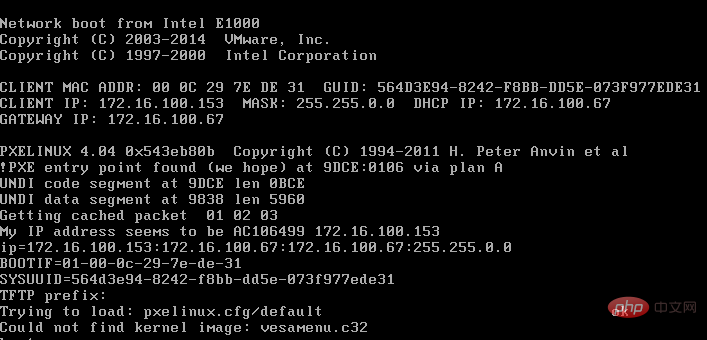
但是vesamenu.c32文件必须要有,不然会报找不到该文件的错误
在/var/lib/tftpboot/下创建pxelinux.cfg:mnt]# mkdir /var/lib/tftpboot/pxelinux.cfg
将isolinux/isolinux.cfg复制到 /var/lib/tftpboot/pxelinux.cfg目录下并命令为default:mnt]# cp isolinux/isolinux.cfg /var/lib/tftpboot/pxelinux.cfg/default
3、dhcp
      subnet 172.16.0.0 netmask 255.255.0.0 {
              range 172.16.100.151 172.16.100.170;
              option routers 172.16.100.67;
              filename "pxelinux.0";
              next-server 172.16.100.67;
}4、然后启动虚拟机,就可以显示熟悉的安装引导菜单了。(连接不是tftp服务器,检查服务是否有开,iptables和selinux)
三、全自动通过http安装Centos
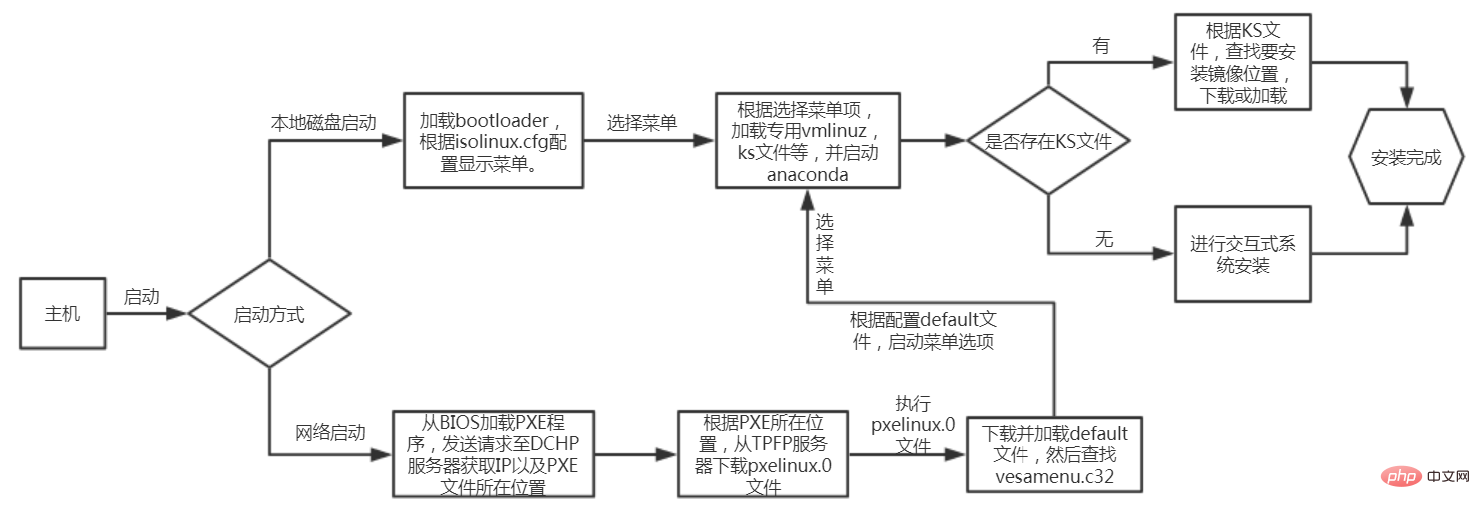
以下内容为我整理的流程图,从图中可以看出pxelinux.0的文件功能相当于bootloader和isolinux.bin的集成版。
1、修改default,增加一项ks;如果想在菜单项时间短一些,可以修改timeout时间。
label ks
  menu label ^Install system based ks
  menu default
  kernel vmlinuz
  append initrd=initrd.img
text ks=http://172.16.100.67/ks.cfg
label linux
  menu label ^Install or upgrade an existing system
  kernel vmlinuz
  append initrd=initrd.img
2、修改ks.cfg文件,指定从http服务器加载安装程序
# Kickstart file automatically generated by anaconda.
#version=DEVELinstall#cdromurl --url=http://172.16.100.67/centos6.6/lang en_US.UTF-8keyboard usnetwork --onboot no --device eth0 --bootproto dhcp --noipv6rootpw  --iscrypted $6$3.bn6KZ9zigMQq.Z$V/Q8xF2asfM8KCWm6GsjhYBvTTmMM6B50i6A/AFFx38xkg1sP2kL.ECBAda4SLwG6itOZhLXG/41sgRCJBLf11firewall --service=sshauthconfig --enableshadow --passalgo=sha512selinux --enforcingtimezone --utc Asia/Shanghaibootloader --location=mbr --driveorder=sda --append="crashkernel=auto rhgb quiet"# The following is the partition information you requested# Note that any partitions you deleted are not expressed# here so unless you clear all partitions first, this is# not guaranteed to workclearpart --all
part /boot --fstype=ext4 --size=200part / --fstype=ext4 --size=7000part swap --size=2000
#repo --name="CentOS"  --baseurl=cdrom:repodata/ --cost=100reboot%packages --nobase@core%end
3、开启dchpd、tftpd、httpd,关闭iptable、selinux,就可以完成自动安装了。
后续:
在安装的时候出现一个问题,提示this device may need to be reinitialized。
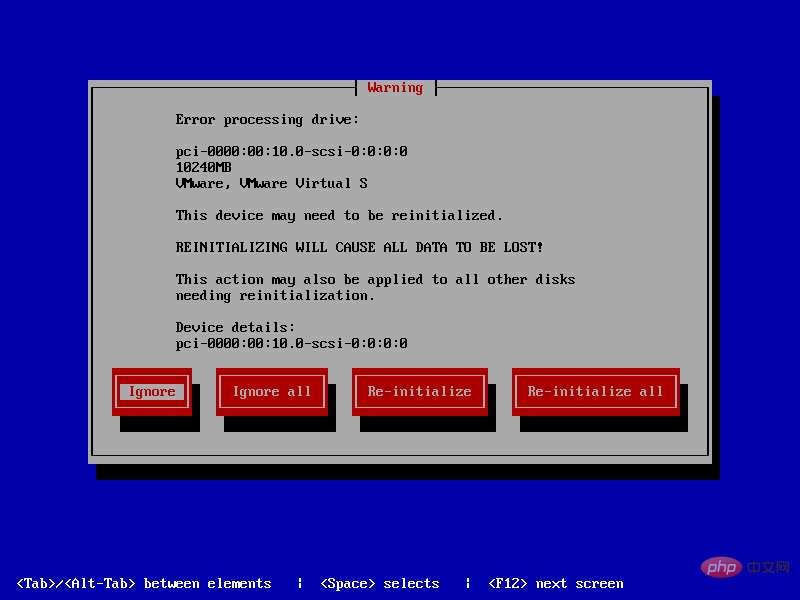
解决方法:
在ks文件中增加zeromb就可以了,#号这一行,可有可无,不影响。
# Clear the Master Boot Record
 zeromb
配置修改为:
url --url=http://172.16.100.67/centos6.6/
lang en_US.UTF-8
keyboard us
network --onboot no --device eth0 --bootproto dhcp --noipv6
rootpw  --iscrypted $6$3.bn6KZ9zigMQq.Z$V/Q8xF2asfM8KCWm6GsjhYBvTTmMM6B50i6A/AFFx38xkg1sP2kL.ECBAda4SLwG6itOZhLXG/41sgRCJBLf11
firewall --service=ssh
authconfig --enableshadow --passalgo=sha512
selinux --enforcing
timezone --utc Asia/Shanghai
bootloader --location=mbr --driveorder=sda --append="crashkernel=auto rhgb quiet"
zerombr
PEX部分内容来自于:https://www.cnblogs.com/sunhongleibibi/archive/2017/11/17/7851382.html
The above is the detailed content of Teach you to install Centos system through the network. For more information, please follow other related articles on the PHP Chinese website!

Hot AI Tools

Undresser.AI Undress
AI-powered app for creating realistic nude photos

AI Clothes Remover
Online AI tool for removing clothes from photos.

Undress AI Tool
Undress images for free

Clothoff.io
AI clothes remover

AI Hentai Generator
Generate AI Hentai for free.

Hot Article

Hot Tools

Notepad++7.3.1
Easy-to-use and free code editor

SublimeText3 Chinese version
Chinese version, very easy to use

Zend Studio 13.0.1
Powerful PHP integrated development environment

Dreamweaver CS6
Visual web development tools

SublimeText3 Mac version
God-level code editing software (SublimeText3)

Hot Topics
 1359
1359
 52
52
 How do I configure log rotation in CentOS?
Mar 17, 2025 pm 04:43 PM
The article explains how to configure log rotation in CentOS using logrotate, detailing installation, configuration, and benefits like disk space management and security.
 How do I install and configure MySQL/MariaDB on CentOS?
Mar 17, 2025 pm 04:35 PM
Article discusses installation, configuration, and troubleshooting of MySQL/MariaDB on CentOS, including system requirements and security measures.(159 characters)
 How do I use Logical Volume Management (LVM) in CentOS to manage storage?
Mar 17, 2025 pm 04:51 PM
The article discusses using Logical Volume Management (LVM) in CentOS for efficient storage management, detailing steps for setup, extension, and backup/restore processes, and highlighting LVM's advantages over traditional partitioning.
 How do I manage system services with systemd in CentOS?
Mar 17, 2025 pm 04:38 PM
The article explains how to manage system services using systemd on CentOS, covering starting, stopping, enabling at boot, and troubleshooting services.
 How to Build a High-Concurrency Application with CentOS and PHP-FPM?
Mar 12, 2025 pm 06:19 PM
This article details building high-concurrency PHP-FPM applications on CentOS. It addresses key issues like server configuration (hardware, PHP-FPM settings, load balancing), caching, database optimization, code efficiency, and resource monitoring.
 What Are the Best Ways to Handle Backup and Disaster Recovery on CentOS?
Mar 12, 2025 pm 06:21 PM
This article details CentOS backup and disaster recovery (DR) best practices. It emphasizes a multi-faceted approach encompassing regular backups (full, incremental, differential), offsite storage, and rigorous testing. High availability clustering
 How do I monitor system performance in CentOS using tools like top, htop, and vmstat?
Mar 17, 2025 pm 04:41 PM
The article discusses monitoring CentOS system performance using top, htop, and vmstat, detailing their features, differences, and customization for effective system analysis.
 How do I set up a firewall in CentOS using firewalld?
Mar 17, 2025 pm 04:44 PM
The article provides a comprehensive guide on setting up and managing firewalld on CentOS, including installation, enabling, basic commands, and troubleshooting steps.


