
 Web Front-end
JS Tutorial
Introducing the offset, client, and scroll family properties of JavaScript
Web Front-end
JS Tutorial
Introducing the offset, client, and scroll family properties of JavaScript
Introducing the offset, client, and scroll family properties of JavaScript

javascript栏目介绍offset、client、scroll家族属性。

offset家族
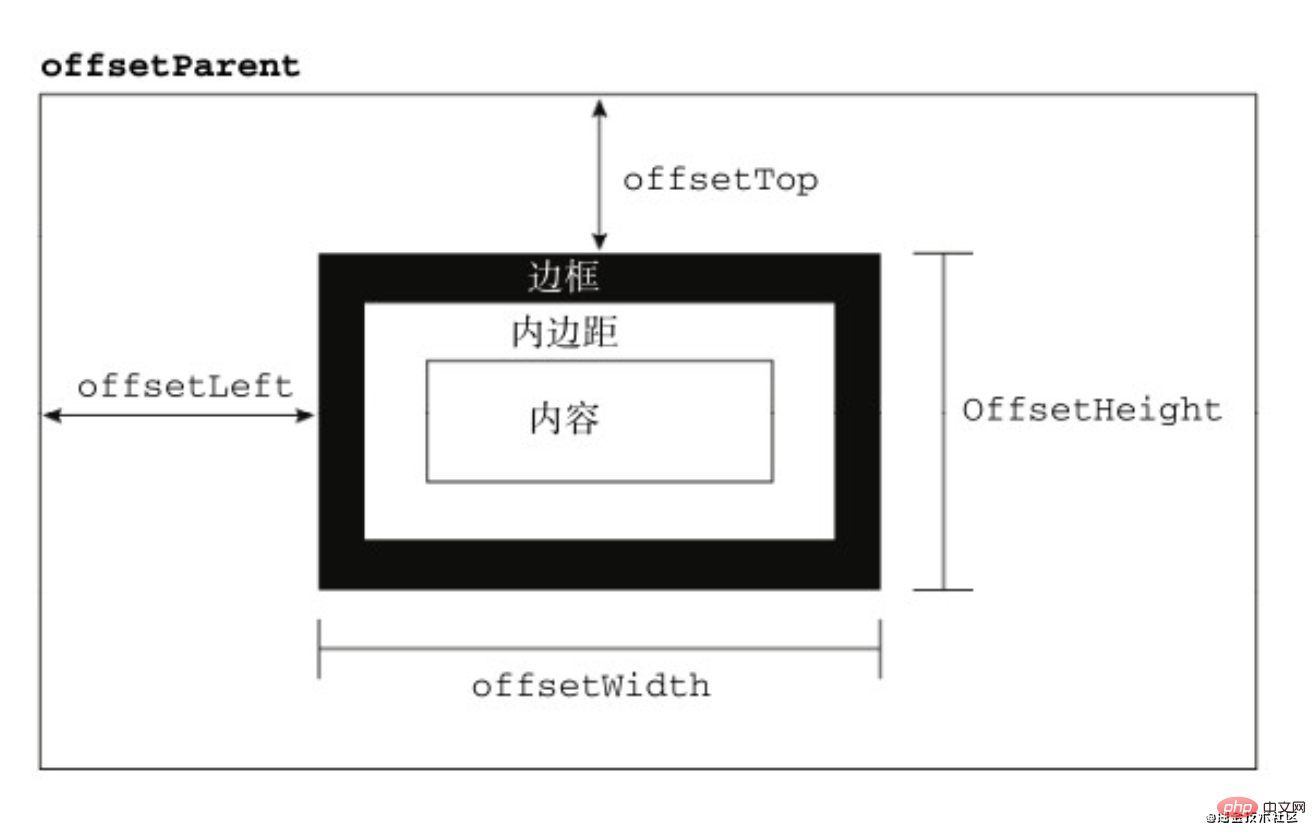
偏移量(offset dimension)是javascript中的一个重要的概念。涉及到偏移量的主要是offsetLeft、offsetTop、offsetHeight、offsetWidth这四个属性。当然,还有一个偏移参照——定位父级offsetParent。本文将详细介绍该部分内容
定位父级
在理解偏移大小之前,首先要理解offsetParent。人们并没有把offsetParent翻译为偏移父级,而是翻译成定位父级,很大原因是offsetParent与定位有关
定位父级offsetParent的定义是:与当前元素最近的经过定位(position不等于static)的父级元素,主要分为下列几种情况
-
元素自身有fixed定位,offsetParent的结果为null
当元素自身有固定定位时,我们知道固定定位的元素相对于视口进行定位,此时没有定位父级,offsetParent的结果为null
[注意]firefox浏览器有兼容性问题
1 2 3 |
|
- 元素自身无fixed定位,且父元素都没有设置定位,offsetParent的结果为body
1 2 |
|
- 元素自身无fixed定位,且父级元素存在经过定位的元素,offsetParent的结果为离自身元素最近的经过定位的父级元素
1 2 3 4 5 6 |
|
-
<body>元素的offsetParent是null
1 |
|
偏移量
偏移量共包括了offsetHeight、offsetWidth、offsetLeft、offsetTop这四个属性
offsetWidth
offsetWidth表示元素在水平方向上占用的空间大小,无单位(以像素px计)
1 2 |
|
offsetHeight
offsetHeight表示元素在垂直方向上占用的空间大小,无单位(以像素px计)
1 |
|
测试:
1 2 3 4 5 6 7 8 9 10 11 12 13 14 15 16 17 18 |
|
注意:如果想修改盒子的大小,请使用xxx.style.width进行设置。offsetWidth和offsetHeight是只读属性
offsetTop
offsetTop表示元素的上外边框至offsetParent元素的上内边框之间的像素距离
offsetLeft
offsetLeft表示元素的左外边框至offsetParent元素的左内边框之间的像素距离
测试:
1 2 3 4 5 6 7 8 9 10 11 12 13 14 15 16 17 18 19 20 21 22 23 24 |
|
总结:相对于父元素(看父元素是否有定位,如果有定位,以父元素为基础,如果没有继续往上寻找,如果一直没有找到,则以body为基准)的左边距和上边距
求出当前元素的页面偏移量
要知道某个元素在页面上的偏移量,将这个元素的offsetLeft和offsetTop与其offsetParent的相同属性相加,并加上offsetParent的相应方向的边框,如此循环直到根元素,就可以得到元素到页面的偏移量
1 2 3 4 5 6 7 8 9 10 11 12 13 14 |
|
client家族
关于元素尺寸,一般地,有偏移大小offset、客户端大小client和滚动大小scroll。前文已经介绍过偏移属性,后文将介绍scroll滚动大小,本文主要介绍客户区大小client。
客户区大小
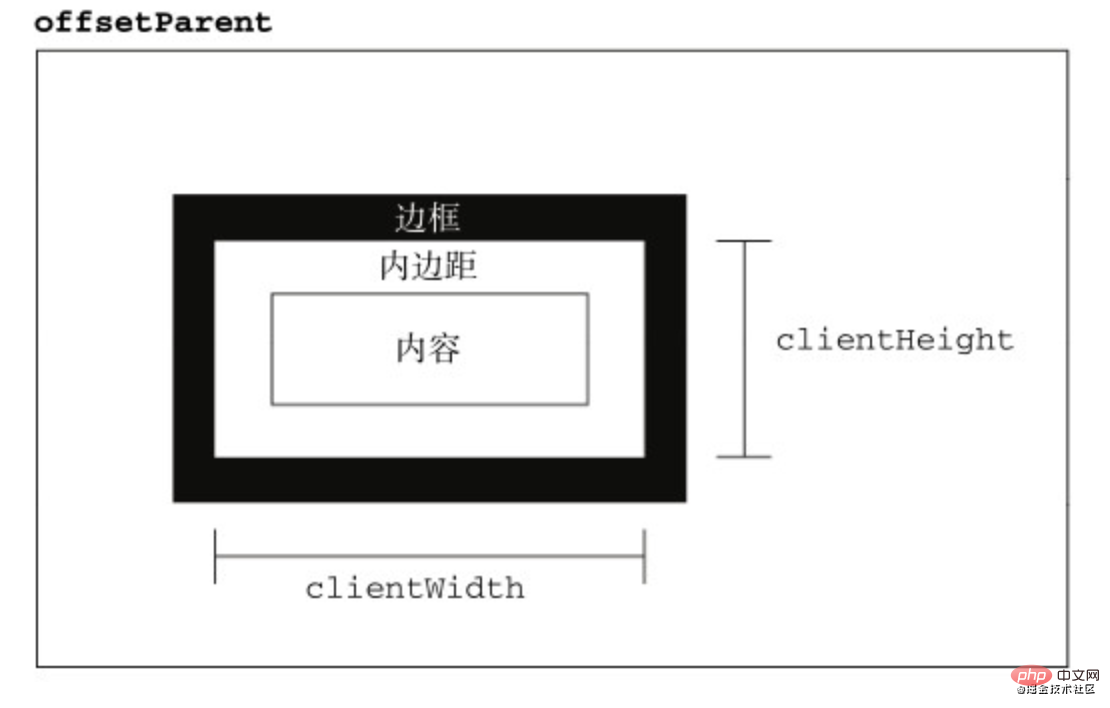
客户区大小client指的是元素内容及其内边距所占据的空间大小
clientWidth
clientHeight属性返回元素节点的客户区高度
1 |
|
clientHeight
clientWidth属性返回元素节点的客户区宽度
1 |
|
clientLeft
1 |
|
clientTop
1 2 |
|
验证
1 2 3 4 5 |
|
页面大小
常用document.documentElement的client属性来表示页面大小(不包含滚动条宽度)
1 |
|
注意
1.所有的client属性都是只读的
1 2 3 |
|
2.如果给元素设置了display:none,则客户区client属性都为0
1 2 3 |
|
3.每次访问客户区client属性都需要重新计算,重复访问需要耗费大量的性能,所以要尽量避免重复访问这些属性。如果需要重复访问,则把它们的值保存在变量中,以提高性能
1 2 3 |
|
1 2 3 4 5 6 7 8 9 10 |
|
scroll家族
滚动宽高
scrollHeight
scrollHeight表示元素的总高度,包括由于溢出而无法展示在网页的不可见部分
scrollWidth
scrollWidth表示元素的总宽度,包括由于溢出而无法展示在网页的不可见部分
-
没有滚动条时,scrollHeight与clientHeight属性结果相等,scrollWidth与clientWidth属性结果相等
1
2
3
4
<p id="test"style="width: 100px;height: 100px;padding: 10px;margin: 10px;border: 1px solid black;"></p><script>vartest = document.getElementById('test');//120 120console.log(test.scrollHeight,test.scrollWidth);//120 120console.log(test.clientHeight,test.clientWidth);</script>复制代码Copy after loginCopy after login -
存在滚动条时,但元素设置宽高大于等于元素内容宽高时,scroll和client属性的结果相等
1
2
3
4
<p id="test"style="width: 100px;height: 100px;padding: 10px;margin: 10px;border: 1px solid black;"></p><script>vartest = document.getElementById('test');//120 120console.log(test.scrollHeight,test.scrollWidth);//120 120console.log(test.clientHeight,test.clientWidth);</script>复制代码Copy after loginCopy after login
滚动长度
scrollTop
scrollTop属性表示被隐藏在内容区域上方的像素数。元素未滚动时,scrollTop的值为0,如果元素被垂直滚动了,scrollTop的值大于0,表示元素上方不可见内容的像素高度
scrollLeft
scrollLeft属性表示被隐藏在内容区域左侧的像素数。元素未滚动时,scrollLeft的值为0,如果元素被水平滚动了,scrollLeft的值大于0,且表示元素左侧不可见内容的像素宽度
当滚动条滚动到内容底部时,符合以下等式
1 |
|
与scrollHeight和scrollWidth属性不同的是,scrollLeft和scrollTop是可写的
1 2 3 4 5 6 7 8 9 10 |
|
页面滚动
理论上,大部分的浏览器通过document.documentElement.scrollTop和scrollLeft可以反映和控制页面的滚动;safari浏览器是通过document.body.scrollTop和scrollLeft来控制的
1 2 3 4 5 6 7 8 9 10 |
|
所以,页面的滚动高度兼容写法是
1 |
|
回到顶部
1 2 3 4 5 6 7 8 9 10 11 12 13 14 |
|
滚动方法
scrollTo(x,y)
scrollTo(x,y)方法滚动当前window中显示的文档,让文档中由坐标x和y指定的点位于显示区域的左上角
1 2 3 4 5 6 7 8 |
|
相关免费学习推荐:javascript(视频)
The above is the detailed content of Introducing the offset, client, and scroll family properties of JavaScript. For more information, please follow other related articles on the PHP Chinese website!

Hot AI Tools

Undresser.AI Undress
AI-powered app for creating realistic nude photos

AI Clothes Remover
Online AI tool for removing clothes from photos.

Undress AI Tool
Undress images for free

Clothoff.io
AI clothes remover

Video Face Swap
Swap faces in any video effortlessly with our completely free AI face swap tool!
Hot Article
Hot Tools

Notepad++7.3.1
Easy-to-use and free code editor

SublimeText3 Chinese version
Chinese version, very easy to use

Zend Studio 13.0.1
Powerful PHP integrated development environment

Dreamweaver CS6
Visual web development tools

SublimeText3 Mac version
God-level code editing software (SublimeText3)
Hot Topics
 1386
1386
 52
52

 How to implement an online speech recognition system using WebSocket and JavaScript
Dec 17, 2023 pm 02:54 PM
How to implement an online speech recognition system using WebSocket and JavaScript
Dec 17, 2023 pm 02:54 PM
How to use WebSocket and JavaScript to implement an online speech recognition system Introduction: With the continuous development of technology, speech recognition technology has become an important part of the field of artificial intelligence. The online speech recognition system based on WebSocket and JavaScript has the characteristics of low latency, real-time and cross-platform, and has become a widely used solution. This article will introduce how to use WebSocket and JavaScript to implement an online speech recognition system.
 WebSocket and JavaScript: key technologies for implementing real-time monitoring systems
Dec 17, 2023 pm 05:30 PM
WebSocket and JavaScript: key technologies for implementing real-time monitoring systems
Dec 17, 2023 pm 05:30 PM
WebSocket and JavaScript: Key technologies for realizing real-time monitoring systems Introduction: With the rapid development of Internet technology, real-time monitoring systems have been widely used in various fields. One of the key technologies to achieve real-time monitoring is the combination of WebSocket and JavaScript. This article will introduce the application of WebSocket and JavaScript in real-time monitoring systems, give code examples, and explain their implementation principles in detail. 1. WebSocket technology
 How to use JavaScript and WebSocket to implement a real-time online ordering system
Dec 17, 2023 pm 12:09 PM
How to use JavaScript and WebSocket to implement a real-time online ordering system
Dec 17, 2023 pm 12:09 PM
Introduction to how to use JavaScript and WebSocket to implement a real-time online ordering system: With the popularity of the Internet and the advancement of technology, more and more restaurants have begun to provide online ordering services. In order to implement a real-time online ordering system, we can use JavaScript and WebSocket technology. WebSocket is a full-duplex communication protocol based on the TCP protocol, which can realize real-time two-way communication between the client and the server. In the real-time online ordering system, when the user selects dishes and places an order
 How to implement an online reservation system using WebSocket and JavaScript
Dec 17, 2023 am 09:39 AM
How to implement an online reservation system using WebSocket and JavaScript
Dec 17, 2023 am 09:39 AM
How to use WebSocket and JavaScript to implement an online reservation system. In today's digital era, more and more businesses and services need to provide online reservation functions. It is crucial to implement an efficient and real-time online reservation system. This article will introduce how to use WebSocket and JavaScript to implement an online reservation system, and provide specific code examples. 1. What is WebSocket? WebSocket is a full-duplex method on a single TCP connection.
 JavaScript and WebSocket: Building an efficient real-time weather forecasting system
Dec 17, 2023 pm 05:13 PM
JavaScript and WebSocket: Building an efficient real-time weather forecasting system
Dec 17, 2023 pm 05:13 PM
JavaScript and WebSocket: Building an efficient real-time weather forecast system Introduction: Today, the accuracy of weather forecasts is of great significance to daily life and decision-making. As technology develops, we can provide more accurate and reliable weather forecasts by obtaining weather data in real time. In this article, we will learn how to use JavaScript and WebSocket technology to build an efficient real-time weather forecast system. This article will demonstrate the implementation process through specific code examples. We
 Simple JavaScript Tutorial: How to Get HTTP Status Code
Jan 05, 2024 pm 06:08 PM
Simple JavaScript Tutorial: How to Get HTTP Status Code
Jan 05, 2024 pm 06:08 PM
JavaScript tutorial: How to get HTTP status code, specific code examples are required. Preface: In web development, data interaction with the server is often involved. When communicating with the server, we often need to obtain the returned HTTP status code to determine whether the operation is successful, and perform corresponding processing based on different status codes. This article will teach you how to use JavaScript to obtain HTTP status codes and provide some practical code examples. Using XMLHttpRequest
How to use insertBefore in javascript
Nov 24, 2023 am 11:56 AM
Usage: In JavaScript, the insertBefore() method is used to insert a new node in the DOM tree. This method requires two parameters: the new node to be inserted and the reference node (that is, the node where the new node will be inserted).
 JavaScript and WebSocket: Building an efficient real-time image processing system
Dec 17, 2023 am 08:41 AM
JavaScript and WebSocket: Building an efficient real-time image processing system
Dec 17, 2023 am 08:41 AM
JavaScript is a programming language widely used in web development, while WebSocket is a network protocol used for real-time communication. Combining the powerful functions of the two, we can create an efficient real-time image processing system. This article will introduce how to implement this system using JavaScript and WebSocket, and provide specific code examples. First, we need to clarify the requirements and goals of the real-time image processing system. Suppose we have a camera device that can collect real-time image data
