 Operation and Maintenance
 Windows Operation and Maintenance
 How to set up Windows 10 wireless network card
How to set up Windows 10 wireless network card
Nov 03, 2020 pm 02:29 PMHow to set up the wireless network card in Windows 10: First open the [Control Panel], click [Network and Internet]; then select the [Network and Sharing Center] option area, click [View Network Status and Tasks]; then click on the left Click the "Change Adapter Settings" icon on the side and select WLAN; finally select the wireless network card properties in the walan properties.

How to set up the window10 wireless network card:
1. Start the Windows 10 operating system, as shown in the figure. Click the taskbar search box to start using Cortana intelligent voice assistant.

#2. As shown in the figure, enter "Control Panel" in the search box. Cortana displays the search results and click the "Best Match→Control Panel" item.

#3. The "Control Panel" program window pops up, as shown in the figure. Click the "Network & Internet" icon to check network status and change settings.

#4. As shown in the figure, call up the "Network and Internet" option interface. Select the "Network and Sharing Center" option area and click the "View network status and tasks" icon.

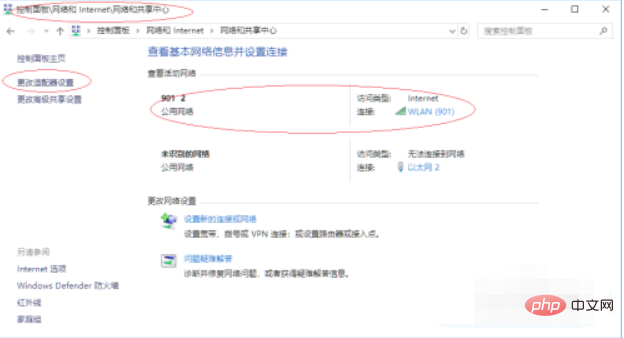
#5. Call up the "Network and Sharing Center" option interface, as shown in the figure. To view basic network information and set up a connection, click the "Change Adapter Settings" icon on the left.

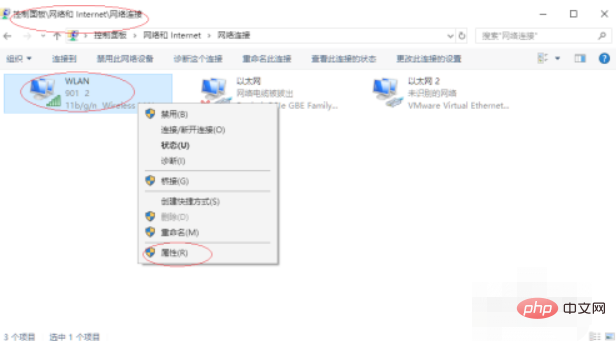
#6. The "Network Connection" dialog box pops up, as shown in the figure. Right-click the "WLAN" icon to pop up the shortcut menu and select the "Properties" item.

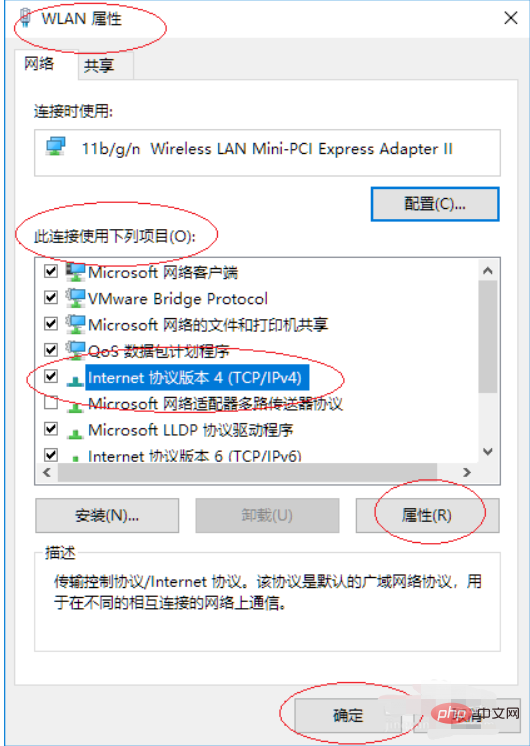
#7. As shown in the figure, the "WLAN Properties" dialog box pops up to set the properties of the wireless network card. This example ends here, I hope it can be helpful to everyone.

Related learning recommendations: windows server operation and maintenance tutorial
The above is the detailed content of How to set up Windows 10 wireless network card. For more information, please follow other related articles on the PHP Chinese website!

Hot Article

Hot tools Tags

Hot Article

Hot Article Tags

Notepad++7.3.1
Easy-to-use and free code editor

SublimeText3 Chinese version
Chinese version, very easy to use

Zend Studio 13.0.1
Powerful PHP integrated development environment

Dreamweaver CS6
Visual web development tools

SublimeText3 Mac version
God-level code editing software (SublimeText3)

Hot Topics
 Debian installs wireless network card and Debian installs wireless network card driver
Feb 15, 2024 pm 02:36 PM
Debian installs wireless network card and Debian installs wireless network card driver
 How to update Win10 wireless network card driver
Jun 30, 2023 am 08:02 AM
How to update Win10 wireless network card driver
 Detailed tutorial on installing jemalloc in CentOS and installing wireless network card in CentOS
Feb 09, 2024 pm 05:21 PM
Detailed tutorial on installing jemalloc in CentOS and installing wireless network card in CentOS
 How to add wireless network card driver in Win10?
Jul 07, 2023 pm 02:09 PM
How to add wireless network card driver in Win10?
 How to make the search box smaller in Windows 10 How to make the search box smaller in Windows 10 taskbar
Jun 26, 2024 am 12:03 AM
How to make the search box smaller in Windows 10 How to make the search box smaller in Windows 10 taskbar
 How to use 360 portable wifi as a wireless network card - How to use 360 portable wifi as a wireless network card
Mar 04, 2024 pm 12:13 PM
How to use 360 portable wifi as a wireless network card - How to use 360 portable wifi as a wireless network card
 Tenda U11 AX900 dual-band Wi-Fi 6 wireless network card is available for pre-order for a limited time of 49.9 yuan
May 08, 2024 pm 09:25 PM
Tenda U11 AX900 dual-band Wi-Fi 6 wireless network card is available for pre-order for a limited time of 49.9 yuan
 Detailed tutorial on installing CentOS on desktop and installing wireless network card on desktop
Feb 12, 2024 am 08:12 AM
Detailed tutorial on installing CentOS on desktop and installing wireless network card on desktop


