
 WeChat Applet
Mini Program Development
Introducing the practice of mini program dependency analysis
WeChat Applet
Mini Program Development
Introducing the practice of mini program dependency analysis
Introducing the practice of mini program dependency analysis

WeChat Mini Program Development TutorialIntroduces the practice of mini program dependency analysis.

Students who have used webpack must know Introducing the practice of mini program dependency analysis, which can be used to analyze the dependencies of the current project's js files.

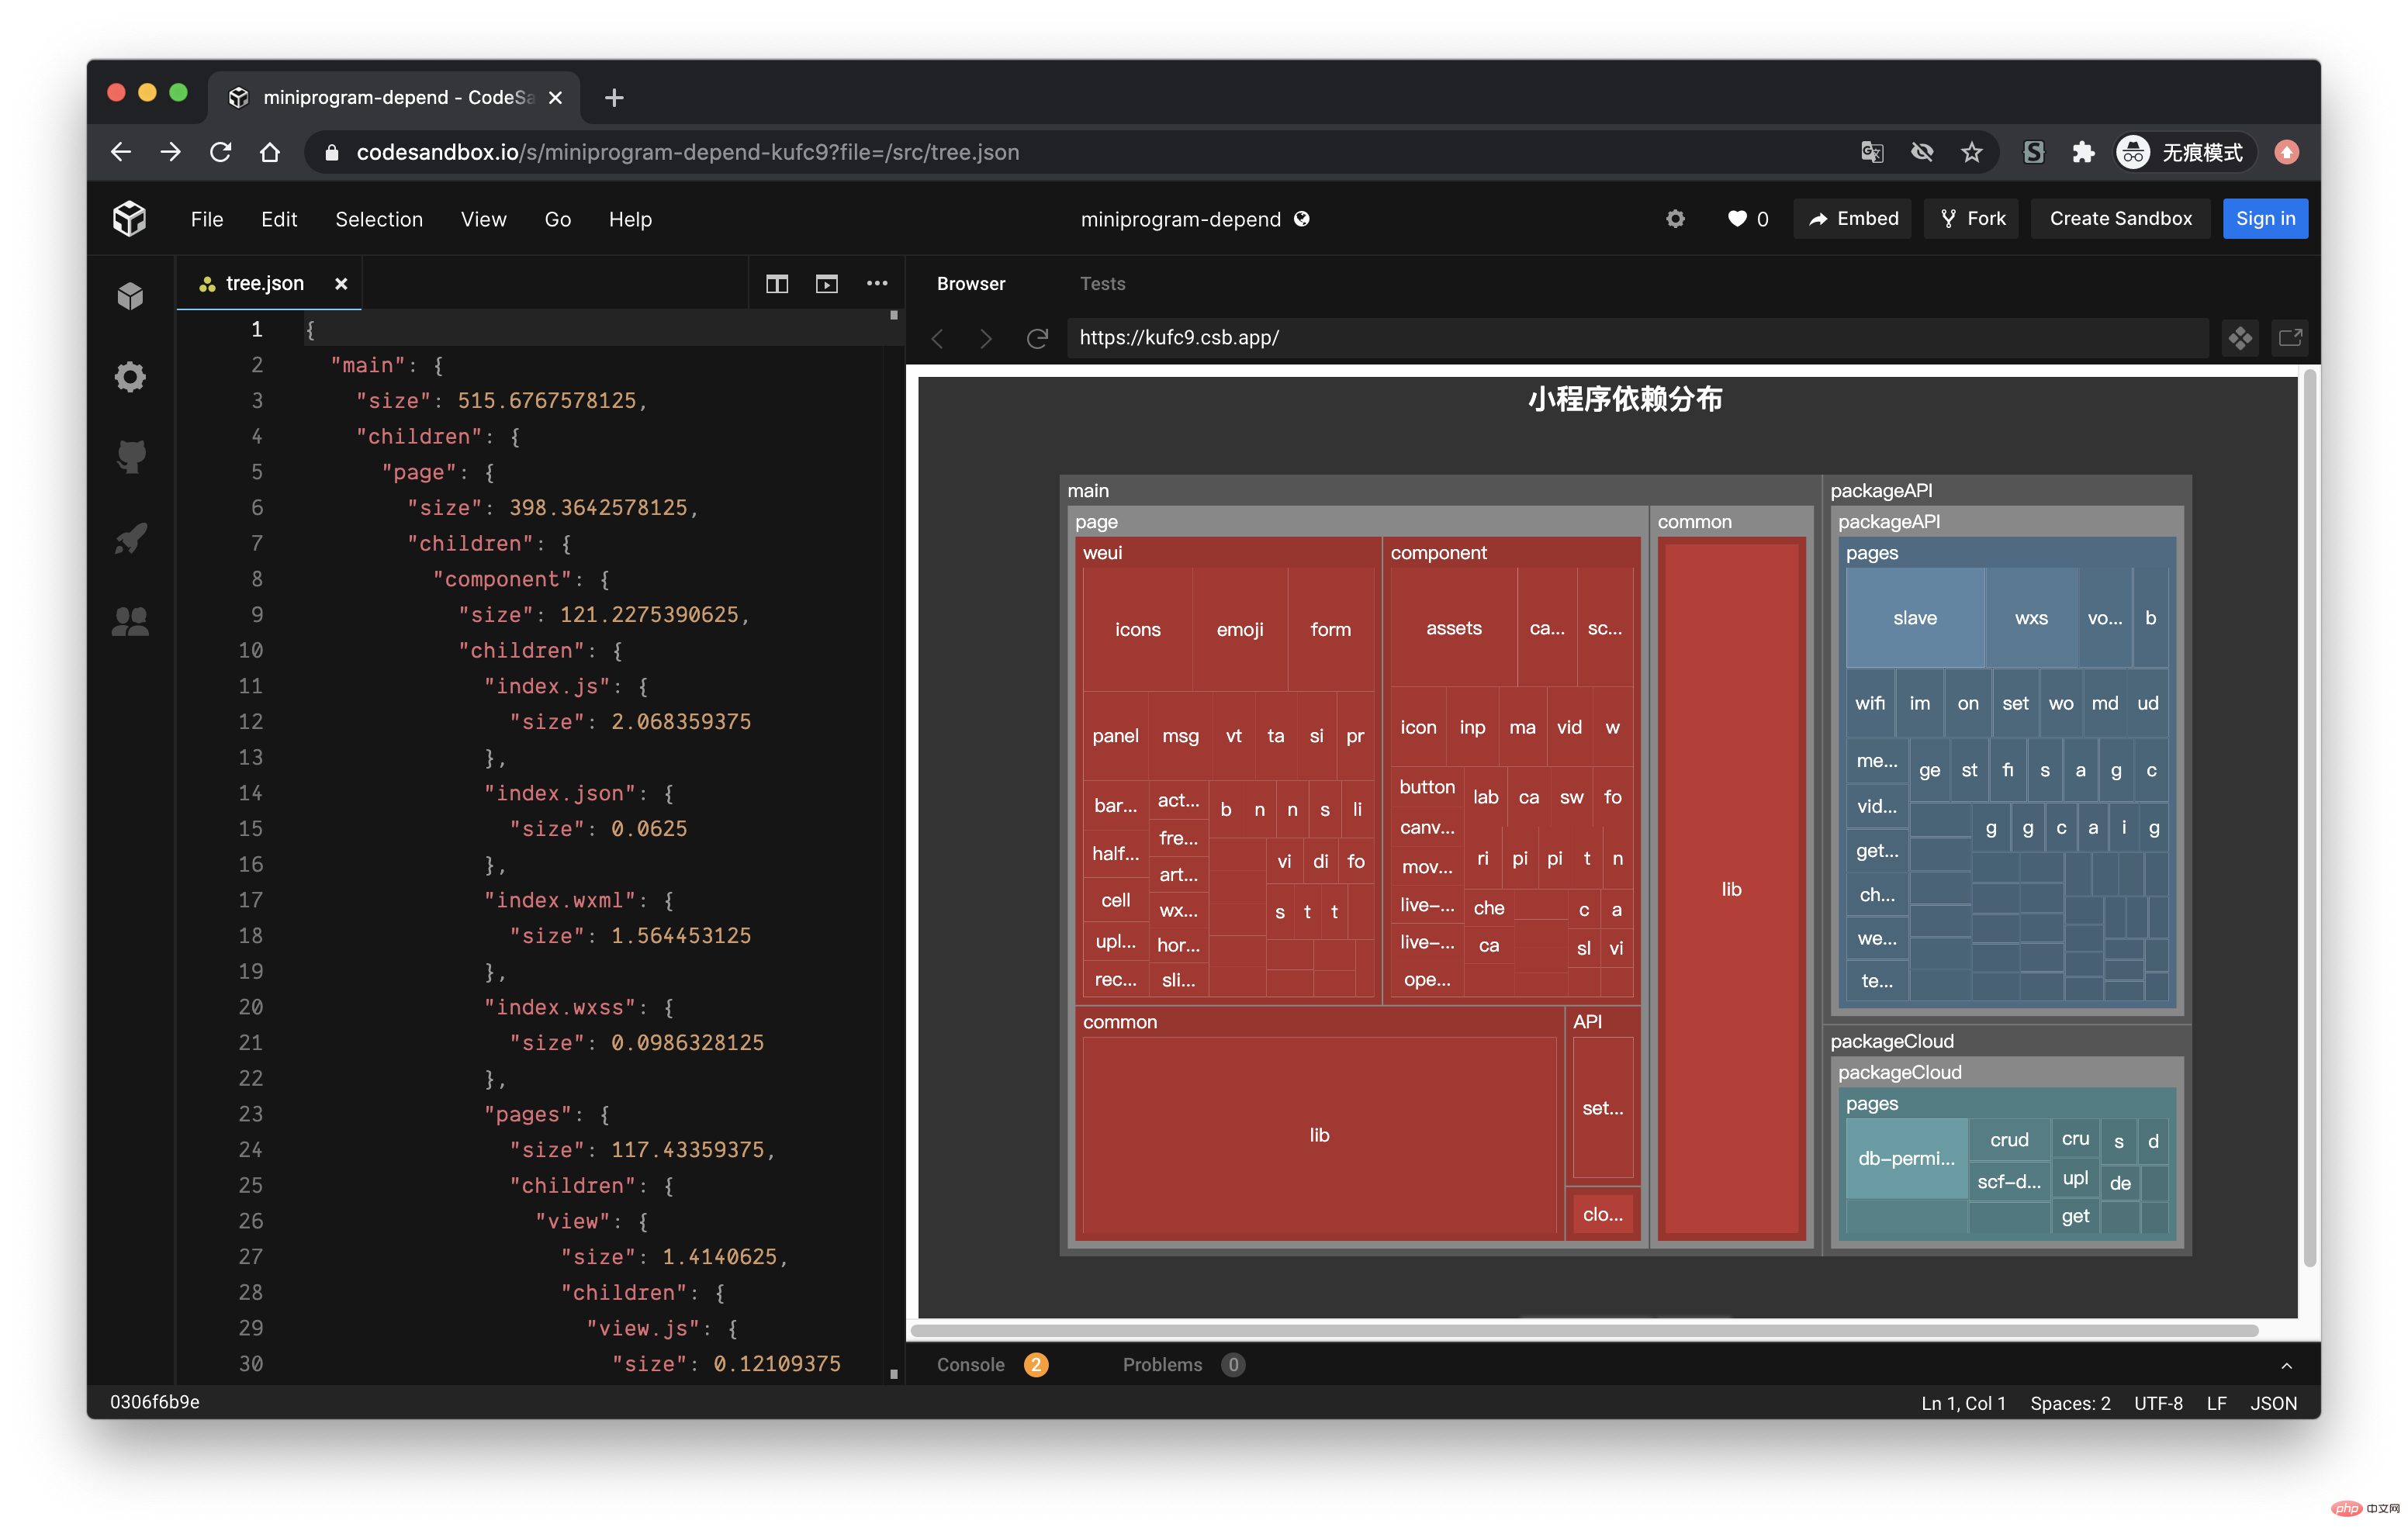
Because I have been doing small program business recently, and small programs are particularly sensitive to package size, I was wondering if I could make a similar tool to view the current The dependencies between the main packages and sub-contracts of the mini program. After a few days of tossing, I finally made it, and the effect is as follows:
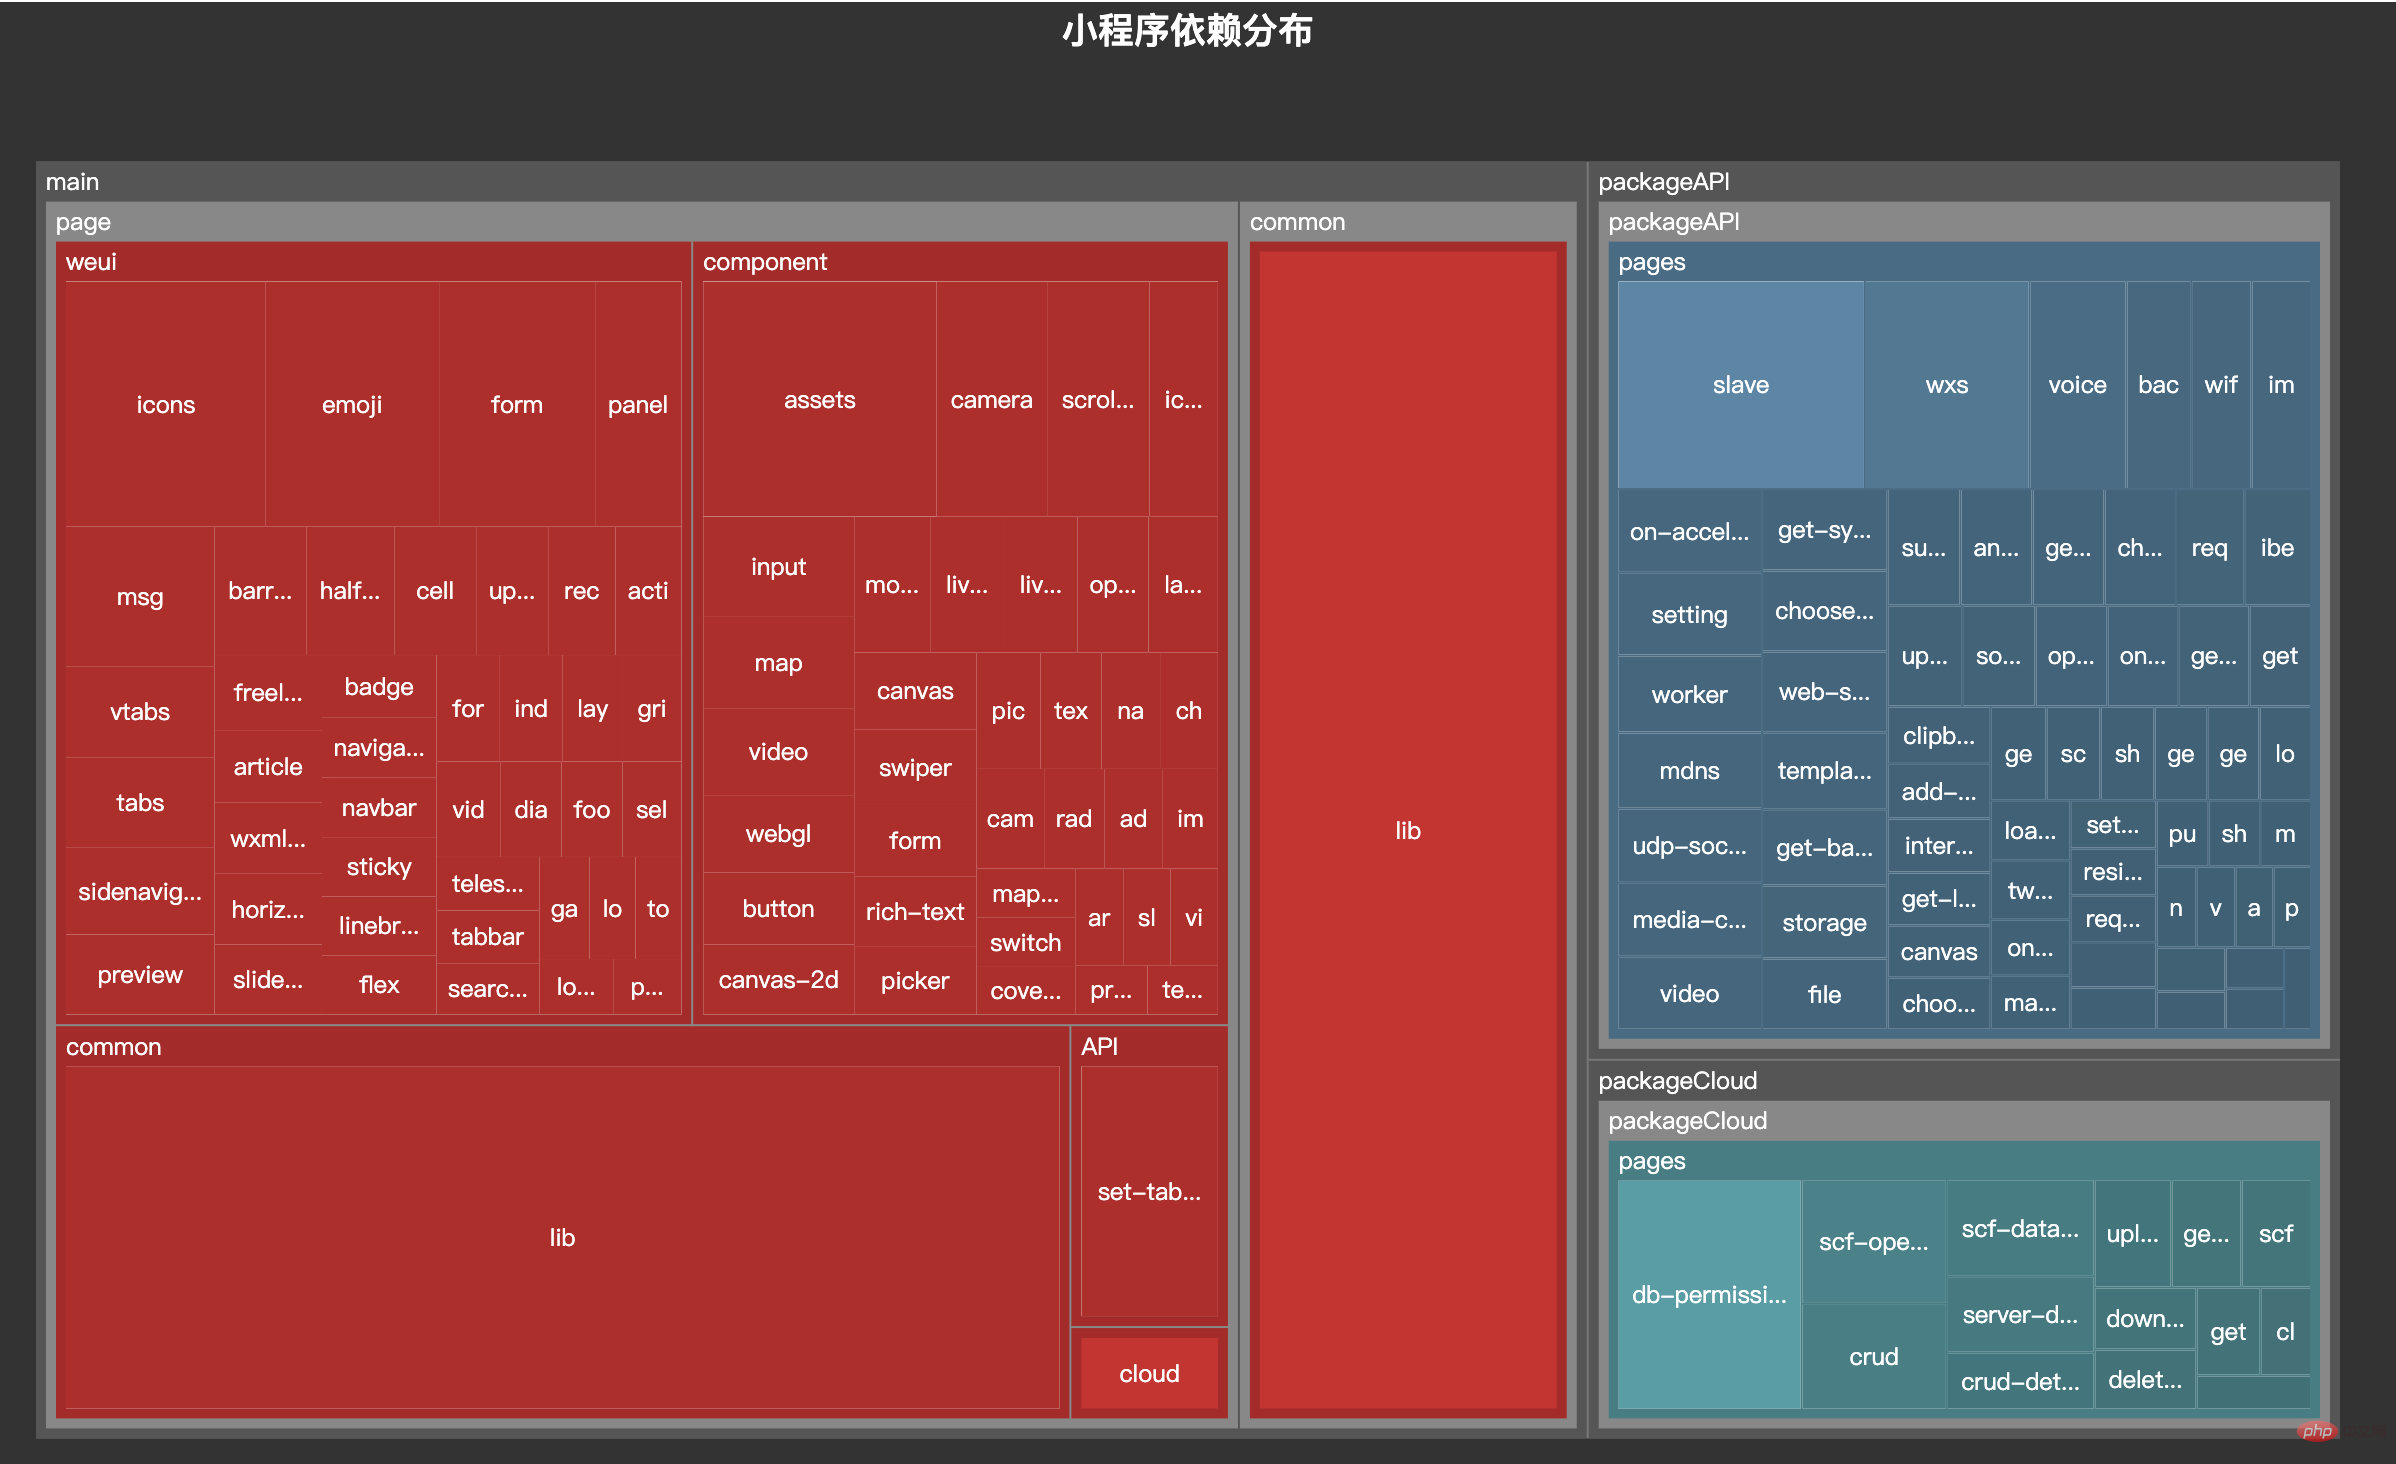
Today’s article will take you to implement this tool.
Mini program entrance
The pages of the mini program are defined by the pages parameter of app.json, which is used to specify which pages the mini program consists of. Each item corresponds to the path (including file name) information of a page. For each page in pages, the applet will look for the corresponding json, js, wxml, wxss Four files are processed.
If the development directory is:
├── app.js
├── app.json
├── app.wxss
├── pages
│   │── index
│   │   ├── index.wxml
│   │   ├── index.js
│   │   ├── index.json
│   │   └── index.wxss
│   └── logs
│       ├── logs.wxml
│       └── logs.js
└── utils复制代码
, you need to write in app.json:
{  "pages": ["pages/index/index", "pages/logs/logs"]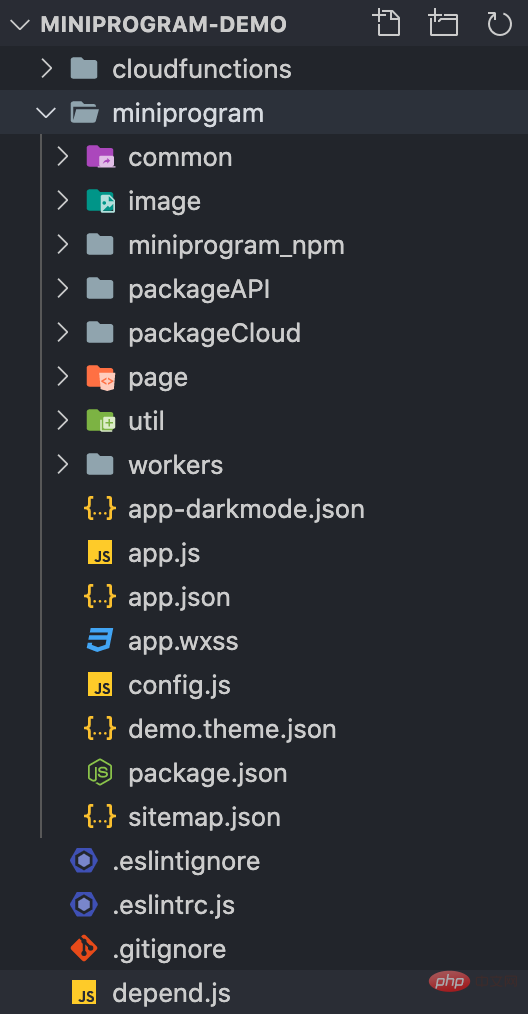
}复制代码In order to facilitate the demonstration, we first fork an official demo of the small program, and then Create a new file depend.js, and the work related to dependency analysis is implemented in this file.
$ git clone git@github.com:wechat-miniprogram/miniprogram-demo.git
$ cd miniprogram-demo
$ touch depend.js复制代码
The approximate directory structure is as follows:
With app.json as the entry, we can obtain all the files under the main package page.
const fs = require('fs-extra')const path = require('path')const root = process.cwd()class Depend {  constructor() {    this.context = path.join(root, 'miniprogram')
  }  // 获取绝对地址
  getAbsolute(file) {    return path.join(this.context, file)
  }  run() {    const appPath = this.getAbsolute('app.json')    const appJson = fs.readJsonSync(appPath)    const { pages } = appJson // 主包的所有页面
  }
}复制代码 Each page will correspond to four files: json, js, wxml, wxss:
const Extends = ['.js', '.json', '.wxml', '.wxss']class Depend {  constructor() {    // 存储文件
    this.files = new Set()    this.context = path.join(root, 'miniprogram')
  }  // 修改文件后缀
  replaceExt(filePath, ext = '') {    const dirName = path.dirname(filePath)    const extName = path.extname(filePath)    const fileName = path.basename(filePath, extName)    return path.join(dirName, fileName + ext)
  }  run() {    // 省略获取 pages 过程
    pages.forEach(page => {      // 获取绝对地址
      const absPath = this.getAbsolute(page)
      Extends.forEach(ext => {        // 每个页面都需要判断 js、json、wxml、wxss 是否存在
        const filePath = this.replaceExt(absPath, ext)        if (fs.existsSync(filePath)) {          this.files.add(filePath)
        }
      })
    })
  }
}复制代码pages directory, and there are two pages in the pages directory: detail, index, this There are four corresponding files under the two page folders.
pages
├── detail
│   ├── detail.js
│   ├── detail.json
│   ├── detail.wxml
│   └── detail.wxss
└── index
    ├── index.js
    ├── index.json
    ├── index.wxml
    └── index.wxss复制代码
size is used to indicate the size of the current file or folder, children stores the folder If it is a file, it will not have the children attribute.
pages = {  "size": 8,  "children": {    "detail": {      "size": 4,      "children": {        "detail.js": { "size": 1 },        "detail.json": { "size": 1 },        "detail.wxml": { "size": 1 },        "detail.wxss": { "size": 1 }
      }
    },    "index": {      "size": 4,      "children": {        "index.js": { "size": 1 },        "index.json": { "size": 1 },        "index.wxml": { "size": 1 },        "index.wxss": { "size": 1 }
      }
    }
  }
}复制代码tree field in the constructor to store the file tree data, and then we pass each file into the addToTree method to add the file Add to tree.
class Depend {  constructor() {    this.tree = {      size: 0,      children: {}
    }    this.files = new Set()    this.context = path.join(root, 'miniprogram')
  }
  run() {    // 省略获取 pages 过程
    pages.forEach(page => {      const absPath = this.getAbsolute(page)
      Extends.forEach(ext => {        const filePath = this.replaceExt(absPath, ext)        if (fs.existsSync(filePath)) {          // 调用 addToTree
          this.addToTree(filePath)
        }
      })
    })
  }
}复制代码addToTree method:
class Depend {  // 省略之前的部分代码

  // 获取相对地址
  getRelative(file) {    return path.relative(this.context, file)
  }  // 获取文件大小,单位 KB
  getSize(file) {    const stats = fs.statSync(file)    return stats.size / 1024
  }  // 将文件添加到树中
  addToTree(filePath) {    if (this.files.has(filePath)) {      // 如果该文件已经添加过,则不再添加到文件树中
      return
    }    const size = this.getSize(filePath)    const relPath = this.getRelative(filePath)    // 将文件路径转化成数组
    // 'pages/index/index.js' =>
    // ['pages', 'index', 'index.js']
    const names = relPath.split(path.sep)    const lastIdx = names.length - 1

    this.tree.size += size    let point = this.tree.children
    names.forEach((name, idx) => {      if (idx === lastIdx) {
        point[name] = { size }        return
      }      if (!point[name]) {
        point[name] = {
          size, children: {}
        }
      } else {
        point[name].size += size
      }
      point = point[name].children
    })    // 将文件添加的 files
    this.files.add(filePath)
  }
}复制代码Introducing the practice of mini program dependency analysis after running it to take a look.
 run() {   // ...
   pages.forEach(page => {     //...
   })
   fs.writeJSONSync('Introducing the practice of mini program dependency analysis', this.tree, { spaces: 2 })
 }复制代码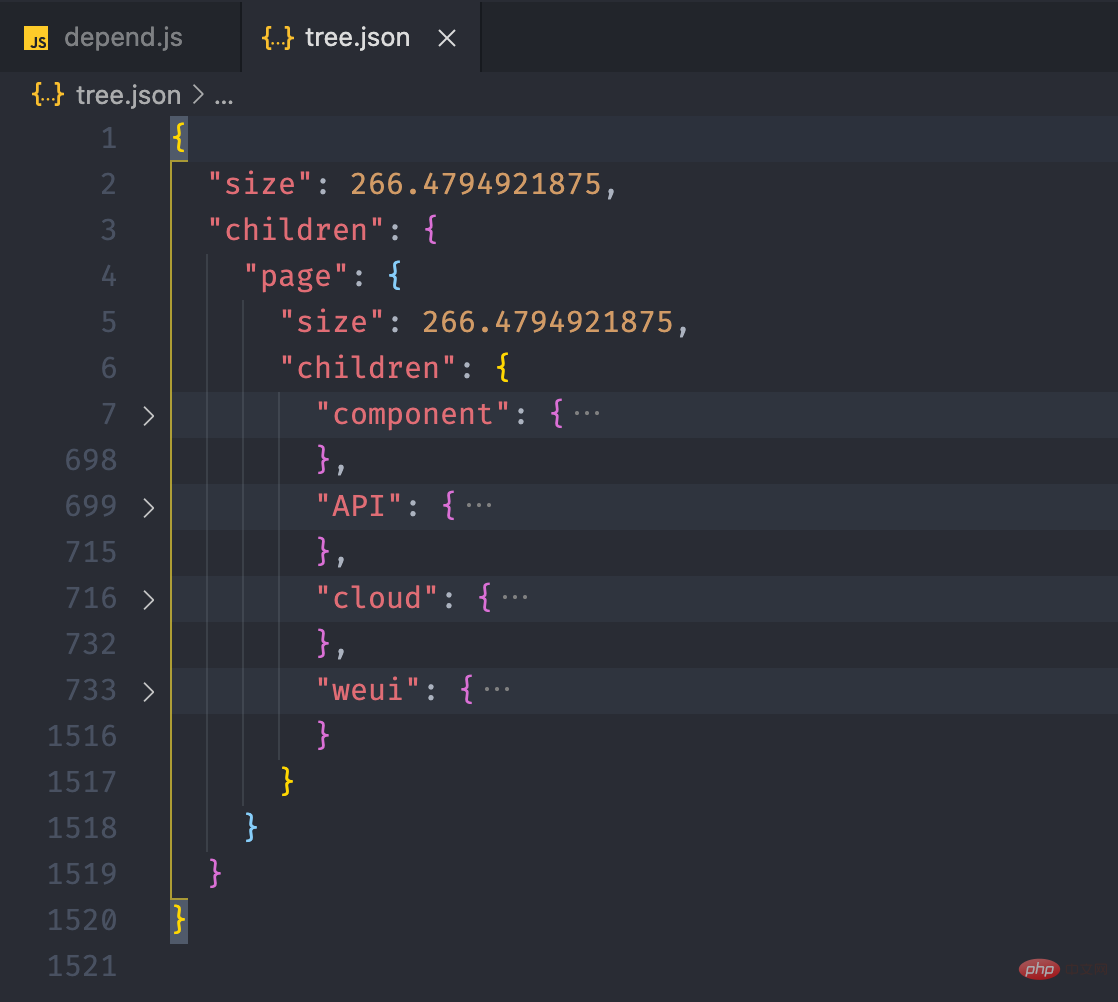
js, json, wxml, wxss. These four types of file acquisition dependent way.
js file, we must first clarify the three ways of writing js files to import modules. For the following three syntaxes, we can introduce Babel to obtain dependencies.
import a from './a.js'export b from './b.js'const c = require('./c.js')复制代码@babel/parser, and then traverse the AST nodes through @babel/traverse to obtain the values of the above three import methods, and put to the array.
const { parse } = require('@babel/parser')const { default: traverse } = require('@babel/traverse')class Depend {  // ...
	jsDeps(file) {    const deps = []    const dirName = path.dirname(file)    // 读取 js 文件内容
    const content = fs.readFileSync(file, 'utf-8')    // 将代码转化为 AST
    const ast = parse(content, {      sourceType: 'module',      plugins: ['exportDefaultFrom']
    })    // 遍历 AST
    traverse(ast, {      ImportDeclaration: ({ node }) => {        // 获取 import from 地址
        const { value } = node.source        const jsFile = this.transformScript(dirName, value)        if (jsFile) {
          deps.push(jsFile)
        }
      },      ExportNamedDeclaration: ({ node }) => {        // 获取 export from 地址
        const { value } = node.source        const jsFile = this.transformScript(dirName, value)        if (jsFile) {
          deps.push(jsFile)
        }
      },      CallExpression: ({ node }) => {        if (
          (node.callee.name && node.callee.name === 'require') &&
          node.arguments.length >= 1
        ) {          // 获取 require 地址
          const [{ value }] = node.arguments          const jsFile = this.transformScript(dirName, value)          if (jsFile) {
            deps.push(jsFile)
          }
        }
      }
    })    return deps
  }
}复制代码js the suffix can be omitted, and the require path is a file folder, index.js under the folder will be imported by default.
class Depend {  // 获取某个路径的脚本文件
  transformScript(url) {    const ext = path.extname(url)    // 如果存在后缀,表示当前已经是一个文件
    if (ext === '.js' && fs.existsSync(url)) {      return url
    }    // a/b/c => a/b/c.js
    const jsFile = url + '.js'
    if (fs.existsSync(jsFile)) {      return jsFile
    }    // a/b/c => a/b/c/index.js
    const jsIndexFile = path.join(url, 'index.js')    if (fs.existsSync(jsIndexFile)) {      return jsIndexFile
    }    return null
  }	jsDeps(file) {...}
}复制代码js and see if the output deps is correct:
// 文件路径:/Users/shenfq/Code/fork/miniprogram-demo/import a from './a.js'export b from '../b.js'const c = require('../../c.js')复制代码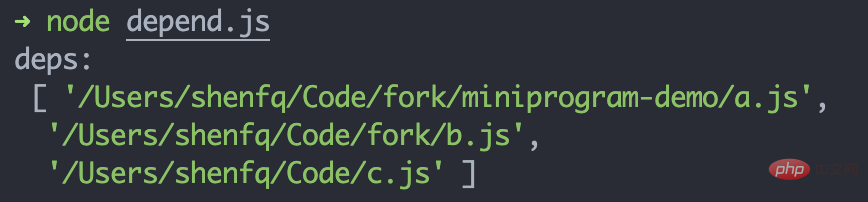
获取 .json 文件依赖
json 文件本身是不支持模块化的,但是小程序可以通过 json 文件导入自定义组件,只需要在页面的 json 文件通过 usingComponents 进行引用声明。usingComponents 为一个对象,键为自定义组件的标签名,值为自定义组件文件路径:
{  "usingComponents": {    "component-tag-name": "path/to/the/custom/component"
  }
}复制代码自定义组件与小程序页面一样,也会对应四个文件,所以我们需要获取 json 中 usingComponents 内的所有依赖项,并判断每个组件对应的那四个文件是否存在,然后添加到依赖项内。
class Depend {  // ...
  jsonDeps(file) {    const deps = []    const dirName = path.dirname(file)    const { usingComponents } = fs.readJsonSync(file)    if (usingComponents && typeof usingComponents === 'object') {      Object.values(usingComponents).forEach((component) => {
        component = path.resolve(dirName, component)        // 每个组件都需要判断 js/json/wxml/wxss 文件是否存在
        Extends.forEach((ext) => {          const file = this.replaceExt(component, ext)          if (fs.existsSync(file)) {
            deps.push(file)
          }
        })
      })
    }    return deps
  }
}复制代码获取 .wxml 文件依赖
wxml 提供两种文件引用方式 import 和 include。
<import></import><include></include>复制代码
wxml 文件本质上还是一个 html 文件,所以可以通过 html parser 对 wxml 文件进行解析,关于 html parser 相关的原理可以看我之前写过的文章 《Vue 模板编译原理》。
const htmlparser2 = require('htmlparser2')class Depend {  // ...
	wxmlDeps(file) {    const deps = []    const dirName = path.dirname(file)    const content = fs.readFileSync(file, 'utf-8')    const htmlParser = new htmlparser2.Parser({      onopentag(name, attribs = {}) {        if (name !== 'import' && name !== 'require') {          return
        }        const { src } = attribs        if (src) {          return
        }      	const wxmlFile = path.resolve(dirName, src)        if (fs.existsSync(wxmlFile)) {
        	deps.push(wxmlFile)
        }
      }
    })
    htmlParser.write(content)
    htmlParser.end()    return deps
  }
}复制代码获取 .wxss 文件依赖
最后 wxss 文件导入样式和 css 语法一致,使用 @import 语句可以导入外联样式表。
@import "common.wxss";复制代码
可以通过 postcss 解析 wxss 文件,然后获取导入文件的地址,但是这里我们偷个懒,直接通过简单的正则匹配来做。
class Depend {  // ...
  wxssDeps(file) {    const deps = []    const dirName = path.dirname(file)    const content = fs.readFileSync(file, 'utf-8')    const importRegExp = /@import\\s*['"](.+)['"];*/g
    let matched    while ((matched = importRegExp.exec(content)) !== null) {      if (!matched[1]) {        continue
      }      const wxssFile = path.resolve(dirName, matched[1])      if (fs.existsSync(wxmlFile)) {
        deps.push(wxssFile)
      }
    }    return deps
  }
}复制代码将依赖添加到树结构中
现在我们需要修改 addToTree 方法。
class Depend {  addToTree(filePath) {    // 如果该文件已经添加过,则不再添加到文件树中
    if (this.files.has(filePath)) {      return
    }    const relPath = this.getRelative(filePath)    const names = relPath.split(path.sep)
    names.forEach((name, idx) => {      // ... 添加到树中
    })    this.files.add(filePath)    // ===== 获取文件依赖,并添加到树中 =====
    const deps = this.getDeps(filePath)
    deps.forEach(dep => {      this.addToTree(dep)
    })
  }
}复制代码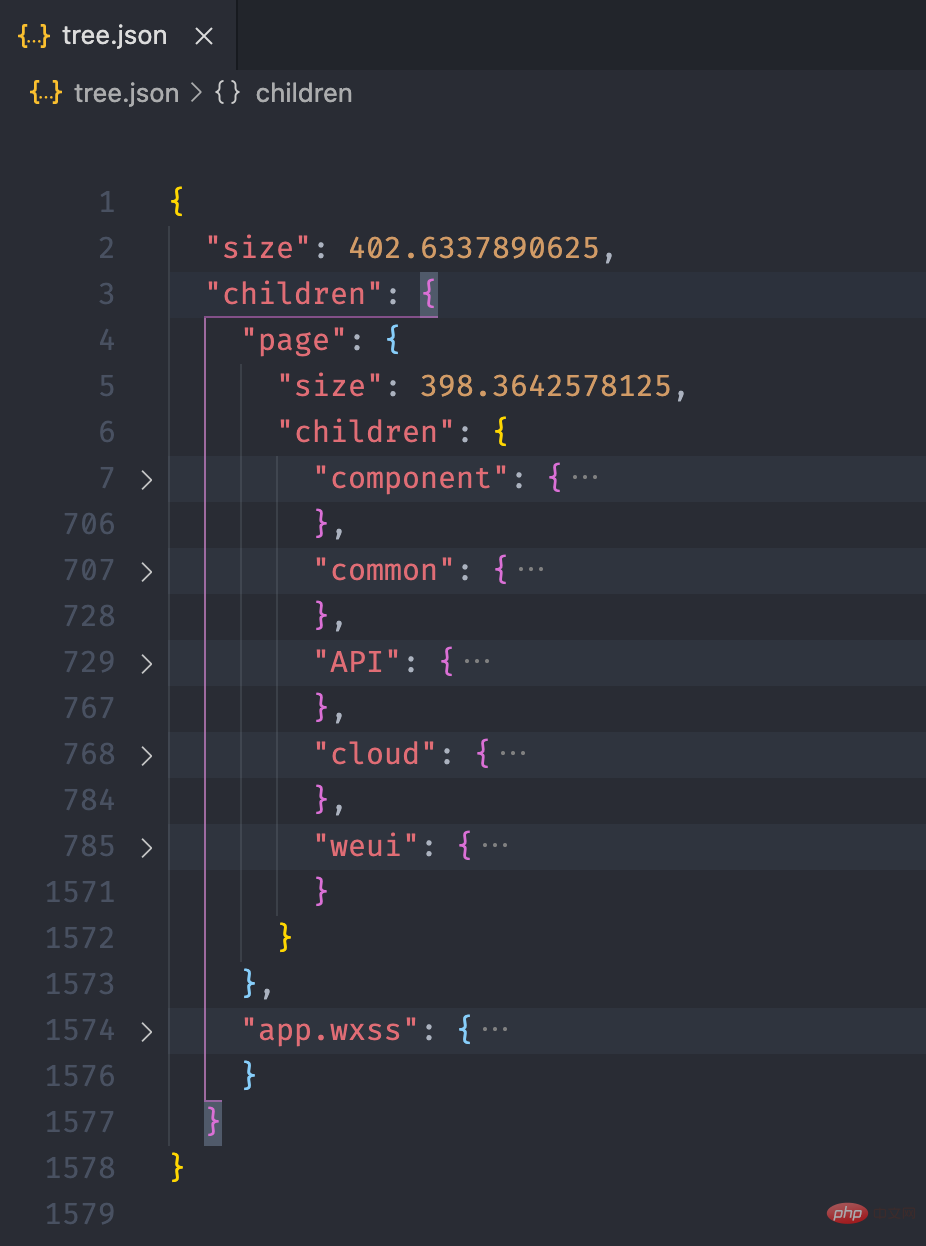
获取分包依赖
熟悉小程序的同学肯定知道,小程序提供了分包机制。使用分包后,分包内的文件会被打包成一个单独的包,在用到的时候才会加载,而其他的文件则会放在主包,小程序打开的时候就会加载。subpackages 中,每个分包的配置有以下几项:
| 字段 | 类型 | 说明 |
|---|---|---|
| root | String | 分包根目录 |
| name | String | 分包别名,分包预下载时可以使用 |
| pages | StringArray | 分包页面路径,相对与分包根目录 |
| independent | Boolean | 分包是否是独立分包 |
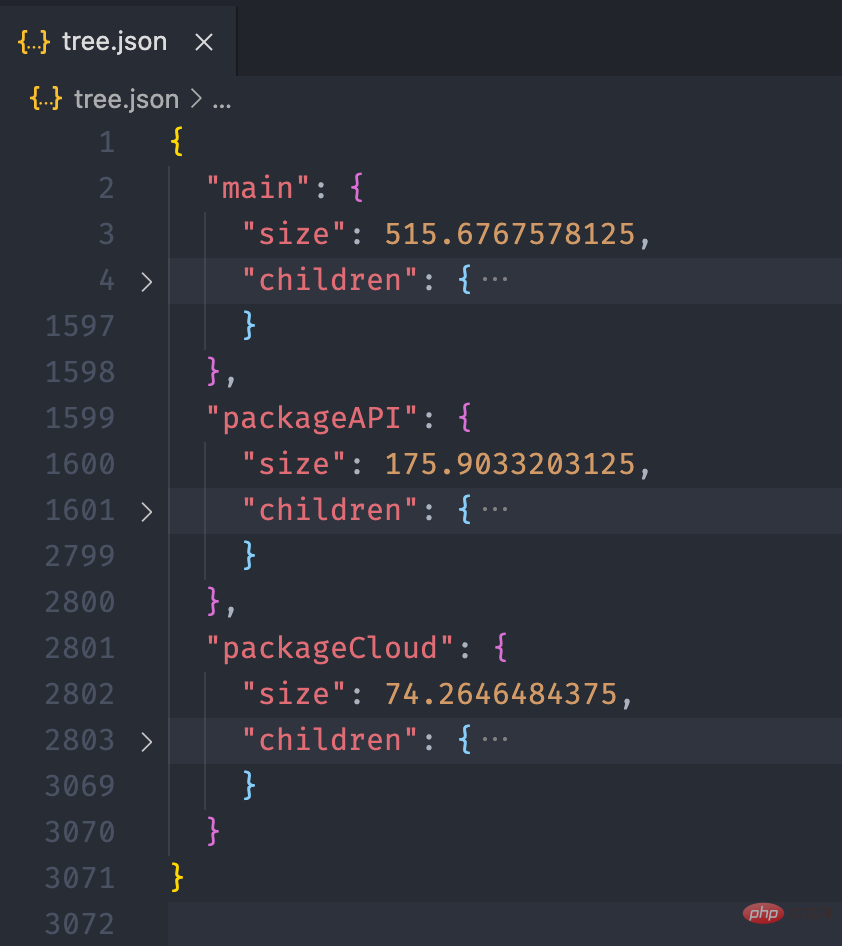
所以我们在运行的时候,除了要拿到 pages 下的所有页面,还需拿到 subpackages 中所有的页面。由于之前只关心主包的内容,this.tree 下面只有一颗文件树,现在我们需要在 this.tree 下挂载多颗文件树,我们需要先为主包创建一个单独的文件树,然后为每个分包创建一个文件树。
class Depend {  constructor() {    this.tree = {}    this.files = new Set()    this.context = path.join(root, 'miniprogram')
  }  createTree(pkg) {    this.tree[pkg] = {      size: 0,      children: {}
    }
  }  addPage(page, pkg) {    const absPath = this.getAbsolute(page)
    Extends.forEach(ext => {      const filePath = this.replaceExt(absPath, ext)      if (fs.existsSync(filePath)) {        this.addToTree(filePath, pkg)
      }
    })
  }  run() {    const appPath = this.getAbsolute('app.json')    const appJson = fs.readJsonSync(appPath)    const { pages, subPackages, subpackages } = appJson
    this.createTree('main') // 为主包创建文件树
    pages.forEach(page => {      this.addPage(page, 'main')
    })    // 由于 app.json 中 subPackages、subpackages 都能生效
    // 所以我们两个属性都获取,哪个存在就用哪个
    const subPkgs = subPackages || subpackages    // 分包存在的时候才进行遍历
    subPkgs && subPkgs.forEach(({ root, pages }) => {
      root = root.split('/').join(path.sep)      this.createTree(root) // 为分包创建文件树
      pages.forEach(page => {        this.addPage(`${root}${path.sep}${page}`, pkg)
      })
    })    // 输出文件树
    fs.writeJSONSync('Introducing the practice of mini program dependency analysis', this.tree, { spaces: 2 })
  }
}复制代码addToTree 方法也需要进行修改,根据传入的 pkg 来判断将当前文件添加到哪个树。
class Depend {  addToTree(filePath, pkg = 'main') {    if (this.files.has(filePath)) {      // 如果该文件已经添加过,则不再添加到文件树中
      return
    }    let relPath = this.getRelative(filePath)    if (pkg !== 'main' && relPath.indexOf(pkg) !== 0) {      // 如果该文件不是以分包名开头,证明该文件不在分包内,
      // 需要将文件添加到主包的文件树内
      pkg = 'main'
    }    const tree = this.tree[pkg] // 依据 pkg 取到对应的树
    const size = this.getSize(filePath)    const names = relPath.split(path.sep)    const lastIdx = names.length - 1

    tree.size += size    let point = tree.children
    names.forEach((name, idx) => {      // ... 添加到树中
    })    this.files.add(filePath)    // ===== 获取文件依赖,并添加到树中 =====
    const deps = this.getDeps(filePath)
    deps.forEach(dep => {      this.addToTree(dep)
    })
  }
}复制代码这里有一点需要注意,如果 package/a 分包下的文件依赖的文件不在 package/a 文件夹下,则该文件需要放入主包的文件树内。
通过 EChart 画图
经过上面的流程后,最终我们可以得到如下的一个 json 文件:
接下来,我们利用 Introducing the practice of mini program dependency analysis 的画图能力,将这个 json 数据以图表的形式展现出来。我们可以在 Introducing the practice of mini program dependency analysis 提供的实例中看到一个 Disk Usage 的案例,很符合我们的预期。

Introducing the practice of mini program dependency analysis 的配置这里就不再赘述,按照官网的 demo 即可,我们需要把 tree. json 的数据转化为 Introducing the practice of mini program dependency analysis 需要的格式就行了,完整的代码放到 codesandbod 了,去下面的线上地址就能看到效果了。
线上地址:https://codesandbox.io/s/cold-dawn-kufc9
总结
这篇文章比较偏实践,所以贴了很多的代码,另外本文对各个文件的依赖获取提供了一个思路,虽然这里只是用文件树构造了一个这样的依赖图。
在业务开发中,小程序 IDE 每次启动都需要进行全量的编译,开发版预览的时候会等待较长的时间,我们现在有文件依赖关系后,就可以只选取目前正在开发的页面进行打包,这样就能大大提高我们的开发效率。如果有对这部分内容感兴趣的,可以另外写一篇文章介绍下如何实现。
相关免费学习推荐:微信小程序开发教程
The above is the detailed content of Introducing the practice of mini program dependency analysis. For more information, please follow other related articles on the PHP Chinese website!

Hot AI Tools

Undresser.AI Undress
AI-powered app for creating realistic nude photos

AI Clothes Remover
Online AI tool for removing clothes from photos.

Undress AI Tool
Undress images for free

Clothoff.io
AI clothes remover

Video Face Swap
Swap faces in any video effortlessly with our completely free AI face swap tool!

Hot Article
Hot Tools

Notepad++7.3.1
Easy-to-use and free code editor

SublimeText3 Chinese version
Chinese version, very easy to use

Zend Studio 13.0.1
Powerful PHP integrated development environment

Dreamweaver CS6
Visual web development tools

SublimeText3 Mac version
God-level code editing software (SublimeText3)
Hot Topics
 1386
1386
 52
52

 Develop WeChat applet using Python
Jun 17, 2023 pm 06:34 PM
Develop WeChat applet using Python
Jun 17, 2023 pm 06:34 PM
With the popularity of mobile Internet technology and smartphones, WeChat has become an indispensable application in people's lives. WeChat mini programs allow people to directly use mini programs to solve some simple needs without downloading and installing applications. This article will introduce how to use Python to develop WeChat applet. 1. Preparation Before using Python to develop WeChat applet, you need to install the relevant Python library. It is recommended to use the two libraries wxpy and itchat here. wxpy is a WeChat machine
 Can small programs use react?
Dec 29, 2022 am 11:06 AM
Can small programs use react?
Dec 29, 2022 am 11:06 AM
Mini programs can use react. How to use it: 1. Implement a renderer based on "react-reconciler" and generate a DSL; 2. Create a mini program component to parse and render DSL; 3. Install npm and execute the developer Build npm in the tool; 4. Introduce the package into your own page, and then use the API to complete the development.
 Implement card flipping effects in WeChat mini programs
Nov 21, 2023 am 10:55 AM
Implement card flipping effects in WeChat mini programs
Nov 21, 2023 am 10:55 AM
Implementing card flipping effects in WeChat mini programs In WeChat mini programs, implementing card flipping effects is a common animation effect that can improve user experience and the attractiveness of interface interactions. The following will introduce in detail how to implement the special effect of card flipping in the WeChat applet and provide relevant code examples. First, you need to define two card elements in the page layout file of the mini program, one for displaying the front content and one for displaying the back content. The specific sample code is as follows: <!--index.wxml-->&l
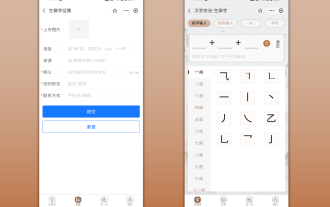 Alipay launched the 'Chinese Character Picking-Rare Characters' mini program to collect and supplement the rare character library
Oct 31, 2023 pm 09:25 PM
Alipay launched the 'Chinese Character Picking-Rare Characters' mini program to collect and supplement the rare character library
Oct 31, 2023 pm 09:25 PM
According to news from this site on October 31, on May 27 this year, Ant Group announced the launch of the "Chinese Character Picking Project", and recently ushered in new progress: Alipay launched the "Chinese Character Picking-Uncommon Characters" mini program to collect collections from the society Rare characters supplement the rare character library and provide different input experiences for rare characters to help improve the rare character input method in Alipay. Currently, users can enter the "Uncommon Characters" applet by searching for keywords such as "Chinese character pick-up" and "rare characters". In the mini program, users can submit pictures of rare characters that have not been recognized and entered by the system. After confirmation, Alipay engineers will make additional entries into the font library. This website noticed that users can also experience the latest word-splitting input method in the mini program. This input method is designed for rare words with unclear pronunciation. User dismantling
 How uniapp achieves rapid conversion between mini programs and H5
Oct 20, 2023 pm 02:12 PM
How uniapp achieves rapid conversion between mini programs and H5
Oct 20, 2023 pm 02:12 PM
How uniapp can achieve rapid conversion between mini programs and H5 requires specific code examples. In recent years, with the development of the mobile Internet and the popularity of smartphones, mini programs and H5 have become indispensable application forms. As a cross-platform development framework, uniapp can quickly realize the conversion between small programs and H5 based on a set of codes, greatly improving development efficiency. This article will introduce how uniapp can achieve rapid conversion between mini programs and H5, and give specific code examples. 1. Introduction to uniapp unia
 Tutorial on writing a simple chat program in Python
May 08, 2023 pm 06:37 PM
Tutorial on writing a simple chat program in Python
May 08, 2023 pm 06:37 PM
Implementation idea: Establishing the server side of thread, so as to process the various functions of the chat room. The establishment of the x02 client is much simpler than the server. The function of the client is only to send and receive messages, and to enter specific characters according to specific rules. To achieve the use of different functions, therefore, on the client side, you only need to use two threads, one is dedicated to receiving messages, and the other is dedicated to sending messages. As for why not use one, that is because, only
 How to operate mini program registration
Sep 13, 2023 pm 04:36 PM
How to operate mini program registration
Sep 13, 2023 pm 04:36 PM
Mini program registration operation steps: 1. Prepare copies of personal ID cards, corporate business licenses, legal person ID cards and other filing materials; 2. Log in to the mini program management background; 3. Enter the mini program settings page; 4. Select " "Basic Settings"; 5. Fill in the filing information; 6. Upload the filing materials; 7. Submit the filing application; 8. Wait for the review results. If the filing is not passed, make modifications based on the reasons and resubmit the filing application; 9. The follow-up operations for the filing are Can.
 How to get membership in WeChat mini program
May 07, 2024 am 10:24 AM
How to get membership in WeChat mini program
May 07, 2024 am 10:24 AM
1. Open the WeChat mini program and enter the corresponding mini program page. 2. Find the member-related entrance on the mini program page. Usually the member entrance is in the bottom navigation bar or personal center. 3. Click the membership portal to enter the membership application page. 4. On the membership application page, fill in relevant information, such as mobile phone number, name, etc. After completing the information, submit the application. 5. The mini program will review the membership application. After passing the review, the user can become a member of the WeChat mini program. 6. As a member, users will enjoy more membership rights, such as points, coupons, member-exclusive activities, etc.
