How to request data in vue.js
Vue.js method of requesting data: first install the [vue-resource] module; then introduce [vue-resource] in [main.js] and use it directly in the component.

[Related article recommendations: vue.js]
vue.js request data Method:
First, vue-resource requests data
Introduction: vue-resource requests data method is an official plug-in
Usage steps:
1. Install the vue-resource module
cnpm install vue-resource --save
Add --save to reference it in package.json, indicating use in the production environment. Because in our daily development, if we want to package the code to others or upload it to github, or if we want to publish the code, package.json is the package required for installation. If you only use it in the development environment, you only need --save-dev. Some are only used in the development environment, and some are used in the production environment.
2. Introduce vue-resource in main.js
import VueResource from 'vue-resource';
Vue.use(VueResource);
3. Use
this.$http.get(地址).then(function(){

}) directly in the component. Note: this.$http.get() Various http requests, etc. all inherit promise. Promise is an asynchronous request; secondly, this in the .then arrow function represents the context. According to the definition of arrow function this, it can be seen that the value has been assigned only when the function is defined. This refers to the object that defines the function. In Vue, the object is the current page of methods. So this guides the data in data. If you want to get the data of the function outside the wrapping function, that is the concept of closure. The implementation method is to add a var that = this to the outer function; Save the outer this into that first.
Example:
Info.vue
<template>
<div id="info">
<button @click="getData">获取数据</button>
<ul>
<li v-for="(item,index) in list" v-bind:key="index">
{{item.title}}
</li>
</ul>
</div>
</template>
<script>
export default {
name: "Info",
data() {
return {
list: []
}
},
methods: {
getData: function () {
let api = 'http://www.phonegap100.com/appapi.php?a=getPortalList&catid=20&page=1';
//此处推荐使用箭头函数。
this.$http.get(api).then((res)=>{
this.list = res.body.result;
}, (err)=>{
console.log(err);
});
}
},
mounted() {
this.getData();
}
}
</script>If arrow functions are not applicable in getData(), you need to pay attention to this issue.
getData: function () {
  let api = 'http://www.phonegap100.com/appapi.php?a=getPortalList&catid=20&page=1';
  const _this = this;
  this.$http.get(api).then(function (res) {
    _this.list = res.body.result;
  }, function (err) {
    console.log(err);
  });
}Second, axios request data
Introduction: This is a third-party plug-in github address: https://github.com/axios/axios
axios and fetch-jsonp are both third-party plug-ins
1. Install
cnpm install axios --save
and call directly. The difference from vue-resource is that aixos is called once on a page every time it is used on that page. vue-resource is bound globally.
2. Where to use and where to introduce axios
Axios.get(api).then((response)=>{
  this.list=response.data.result;
}).catch((error)=>{
  console.log(error);
})About cross-domain requests of axios
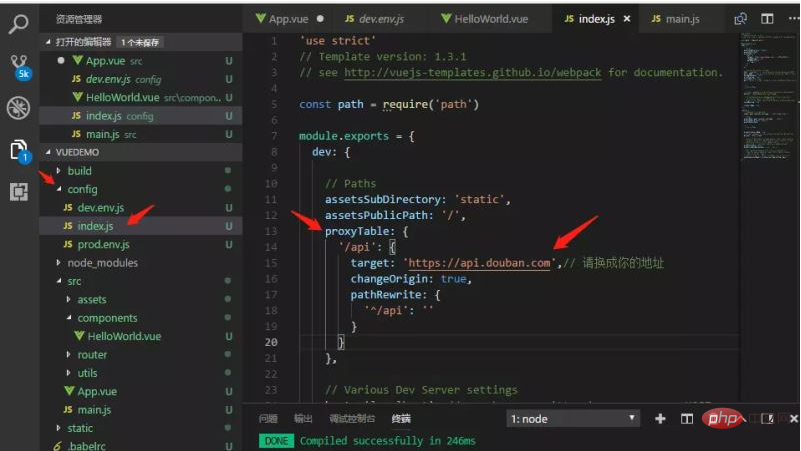
Configure in config->index.js->proxyTable as follows: target fill in yourself The desired address

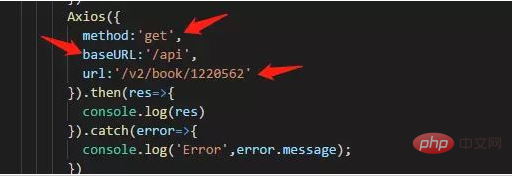
# is configured as follows. The url is the parameter after the address. After configuration, just run npm run dev now.

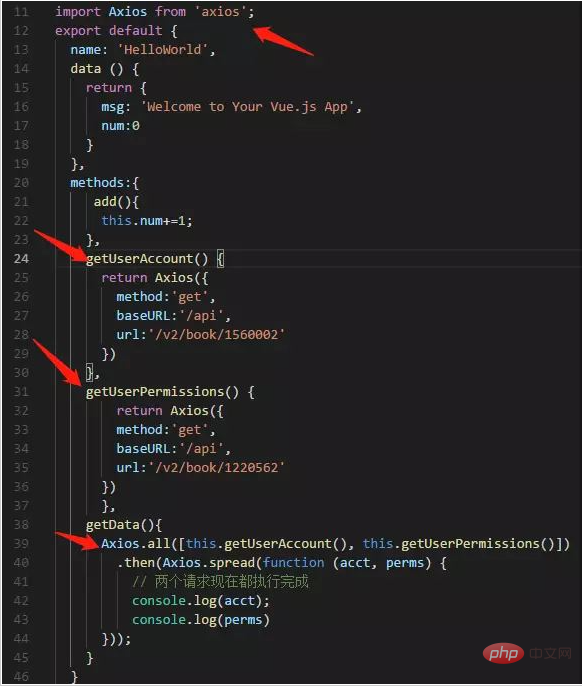
About multiple concurrent requests:

The above is a cross-domain version of the same address. If you want to get different addresses For cross-domain, you only need to change the configuration of config->index.js->proxyTable and add an address block.
Three, about fetch-jsonp
github address: https://github.com/camsong/fetch-jsonp
1. Installation
cnpm install fetch-jsonp --save
2. Where to use and where to introduce fetch-jsonp
fetchJsonp('/users.jsonp')
 .then(function(response) {
  return response.json()
 }).then(function(json) {
  console.log('parsed json', json)
 }).catch(function(ex) {
  console.log('parsing failed', ex)
})Related free learning recommendations: JavaScript(video)
The above is the detailed content of How to request data in vue.js. For more information, please follow other related articles on the PHP Chinese website!

Hot AI Tools

Undresser.AI Undress
AI-powered app for creating realistic nude photos

AI Clothes Remover
Online AI tool for removing clothes from photos.

Undress AI Tool
Undress images for free

Clothoff.io
AI clothes remover

AI Hentai Generator
Generate AI Hentai for free.

Hot Article

Hot Tools

Notepad++7.3.1
Easy-to-use and free code editor

SublimeText3 Chinese version
Chinese version, very easy to use

Zend Studio 13.0.1
Powerful PHP integrated development environment

Dreamweaver CS6
Visual web development tools

SublimeText3 Mac version
God-level code editing software (SublimeText3)

Hot Topics
 1378
1378
 52
52
 In-depth discussion of how vite parses .env files
Jan 24, 2023 am 05:30 AM
When using the Vue framework to develop front-end projects, we will deploy multiple environments when deploying. Often the interface domain names called by development, testing and online environments are different. How can we make the distinction? That is using environment variables and patterns.
 What is the difference between componentization and modularization in vue
Dec 15, 2022 pm 12:54 PM
The difference between componentization and modularization: Modularization is divided from the perspective of code logic; it facilitates code layered development and ensures that the functions of each functional module are consistent. Componentization is planning from the perspective of UI interface; componentization of the front end facilitates the reuse of UI components.
 Detailed graphic explanation of how to integrate the Ace code editor in a Vue project
Apr 24, 2023 am 10:52 AM
Ace is an embeddable code editor written in JavaScript. It matches the functionality and performance of native editors like Sublime, Vim, and TextMate. It can be easily embedded into any web page and JavaScript application. Ace is maintained as the main editor for the Cloud9 IDE and is the successor to the Mozilla Skywriter (Bespin) project.
 Practical combat: Develop a plug-in in vscode that supports vue files to jump to definitions
Nov 16, 2022 pm 08:43 PM
vscode itself supports Vue file components to jump to definitions, but the support is very weak. Under the configuration of vue-cli, we can write many flexible usages, which can improve our production efficiency. But it is these flexible writing methods that prevent the functions provided by vscode itself from supporting jumping to file definitions. In order to be compatible with these flexible writing methods and improve work efficiency, I wrote a vscode plug-in that supports Vue files to jump to definitions.
 Let's talk in depth about reactive() in vue3
Jan 06, 2023 pm 09:21 PM
Foreword: In the development of vue3, reactive provides a method to implement responsive data. This is a frequently used API in daily development. In this article, the author will explore its internal operating mechanism.
 Explore how to write unit tests in Vue3
Apr 25, 2023 pm 07:41 PM
Vue.js has become a very popular framework in front-end development today. As Vue.js continues to evolve, unit testing is becoming more and more important. Today we’ll explore how to write unit tests in Vue.js 3 and provide some best practices and common problems and solutions.
 A simple comparison of JSX syntax and template syntax in Vue (analysis of advantages and disadvantages)
Mar 23, 2023 pm 07:53 PM
In Vue.js, developers can use two different syntaxes to create user interfaces: JSX syntax and template syntax. Both syntaxes have their own advantages and disadvantages. Let’s discuss their differences, advantages and disadvantages.
 A brief analysis of how vue implements file slicing upload
Mar 24, 2023 pm 07:40 PM
In the actual development project process, sometimes it is necessary to upload relatively large files, and then the upload will be relatively slow, so the background may require the front-end to upload file slices. It is very simple. For example, 1 A gigabyte file stream is cut into several small file streams, and then the interface is requested to deliver the small file streams respectively.


