
 Web Front-end
JS Tutorial
How does node+vue implement a simple WebSocket chat function? (code example)
Web Front-end
JS Tutorial
How does node+vue implement a simple WebSocket chat function? (code example)
How does node+vue implement a simple WebSocket chat function? (code example)

Related recommendations: "node js tutorial"
I recently learned about websocket instant messaging and I feel it is very powerful. Here I used node to start a service for websocket link, and then linked it in the view of vue for communication. Without further ado, let’s go directly to the code.
First of all, I need to use node’s nodejs- websocket module
Use yarn to install
yarn add nodejs-websocket --save
Of course, you can also use npm to install
npm i nodejs-websocket --save
After the installation is completed, we start writing the server code. First, I use node has a node server locally to start the websocket service
sock.js:
let ws = require("nodejs-websocket");
console.log("开始建立链接");
ws.createServer(function (conn) {
  conn.on("text", function (str) {
    console.log("收到的信息为", str);
      conn.send(`${str}(机器人`)
  });
  conn.on("close", function (code, reason) {
    console.log("关闭连接")
  });
  conn.on("error", function (code, reason) {
    console.log("异常关闭")
  })
}).listen(8001);
console.log("链接建立完毕");The server mainly uses nodejs-websocket to start the service and return the values required by the front end. Here I just did a simple process, adding a 'robot' string after the acceptance value,
Then, we need to start the node service,
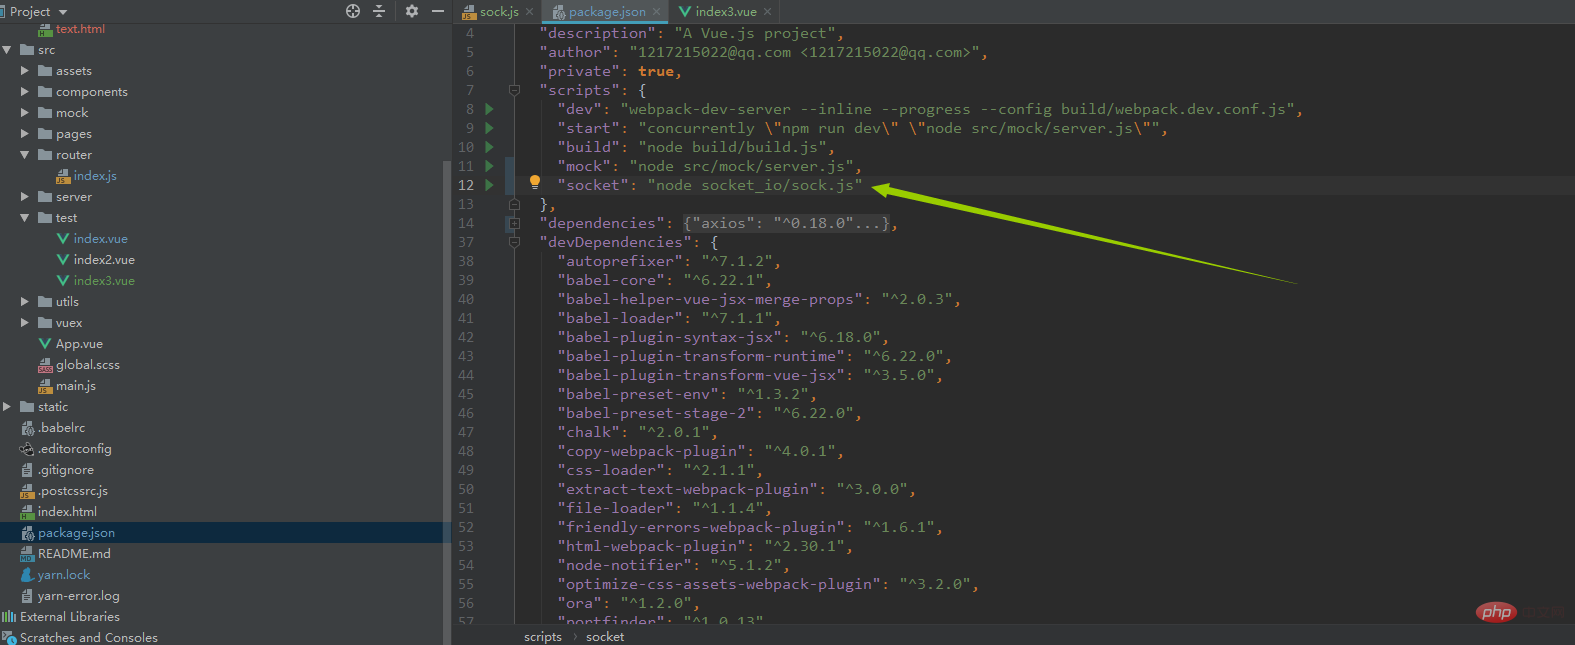
The path behind the command must be found correctly. I placed sock.js under the socket folder in the root directory.
Execute
yarn socket
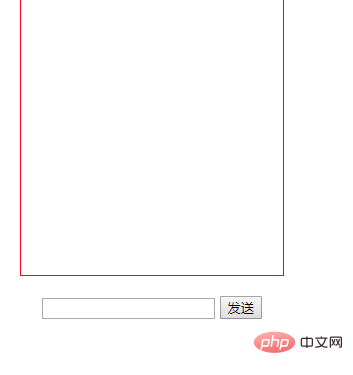
Finally, look at our client. On the client side, I want to have an input box and then a chat box:
<template>
<p class="test3">
<p class="msg" ref="box">
<p v-for="item in list" :class="[item.type,'msg-item']">
<p>
{{item.content}}
</p>
</p>
</p>
<p class="input-group">
<input type="text" v-model="contentText">
<button @click="sendText">发送</button>
</p>
</p>
</template>
<script>
export default {
name: "index3",
data() {
return {
list: [],//聊天记录的数组
contentText: "",//input输入的值
}
},
methods: {
//发送聊天信息
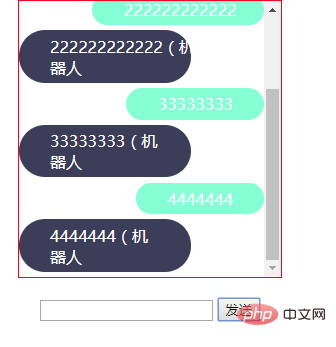
sendText() {
let that = this;
this.list = [...this.list, {type: "mine", content: this.contentText}];//通过type字段进行区分是自己(mine)发的还是系统(robot)返回的
this.backText(function () {
that.contentText = "";//加回调在得到返回数据的时候清除输入框的内容
});
},
backText(callback) {
let that = this;
if (window.WebSocket) {
let ws = new WebSocket("ws://192.168.11.169:8001");
ws.onopen = function (e) {
console.log("链接服务器成功");
console.log("that.contentText is", that.contentText);
ws.send(that.contentText);
callback();
};
ws.onclose = function (e) {
console.log("服务器关闭")
};
ws.onerror = function () {
console.log("服务器出错")
};
ws.onmessage = function (e) {
that.list = [...that.list, {type: "robot", content: e.data}]
}
}
}
},
watch: {
//监听list,当有修改的时候进行p的屏幕滚动,确保能看到最新的聊天
list: function () {
let that = this;
setTimeout(() => {
that.$refs.box.scrollTop = that.$refs.box.scrollHeight;
}, 0);
//加setTimeout的原因:由于vue采用虚拟dom,我每次生成新的消息时获取到的p的scrollHeight的值是生成新消息之前的值,所以造成每次都是最新的那条消息被隐藏掉了
}
},
mounted() {
}
};
</script>
<style scoped lang="scss">
.test3 {
text-align: center;
}
.msg {
width: 100px;
height: 100px;
overflow: auto;
padding-top: 5px;
border: 1px solid red;
display: inline-block;
margin-bottom: 6px;
.msg-item {
position: relative;
overflow: hidden;
p {
display: inline-block;
border-radius: 40px;
background: #3C3D5A;
color: white;
float: left;
padding: 2px 12px;
margin: 0 0 2px 0;
max-width: 70%;
text-align: left;
box-sizing: border-box;
}
&.mine {
p {
float: right;
background: aquamarine;
color: white;
}
}
}
}
</style>Let’s take a look at the final effect:
Related Recommendation:
2020 Summary of front-end vue interview questions (with answers)
vue tutorial recommendation: The latest 5 vue.js in 2020 Video tutorial selection
For more programming-related knowledge, please visit: Programming Teaching! !
The above is the detailed content of How does node+vue implement a simple WebSocket chat function? (code example). For more information, please follow other related articles on the PHP Chinese website!

Hot AI Tools

Undresser.AI Undress
AI-powered app for creating realistic nude photos

AI Clothes Remover
Online AI tool for removing clothes from photos.

Undress AI Tool
Undress images for free

Clothoff.io
AI clothes remover

Video Face Swap
Swap faces in any video effortlessly with our completely free AI face swap tool!

Hot Article
Hot Tools

Notepad++7.3.1
Easy-to-use and free code editor

SublimeText3 Chinese version
Chinese version, very easy to use

Zend Studio 13.0.1
Powerful PHP integrated development environment

Dreamweaver CS6
Visual web development tools

SublimeText3 Mac version
God-level code editing software (SublimeText3)
Hot Topics
 1386
1386
 52
52

 How to use bootstrap in vue
Apr 07, 2025 pm 11:33 PM
How to use bootstrap in vue
Apr 07, 2025 pm 11:33 PM
Using Bootstrap in Vue.js is divided into five steps: Install Bootstrap. Import Bootstrap in main.js. Use the Bootstrap component directly in the template. Optional: Custom style. Optional: Use plug-ins.
 How to add functions to buttons for vue
Apr 08, 2025 am 08:51 AM
How to add functions to buttons for vue
Apr 08, 2025 am 08:51 AM
You can add a function to the Vue button by binding the button in the HTML template to a method. Define the method and write function logic in the Vue instance.
 How to reference js file with vue.js
Apr 07, 2025 pm 11:27 PM
How to reference js file with vue.js
Apr 07, 2025 pm 11:27 PM
There are three ways to refer to JS files in Vue.js: directly specify the path using the <script> tag;; dynamic import using the mounted() lifecycle hook; and importing through the Vuex state management library.
 How to use watch in vue
Apr 07, 2025 pm 11:36 PM
How to use watch in vue
Apr 07, 2025 pm 11:36 PM
The watch option in Vue.js allows developers to listen for changes in specific data. When the data changes, watch triggers a callback function to perform update views or other tasks. Its configuration options include immediate, which specifies whether to execute a callback immediately, and deep, which specifies whether to recursively listen to changes to objects or arrays.
 What does vue multi-page development mean?
Apr 07, 2025 pm 11:57 PM
What does vue multi-page development mean?
Apr 07, 2025 pm 11:57 PM
Vue multi-page development is a way to build applications using the Vue.js framework, where the application is divided into separate pages: Code Maintenance: Splitting the application into multiple pages can make the code easier to manage and maintain. Modularity: Each page can be used as a separate module for easy reuse and replacement. Simple routing: Navigation between pages can be managed through simple routing configuration. SEO Optimization: Each page has its own URL, which helps SEO.
 How to return to previous page by vue
Apr 07, 2025 pm 11:30 PM
How to return to previous page by vue
Apr 07, 2025 pm 11:30 PM
Vue.js has four methods to return to the previous page: $router.go(-1)$router.back() uses <router-link to="/" component window.history.back(), and the method selection depends on the scene.
 How to query the version of vue
Apr 07, 2025 pm 11:24 PM
How to query the version of vue
Apr 07, 2025 pm 11:24 PM
You can query the Vue version by using Vue Devtools to view the Vue tab in the browser's console. Use npm to run the "npm list -g vue" command. Find the Vue item in the "dependencies" object of the package.json file. For Vue CLI projects, run the "vue --version" command. Check the version information in the <script> tag in the HTML file that refers to the Vue file.
 How to use vue traversal
Apr 07, 2025 pm 11:48 PM
How to use vue traversal
Apr 07, 2025 pm 11:48 PM
There are three common methods for Vue.js to traverse arrays and objects: the v-for directive is used to traverse each element and render templates; the v-bind directive can be used with v-for to dynamically set attribute values for each element; and the .map method can convert array elements into new arrays.
