Detailed explanation of using phpmyadmin to set mysql permissions
The following phpmyadmin usage tutorial column will give you a detailed explanation of how to use phpmyadmin to set mysql permissions. I hope it will be helpful to friends in need!

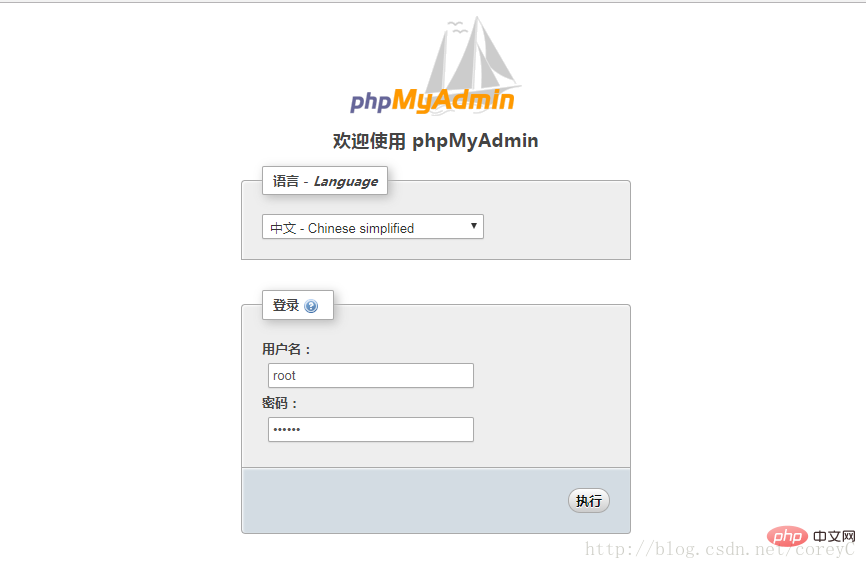
Step one: Log in as root user.

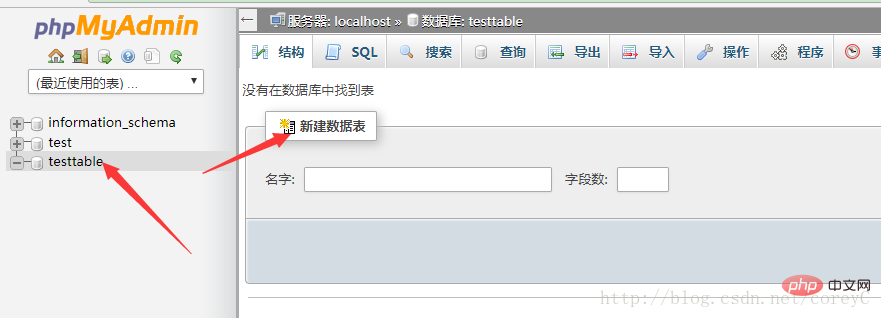
Step 2: Create a new data table and select the sorting rule. Here I use testtable.

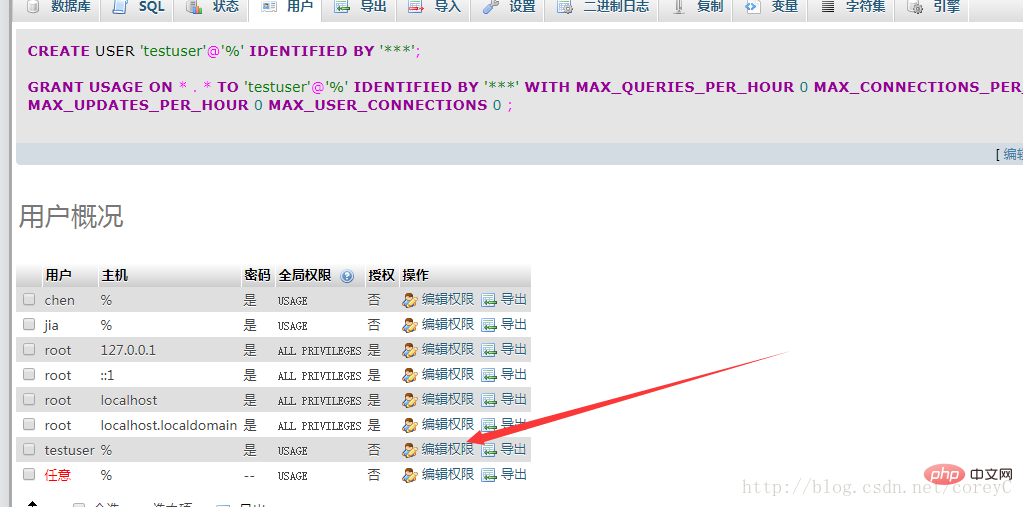
Step 3: We can create a new user and enter the relevant account name and password.

Step 4: We edit permissions for the user testuser we just added:

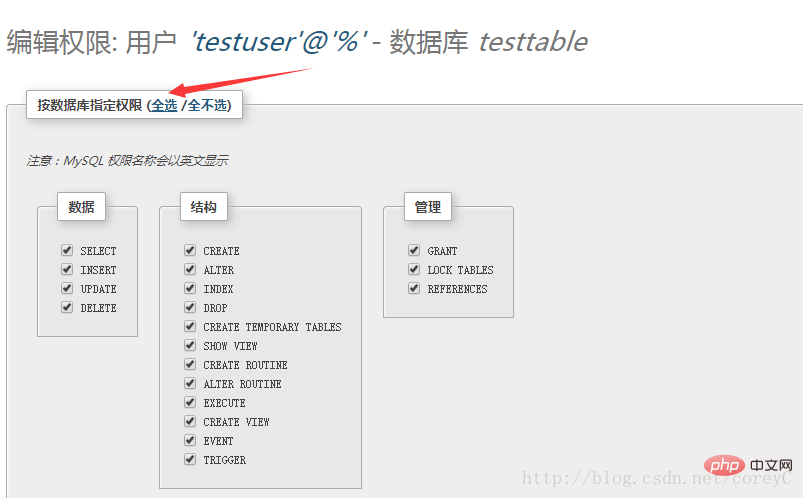
After entering the page , we only need to choose to set permissions by database. There is no need to check global permissions.

After clicking, a permissions page will appear, just select all and execute.

At this time, when we log in as testuser, we only see the testtable library and the related operation permissions of this table.

For more related technical articles, please visit the phpmyadmin column!
The above is the detailed content of Detailed explanation of using phpmyadmin to set mysql permissions. For more information, please follow other related articles on the PHP Chinese website!

Hot AI Tools

Undresser.AI Undress
AI-powered app for creating realistic nude photos

AI Clothes Remover
Online AI tool for removing clothes from photos.

Undress AI Tool
Undress images for free

Clothoff.io
AI clothes remover

AI Hentai Generator
Generate AI Hentai for free.

Hot Article

Hot Tools

Notepad++7.3.1
Easy-to-use and free code editor

SublimeText3 Chinese version
Chinese version, very easy to use

Zend Studio 13.0.1
Powerful PHP integrated development environment

Dreamweaver CS6
Visual web development tools

SublimeText3 Mac version
God-level code editing software (SublimeText3)

Hot Topics
 1377
1377
 52
52
 MySQL: The Ease of Data Management for Beginners
Apr 09, 2025 am 12:07 AM
MySQL is suitable for beginners because it is simple to install, powerful and easy to manage data. 1. Simple installation and configuration, suitable for a variety of operating systems. 2. Support basic operations such as creating databases and tables, inserting, querying, updating and deleting data. 3. Provide advanced functions such as JOIN operations and subqueries. 4. Performance can be improved through indexing, query optimization and table partitioning. 5. Support backup, recovery and security measures to ensure data security and consistency.
 Can I retrieve the database password in Navicat?
Apr 08, 2025 pm 09:51 PM
Navicat itself does not store the database password, and can only retrieve the encrypted password. Solution: 1. Check the password manager; 2. Check Navicat's "Remember Password" function; 3. Reset the database password; 4. Contact the database administrator.
 How to create navicat premium
Apr 09, 2025 am 07:09 AM
Create a database using Navicat Premium: Connect to the database server and enter the connection parameters. Right-click on the server and select Create Database. Enter the name of the new database and the specified character set and collation. Connect to the new database and create the table in the Object Browser. Right-click on the table and select Insert Data to insert the data.
 How to view database password in Navicat for MariaDB?
Apr 08, 2025 pm 09:18 PM
Navicat for MariaDB cannot view the database password directly because the password is stored in encrypted form. To ensure the database security, there are three ways to reset your password: reset your password through Navicat and set a complex password. View the configuration file (not recommended, high risk). Use system command line tools (not recommended, you need to be proficient in command line tools).
 MySQL: Simple Concepts for Easy Learning
Apr 10, 2025 am 09:29 AM
MySQL is an open source relational database management system. 1) Create database and tables: Use the CREATEDATABASE and CREATETABLE commands. 2) Basic operations: INSERT, UPDATE, DELETE and SELECT. 3) Advanced operations: JOIN, subquery and transaction processing. 4) Debugging skills: Check syntax, data type and permissions. 5) Optimization suggestions: Use indexes, avoid SELECT* and use transactions.
 Navicat cannot connect to MySQL/MariaDB/PostgreSQL and other databases
Apr 08, 2025 pm 11:00 PM
Common reasons why Navicat cannot connect to the database and its solutions: 1. Check the server's running status; 2. Check the connection information; 3. Adjust the firewall settings; 4. Configure remote access; 5. Troubleshoot network problems; 6. Check permissions; 7. Ensure version compatibility; 8. Troubleshoot other possibilities.
 How to execute sql in navicat
Apr 08, 2025 pm 11:42 PM
Steps to perform SQL in Navicat: Connect to the database. Create a SQL Editor window. Write SQL queries or scripts. Click the Run button to execute a query or script. View the results (if the query is executed).
 How to create a new connection to mysql in navicat
Apr 09, 2025 am 07:21 AM
You can create a new MySQL connection in Navicat by following the steps: Open the application and select New Connection (Ctrl N). Select "MySQL" as the connection type. Enter the hostname/IP address, port, username, and password. (Optional) Configure advanced options. Save the connection and enter the connection name.


