

How to display pictures in layui table

How to display images in layui tables: First, place a table tag, id and lay-filter in the HTML code; then use the custom template function in the js code to implement logical processing; finally declare a string type The variable is used to receive the name of the picture.

The operating environment of this tutorial: windows10 system, layui2.5.6. This article is applicable to all brands of computers.
Recommended: "layUI Tutorial"
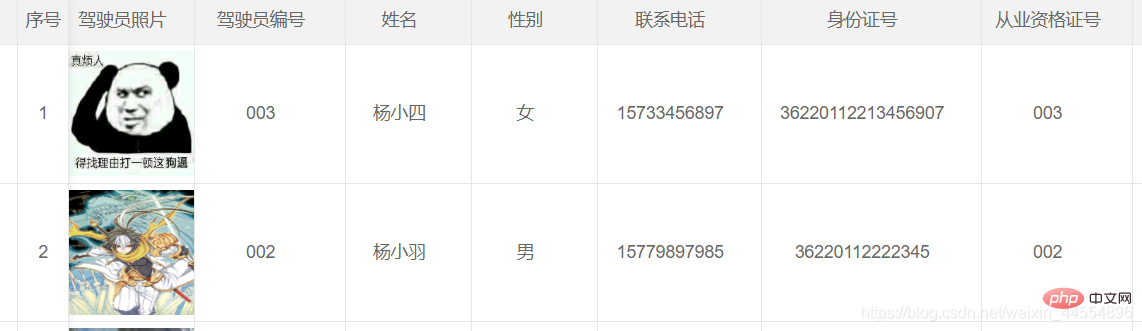
1. The effect achieved
2. Code
HTML code
The HTML code is still similar to other tables. You only need to place a table tag in the appropriate place, and write both id and lay-filter. Just go up. 
JS code
In the JS code, except that the picture column is different from the other columns, the other columns are basically similar. Of course, if you write some fixed columns, you will find that in your The fixed column written also needs to be different from other columns. Let’s talk about the driver picture column first. The function of custom template (templet) is used in this column. You can use this feature to perform logical processing and convert raw data into other formats. Of course, I didn't use data conversion here. Here I just use this function to add some styles. 
    layui.use(['table', 'layer'], function () {
                layuiTable = layui.table;
                layer = layui.layer;

                tabDriver = layuiTable.render({
                    elem: "#tabDriver",
                    cellMinWidth: 100,
                    height: 'full-200',
                    cols: [[
                        { type: 'checkbox', align: "center", fixed: "left", style: "height:110px;"},
                        { type: 'numbers', title: "序号", align: "center", fixed: "left", style: "height:110px;" },
                        { field: 'DriverID', title: 'DriverID', hide: true },
                        { field: 'PassengerCarID', title: 'PassengerCarID', hide: true },
                        { field: 'DriverPicture', title: '驾驶员照片', align: "center", templet: "#imgtmp" },
                        { field: 'DriverCode', title: '驾驶员编号', align: "center", width: 120 },
                        { field: 'DirverName', title: '姓名', align: "center" },
                        { field: 'DriverSex', title: '性别', align: "center" },
                        { field: 'DriverMovePhone', title: '联系电话', align: "center", width: 130 },
                        { field: 'DriverIDNum', title: '身份证号', align: "center", width: 175 },
                        { field: 'OccupationalNumber', title: '从业资格证号', align: "center", width: 120 },
                        { field: 'PassengerCarCode', title: '驾驶车辆编号', align: "center", width: 120 },
                        { field: 'DriverNumber', title: '驾驶证号', align: "center", width: 100 },
                        { field: 'DrivingType', title: '准驾车型', align: "center", width: 100 },
                        { field: 'StrDrivingDay', title: '驾驶证审验期', align: "center", width: 120 },
                        { field: 'StrOccupationalDay', title: '从业资格证审验期', align: "center", width: 150 },
                        { field: 'strSGZUseLifes', title: '上岗证有效期', align: "center", width: 150 },
                        { field: 'DriverRemark', title: '备注', align: "center" },
                        { title: '操作', templet: setOperate, width: 100, align: "center", fixed: "right", style: "height:110px;" },
                    ]],
                    page: {
                        limit: 10,//指定每页显示条数
                        limits: [5, 10, 15, 20, 25, 30, 35, 40, 45, 50],//每页条数的选择项
                    },
                    data: [],
                    toolbar: "#toolbarDemo",
                });

                //监听事件
                layuiTable.on('row(tabDriver)', function (obj) {
                    //标中选中样式
                    obj.tr.addClass("layui-table-click").siblings().removeClass("layui-table-click");
                    //选中行,勾选复选框
                    obj.tr.find("p.layui-unselect.layui-form-checkbox")[1].click();
                });
});Custom template (templet)
Here, the way to write a custom template is very simple. The outermost layer is wrapped with a script tag. The type of the script tag is text/html and the id is imgtep. (The id here must be consistent with the id in the templet in the column of the driver's photo in the layui table). Use an img tag in the script tag to display the driver's photo, and give the img tag some fixed width and height. Among them, {{d.DriverPicture}} in src represents the path of the corresponding picture queried from the database. (My database here saves the path of the corresponding picture, and the corresponding picture is saved in a special folder in the project. Instead of using binary saved pictures. If you use binary to save pictures, the data must be processed after querying. Conversion.) 
If fixed columns are set in the layui data table
Add style to the corresponding fixed columns, and then set the height of these fixed columns. 
Controller Code - Save Picture
I am too lazy to write some queries on the controller side. First, use the name received by HttpPostedFileBase in the controller method. This A form to receive the image information passed. Note: The received name must be the same as the name of the hidden type input tag under the img tag on the page. 

First save the other data except the picture, and then process the picture
First declare a string type variable to receive the name of the last picture, and then whether fileDriverImage is empty , if not equal to empty. First get the suffix name of the image, which will be used later to determine whether the passed image is the image type. Five random strings are spliced in front of the picture name (fileName) to prevent exceptions when pictures with the same name appear during modification. Then determine whether the path to Bai Cun's picture exists. If the path does not exist, create the corresponding path in the project. The path is divided into two, a temporary path is used to save the pictures after uploading, but before the data is saved to the database. A final path used to save the image after the data is saved successfully. Then splice the temporary path where the picture is saved and the path of the picture to be saved to the database. Then assign the path of the spliced picture to be saved to the database to the corresponding field in the table object to be saved. Then judge the suffix name obtained previously, convert all the suffix names into lowercase, and then determine whether it is an image type. If it is a picture type, save the picture to a temporary path.
                        string fileName = "";
                        //判断图片是否为空
                        if (fileDriverImage != null)
                        {
                            string fileExtension = System.IO.Path.GetExtension(fileDriverImage.FileName);
                            fileName = Common.ValidCodeUtils.GetRandomCode(5) + fileDriverImage.FileName;
                            //判断是否存在该路径,若不存在,创建 最终路径
                            if (!Directory.Exists(Server.MapPath("~/Document/BusinessManagement/Driverimg/")))
                            {
                                Directory.CreateDirectory(Server.MapPath("~/Document/BusinessManagement/Driverimg/"));
                            }
                            //临时路径
                            if (!Directory.Exists(Server.MapPath("~/Document/BusinessManagement/Temp/")))
                            {
                                Directory.CreateDirectory(Server.MapPath("~/Document/BusinessManagement/Temp/"));
                            }
                            //拼接保存的图片路径
                            string fileTempPath = Server.MapPath("/Document/BusinessManagement/Temp/") + fileDriverImage.FileName;
                            string fileSavePath = "/Document/BusinessManagement/Driverimg/" + fileDriverImage.FileName;
                            sysDriver.DriverPicture = fileSavePath;
                            if (fileExtension != null)
                            {
                                fileExtension = fileExtension.ToLower(); //将后缀转化为小写
                                //判断文件扩展名是否是指定的图片类型
                                if ("(.gif)|(.jpg)|(.bmp)|(.jpeg)|(.png)".Contains(fileExtension))
                                {
                                    fileDriverImage.SaveAs(fileTempPath); //保存文件
                                }
                            }
}数据库保存成功之后将图片从临时路径移动到最终路径
在数据保存成功之后,判断获取到的图片的文件是否为空,若不为空,获取图片在临时路径中的路径和在最终路径中的路径。然后使用IO中的Move将图片从临时路径移动到最终路径。
The above is the detailed content of How to display pictures in layui table. For more information, please follow other related articles on the PHP Chinese website!

Hot AI Tools

Undresser.AI Undress
AI-powered app for creating realistic nude photos

AI Clothes Remover
Online AI tool for removing clothes from photos.

Undress AI Tool
Undress images for free

Clothoff.io
AI clothes remover

AI Hentai Generator
Generate AI Hentai for free.

Hot Article
Hot Tools

Notepad++7.3.1
Easy-to-use and free code editor

SublimeText3 Chinese version
Chinese version, very easy to use

Zend Studio 13.0.1
Powerful PHP integrated development environment

Dreamweaver CS6
Visual web development tools

SublimeText3 Mac version
God-level code editing software (SublimeText3)
Hot Topics
 1378
1378
 52
52

 How to set up jump on layui login page
Apr 04, 2024 am 03:12 AM
How to set up jump on layui login page
Apr 04, 2024 am 03:12 AM
Layui login page jump setting steps: Add jump code: Add judgment in the login form submit button click event, and jump to the specified page through window.location.href after successful login. Modify the form configuration: add a hidden input field to the form element of lay-filter="login", with the name "redirect" and the value being the target page address.
 How to get form data in layui
Apr 04, 2024 am 03:39 AM
How to get form data in layui
Apr 04, 2024 am 03:39 AM
layui provides a variety of methods for obtaining form data, including directly obtaining all field data of the form, obtaining the value of a single form element, using the formAPI.getVal() method to obtain the specified field value, serializing the form data and using it as an AJAX request parameter, and listening Form submission event gets data.
 How layui implements self-adaptation
Apr 26, 2024 am 03:00 AM
How layui implements self-adaptation
Apr 26, 2024 am 03:00 AM
Adaptive layout can be achieved by using the responsive layout function of the layui framework. The steps include: referencing the layui framework. Define an adaptive layout container and set the layui-container class. Use responsive breakpoints (xs/sm/md/lg) to hide elements under specific breakpoints. Specify element width using the grid system (layui-col-). Create spacing via offset (layui-offset-). Use responsive utilities (layui-invisible/show/block/inline) to control the visibility of elements and how they appear.
 How to transfer data in layui
Apr 26, 2024 am 03:39 AM
How to transfer data in layui
Apr 26, 2024 am 03:39 AM
The method of using layui to transmit data is as follows: Use Ajax: Create the request object, set the request parameters (URL, method, data), and process the response. Use built-in methods: Simplify data transfer using built-in methods such as $.post, $.get, $.postJSON, or $.getJSON.
 What is the difference between layui and vue?
Apr 04, 2024 am 03:54 AM
What is the difference between layui and vue?
Apr 04, 2024 am 03:54 AM
The difference between layui and Vue is mainly reflected in functions and concerns. Layui focuses on rapid development of UI elements and provides prefabricated components to simplify page construction; Vue is a full-stack framework that focuses on data binding, component development and state management, and is more suitable for building complex applications. Layui is easy to learn and suitable for quickly building pages; Vue has a steep learning curve but helps build scalable and easy-to-maintain applications. Depending on the project needs and developer skill level, the appropriate framework can be selected.
 How to run layui
Apr 04, 2024 am 03:42 AM
How to run layui
Apr 04, 2024 am 03:42 AM
To run layui, perform the following steps: 1. Import layui script; 2. Initialize layui; 3. Use layui components; 4. Import layui styles (optional); 5. Ensure script compatibility and pay attention to other considerations. With these steps, you can build web applications using the power of layui.
 What does layui mean?
Apr 04, 2024 am 04:33 AM
What does layui mean?
Apr 04, 2024 am 04:33 AM
layui is a front-end UI framework that provides a wealth of UI components, tools and functions to help developers quickly build modern, responsive and interactive web applications. Its features include: flexible and lightweight, modular design, rich components, Powerful tools and easy customization. It is widely used in the development of various web applications, including management systems, e-commerce platforms, content management systems, social networks and mobile applications.
 What language is layui framework?
Apr 04, 2024 am 04:39 AM
What language is layui framework?
Apr 04, 2024 am 04:39 AM
The layui framework is a JavaScript-based front-end framework that provides a set of easy-to-use UI components and tools to help developers quickly build responsive web applications. Its features include: modular, lightweight, responsive, and has complete documentation and community support. layui is widely used in the development of management backend systems, e-commerce websites, and mobile applications. The advantages are quick start-up, improved efficiency, and easy maintenance. The disadvantages are poor customization and slow technology updates.
