

How to implement data binding in layui

How layui implements data binding: first introduce layui's css file and js file; then create a view to present the rendering results; then write the template and use a script tag to store the template; finally render the template .

The operating environment of this tutorial: Windows 7 system, layui version 2.5.6. This article is applicable to all brands of computers.
Recommended: "layUI Tutorial"
Laytpl based on layui implements data binding
It took me a long time to remember the login password for my garden. You can imagine how long it has been since I logged in
Text
I used layui to make several management systems at the beginning, so it feels really comfortable to use. It’s easy to get started. The most commonly used ones in the management backend are form, table and pop-up window classes. The form table layer provided by layui is already very simple and easy to use. Regardless of the underlying encapsulation, I think the usage method shown to us is very simplified. In addition to the form table layer used in management, there are often some statistical data displays or content displays such as details pages. Then some used statistical data (except charts), such as text statistical data display. At this time, it is actually excellent to use layui based on laytpl to display this function.
##Write a simple data binding first
The first step: Introduce layui’s css file and js file (introduced by yourself) The second step: Create a view to present the rendering results. The code is as follows:
 <p class="layui-row">
 <p class="layui-col-md6" id="orderInfop"></p>
</p>
<script type="text/html" id="orderInfo">
        <div class="layui-card">
            <div class="layui-card-header">订单概况</div>
            <div class="layui-card-body">
                <ul class="layui-row layui-col-space10 layadmin-backlog">
                    <li class="layui-col-xs6 layui-col-sm3">
                        <a class="layadmin-backlog-body">
                            <h3>营业额</h3>
                            <p><cite style="font-size:24px;">{{d.turnover}}</cite></p>
                        </a>
                    </li>
                    <li class="layui-col-xs6 layui-col-sm3">
                        <a class="layadmin-backlog-body">
                            <h3>订单数</h3>
                            <p><cite style="font-size:24px;">{{d.orderNum}}</cite></p>
                        </a>
                    </li>
                    <li class="layui-col-xs6 layui-col-sm3">
                        <a class="layadmin-backlog-body">
                            <h3>已发货</h3>
                            <p><cite style="font-size:24px;">{{d.delivered}}</cite></p>
                        </a>
                    </li>
                    <li class="layui-col-xs6 layui-col-sm3">
                        <a class="layadmin-backlog-body">
                            <h3>未发货</h3>
                            <p><cite style="font-size:24px;">{{d.unDelivered}}</cite></p>
                        </a>
                    </li>
                    <li class="layui-col-xs6 layui-col-sm3">
                        <a class="layadmin-backlog-body">
                            <h3>已取消</h3>
                            <p><cite style="font-size:24px;">{{d.cancelled}}</cite></p>
                        </a>
                    </li>
                    <li class="layui-col-xs6 layui-col-sm3">
                        <a class="layadmin-backlog-body">
                            <h3>已收货</h3>
                            <p><cite style="font-size:24px;">{{d.received }}</cite></p>
                        </a>
                    </li>
                    <li class="layui-col-xs6 layui-col-sm3">
                        <a class="layadmin-backlog-body">
                            <h3>已评价</h3>
                            <p><cite style="font-size:24px;">{{d.evaluated}}</cite></p>
                        </a>
                    </li>
                    <li class="layui-col-xs6 layui-col-sm3">
                        <a class="layadmin-backlog-body">
                            <h3>好评率</h3>
                            <p><cite style="font-size:24px;">{{d.favorableRate}}%</cite></p>
                        </a>
                    </li>
                </ul>
            </div>
        </div>
</script><script>
layui.use(['laytpl'], function () {
var laytpl = layui.laytpl;
//订单统计(正常情况下,此处应是ajax返回后的数据,这里是模拟数据。)
//渲染模板所用的数据
var data = { turnover: "23,251", orderNum: "256", delivered: "16", unDelivered: "130", cancelled: "10", received: "100", evaluated: "80", favorableRate: "80" }
var orderInfoTpl = orderInfo.innerHTML //获取模板,即上面所定义的 <script id="orderInfo">
, orderInfoDiv = document.getElementById('orderInfoDiv'); //视图 即上面的 <div id="orderInfoDiv">
laytpl(orderInfoTpl).render(data, function (html) { //渲染视图
orderInfoDiv.innerHTML = html;
});
})
</script>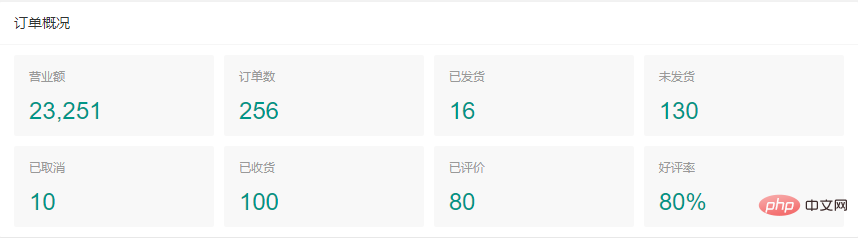
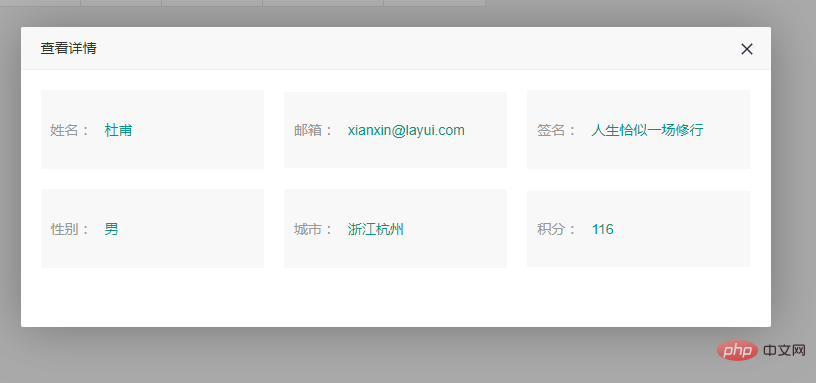
Detailed data display
If it is a table, click to view the details, you can also display the data in this wayStep 1: Import The css files and js files of layui (introduced by yourself), and the css styles used in the page are written by yourself. The second step: table data display, here is the assignment of known data, replace it with your own data during development, and define a click event for the table<table class="layui-hide" lay-filter="demoTableFilter" id="demoTable"></table>
  <script type="text/html" id="barDemo">
   <a class="layui-btn layui-btn-xs" lay-event="detail">查看详情</a>
</script><script type="text/html" id="demoDetail">
<div>
<div class="disF">
<div class="flex1">
<div class="disF">
<label>姓名:</label>
<p class="flex1">{{d.username}}</p>
</div>
</div>
<div class="flex1">
<div class="disF">
<label>邮箱:</label>
<p class="flex1">{{d.email}}</p>
</div>
</div>
<div class="flex1">
<div class="disF">
<label>签名:</label>
<p class="flex1">{{d.sign}}</p>
</div>
</div>
</div>
<div class="disF">
<div class="flex1">
<div class="disF">
<label>性别:</label>
<p class="flex1">{{d.sex}}</p>
</div>
</div>
<div class="flex1">
<div class="disF">
<label>城市:</label>
<p class="flex1">{{d.city}}</p>
</div>
</div>
<div class="flex1">
<div class="disF">
<label>积分:</label>
<p class="flex1">{{d.experience}}</p>
</div>
</div>
</div>
</div>
</script>table.render({
elem: '#demoTable'
, cols: [[ //标题栏
{ field: 'id', title: 'ID', width: 100 }
, { field: 'username', title: '用户名', width: 80 }
, { field: 'email', title: '邮箱', width: 180 }
, { field: 'sign', title: '签名', width: 180 }
, { field: 'sex', title: '性别', width: 80 }
, { field: 'city', title: '城市', width: 100 }
, { field: 'experience', title: '积分', minWidth: 80 }
, { width: 100, align: 'center', toolbar: '#barDemo' }
]]
, data: [{
"id": "10001"
, "username": "杜甫"
, "email": "xianxin@layui.com"
, "sex": "男"
, "city": "浙江杭州"
, "sign": "人生恰似一场修行"
, "experience": "116"
, "ip": "192.168.0.8"
, "logins": "108"
, "joinTime": "2016-10-14"
},{
"id": "10002"
, "username": "李白"
, "email": "xianxin@layui.com"
, "sex": "男"
, "city": "浙江杭州"
, "sign": "人生恰似一场修行"
, "experience": "12"
, "ip": "192.168.0.8"
, "logins": "106"
, "joinTime": "2016-10-14"
, "LAY_CHECKED": true
}]
});
<p class="demoDetailp" style="display:none;padding:10px;">
        <p id="detailp"></p>
</p>table.on('tool(demoTableFilter)', function (obj) {
var data = obj.data;
if (obj.event === 'detail') {
index = layer.open({
title: '查看详情',
type: 1,
move: false,
content: $('.demoDetailDiv'),
area: ['750px', '300px'],
resize: false,
scrollbar: false
});
var demoDetailTpl = demoDetail.innerHTML //获取模板,
, detailDiv = document.getElementById('detailDiv'); //视图
laytpl(demoDetailTpl).render(obj.data, function (html) { //渲染视图
detailDiv.innerHTML = html;
});
}
});
The above is the detailed content of How to implement data binding in layui. For more information, please follow other related articles on the PHP Chinese website!

Hot AI Tools

Undresser.AI Undress
AI-powered app for creating realistic nude photos

AI Clothes Remover
Online AI tool for removing clothes from photos.

Undress AI Tool
Undress images for free

Clothoff.io
AI clothes remover

AI Hentai Generator
Generate AI Hentai for free.

Hot Article
Hot Tools

Notepad++7.3.1
Easy-to-use and free code editor

SublimeText3 Chinese version
Chinese version, very easy to use

Zend Studio 13.0.1
Powerful PHP integrated development environment

Dreamweaver CS6
Visual web development tools

SublimeText3 Mac version
God-level code editing software (SublimeText3)
Hot Topics


 How to get form data in layui
Apr 04, 2024 am 03:39 AM
How to get form data in layui
Apr 04, 2024 am 03:39 AM
layui provides a variety of methods for obtaining form data, including directly obtaining all field data of the form, obtaining the value of a single form element, using the formAPI.getVal() method to obtain the specified field value, serializing the form data and using it as an AJAX request parameter, and listening Form submission event gets data.
 How to set up jump on layui login page
Apr 04, 2024 am 03:12 AM
How to set up jump on layui login page
Apr 04, 2024 am 03:12 AM
Layui login page jump setting steps: Add jump code: Add judgment in the login form submit button click event, and jump to the specified page through window.location.href after successful login. Modify the form configuration: add a hidden input field to the form element of lay-filter="login", with the name "redirect" and the value being the target page address.
 How layui implements self-adaptation
Apr 26, 2024 am 03:00 AM
How layui implements self-adaptation
Apr 26, 2024 am 03:00 AM
Adaptive layout can be achieved by using the responsive layout function of the layui framework. The steps include: referencing the layui framework. Define an adaptive layout container and set the layui-container class. Use responsive breakpoints (xs/sm/md/lg) to hide elements under specific breakpoints. Specify element width using the grid system (layui-col-). Create spacing via offset (layui-offset-). Use responsive utilities (layui-invisible/show/block/inline) to control the visibility of elements and how they appear.
 How to run layui
Apr 04, 2024 am 03:42 AM
How to run layui
Apr 04, 2024 am 03:42 AM
To run layui, perform the following steps: 1. Import layui script; 2. Initialize layui; 3. Use layui components; 4. Import layui styles (optional); 5. Ensure script compatibility and pay attention to other considerations. With these steps, you can build web applications using the power of layui.
 Which one is better, layui or elementui?
Apr 04, 2024 am 04:15 AM
Which one is better, layui or elementui?
Apr 04, 2024 am 04:15 AM
Question: Which one is better, layui or ElementUI? Answer: It depends on the project requirements. Layui is more comprehensive, customizable and suitable for large projects, while ElementUI is more lightweight, beautiful and easy to use. The specific reasons for selection are as follows: Choose layui: Provides a wider range of functions and modules that allow a high degree of customization of component appearance and behavior. Suitable for large projects that require a wide range of functions and scalability. Choose ElementUI: Smaller size and faster loading speed. Components follow Material Design principles. , high aesthetics, providing a large number of ready-made components, reducing development complexity and time
 What is the difference between layui and vue?
Apr 04, 2024 am 03:54 AM
What is the difference between layui and vue?
Apr 04, 2024 am 03:54 AM
The difference between layui and Vue is mainly reflected in functions and concerns. Layui focuses on rapid development of UI elements and provides prefabricated components to simplify page construction; Vue is a full-stack framework that focuses on data binding, component development and state management, and is more suitable for building complex applications. Layui is easy to learn and suitable for quickly building pages; Vue has a steep learning curve but helps build scalable and easy-to-maintain applications. Depending on the project needs and developer skill level, the appropriate framework can be selected.
 The difference between layui framework and vue framework
Apr 26, 2024 am 01:27 AM
The difference between layui framework and vue framework
Apr 26, 2024 am 01:27 AM
layui and vue are front-end frameworks. layui is a lightweight library that provides UI components and tools; vue is a comprehensive framework that provides UI components, state management, data binding, routing and other functions. layui is based on a modular architecture, and vue is based on a componentized architecture. layui has a smaller ecosystem, vue has a large and active ecosystem. The learning curve of layui is low, and the learning curve of vue is steep. Layui is suitable for small projects and rapid development of UI components, while vue is suitable for large projects and scenarios that require rich functions.
 What language is layui framework?
Apr 04, 2024 am 04:39 AM
What language is layui framework?
Apr 04, 2024 am 04:39 AM
The layui framework is a JavaScript-based front-end framework that provides a set of easy-to-use UI components and tools to help developers quickly build responsive web applications. Its features include: modular, lightweight, responsive, and has complete documentation and community support. layui is widely used in the development of management backend systems, e-commerce websites, and mobile applications. The advantages are quick start-up, improved efficiency, and easy maintenance. The disadvantages are poor customization and slow technology updates.
