
 Operation and Maintenance
Linux Operation and Maintenance
How to configure the ssh service so that you can connect to the remote host without entering an account and password
Operation and Maintenance
Linux Operation and Maintenance
How to configure the ssh service so that you can connect to the remote host without entering an account and password
How to configure the ssh service so that you can connect to the remote host without entering an account and password

We know that the ssh protocol can connect to the remote server by entering the account name and password. So, can I log in directly without entering my account number and password? The answer is yes, and in daily work, this need is also common. For example, if you use scp for off-site backup and want to write scp to crontab, but you will definitely not be able to enter the account and password in crontab, then you need to log in without account and password.
ssh is an asymmetric encryption protocol with public and private keys. The public key is used to encrypt information. Each host will store the public keys of other hosts in the known_hosts file in the .ssh directory of its own home directory. If you want to be free of account and password, the key point is this public key.
Suppose there is a server host SERVER and a client CLIENT. The client wants to connect to SERVER without logging in. Then just append the client's public key to the end of ~/.ssh/authorized_keys on the SERVER machine. The following demonstrates how to log in without a password in two situations:
The client is a windows system
The client is a linux system
The client is a windows system
The first step is to generate a secret key pair. Here, we use the git tool to generate Secret key pair (how to install git on a windows system, you can check this yourself, it is very simple, just follow the next step).
ssh-keygen
After entering the above command in the git terminal, there will be a series of prompt messages, directly enter the ENTER key (a total of three times of ENTER required). After that, you can see the public key and private key in the $HOMT/.ssh/ directory. The one ending with pub is the public key.
admin@LAPTOP-7P19B9SH MINGW64 ~/.ssh
$ ll
total 13
-rw-r--r-- 1 admin 197121 1679  5月  3  2019 id_rsa
-rw-r--r-- 1 admin 197121  398  5月  3  2019 id_rsa.pub
Next, upload the public key to the server, and then append the public key information to ~/.ssh/authorized_keys.
# cat id_rsa.pub >> .ssh/authorized_keys
The following demonstrates how to use xshell to log in without a password
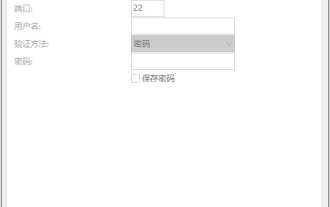
The first step is to enter the IP address of the remote host

The second step is to Click User Authentication and select the method as Public Key. Then enter the user name, here we fill in root. Finally, select the key. Note that you need to select the private key here, not the public key.

After these two steps are set up, password-free login is completed.
The client is a linux host
The first step is also to generate a secret key pair
# ssh-keygen -t rsa
Generating public/private rsa key pair.
Enter file in which to save the key (/root/.ssh/id_rsa):
Enter passphrase (empty for no passphrase):
Enter same passphrase again:
Your identification has been saved in /root/.ssh/id_rsa.
Your public key has been saved in /root/.ssh/id_rsa.pub.
The key fingerprint is:
SHA256:GCyx2cSYE6yR7xCuUVOF0Omvp5fEoxv0Y2wOQvMRB98 root@lijia
The key's randomart image is:
+---[RSA 2048]----+
|  .*=Oo          |
|  * OX..         |
| o B=.* E        |
|. + o+ o         |
| ooooo. S        |
|.. +.+=          |
|  . ++*o         |
|   .o*+.         |
|    o=.          |
+----[SHA256]-----+
The second step is to Transfer the produced public key to another machine
# ssh-copy-id root@121.***.***.64
/usr/bin/ssh-copy-id: INFO: Source of key(s) to be installed: "/root/.ssh/id_rsa.pub"
/usr/bin/ssh-copy-id: INFO: attempting to log in with the new key(s), to filter out any that are already installed
/usr/bin/ssh-copy-id: INFO: 1 key(s) remain to be installed -- if you are prompted now it is to install the new keys
root@121.196.12.64's password:
Number of key(s) added: 1
Now try logging into the machine, with:   "ssh 'root@121.***.***.64'"
and check to make sure that only the key(s) you wanted were added.
The third step is to log in to the remote host
# ssh root@121.196.12.64
Welcome to Alibaba Cloud Elastic Compute Service !
Activate the web console with: systemctl enable --now cockpit.socket
Last login: Fri Nov 20 10:28:37 2020 from 111.38.123.86
# 免密码登录成功
For more related technical articles, please visitlinux system tutorialColumn!
The above is the detailed content of How to configure the ssh service so that you can connect to the remote host without entering an account and password. For more information, please follow other related articles on the PHP Chinese website!

Hot AI Tools

Undresser.AI Undress
AI-powered app for creating realistic nude photos

AI Clothes Remover
Online AI tool for removing clothes from photos.

Undress AI Tool
Undress images for free

Clothoff.io
AI clothes remover

AI Hentai Generator
Generate AI Hentai for free.

Hot Article
Hot Tools

Notepad++7.3.1
Easy-to-use and free code editor

SublimeText3 Chinese version
Chinese version, very easy to use

Zend Studio 13.0.1
Powerful PHP integrated development environment

Dreamweaver CS6
Visual web development tools

SublimeText3 Mac version
God-level code editing software (SublimeText3)
Hot Topics
 1386
1386
 52
52

![Telnet in Windows 11 Complete Tutorial [Installation/Enablement and Troubleshooting]](https://img.php.cn/upload/article/000/000/164/168476253791019.jpg?x-oss-process=image/resize,m_fill,h_207,w_330) Telnet in Windows 11 Complete Tutorial [Installation/Enablement and Troubleshooting]
May 22, 2023 pm 09:35 PM
Telnet in Windows 11 Complete Tutorial [Installation/Enablement and Troubleshooting]
May 22, 2023 pm 09:35 PM
<p>Telnet is the abbreviation of "Terminal Network". It is a protocol that users can use to connect one computer to a local computer. </p><p>Here, the local computer refers to the device that initiates the connection, and the computer connected to the local computer is called the remote computer. </p><p>Telnet runs on a client/server principal, and although it is outdated, it is still used by many people in 2022. Many people have already switched to Windows 11 operating system, which is the latest operating system offered by Microsoft. &
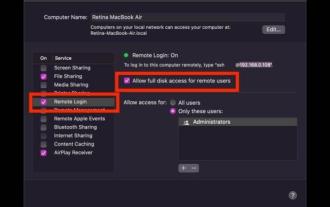 How to SSH from iPad to Mac
Apr 14, 2023 pm 12:22 PM
How to SSH from iPad to Mac
Apr 14, 2023 pm 12:22 PM
How to SSH from iPad to Mac This is a two-part walkthrough. First, you'll enable the SSH server on your Mac, and then you'll use the ssh client app to connect to it from your iPad. On Mac, start an SSH server You can enable an SSH server on your Mac by turning on a feature called Remote Login. Go to Apple Menu > System Preferences > Sharing > Enable "Remote Login" and check the "Allow remote users full access to disk" box Your Mac is now an SSH server, providing you with a shell to connect from your iPad. Notice
 Python server programming: Using Paramiko to implement SSH remote operation
Jun 18, 2023 pm 01:10 PM
Python server programming: Using Paramiko to implement SSH remote operation
Jun 18, 2023 pm 01:10 PM
With the development of cloud computing and the Internet of Things, remote operation of servers has become increasingly important. In Python, we can use the Paramiko module to easily implement SSH remote operations. In this article, we will introduce the basic usage of Paramiko and how to use Paramiko in Python to remotely manage servers. What is Paramiko Paramiko is a Python module for SSHv1 and SSHv2 that can be used to connect and control SSH clients
 OpenSSH on Windows: Installation, Configuration, and Usage Guide
Mar 08, 2024 am 09:31 AM
OpenSSH on Windows: Installation, Configuration, and Usage Guide
Mar 08, 2024 am 09:31 AM
For most Windows users, Remote Desktop Protocol (RDP) has always been the first choice for remote management because it provides a friendly graphical interface. However, for system administrators who require more granular control, SSH may better suit their needs. Through SSH, administrators can interact with remote devices through the command line, which can make management work more efficient. The advantage of SSH is its security and flexibility, making it easier for administrators to perform remote management and maintenance work, especially when dealing with a large number of devices or performing automated tasks. So while RDP excels in terms of user-friendliness, for system administrators, SSH is superior in terms of power and control. Previously, Windows users needed to borrow
 Linux SSH login mutual trust configuration
Feb 19, 2024 pm 07:48 PM
Linux SSH login mutual trust configuration
Feb 19, 2024 pm 07:48 PM
1. The purpose of ssh mutual trust 1. SSH mutual trust is required when building a cluster, which is conducive to convenient operation on another node. 2. When using scp remote copy operation, you need to enter the user name and password of the target server. At this time, you can configure SSH mutual trust between Linux servers, so that you can log in without a password when operating between multiple Linux servers. 2. The principle of ssh mutual trust configuration. In short, the server stores the certificate of the target host so that authentication can be completed automatically without entering a password. 3. SSH mutual trust configuration steps 1. Each node generates its own public key and private key pair. 2. Send your public key file to the other party. 3. Verify whether the mutual trust configuration is successful. 4. Configure ssh mutual trust here with MYDB01 and
 How to connect to Mysql database remotely using Python based on ssh
May 27, 2023 pm 04:07 PM
How to connect to Mysql database remotely using Python based on ssh
May 27, 2023 pm 04:07 PM
Background: If you need to access the Mysql database of a remote server, but for the security period of the Mysql database, the security measures are set to only allow local connections (that is, you need to log in to the server to use it), and other remote connections cannot be accessed directly, and The corresponding port has also been modified, so you need to connect to the database based on ssh. Connecting to the database in this way is the same as the interface in Navicat based on ssh connection. Navicat connects to the database installation support library. If you want to connect to Mysql, you first need to install pymysqlpipinstallpymysql to install the ssh-based library sshtunnelpipinstallsshtunnel#
 Does linux come with ssh?
Apr 06, 2023 pm 03:55 PM
Does linux come with ssh?
Apr 06, 2023 pm 03:55 PM
Linux comes with ssh. The Linux system will come with its own ssh software. The default is the OpenSSH related software package, and the ssh service is added to start automatically at boot. You can use the "ssh -V" command to view the installed ssh version information. Execute the "systemctl start sshd" command to start the sshd service. The default port is port 22.
 CentOS 7.9 installation and centos 7.9 installation ssh
Feb 13, 2024 pm 10:30 PM
CentOS 7.9 installation and centos 7.9 installation ssh
Feb 13, 2024 pm 10:30 PM
CentOS7.9 is a very commonly used operating system version when building servers or system management. This article will provide you with detailed steps and instructions for installing CentOS7.9 and installing SSH. CentOS7.9 is a free and open source Linux operating system. It is a binary compatible version based on Red Hat Enterprise Linux (RHEL). The following are the steps to install CentOS7.9: 1. You need to download the ISO image file of CentOS7.9. You can download it from Download the latest CentOS7.9 ISO image file from the CentOS official website. 2. Create a new virtual machine or physical machine on your computer and install
