Learning: ThinkPHP deployment directory
The following is an introduction to the ThinkPHP deployment directory from the thinkphp framework tutorial column. I hope it will be helpful to friends in need!
1. Problem: I was very confused about the directory structure when writing the project according to the deployment directory instructions in document 2.2.3
2. Solution: (Officially gives two deployment solutions)
1. Official recommendation Solution
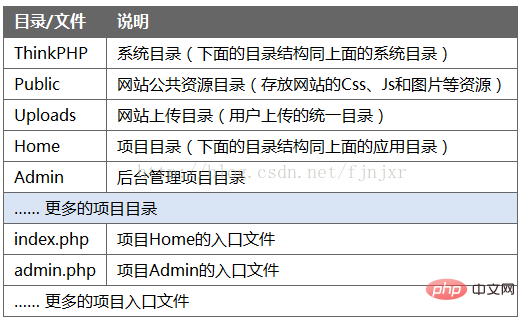
Official recommended solution: (Table of contents as shown below)

#Operation Steps:
1.1 Download the ThinkPHP software package, create a new TESTAPP directory, and put the ThinkPHP folder into the TESTAPP folder.
1.2 If necessary Create the front-end directory Home and the back-end directory Admin, and create a new entry file index.php in the TESTAPP folder (used to create the Home directory). The code is as follows:
<?php //1.确定前台文件夹名称 Home define('APP_NAME','Home'); //2.确定应用路径 define('APP_PATH','./Home/'); //3.开启调试模式 define('APP_DEBUG',true); //4.应用核心文件 require './ThinkPHP/ThinkPHP.php';
<?php //1.确定后台文件名称 Admin define('APP_NAME','Admin'); //2.确定应用路径 define('APP_PATH','./Admin/'); //3.开启调试模式,防止缓存造成调试问题 define('APP_DEBUG',true); //4.应用核心文件 require './ThinkPHP/ThinkPHP.php';
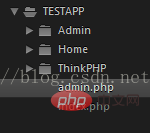
When you see the Welcome to thinkPHP prompt, the directory structure is as shown in the figure:
Deployment Finish.
1.5 Start writing code
If you need a User controller, create a new UserAction.class in the Admin folder. php, write the following code:
##<?php
class UserAction extends Action {
public function index(){
$this->user=M('user')->select();
$this->display();
}}
Create a new folder Home in tpl, create a new File index.html, write the following code:
##
<!doctype html>
<html lang="en">
<head>
<meta charset="UTF-8">
<title>Document</title>
<!-- 引入 jquery 和 layer 插件 -->
<script src="http://apps.bdimg.com/libs/jquery/2.1.4/jquery.min.js"></script>
<script src="http://apps.bdimg.com/libs/layer/2.1/layer.js"></script>
</head>
<body>
<a href="__URL__/add">添加</a>
<table>
<volist id="vo" name="user">
<tr>
<td>{$vo.username}</td>
<td><a href="{:U('Index/edit',array('id'=>$vo['id']))}">修 改</a></td>
</tr>
</volist>
</table>
</body>
</html>2. Group module solution (will be added after testing)
The above is the detailed content of Learning: ThinkPHP deployment directory. For more information, please follow other related articles on the PHP Chinese website!

Hot AI Tools

Undresser.AI Undress
AI-powered app for creating realistic nude photos

AI Clothes Remover
Online AI tool for removing clothes from photos.

Undress AI Tool
Undress images for free

Clothoff.io
AI clothes remover

AI Hentai Generator
Generate AI Hentai for free.

Hot Article

Hot Tools

Notepad++7.3.1
Easy-to-use and free code editor

SublimeText3 Chinese version
Chinese version, very easy to use

Zend Studio 13.0.1
Powerful PHP integrated development environment

Dreamweaver CS6
Visual web development tools

SublimeText3 Mac version
God-level code editing software (SublimeText3)

Hot Topics
 1378
1378
 52
52
 How to run thinkphp project
Apr 09, 2024 pm 05:33 PM
To run the ThinkPHP project, you need to: install Composer; use Composer to create the project; enter the project directory and execute php bin/console serve; visit http://localhost:8000 to view the welcome page.
 There are several versions of thinkphp
Apr 09, 2024 pm 06:09 PM
ThinkPHP has multiple versions designed for different PHP versions. Major versions include 3.2, 5.0, 5.1, and 6.0, while minor versions are used to fix bugs and provide new features. The latest stable version is ThinkPHP 6.0.16. When choosing a version, consider the PHP version, feature requirements, and community support. It is recommended to use the latest stable version for best performance and support.
 How to run thinkphp
Apr 09, 2024 pm 05:39 PM
Steps to run ThinkPHP Framework locally: Download and unzip ThinkPHP Framework to a local directory. Create a virtual host (optional) pointing to the ThinkPHP root directory. Configure database connection parameters. Start the web server. Initialize the ThinkPHP application. Access the ThinkPHP application URL and run it.
 Which one is better, laravel or thinkphp?
Apr 09, 2024 pm 03:18 PM
Performance comparison of Laravel and ThinkPHP frameworks: ThinkPHP generally performs better than Laravel, focusing on optimization and caching. Laravel performs well, but for complex applications, ThinkPHP may be a better fit.
 Development suggestions: How to use the ThinkPHP framework to implement asynchronous tasks
Nov 22, 2023 pm 12:01 PM
"Development Suggestions: How to Use the ThinkPHP Framework to Implement Asynchronous Tasks" With the rapid development of Internet technology, Web applications have increasingly higher requirements for handling a large number of concurrent requests and complex business logic. In order to improve system performance and user experience, developers often consider using asynchronous tasks to perform some time-consuming operations, such as sending emails, processing file uploads, generating reports, etc. In the field of PHP, the ThinkPHP framework, as a popular development framework, provides some convenient ways to implement asynchronous tasks.
 How to install thinkphp
Apr 09, 2024 pm 05:42 PM
ThinkPHP installation steps: Prepare PHP, Composer, and MySQL environments. Create projects using Composer. Install the ThinkPHP framework and dependencies. Configure database connection. Generate application code. Launch the application and visit http://localhost:8000.
 How is the performance of thinkphp?
Apr 09, 2024 pm 05:24 PM
ThinkPHP is a high-performance PHP framework with advantages such as caching mechanism, code optimization, parallel processing and database optimization. Official performance tests show that it can handle more than 10,000 requests per second and is widely used in large-scale websites and enterprise systems such as JD.com and Ctrip in actual applications.
 RPC service based on ThinkPHP6 and Swoole to implement file transfer function
Oct 12, 2023 pm 12:06 PM
RPC service based on ThinkPHP6 and Swoole implements file transfer function Introduction: With the development of the Internet, file transfer has become more and more important in our daily work. In order to improve the efficiency and security of file transfer, this article will introduce the specific implementation method of the RPC service based on ThinkPHP6 and Swoole to implement the file transfer function. We will use ThinkPHP6 as the web framework and utilize Swoole's RPC function to achieve cross-server file transfer. 1. Environmental standard


