The development tools that can be used for react are: 1. Chrome React Dev Tools; 2. React Sight; 3. React Bootstrap; 4. Create React App; 5. React Styleguideist, etc.

Suitable for all brands of computers.
A large number of frameworks and tools are emerging in JavaScript every day, and React is another popular framework besides Vue and Ember we mentioned last time. But because new tools are emerging every day, developers are always a little overwhelmed when trying them.
So when it comes to choosing the right IDE, the right visualization tool, and even the right style for your new React project, you’ll have a lot of choices. How do you choose the right one? This is a worrying thing.
In this article, I will introduce 11 development tools about React to help you choose and show you how to use them to make full use of the framework.
We will start with one of the most popular tools for React developersChrome React Dev Tools Since then, it is a Chrome extension and recently it released its v4 version.


After the installation is complete, open Chrome’s developer tools and you will see the addition of Components and Profiler tab, "Components" option can help you view the list of components on the screen and sub-components derived from other components. You can choose to inspect and even edit the status and properties of the components. Using the Profiler tab, you can also evaluate the performance of your application.
Both options can be found on the Chrome DevTools tab. In order to better experience the functions and features of the plug-in, you can use this online site to experience it.
In addition to the above extensions, we need to mention another Chrome extension React Sight, which can help you when inspecting React applications Play a role.
After installing DevTools, after you have enabled the "Allow access to file URLs" option in the extension settings of React Dev Tools and React Sight, you can find a new one in DevTools named "React Sight" ” label, when you run the local program, you will be able to use React Sight to view and create different components in a visual tree form, which will allow you to easily understand how they are connected. When you hover the mouse When on elements, you can see their current status and attributes.
So far, Visual Studio is probably one of the most favorite IDEs for JavaScript developers. I say one rather than the only one here, because there are many other good IDEs that are also great, such as Sublime, IntelliJ and Vim.
But we won’t expand on it here. VS is mentioned here because there is a strong community behind VS, so let’s take a look at React Extension Pack.
Essentially, it is a set of extension packages for completing tasks related to React. Under normal circumstances, VS does an excellent job in parsing and doing general JS requirements, but this small tool package will Taken to a new level. In this pack, you will find:
There are 7 extensions in total, each of which provides some value to the project. To install this extension package, you can easily install it by using the following command from the command panel of VS (use CTRL P to open it) :
ext install jawandarajbir.react-vscode-extension-pack
React is designed to help you write UI in a very intuitive way. But having to write code to create visual components isn’t really natural, which is why we often jump from code to the browser and back to code again.
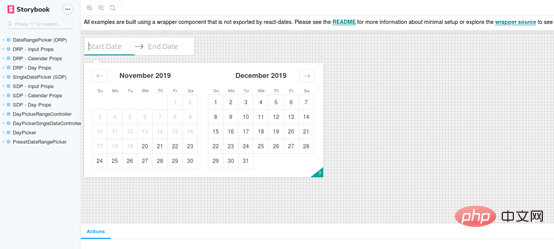
Storybook is an open source tool that can be used to develop your own UI components. It's more than just a code base, their online UI editor allows you to develop, inspect and ultimately present your work interactively (which is crucial when developing visual components).

In order to install Storybook into your existing React project, all you have to do is:
$ npx -p @storybook/cli sb init
This command will check the structure of your project, And try to understand which view layer you are using (because Storybook supports other view layers besides React, such as Vue, Angular, etc.).
Once the command completes, you can run the Storybook by running:
$ npm run storybook
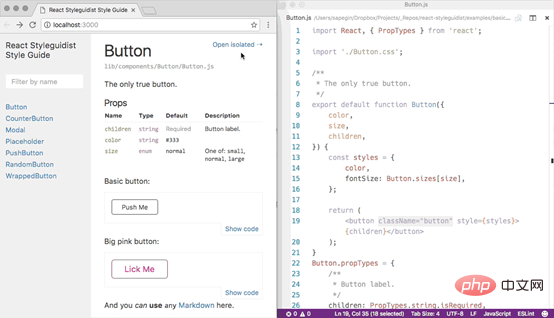
This is another very interesting interaction style tool that allows you to create and display your UI components.

Please look at the picture above carefully. On the right you can see the actual code, which generates the UI on the left. You can display the UI this way and even test it and edit the UI by changing the code directly on the displayed interface.
In order to include this into your React project, all you need to do is (assuming you have webpack installed and you created the project using Create React App):
$ npm install --save-dev react-styleguidist
Then Run the following command to start your styling server:
$ npx styleguidist server
If you want to learn more about using Styleguideist on your project, check out the documentation and demos.
A standard project structure is the basis for using many React tools, and this is where Create React App from Facebook comes into play. In fact, this tool is so simple to use that you can create a new React project with just one command, without having to think about what project structure is best or which modules are correct to add to the project. This tool will do all the work for you.
If you already have npx installed, you don't need to install anything, just the following line:
$ npx create-react-app my-app
Alternatively, if you don't like npx, you can also use npm or yarn:
$ npm init react-app my-app
or
$ yarn create react-app my-app
But in any case, Node.js (8.16.0 or 10.16.0 or higher) needs to be installed on the system.
Using one of these commands, you will get a folder structure as shown below:
my-app
├── README.md
├── node_modules
├── package.json
├── .gitignore
├── public
│ ├── favicon.ico
│ ├── index.html
│ └── manifest.json
└── src
├── App.css
├── App.js
├── App.test.js
├── index.css
├── index.js
├── logo.svg
└── serviceWorker.js
With the above structure, you can start the server and start development work with the following command:
$ cd my-app
$ npm start #根据喜好使用yarn start 也可以
After the operation is completed, you can access this newly created application through http://localhost:3000.
Have you heard of Bootstrap? This is a relatively popular CSS framework. It provides a set of CSS classes and JavaScript functions that allow you to make beautiful and responsive UI easily.
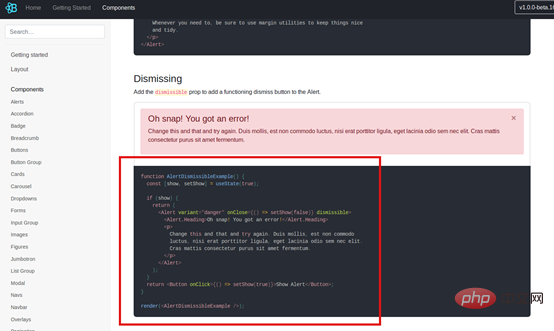
Now the author of React Bootstrap has rewritten the JS part of the code to make it compatible with React. So you can now use its components just like React components:

To add it to your project you can use npm
$ npm install react-bootstrap bootstrap
Once you are ready, you can add the required stylesheets to your project App.js or src/index.js file.
{/* The following line can be included in your src/index.js or App.js file*/}

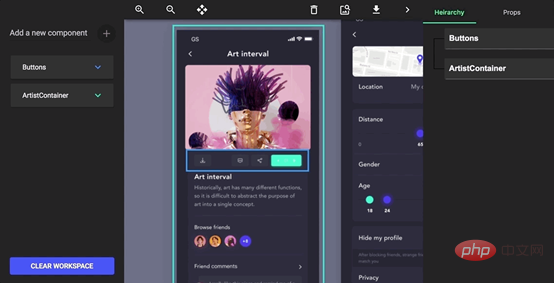
import 'bootstrap/dist/css/bootstrap.min.css';If you are less interested in code and more interested in visual design, then maybe react-proto is for you tool. With it, you can use drag and drop to create UI prototypes without having to write code for them.
You start with a design provided by the designer and use this tool to mark up all possible components, giving them names, properties, and hierarchical settings. Once completed, you can export them into actual auto-generated code, which you can then customize.

#If you are about to start a new project, this tool will save you a lot of time in the initial stages of the project.
Why did you render is a tool used to detect whether the React component needs to be re-rendered. If it is determined that it does not need to be re-rendered, Then a section of the properties, status and suggestions of the marked component will be consoled for developers to adjust.
You can install it using the following simple method:
$ npm install @ welldone-software / why-did-you-render --save
然后,您可以使用以下几行将其包含到您的项目中:
import React from 'react';

if (process.env.NODE_ENV !== 'production') {
  const whyDidYouRender = require('@welldone-software/why-did-you-render');
  whyDidYouRender(React);
}之后,剩下要做的就是标记要通知您的组件,如下所示:
class BigListPureComponent extends React.PureComponent {
  static whyDidYouRender = true
  render(){
    return (
      //some heavy render you want to ensure doesn't happen if its not neceserry
    )
  }
}一切准备就绪后,您可以期待以下输出:

最后,对于最后一个工具,我想介绍一种使用React来创建桌面应用程序的方法,因为毕竟,像Electron这样的项目,用JavaScript做这件事已经有一段时间了。
现在,有了Proton Native,你也可以用React来实现了。你可以通过定义React组件来定义GUI元素,并且该工具与所有Node.js模块、Redux兼容,并且由于Proton的特性,它完全是跨平台的!
为了将它安装到你的系统中,你所需要做的就是通过NPM并执行以下命令:
$ npm install -g create-proton-app
但是请注意,如果你使用的是Linux,则需要先安装以下依赖项:
libgtk-3-dev build-essential python2 pkg-config
最后,创建应用程序,只需执行以下操作:
$ create-proton-app my-app
# 进入项目目录
$ cd my-app
# 运行app
$ npm run start
他们已经有一个可用的示例供你查看,如果你想了解如何将其用于自己的项目,可以随时查看它的完整文档。
这些是与React相关11个工具,并不是所有的工具都是Web的,也不是所有的工具都是可视化的,也不是所有的工具都是用来帮助你编写代码的。但这里的重点是,它们中的许多可以一起使用,并相互补充。
更多编程相关知识,请访问:编程学习网站!!
The above is the detailed content of What tools are used to develop react?. For more information, please follow other related articles on the PHP Chinese website!