
 Web Front-end
Bootstrap Tutorial
Use bootstrap to create a login registration page and implement form verification function
Web Front-end
Bootstrap Tutorial
Use bootstrap to create a login registration page and implement form verification function
Use bootstrap to create a login registration page and implement form verification function

This article will introduce to you how to use bootstrap to create a login registration page and implement the single verification function. It has certain reference value. Friends in need can refer to it. I hope it will be helpful to everyone.

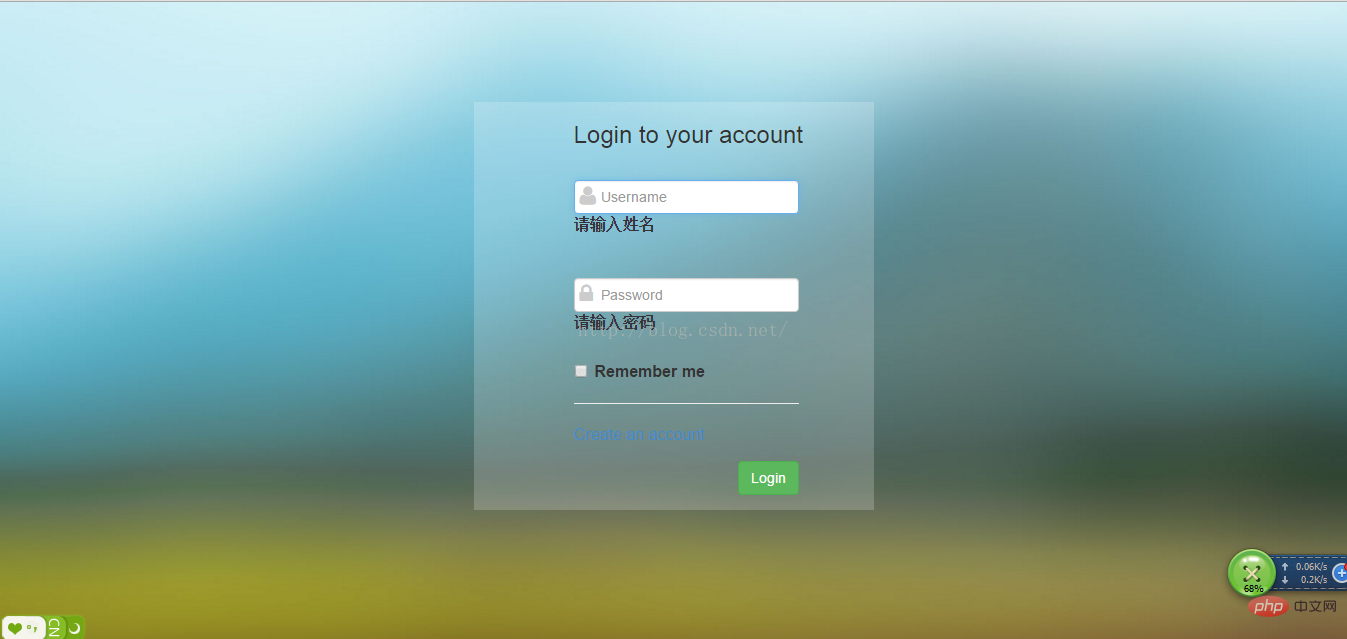
Use bootstrap for login registration page, use validate for form verification
Technology: bootstrap, font-awesome, jquery-validate;
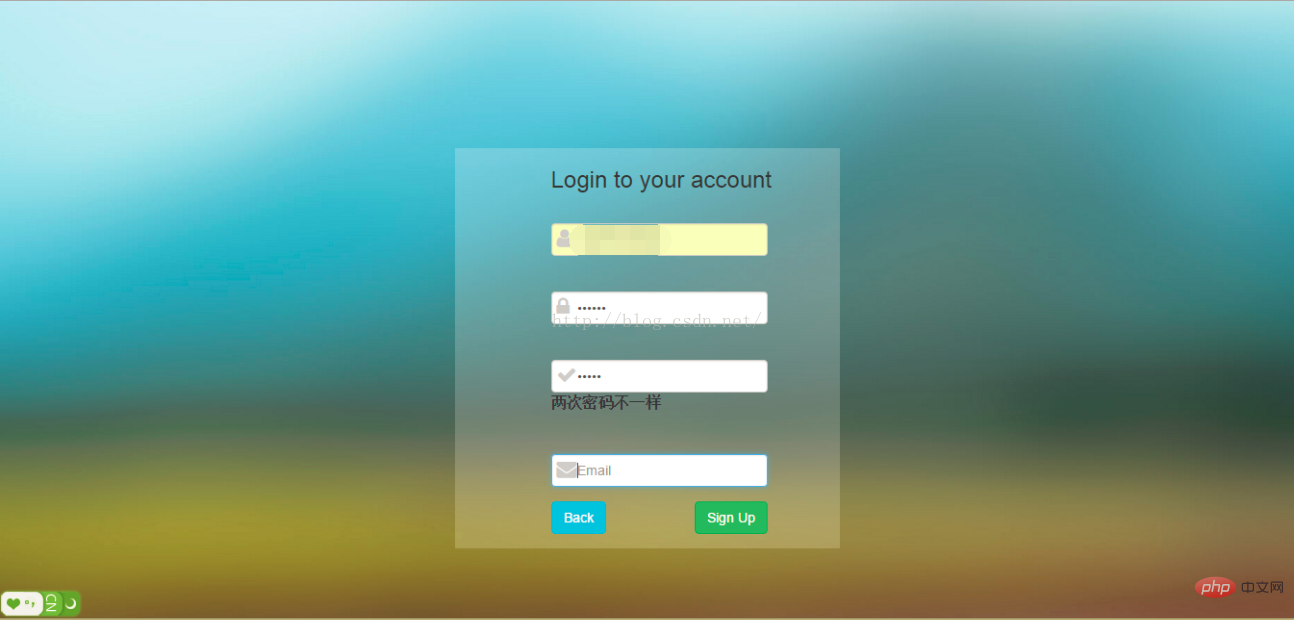
Features: Responsive layout, form verification (whether the user's two passwords are the same, whether the required information is filled in) The background image adapts to the screen size;
Purpose: Learn knowledge from actual combat.
Personal homepage: http://www.itit123.cn/ More useful information is waiting for you (Introduction Tutorial on WeChat Mini Program: Introductory Tutorial Series, providing free api interface, no need to consider server-side code issues) .
Verification code implementation function ITDragon blog
Rendering:
html code:
The import of third-party resources is introduced using cdn; of course, you can also download it yourself and import it locally.
<!DOCTYPE html>
<html>
	<head>
		<meta charset="utf-8" />
		<title>bootstrap案例</title>
		<!--用百度的静态资源库的cdn安装bootstrap环境-->
		<!-- Bootstrap 核心 CSS 文件 -->
		<link href="http://apps.bdimg.com/libs/bootstrap/3.3.0/css/bootstrap.min.css" rel="stylesheet">
		<!--font-awesome 核心我CSS 文件-->
		<link href="//cdn.bootcss.com/font-awesome/4.3.0/css/font-awesome.min.css" rel="stylesheet">
		<!-- 在bootstrap.min.js 之前引入 -->
		<script src="http://apps.bdimg.com/libs/jquery/2.0.0/jquery.min.js"></script>
		<!-- Bootstrap 核心 JavaScript 文件 -->
		<script src="http://apps.bdimg.com/libs/bootstrap/3.3.0/js/bootstrap.min.js"></script>
		<!--jquery.validate-->
		<script type="text/javascript" src="js/jquery.validate.min.js" ></script>
		<script type="text/javascript" src="js/message.js" ></script>
		<style type="text/css">
			body{background: url(img/4.jpg) no-repeat;background-size:cover;font-size: 16px;}
			.form{background: rgba(255,255,255,0.2);width:400px;margin:100px auto;}
			#login_form{display: block;}
			#register_form{display: none;}
			.fa{display: inline-block;top: 27px;left: 6px;position: relative;color: #ccc;}
			input[type="text"],input[type="password"]{padding-left:26px;}
			.checkbox{padding-left:21px;}
		</style>
	</head>
	<body>
		<!--
			基础知识:
			网格系统:通过行和列布局
			行必须放在container内
			手机用col-xs-*
			平板用col-sm-*
			笔记本或普通台式电脑用col-md-*
			大型设备台式电脑用col-lg-*
			为了兼容多个设备,可以用多个col-*-*来控制;
		-->
	<p class="container">
		<p class="form row">
			<form class="form-horizontal col-sm-offset-3 col-md-offset-3" id="login_form">
				<h3 class="form-title">Login to your account</h3>
				<p class="col-sm-9 col-md-9">
					<p class="form-group">
						<i class="fa fa-user fa-lg"></i>
						<input class="form-control required" type="text" placeholder="Username" name="username" autofocus="autofocus" maxlength="20"/>
					</p>
					<p class="form-group">
							<i class="fa fa-lock fa-lg"></i>
							<input class="form-control required" type="password" placeholder="Password" name="password" maxlength="8"/>
					</p>
					<p class="form-group">
						<label class="checkbox">
							<input type="checkbox" name="remember" value="1"/> Remember me
						</label>
						<hr />
						<a href="javascript:;" id="register_btn" class="">Create an account</a>
					</p>
					<p class="form-group">
						<input type="submit" class="btn btn-success pull-right" value="Login "/>
					</p>
				</p>
			</form>
		</p>

		<p class="form row">
			<form class="form-horizontal col-sm-offset-3 col-md-offset-3" id="register_form">
				<h3 class="form-title">Login to your account</h3>
				<p class="col-sm-9 col-md-9">
					<p class="form-group">
						<i class="fa fa-user fa-lg"></i>
						<input class="form-control required" type="text" placeholder="Username" name="username" autofocus="autofocus"/>
					</p>
					<p class="form-group">
							<i class="fa fa-lock fa-lg"></i>
							<input class="form-control required" type="password" placeholder="Password" id="register_password" name="password"/>
					</p>
					<p class="form-group">
							<i class="fa fa-check fa-lg"></i>
							<input class="form-control required" type="password" placeholder="Re-type Your Password" name="rpassword"/>
					</p>
					<p class="form-group">
							<i class="fa fa-envelope fa-lg"></i>
							<input class="form-control eamil" type="text" placeholder="Email" name="email"/>
					</p>
					<p class="form-group">
						<input type="submit" class="btn btn-success pull-right" value="Sign Up "/>
						<input type="submit" class="btn btn-info pull-left" id="back_btn" value="Back"/>
					</p>
				</p>
			</form>
		</p>
		</p>
	<script type="text/javascript" src="js/main.js" ></script>
	</body>
</html>js code:
There may be unreasonable methods. After all, the author's ability is limited. If there is a better method, please leave a message and I will modify it in time.
$().ready(function() {
	$("#login_form").validate({
		rules: {
			username: "required",
			password: {
				required: true,
				minlength: 5
			},
		},
		messages: {
			username: "请输入姓名",
			password: {
				required: "请输入密码",
				minlength: jQuery.format("密码不能小于{0}个字 符")
			},
		}
	});
	$("#register_form").validate({
		rules: {
			username: "required",
			password: {
				required: true,
				minlength: 5
			},
			rpassword: {
				equalTo: "#register_password"
			},
			email: {
				required: true,
				email: true
			}
		},
		messages: {
			username: "请输入姓名",
			password: {
				required: "请输入密码",
				minlength: jQuery.format("密码不能小于{0}个字 符")
			},
			rpassword: {
				equalTo: "两次密码不一样"
			},
			email: {
				required: "请输入邮箱",
				email: "请输入有效邮箱"
			}
		}
	});
});
$(function() {
	$("#register_btn").click(function() {
		$("#register_form").css("display", "block");
		$("#login_form").css("display", "none");
	});
	$("#back_btn").click(function() {
		$("#register_form").css("display", "none");
		$("#login_form").css("display", "block");
	});
});Resource download address: http://download.csdn.net/detail/qq_19558705/9358603
Now let’s talk about the knowledge points used:
①bootstrap Layout:
bootstrap uses grid layout, using col-*-*
Conditions of use: It must be used under .container and .row. The structure is as follows:
<p class="container">
   <p class="row">
      <p class="col-*-*"></p>
      <p class="col-*-*"></p>
   </p>
   <p class="row">...</p>
</p>Reference value:
col-xs-*: less than 768px, mobile phone
col-sm-*: greater than 768px, tablet
col-md-*: greater than 998px, Ordinary computers, laptops, etc.
col-lg-*: larger than 1200px, generally large desktop computers
can be used simultaneously to achieve the effect across multiple devices
Offset :col-*-offset-*
②Form:
The form here is not much different from the ordinary form, so I won’t say more.
③Usage of font-awesome:
is using version 4.3.0, usage method
<i class="fa fa-check fa-lg"></i>
fa-lg indicates large image
More icons Reference: http://fontawesome.dashgame.com/
④jquery-validate form verification:
This is the key point I want to talk about,
The first step : First, import jquery-validate third-party resources,
Second step: Create the form form, initialize validate
$("#login_form").validate({
		rules: {
			username: "required",
			password: {
				required: true,
				minlength: 5
			},
		},
		messages: {
			username: "请输入姓名",
			password: {
				required: "请输入密码",
				minlength: jQuery.format("密码不能小于{0}个字 符")
			},
		}
});Note that the login_form here must be the selector on the form form, because the author Set it on p, and the console shows an error that settings are not defined. The username and password here are both name values in the form; rules are the rules, and message is the prompted information
required:true indicates that the field is required,
minlength indicates that the length is at least 5. maxlength is supported by html5, so there is no need to set it here.
equalTo means the same as XX, followed by the first value, "#id" or ".class"
# The corresponding content in ##message is followed by the text information of the prompt. You can copy my code directly and modify it according to your needs. ⑤Background adaptive screen size: I was looking for documentation everywhere before I knew it, but after I knew it, I found it is very simple, that is, background-size:cover; This can achieve the background image and browser The size is the same. It's very simple. bootstrap creates login registration page github download address: https://github.com/ITDragonBlog/daydayup/blob/master/bootstrapI think learning in practice The effect is much better than blind learning. Knowing what this knowledge can do solves the problem of why you learn this knowledge. I sum up, you come and learn, let’s pretend and fly together. If you have any questions or suggestions, please leave a message and I will revise it in time. If reproduced, please indicate source. For more programming-related knowledge, please visit:Programming Learning Website! !
The above is the detailed content of Use bootstrap to create a login registration page and implement form verification function. For more information, please follow other related articles on the PHP Chinese website!

Hot AI Tools

Undresser.AI Undress
AI-powered app for creating realistic nude photos

AI Clothes Remover
Online AI tool for removing clothes from photos.

Undress AI Tool
Undress images for free

Clothoff.io
AI clothes remover

Video Face Swap
Swap faces in any video effortlessly with our completely free AI face swap tool!

Hot Article
Hot Tools

Notepad++7.3.1
Easy-to-use and free code editor

SublimeText3 Chinese version
Chinese version, very easy to use

Zend Studio 13.0.1
Powerful PHP integrated development environment

Dreamweaver CS6
Visual web development tools

SublimeText3 Mac version
God-level code editing software (SublimeText3)
Hot Topics
 1386
1386
 52
52

 Do I need to use flexbox in the center of the Bootstrap picture?
Apr 07, 2025 am 09:06 AM
Do I need to use flexbox in the center of the Bootstrap picture?
Apr 07, 2025 am 09:06 AM
There are many ways to center Bootstrap pictures, and you don’t have to use Flexbox. If you only need to center horizontally, the text-center class is enough; if you need to center vertically or multiple elements, Flexbox or Grid is more suitable. Flexbox is less compatible and may increase complexity, while Grid is more powerful and has a higher learning cost. When choosing a method, you should weigh the pros and cons and choose the most suitable method according to your needs and preferences.
 How to get the bootstrap search bar
Apr 07, 2025 pm 03:33 PM
How to get the bootstrap search bar
Apr 07, 2025 pm 03:33 PM
How to use Bootstrap to get the value of the search bar: Determines the ID or name of the search bar. Use JavaScript to get DOM elements. Gets the value of the element. Perform the required actions.
 How to write split lines on bootstrap
Apr 07, 2025 pm 03:12 PM
How to write split lines on bootstrap
Apr 07, 2025 pm 03:12 PM
There are two ways to create a Bootstrap split line: using the tag, which creates a horizontal split line. Use the CSS border property to create custom style split lines.
 How to do vertical centering of bootstrap
Apr 07, 2025 pm 03:21 PM
How to do vertical centering of bootstrap
Apr 07, 2025 pm 03:21 PM
Use Bootstrap to implement vertical centering: flexbox method: Use the d-flex, justify-content-center, and align-items-center classes to place elements in the flexbox container. align-items-center class method: For browsers that do not support flexbox, use the align-items-center class, provided that the parent element has a defined height.
 Bootstrap Accessibility: Building Inclusive and User-Friendly Websites
Apr 07, 2025 am 12:04 AM
Bootstrap Accessibility: Building Inclusive and User-Friendly Websites
Apr 07, 2025 am 12:04 AM
Building an inclusive and user-friendly website with Bootstrap can be achieved through the following steps: 1. Enhance screen reader support with ARIA tags; 2. Adjust color contrast to comply with WCAG standards; 3. Ensure keyboard navigation is friendly. These measures ensure that the website is friendly and accessible to all users, including those with barriers.
 How to insert pictures on bootstrap
Apr 07, 2025 pm 03:30 PM
How to insert pictures on bootstrap
Apr 07, 2025 pm 03:30 PM
There are several ways to insert images in Bootstrap: insert images directly, using the HTML img tag. With the Bootstrap image component, you can provide responsive images and more styles. Set the image size, use the img-fluid class to make the image adaptable. Set the border, using the img-bordered class. Set the rounded corners and use the img-rounded class. Set the shadow, use the shadow class. Resize and position the image, using CSS style. Using the background image, use the background-image CSS property.
 How to set up the framework for bootstrap
Apr 07, 2025 pm 03:27 PM
How to set up the framework for bootstrap
Apr 07, 2025 pm 03:27 PM
To set up the Bootstrap framework, you need to follow these steps: 1. Reference the Bootstrap file via CDN; 2. Download and host the file on your own server; 3. Include the Bootstrap file in HTML; 4. Compile Sass/Less as needed; 5. Import a custom file (optional). Once setup is complete, you can use Bootstrap's grid systems, components, and styles to create responsive websites and applications.
 How to use bootstrap button
Apr 07, 2025 pm 03:09 PM
How to use bootstrap button
Apr 07, 2025 pm 03:09 PM
How to use the Bootstrap button? Introduce Bootstrap CSS to create button elements and add Bootstrap button class to add button text
