Detailed explanation of the process of developing an Atom plug-in
How to develop an Atom component from scratch? The following article will introduce you to the process of developing an Atom plug-in. It has certain reference value. Friends in need can refer to it. I hope it will be helpful to everyone.

Related recommendations: "atom usage tutorial"
I use Atom to write blogs a lot recently, and then I discovered a very serious problem . .
There is no way I want to upload pictures. For example, you can directly copy/paste the file and then upload it.
However, no similar plug-in was found on Atom. The closest one still requires manual selection of files and then uploading.
This operation process is too cumbersome, so just write a plug-in yourself and use it.
Download address of the finished plug-in: https://atom.io/packages/atom-image-uploader
Planning
First of all, we determined the requirements. If you want to pass it, you can directly copy file, and then paste in Atom to complete the upload operation.
After confirmation, we will start moving bricks.
Plug-in development
Because Atom is an Electron application: https://electronjs.org
is using ## It is a desktop application developed with #JavaScript, so for a front-end, it is simply wonderful. Let’s first look at the official documentation of
Atom to view the operations related to creating a plug-in: First we open the command panel in
Atom, and then enter Generate Package
<img src="/static/imghw/default1.png" data-src="https://img.php.cn/upload/image/710/621/933/1607075397771820.png" class="lazy" title="160707538187362Detailed explanation of the process of developing an Atom plug-in" alt="Detailed explanation of the process of developing an Atom plug-in">
Package.
Atom will generate a set of default files and open a new window.
.
├── keymaps
│   └── first-package.json
├── lib
│   ├── first-package-view.js
│   └── first-package.js
├── menus
│   └── first-package.json
├── package.json
├── spec
│   ├── first-package-spec.js
│   └── first-package-view-spec.js
└── styles
    └── first-package.less
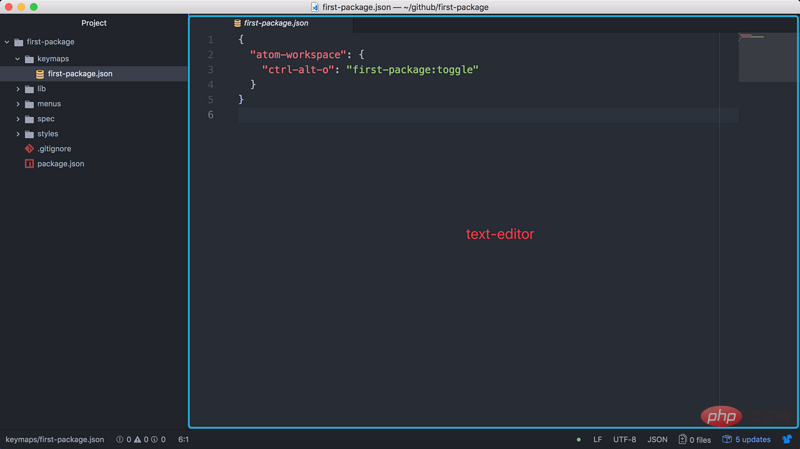
{
  "atom-workspace": {
    "ctrl-alt-o": "first-package:toggle"
  }
}
Value is defined as: Package name: Triggered event nameIt should be noted that:
The shortcut keys configured here also have the concept of scope . That is the
key outside JSON.
atom-workspace means it takes effect in Atom
atom-text-editor means it only takes effect within the scope of the text editor.

Two files will be generated by default:
- ##package.js
- package.view. js
 The entry file is expressed as a
object, which can implement the following functions:
- activate
: This method will be executed when
Packageis activated. The signature of the function indicates that it will accept astateparameter, which is passedPassed by the serializemethod (if it is implemented) ##deactivate - : The method that will be triggered when
Package
infails. These two methods can be understood ascomponentWillMountandcomponentWillUnmountserializeReact - : That is, the method mentioned above can return a
JSON
Customize the event name corresponding to the shortcut key: Each timeobject for use after next activation.Package - Methods that will be executed when the corresponding shortcut keys are triggered
menus
{
  "context-menu": {
    "atom-text-editor": [
      {
        "label": "Toggle first-package",
        "command": "first-package:toggle"
      }
    ]
  },
  "menu": [
    {
      "label": "Packages",
      "submenu": [
        {
          "label": "first-package",
          "submenu": [
            {
              "label": "Toggle",
              "command": "first-package:toggle"
            }
          ]
        }
      ]
    }
  ]
}
Copy after login
{
"context-menu": {
"atom-text-editor": [
{
"label": "Toggle first-package",
"command": "first-package:toggle"
}
]
},
"menu": [
{
"label": "Packages",
"submenu": [
{
"label": "first-package",
"submenu": [
{
"label": "Toggle",
"command": "first-package:toggle"
}
]
}
]
}
]
}context-menu
will be displayed when the right click is triggered in the corresponding area.menu appears on the
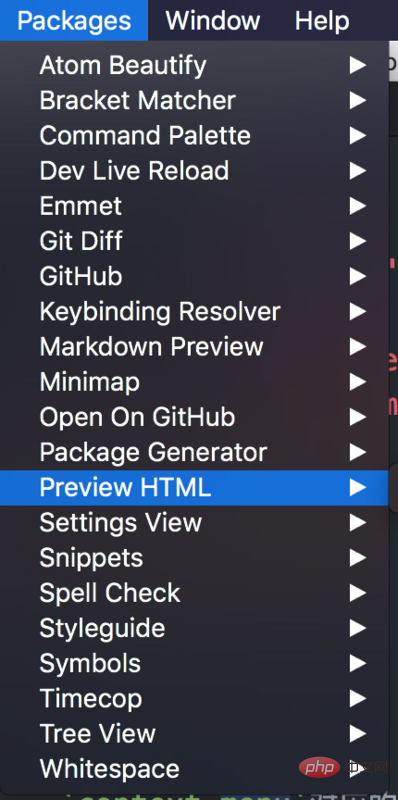
Atom main menu bar:
Similarly,  context-menu
text-editor and workspace. spec
Package
will generate some default assertions.Writing tests is indeed a good habit.
styles
如果Package有很多View要展示的话,可以在这里编写,默认使用的是Less语法。
由于我们只做一个C/V的操作,不会涉及到界面,所以styles直接就删掉了。
开始搬砖
大致结构已经了解了,我们就可以开始搬砖了。
因为是一个Electron应用,所以我们直接在Atom中按下alt + command + i,呼出我们熟悉的控制台界面。
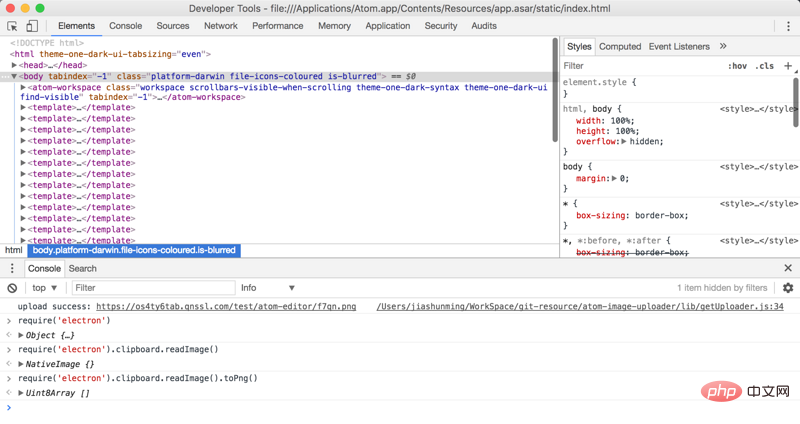
Atom是不会把Electron的各种文档重新写一遍的,所以我们现在控制台里边试一下我们的猜测是否正确。
一些想要的东西是否存在。

经过验证确定了,Electron的clipboard对象可以直接在Atom中使用,这就很开心了。
require('electron').clipboard.readImage().toPng()这样我们就拿到剪切板中的图片数据了,一个二进制的数组对象。
我们在触发Paste操作时,从clipboard中获取,如果剪切板中是图片的话,我们就将它上传并显示到编辑器中。
所以,接下来我们要做的就是:
进行上传图片的操作
将上传后的图片显示到编辑器中
上传图片
上传图片我们选择的是七牛,我们选择七牛来作为图床使用,因为他家提供了10GB的免费存储,灰常适合自己这样的笔记型博客。
但是用他家SDK时发现一个问题。。我将二进制数据转换为ReadStream后上传的资源损坏了-.-目前还没有找到原因。
所以我们做了曲线救国的方式。
将剪切板中的数据转换为Buffer然后暂存到本地,通过本地文件的方式来进行上传七牛。
在操作完成后我们再将临时文件移除。
try {
  let buffer = clipboard.readImage().toPng()
  let tempFilePath = 'XXX'
  fs.writeFileSync(tempFilePath, Buffer.from(buffer))
} catch (e) {
  // catch error
} finally {
  fs.unlink(tempFilePath) // 因为我们并不依赖于删除成功的回调,所以直接空调用异步方法即可
}将上传后的资源显示到编辑器中
因为考虑到上传可能会受到网络影响,从而上传时间不可预估。
所以我们会先在文件中显示一部分占位文字。
通过全局的atom对象可以拿到当前活跃的窗口:
let editor = atom.workspace.getActiveTextEditor()
为了避免同时上传多张图片时出现问题,我们将临时文件名作为填充的一部分。
editor.insertText(``, editor)然后在上传成功后,我们将对应的填充字符替换为上传后的URL就可以了。
editor.scan(new RegExp(placeHolderText), tools => tools.replace(url))
scan方法接收一个正则对象和回调函数。
我们将前边用到的占位文本作为正则对象,然后在回调将其替换为上传后的url。
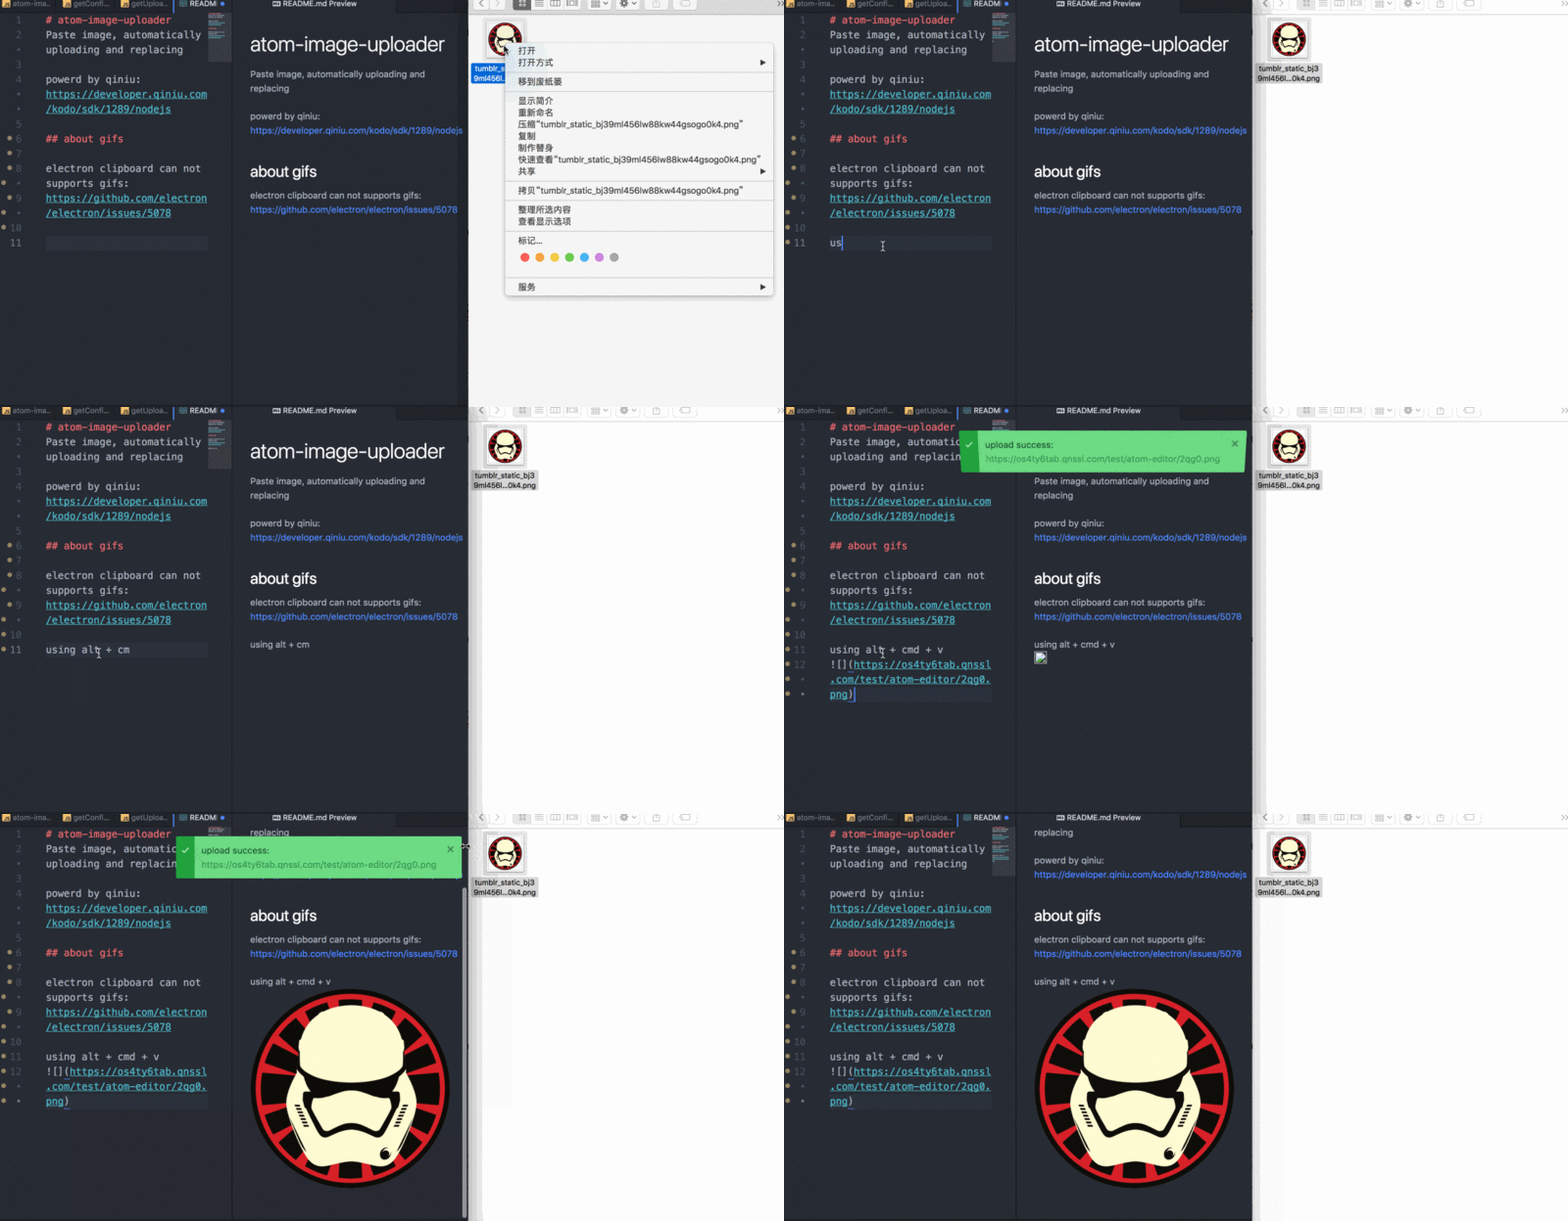
至此,我们的代码已经编写完了,剩下的就是一些交互上的优化。
完成后的效果图:
以及,最后:我们要进行Package的上传。
上传开发完的Package
首先我们需要保证package.json中存在如下几个参数:
namedescriptionrepository
我们可以先使用如下命令来检查包名是否冲突。
apm show 你的包名
如果没有冲突,我们就可以直接执行以下命令进行上传了。
apm publish 你的包名
后续的代码修改,只需在该包的目录下执行:
apm publish
一些可选的参数:
-
major,增加版本号的第一位1.0.0->2.0.0 -
minor,增加版本号的第二位0.1.0->0.2.0 -
patch,增加版本号的第三位0.0.1->0.0.2
通过apm help可以获取到更多的帮助信息。
以上,就是开发一个Atom插件的完整流程咯。
更多编程相关知识,请访问:编程教学!!
The above is the detailed content of Detailed explanation of the process of developing an Atom plug-in. For more information, please follow other related articles on the PHP Chinese website!

Hot AI Tools

Undresser.AI Undress
AI-powered app for creating realistic nude photos

AI Clothes Remover
Online AI tool for removing clothes from photos.

Undress AI Tool
Undress images for free

Clothoff.io
AI clothes remover

AI Hentai Generator
Generate AI Hentai for free.

Hot Article

Hot Tools

Notepad++7.3.1
Easy-to-use and free code editor

SublimeText3 Chinese version
Chinese version, very easy to use

Zend Studio 13.0.1
Powerful PHP integrated development environment

Dreamweaver CS6
Visual web development tools

SublimeText3 Mac version
God-level code editing software (SublimeText3)

Hot Topics
 1376
1376
 52
52
 How to implement an online speech recognition system using WebSocket and JavaScript
Dec 17, 2023 pm 02:54 PM
How to use WebSocket and JavaScript to implement an online speech recognition system Introduction: With the continuous development of technology, speech recognition technology has become an important part of the field of artificial intelligence. The online speech recognition system based on WebSocket and JavaScript has the characteristics of low latency, real-time and cross-platform, and has become a widely used solution. This article will introduce how to use WebSocket and JavaScript to implement an online speech recognition system.
 WebSocket and JavaScript: key technologies for implementing real-time monitoring systems
Dec 17, 2023 pm 05:30 PM
WebSocket and JavaScript: Key technologies for realizing real-time monitoring systems Introduction: With the rapid development of Internet technology, real-time monitoring systems have been widely used in various fields. One of the key technologies to achieve real-time monitoring is the combination of WebSocket and JavaScript. This article will introduce the application of WebSocket and JavaScript in real-time monitoring systems, give code examples, and explain their implementation principles in detail. 1. WebSocket technology
 How to implement an online reservation system using WebSocket and JavaScript
Dec 17, 2023 am 09:39 AM
How to use WebSocket and JavaScript to implement an online reservation system. In today's digital era, more and more businesses and services need to provide online reservation functions. It is crucial to implement an efficient and real-time online reservation system. This article will introduce how to use WebSocket and JavaScript to implement an online reservation system, and provide specific code examples. 1. What is WebSocket? WebSocket is a full-duplex method on a single TCP connection.
 How to use JavaScript and WebSocket to implement a real-time online ordering system
Dec 17, 2023 pm 12:09 PM
Introduction to how to use JavaScript and WebSocket to implement a real-time online ordering system: With the popularity of the Internet and the advancement of technology, more and more restaurants have begun to provide online ordering services. In order to implement a real-time online ordering system, we can use JavaScript and WebSocket technology. WebSocket is a full-duplex communication protocol based on the TCP protocol, which can realize real-time two-way communication between the client and the server. In the real-time online ordering system, when the user selects dishes and places an order
 Intel launches Amston Lake series of Atom processors for edge and networking markets
Apr 09, 2024 pm 09:22 PM
According to news from this site on April 9, Intel today released the Amston Lake series of Atom processors at Embedded World 2024. The Amston Lake processor is based on the Intel7 process and supports single-channel memory. It can be regarded as a branch variant of the Alder Lake-N processor, including the edge-oriented Atom x7000RE series and the network-oriented x7000C series. This site reported on the ADL-N architecture Atom x7000E processor with up to four cores in 2023, and today’s x7000RE series has further expanded the specifications: it can choose up to 8-core Atom x7835RE, both this processor and the four-core x7433RE Equipped with 32E
 JavaScript and WebSocket: Building an efficient real-time weather forecasting system
Dec 17, 2023 pm 05:13 PM
JavaScript and WebSocket: Building an efficient real-time weather forecast system Introduction: Today, the accuracy of weather forecasts is of great significance to daily life and decision-making. As technology develops, we can provide more accurate and reliable weather forecasts by obtaining weather data in real time. In this article, we will learn how to use JavaScript and WebSocket technology to build an efficient real-time weather forecast system. This article will demonstrate the implementation process through specific code examples. We
 Simple JavaScript Tutorial: How to Get HTTP Status Code
Jan 05, 2024 pm 06:08 PM
JavaScript tutorial: How to get HTTP status code, specific code examples are required. Preface: In web development, data interaction with the server is often involved. When communicating with the server, we often need to obtain the returned HTTP status code to determine whether the operation is successful, and perform corresponding processing based on different status codes. This article will teach you how to use JavaScript to obtain HTTP status codes and provide some practical code examples. Using XMLHttpRequest
 How to use insertBefore in javascript
Nov 24, 2023 am 11:56 AM
Usage: In JavaScript, the insertBefore() method is used to insert a new node in the DOM tree. This method requires two parameters: the new node to be inserted and the reference node (that is, the node where the new node will be inserted).


