


Lots of free learning recommendations, thanks Please visit python tutorial(Video)
##Introduction
Object detection in images
There are many algorithms for target detection, and YOLO and SSD are the most popular algorithms currently. In this article, we will use YOLOv3. We will not discuss YOLO in detail here. If you want to know more about it, you can refer to the link below~ (https://pjreddie.com/darknet/yolo/)Let’s get started , still start from the import module:from models import * from utils import * import os, sys, time, datetime, random import torch from torch.utils.data import DataLoader from torchvision import datasets, transforms from torch.autograd import Variable import matplotlib.pyplot as plt import matplotlib.patches as patches from PIL import Image
config_path='config/yolov3.cfg'
weights_path='config/yolov3.weights'
class_path='config/coco.names'
img_size=416
conf_thres=0.8
nms_thres=0.4
# Load model and weights
model = Darknet(config_path, img_size=img_size)
model.load_weights(weights_path)
model.cuda()
model.eval()
classes = utils.load_classes(class_path)
Tensor = torch.cuda.FloatTensor
def detect_image(img):
    # scale and pad image
    ratio = min(img_size/img.size[0], img_size/img.size[1])
    imw = round(img.size[0] * ratio)
    imh = round(img.size[1] * ratio)
    img_transforms=transforms.Compose([transforms.Resize((imh,imw)),
         transforms.Pad((max(int((imh-imw)/2),0),
              max(int((imw-imh)/2),0), max(int((imh-imw)/2),0),
              max(int((imw-imh)/2),0)), (128,128,128)),
         transforms.ToTensor(),
         ])
    # convert image to Tensor
    image_tensor = img_transforms(img).float()
    image_tensor = image_tensor.unsqueeze_(0)
    input_img = Variable(image_tensor.type(Tensor))
    # run inference on the model and get detections
    with torch.no_grad():
        detections = model(input_img)
        detections = utils.non_max_suppression(detections, 80,
                        conf_thres, nms_thres)
return detections[0]# load image and get detections
img_path = "images/blueangels.jpg"
prev_time = time.time()
img = Image.open(img_path)
detections = detect_image(img)
inference_time = datetime.timedelta(seconds=time.time() - prev_time)
print ('Inference Time: %s' % (inference_time))
# Get bounding-box colors
cmap = plt.get_cmap('tab20b')
colors = [cmap(i) for i in np.linspace(0, 1, 20)]
img = np.array(img)
plt.figure()
fig, ax = plt.subplots(1, figsize=(12,9))
ax.imshow(img)
pad_x = max(img.shape[0] - img.shape[1], 0) * (img_size / max(img.shape))
pad_y = max(img.shape[1] - img.shape[0], 0) * (img_size / max(img.shape))
unpad_h = img_size - pad_y
unpad_w = img_size - pad_x
if detections is not None:
unique_labels = detections[:, -1].cpu().unique()
n_cls_preds = len(unique_labels)
bbox_colors = random.sample(colors, n_cls_preds)
# browse detections and draw bounding boxes
for x1, y1, x2, y2, conf, cls_conf, cls_pred in detections:
box_h = ((y2 - y1) / unpad_h) * img.shape[0]
box_w = ((x2 - x1) / unpad_w) * img.shape[1]
y1 = ((y1 - pad_y // 2) / unpad_h) * img.shape[0]
x1 = ((x1 - pad_x // 2) / unpad_w) * img.shape[1]
color = bbox_colors[int(np.where(
unique_labels == int(cls_pred))[0])]
bbox = patches.Rectangle((x1, y1), box_w, box_h,
linewidth=2, edgecolor=color, facecolor='none')
ax.add_patch(bbox)
plt.text(x1, y1, s=classes[int(cls_pred)],
color='white', verticalalignment='top',
bbox={'color': color, 'pad': 0})
plt.axis('off')
# save image
plt.savefig(img_path.replace(".jpg", "-det.jpg"),
bbox_inches='tight', pad_inches=0.0)
plt.show()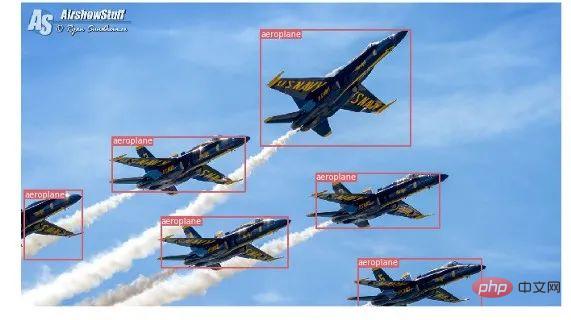

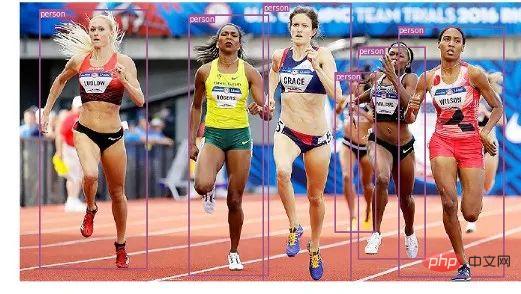
Now you know how to detect different objects in images. When you look at it frame by frame in a video, you'll see those tracking boxes moving. But if there are multiple objects in these video frames, how do you know if the object in one frame is the same as the object in the previous frame? This is called object tracking, and it uses multiple detections to identify a specific object.
There are multiple algorithms to do this, in this article I decided to use SORT (Simple Online and Realtime Tracking), which uses a Kalman filter to predict the trajectory of a previously identified target and compare it with the new detection Matching results is very convenient and fast.
Now let’s start writing the code, the first 3 code snippets will be the same as those in single image detection as they deal with getting YOLO detection on a single frame. The difference comes in the last part, for each detection we call the Sort object's Update function to get a reference to the object in the image. So, unlike the regular detection in the previous example (including the coordinates of the bounding box and the class prediction), we will get the tracked object, including an object ID in addition to the parameters above. And need to use OpenCV to read the video and display the video frames.
videopath = 'video/interp.mp4'
%pylab inline
import cv2
from IPython.display import clear_output
cmap = plt.get_cmap('tab20b')
colors = [cmap(i)[:3] for i in np.linspace(0, 1, 20)]
# initialize Sort object and video capture
from sort import *
vid = cv2.VideoCapture(videopath)
mot_tracker = Sort()
#while(True):
for ii in range(40):
    ret, frame = vid.read()
    frame = cv2.cvtColor(frame, cv2.COLOR_BGR2RGB)
    pilimg = Image.fromarray(frame)
    detections = detect_image(pilimg)
    img = np.array(pilimg)
    pad_x = max(img.shape[0] - img.shape[1], 0) *
            (img_size / max(img.shape))
    pad_y = max(img.shape[1] - img.shape[0], 0) *
            (img_size / max(img.shape))
    unpad_h = img_size - pad_y
    unpad_w = img_size - pad_x
    if detections is not None:
        tracked_objects = mot_tracker.update(detections.cpu())
        unique_labels = detections[:, -1].cpu().unique()
        n_cls_preds = len(unique_labels)
        for x1, y1, x2, y2, obj_id, cls_pred in tracked_objects:
            box_h = int(((y2 - y1) / unpad_h) * img.shape[0])
            box_w = int(((x2 - x1) / unpad_w) * img.shape[1])
            y1 = int(((y1 - pad_y // 2) / unpad_h) * img.shape[0])
            x1 = int(((x1 - pad_x // 2) / unpad_w) * img.shape[1])
            color = colors[int(obj_id) % len(colors)]
            color = [i * 255 for i in color]
            cls = classes[int(cls_pred)]
            cv2.rectangle(frame, (x1, y1), (x1+box_w, y1+box_h),
                         color, 4)
            cv2.rectangle(frame, (x1, y1-35), (x1+len(cls)*19+60,
                         y1), color, -1)
            cv2.putText(frame, cls + "-" + str(int(obj_id)),
                        (x1, y1 - 10), cv2.FONT_HERSHEY_SIMPLEX,
                        1, (255,255,255), 3)
    fig=figure(figsize=(12, 8))
    title("Video Stream")
    imshow(frame)
    show()
clear_output(wait=True)php programming
The above is the detailed content of Detailed explanation of using PyTorch to implement target detection and tracking. For more information, please follow other related articles on the PHP Chinese website!


![[Web front-end] Node.js quick start](https://img.php.cn/upload/course/000/000/067/662b5d34ba7c0227.png)


