Uniapp implements the method of customizing the navigation bar: using a view, the code is [
, ].

The operating environment of this tutorial: windows7 system, uni-app2.5.1 version, this method is suitable for all brands of computers.
Recommended (free): uni-app development tutorial
uniapp implements custom navigation bar Method:
Close the default navigation bar on a single page
"navigationStyle": "custom"
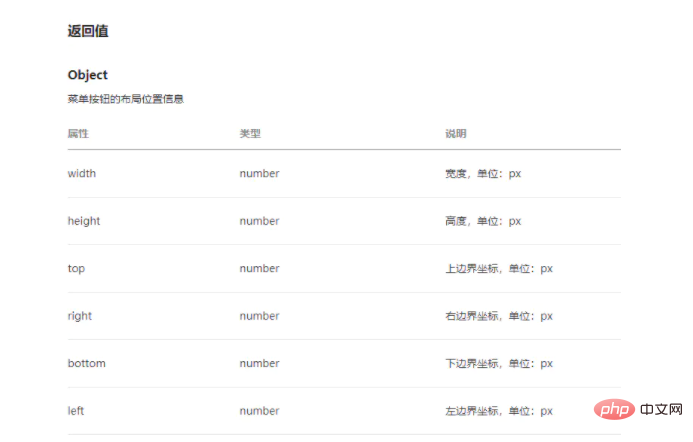
The officially obtained parameters are

Parameter details

Implementation principle
Use a view, padding-top=top;height=height;padding-bottom=give it to the one you like The value of rpx
The code implemented
<template>
<view>
<view :style="'height:' + demo.height + 'px;' + 'padding-top:' + demo.top + 'px;padding-bottom:10rpx'">
<view :style="'top:' + demo.top + 'px'">
<view class="iconfont icon-xiaoxi"></view>
</view>
测试辣
</view>
</view>
</template>
<script>
export default {
data () {
return {
demo: {
top: 0,
height: 0
}
}
},
created () {
const demo = uni.getMenuButtonBoundingClientRect()
this.demo.top = demo.top
this.demo.height = demo.height
}
}
</script>
<style>
.demo{
position: relative;
display: flex;
align-items: center;
justify-content: center;
background: #fff;
font-size: 26rpx;
.left{
float: left;
position: absolute;
width: max-content;
height: max-content;
top: 0;
bottom: 0;
left: 20rpx;
margin: auto;
.iconfont{
color: #3C3C3C;
}
}
}
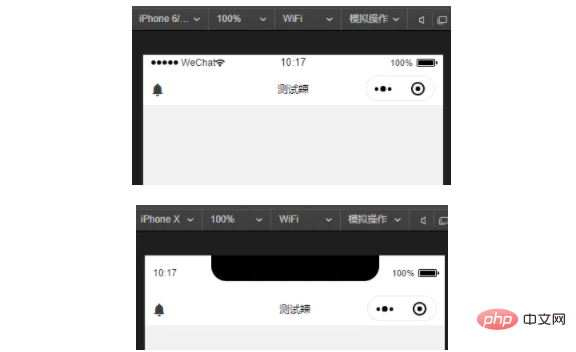
</style>Effect

##Related free learning recommendations:php programming(video)
The above is the detailed content of How to implement custom navigation bar in uniapp. For more information, please follow other related articles on the PHP Chinese website!