

About centos7 fastdfs deployment

The following tutorial column from centos will introduce to you about centos7 fastdfs deployment. I hope it will be helpful to friends in need!

centos7 fastdfs deployment
### start from here

## 前置准备依赖c++ :
yum -y install libevent  libevent-devel perl  make gcc zlib  zlib-devel pcre pcre-devel  gcc-c++  openssl-devel
1. Install libfastcommon
wget https://github.com/happyfish100/libfastcommon/archive/V1.0.43.tar.gz
mv V1.0.43.tar.gz libfastcommon-1.0.43.tar.gz && tar -xvf  libfastcommon-1.0.43.tar.gz
cd libfastcommon-1.0.43 && ./make.sh  && ./make.sh install
2. Install fastdfs # Pay attention to the conf Mine.types and http.conf must be copied. Secondly, it is recommended to download this version 6.x, otherwise there will be compatibility issues during installation
wget https://github.com/happyfish100/fastdfs/archive/V6.06.tar.gz
mv V6.06.tar.gz fdfs6.06.tar.gz && tar -xvf fdfs6.06.tar.gz
cd  cd fastdfs-6.06 && ./make.sh  && ./make.sh install
cp -r conf/* /etc/fdfs && rm -f *.sample

. 在$base_path 下新建data 和logs目录(存储trackerd.log 和storaged.log)
cd $base_path && mkdir -p data && mkdir  logs
3. Modify the configuration
1 .Modify vi tracker.conf
    port=22122  # tracker服务器端口(默认22122,一般不修改)
    base_path=/etc/fdfs # 存储日志和数据的根目录
2.Modify vi storage.conf
  port=23000             # storage服务端口(默认23000,一般不修改)
    base_path=/etc/fdfs    # 数据和日志文件存储根目录
    store_path0=/etc/fdfs  # 第一个存储目录
    tracker_server=192.168.110.151:22122  # tracker也就是fdfs服务器IP和端口
    http.server_port=8888  # http访问文件的端口(默认8888,看情况修改,和nginx中保持一致)
3.Modify vi client.conf
    base_path=/etc/fdfs
    tracker_server=192.168.110.151:22122    #tracker服务器IP和端口
4. Start the service:
sh fastfdfs_services.sh
or use:
/etc/init.d/fdfs_trackerd start/stop/restart
/etc/init.d/fdfs_storaged start/stop/restart
6. Test the fastfdfs upload service:
/usr/bin/fdfs_test /etc/fdfs/client.conf upload $filename
See the following similar service ok
example file url: http://192.168.110.151/group1/M00/00/00/wKhul1-qhhKAO3ywAAABcxvxSxw5288_big.jpg
7.nginx, because it has not been integrated with nginx yet Integration cannot be downloaded using http
7.1 Install fastdfs-nginx-module Install fastdfs-nginx-module:
    wget https://github.com/happyfish100/fastdfs-nginx-module/archive/V1.22.tar.gz
    cp /usr/local/src/fastdfs-nginx-module/src/mod_fastdfs.conf /etc/fdfs
Configure nginx moudle:
    vim /etc/fdfs/mod_fastdfs.conf
    tracker_server=192.168.0.104:22122  #tracker服务器IP和端口
    url_have_group_name=true
    store_path0=/home/dfs
Install nginx:
wget http://nginx.org/download/nginx-1.15.4.tar.gz #下载nginx压缩包
    tar -zxvf nginx-1.15.4.tar.gz
    cd nginx-1.15.4/
    ./configure --add-module=/usr/local/src/fastdfs-nginx-module/src/  # 添加fastdfs-nginx-module模块
    make && make install
7.2#Configure nginx.config
  touch  /usr/local/nginx/logs/nginx.pid && chmod a+w /usr/local/nginx/logs/nginx.pid
    vim /usr/local/nginx/conf/nginx.conf
    #添加如下配置
        pid /usr/local/nginx/logs/nginx.pid;

        server {
        listen       8888;   ## 该端口为storage.conf中的http.server_port相同
        server_name  192.168.110.151;

        location ~/group[0-9]/ {
            ngx_fastdfs_module;
       }

        error_page   500 502 503 504  /50x.html;
        location = /50x.html {
            root   html;
        }

       }
8. Turn off the firewall:
systemctl stop firewalld.service
9.nginx start and stop
./nginx -c /usr/local/nginx/conf/nginx.conf # 根据配置启动
/usr/local/nginx/sbin/nginx #启动nginx
/usr/local/nginx/sbin/nginx -s reload #重启nginx
/usr/local/nginx/sbin/nginx -s stop #停止nginx
10. Test visit:
nginx访问
访问:http://192.168.0.104:8888/group1/M00/00/00/wKgAaFyMoNKAUNcVAAWjVxW4v70993.jpg
The above is the detailed content of About centos7 fastdfs deployment. For more information, please follow other related articles on the PHP Chinese website!

Hot AI Tools

Undresser.AI Undress
AI-powered app for creating realistic nude photos

AI Clothes Remover
Online AI tool for removing clothes from photos.

Undress AI Tool
Undress images for free

Clothoff.io
AI clothes remover

AI Hentai Generator
Generate AI Hentai for free.

Hot Article
Hot Tools

Notepad++7.3.1
Easy-to-use and free code editor

SublimeText3 Chinese version
Chinese version, very easy to use

Zend Studio 13.0.1
Powerful PHP integrated development environment

Dreamweaver CS6
Visual web development tools

SublimeText3 Mac version
God-level code editing software (SublimeText3)
Hot Topics
 1376
1376
 52
52

 CentOS7 various version image download addresses and version descriptions (including Everything version)
Feb 29, 2024 am 09:20 AM
CentOS7 various version image download addresses and version descriptions (including Everything version)
Feb 29, 2024 am 09:20 AM
When loading CentOS-7.0-1406, there are many optional versions. For ordinary users, they don’t know which one to choose. Here is a brief introduction: (1) CentOS-xxxx-LiveCD.ios and CentOS-xxxx- What is the difference between bin-DVD.iso? The former only has 700M, and the latter has 3.8G. The difference is not only in size, but the more essential difference is that CentOS-xxxx-LiveCD.ios can only be loaded into the memory and run, and cannot be installed. Only CentOS-xxx-bin-DVD1.iso can be installed on the hard disk. (2) CentOS-xxx-bin-DVD1.iso, Ce
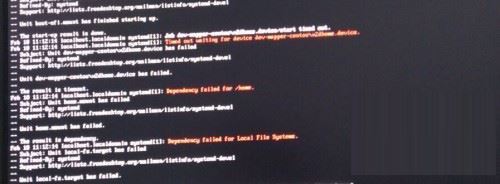 Steps to enter CentOS 7 emergency repair mode
Jan 13, 2024 am 09:36 AM
Steps to enter CentOS 7 emergency repair mode
Jan 13, 2024 am 09:36 AM
Open the centos7 page and appear: welcome to emergency mode! afterloggingin, type "journalctl -xb" to viewsystemlogs, "systemctlreboot" toreboot, "systemctldefault" to tryagaintobootintodefaultmode. giverootpasswordformaintenance(??Control-D???): Solution: execute r
 How to access and clean junk files in /tmp directory in CentOS 7?
Dec 27, 2023 pm 09:10 PM
How to access and clean junk files in /tmp directory in CentOS 7?
Dec 27, 2023 pm 09:10 PM
There is a lot of garbage in the tmp directory in the centos7 system. If you want to clear the garbage, how should you do it? Let’s take a look at the detailed tutorial below. To view the list of files in the tmp file directory, execute the command cdtmp/ to switch to the current file directory of tmp, and execute the ll command to view the list of files in the current directory. As shown below. Use the rm command to delete files. It should be noted that the rm command deletes files from the system forever. Therefore, it is recommended that when using the rm command, it is best to give a prompt before deleting the file. Use the command rm-i file name, wait for the user to confirm deletion (y) or skip deletion (n), and the system will perform corresponding operations. As shown below.
 How to set password rules in centos7? How to set password rules in centos7
Jan 07, 2024 pm 01:17 PM
How to set password rules in centos7? How to set password rules in centos7
Jan 07, 2024 pm 01:17 PM
Set password rules for security reasons Set the number of days after which passwords expire. User must change password within days. This setting only affects created users, not existing users. If setting to an existing user, run the command "chage -M (days) (user)". PASS_MAX_DAYS60#Password expiration time PASS_MIN_DAYS3#Initial password change time PASS_MIN_LEN8#Minimum password length PASS_WARN_AGE7#Password expiration prompt time Repeat password restriction use [root@linuxprobe~]#vi/etc/pam.d/system-auth#nearline15:
 How to install mbstring extension under CENTOS7?
Jan 06, 2024 pm 09:59 PM
How to install mbstring extension under CENTOS7?
Jan 06, 2024 pm 09:59 PM
1.UncaughtError:Calltoundefinedfunctionmb_strlen(); When the above error occurs, it means that we have not installed the mbstring extension; 2. Enter the PHP installation directory cd/temp001/php-7.1.0/ext/mbstring 3. Start phpize(/usr/local/bin /phpize or /usr/local/php7-abel001/bin/phpize) command to install php extension 4../configure--with-php-config=/usr/local/php7-abel
 How to install Mysql in CentOS7 and set it to start automatically at boot
Jun 02, 2023 pm 08:36 PM
How to install Mysql in CentOS7 and set it to start automatically at boot
Jun 02, 2023 pm 08:36 PM
Centos7 does not have a mysql database. The default database is mariadb (a branch of mysql). You can install the mysql database manually by following the steps below. 1. Download the rpm installation file wgethttp://repo.mysql.com/mysql-community-release-el7.rpm 2. Execute rpm to install rpm-ivhmysql-community-release-el7.rpm. After the dependency resolution is completed, the following options appear: dependenciesresolved =================================
 How to modify and set the default shortcut keys of CentOS7?
Jan 09, 2024 pm 06:14 PM
How to modify and set the default shortcut keys of CentOS7?
Jan 09, 2024 pm 06:14 PM
When the default shortcut keys conflict with the keys of the software you are using or you need to use the shortcut keys according to your own habits, you have to modify and set the default shortcut keys. How to modify the default shortcut keys of CentOS7? Let’s take a look at the detailed tutorial below. 1. Start the Centos7 system in the virtual machine and enter the desktop. 2. Click Applications->System Tools->Settings in the upper left corner. 3. Enter the setting interface and click the device. 4. Select Keyboard and click any item on the right. And press the shortcut key to be set on the keyboard to change its shortcut key (note that some cannot be changed!) 5. After the change, as shown below, finally click Settings, so that the shortcut key setting modification is completed.
 Detailed explanation of decompression file command (zip) under centos7
Jan 07, 2024 pm 06:30 PM
Detailed explanation of decompression file command (zip) under centos7
Jan 07, 2024 pm 06:30 PM
1. The compressed folder is a zip file [root@cgls]#zip-rmydata.zipmydata2. Unzip mydata.zip into the mydatabak directory [root@cgls]#unzipmydata.zip-dmydatabak3.mydata01 folder and mydata02.txt are compressed into mydata.zip[root@cgls]#zipmydata.zipmydata01mydata02.txt4. Decompress the mydata.zip file directly [root@cgls]#unzipmydata.zip5. View myd
