

How to set up a Discuz forum in Linux? The following article will introduce to you how to build a Discuz forum in Linux. It has certain reference value. Friends in need can refer to it. I hope it will be helpful to everyone.

Related recommendations: "discuz tutorial"
Note: This experiment was conducted in a virtual machine. The software used was VMware Workstation Pro14.0
The image file of rhel-server-7.5-x86_64-dvd was used, and the installation package for building the forum was Discuz_X2.5_SC_UTF8. zip.
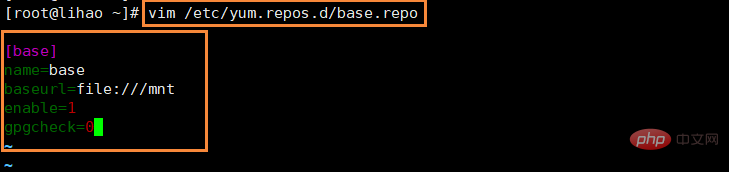
(1) Edit the yum configuration file: vim /etc/yum.repos.d/base.repo
(2) Write the following code in the configuration file. Remember to save and exit after writing.
(3) Then we mount the Redhat7.5 image file to the specified mount point directory/mnt using the command: mount /dev/sr0 /mnt /
(4) Then we use the command: yum repolist to check whether yum is installed correctly. When the status appears 5099, it means there is no problem with the installation. As shown below:

(1) Use the command: yum install httpd -y , to install an http (package name: httpd) service, when complete appears! That's it.
(2) Re-enable the httpd service, use the command systemctl restart httpd
(3) Let’s check the firewall operation status, use the command: systemctl status firewalld
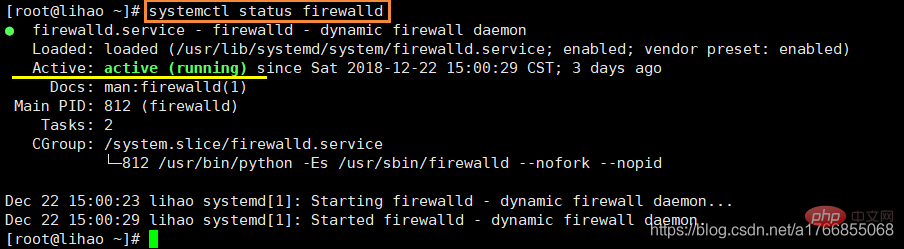
(4) Since the firewall is open, it will prevent our virtual machine and PC from accessing each other, so we need to turn off the firewall.
Use command: systemctl stop firewalld.service
(5) Then we use the browser on the PC and enter the current IP address of the virtual machine: 192.168.0.22, Then visit. You will enter the following interface:
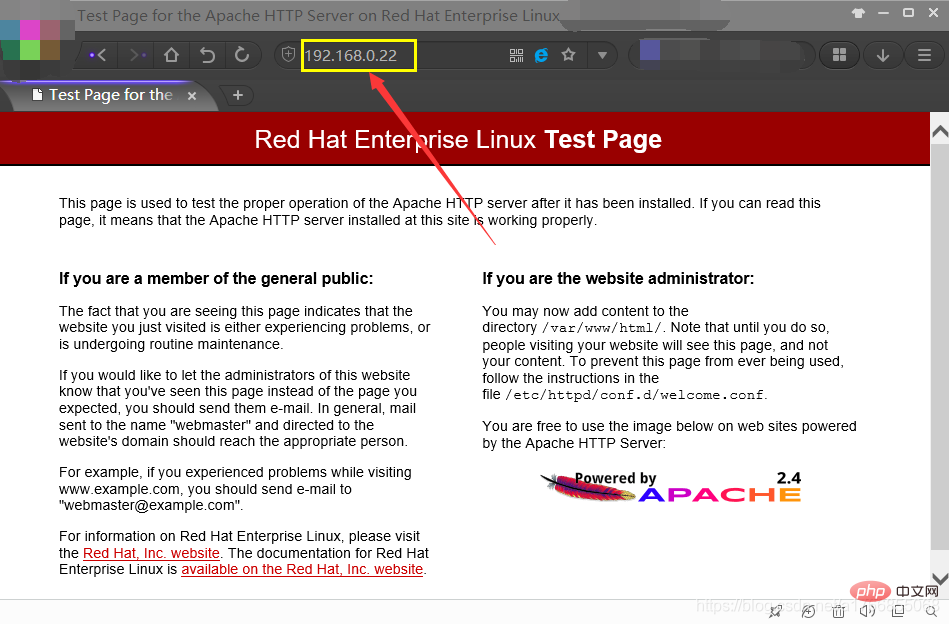
When you see this interface, it means that you have accessed the main interface of the apache software used for http.
(6) If you do not see this interface, you need to turn off SELINUX and use the command: setenforce 0. I will explain in detail about SELINUX in my Linux advancement in the future. It is recommended that you click on this interface if you have seen it.
It is web-related software. We need to dynamically access web pages. To install all software related to php, use the command: yum install php* -y
(1) Generally default It has already been installed, but it doesn’t matter. We can install it again and use the command: yum install mariadb-db -y. It will prompt us that it has been installed. As shown below: 
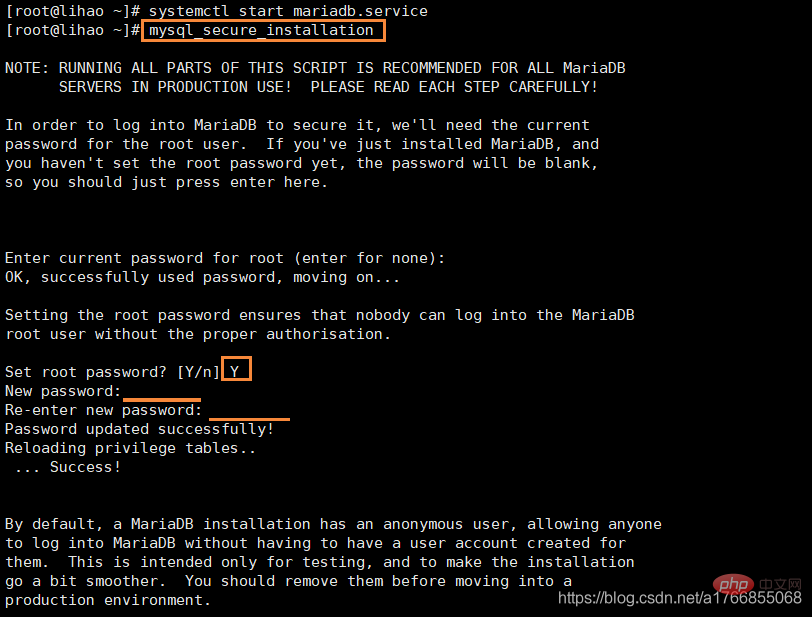
(2) Start the service and use the command: systemctl start mariadb.service
(3) After the database is installed, we need to initialize the database. The data in the forum are stored in the database. The database can be simply understood as an EXCEL table with corresponding user and password information.
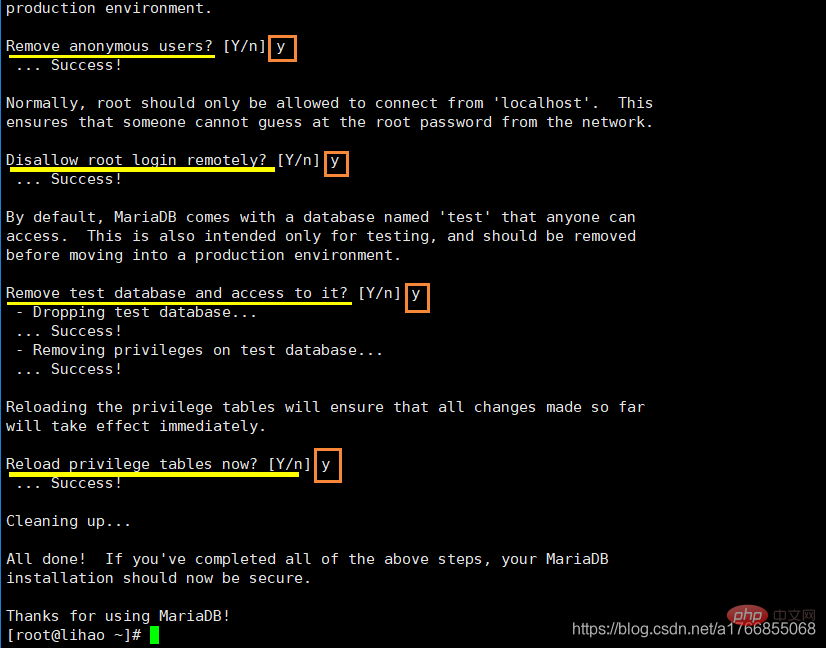
①Install the database: Use the command: mysql_secure_installation
②Then press Enter directly to enter the next step. It will prompt whether to set a password for the root user entering the database
③We enter y or Y , press Enter and enter the password. If the two passwords are consistent, go to the next step.
④Ask: Do you want to delete anonymous users? y This depends on the actual situation. Since we are doing an experiment here, go directly to the next step.
⑤Question: Disallow (disallow) root user to log in remotely? y
⑥Ask: Remove the data test database and access it? y
⑦Question: Reload the permission table now? y
Use the command: mysql -u root -p Enter , the password is the password to enter the database. After entering the database, we can use the database command to take a brief look: show databases;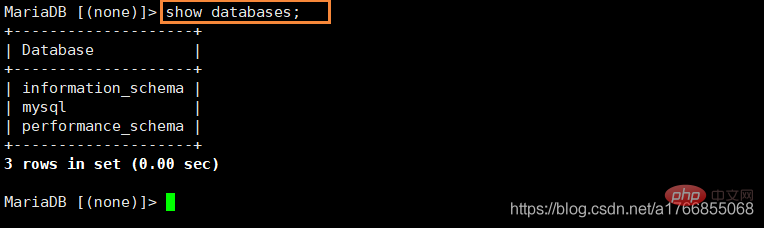
Use command: create dabase luntan; After the creation is completed, we use show databases; to check and find that the luntan database has been successfully created. 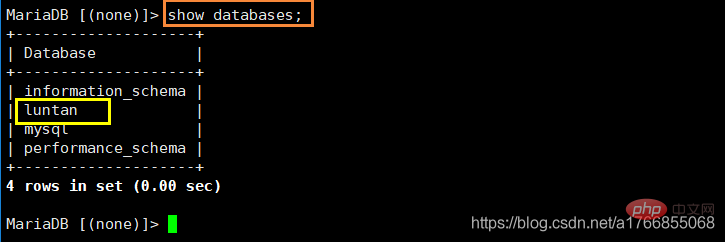
After completion, we can use the command: quit or exit to exit.
Before building a forum, first understand two terms about web pages:
Static interface: refers to The code of the web page is all in the page. It does not need to execute some programs to generate the web page of the client web page code. It cannot independently manage the published updated page.
Dynamic interface: It generates web pages with client web code by executing some programs. Dynamic web pages can update and manage the content of the website through the website background management system. Publish news, communicate and interact, blog, log in to email, and interact with the server.
(1) Go to the specified folder: cd /var/www/html. To decompress the source code of the forum, go to the specified folder.
This directory is a page that can be accessed by the http service. If you create a file here and write some content in it. Use the command: echo I love China > index.html When we visit 192.168.0.22 again, we will see the following result: 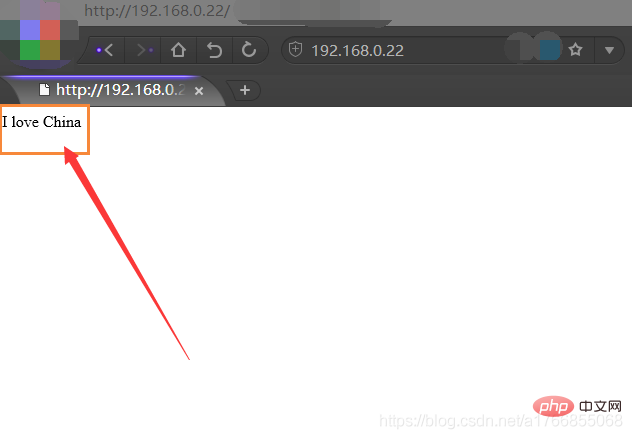
Just take a look at this and you will know. We Delete it first.
(2) Then we need to transfer the source code software of the forum to this directory. The name of the source code software in windows is Discuz_X2.5_SC_UTF8.zip, so we need to use the rz command
(3) The passed file is a compressed file with zip suffix, so we need to use the command: unzip Discuz_X2.5_SC_UTF8.zip to decompress the file.
(4) Restart the service and database:
Restart the httpd service: systemctl restart httpd.service
Restart the database: systemctl restart mariadb.service
( 4) Visit 192.168.0.22/upload/ to enter Discuz! installation guide. Click to accept 
(5) We found that many of our directory files are not writable, so we need to change the permissions. 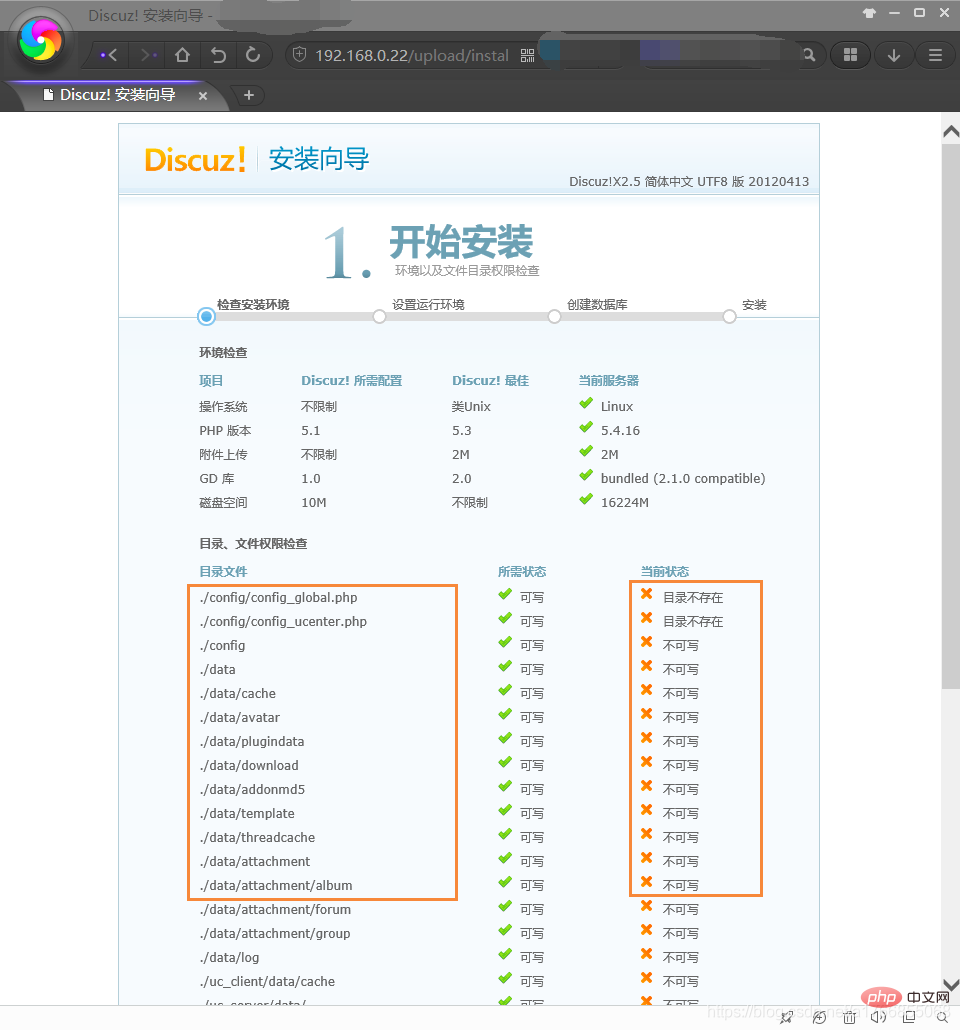
(6) Use the command to change permissions: chmod 777 config/ data/ uc_* -R Give these directories and all files and directories contained in them 777 permissions, refresh the installation wizard web page: it is found that all statuses are Writable Status
(7) Next step, and the next step:

(8) Next Step one, after the installation is complete. Then close the browser and re-enter to visit 192.168.0.22/upload. At this time, the DISCUZ forum has been fully established, and we can register users and log in there.
Here we have finished explaining this section of the experiment. You can log in to the forum to play, among other things. You can also use other PCs under the LAN to access 192.168.0.22/upload, and you will find that others can also log in!
Summary of the main commands used in this section:
| Command | Comments |
|---|---|
| Confirm Install httpd service | |
| Restart httpd service | |
| Check the firewall status | |
| Close the firewall | |
| Close SELINUX | |
| Confirm the installation of all software related to PHP | |
| Confirm the installation of the database file | |
| Start the database file | |
| Install database | |
| Log in to database | |
| Check what databases there are | |
| Create a database named forum | |
| Give 777 permissions to the folders config/data/uc_* and the directories and files they own |
The above is the detailed content of Introduction to the method of setting up Discuz forum in Linux. For more information, please follow other related articles on the PHP Chinese website!


![[Web front-end] Node.js quick start](https://img.php.cn/upload/course/000/000/067/662b5d34ba7c0227.png)


