

Tutorial for beginners on redis cluster building


redis cluster construction
(Learning video sharing: redis video tutorial)
Before introducing the formal content , first let’s introduce the steps to build the stand-alone version of redis.
- Download the redis compressed package, and then decompress the compressed file;
- Enter the decompressed redis file directory (you can see the Makefile file at this time), and compile the redis source file;
- Install the compiled redis source files into the /usr/local/redis directory. If there is no redis directory in the /local directory, a new redis directory will be automatically created;
- Enter /usr/local/ redis/bin directory, start redis directly in ./redis-server (redis is started at the front end at this time);
- Change the redis startup mode to backend startup. The specific method is: put the redis under the decompressed redis file. Copy the .conf file to the /usr/local/redis/bin directory, and then modify the redis.conf file -> daemonize: no to daemonize: yse;
- Pass ./redis in the /bin directory -server redis.conf starts redis (background startup at this time).
In summary, the installation and startup of the redis stand-alone version is completed.
For detailed steps with pictures, please refer to -> Getting started with redis
Please forgive me for being verbose, ok, then let’s return to this topic—redis cluster construction!
1. Introduction to Redis Cluster
- redis is an open source key value storage system that has been favored by the Internet favor of the company. Before the redis3.0 version, it only supported singleton mode, and only supported clusters in version 3.0 and later. I am using the redis3.0.0 version here;
- redis cluster adopts P2P mode, which is completely decentralized and does not There is a central node or agent node;
- The redis cluster does not have a unified entrance. When the client connects to the cluster, it can connect to any node in the cluster. The nodes within the cluster communicate with each other. (PING-PONG mechanism), each node is a redis instance;
- In order to achieve high availability of the cluster, that is, to determine whether the node is healthy (can it be used normally), redis-cluster has such a voting fault tolerance Mechanism: If more than half of the nodes in the cluster vote that a node is down, then this node will fail. This is how to determine whether a node is down;
- So how to determine whether the cluster is down? -> If any node in the cluster is down, and the node has no slave node (backup node), then this The cluster is down. This is a way to determine whether the cluster is down;
- So why does the cluster hang up when any node hangs up (there is no slave node)? -> Because the cluster has 16384 built-in slots (hash slots), and all physical nodes are mapped to these 16384[0-16383] slots, or these slots are equally distributed to each node. When it is necessary to store a piece of data (key-value) in the Redis cluster, redis will first perform the crc16 algorithm on the key and then obtain a result. Then calculate the remainder of this result to 16384. This remainder will correspond to one of the slots [0-16383], and then determine which node the key-value is stored in. Therefore, once a node hangs up, the slot corresponding to the node cannot be used, which will cause the cluster to not work properly.
- To sum up, each Redis cluster can theoretically have up to 16384 nodes.
2. Environment required for cluster construction
2.1 Redis cluster requires at least 3 nodes, because the voting fault tolerance mechanism requires more than half of the nodes to think that a certain node has failed. It is down, so 2 nodes cannot form a cluster.
2.2 To ensure the high availability of the cluster, each node needs to have a slave node, that is, a backup node, so the Redis cluster requires at least 6 servers. Because I don’t have that many servers, and I can’t start that many virtual machines, so what I build here is a pseudo-distributed cluster, that is, one server runs 6 redis instances virtually, and the port number is modified to (7001-7006). Of course, the actual production environment The Redis cluster setup is the same as here.
2.3 Install ruby
3. The specific steps to build the cluster are as follows (note to turn off the firewall)
3.1 Create a new redis-cluster directory in the usr/local directory to store cluster nodes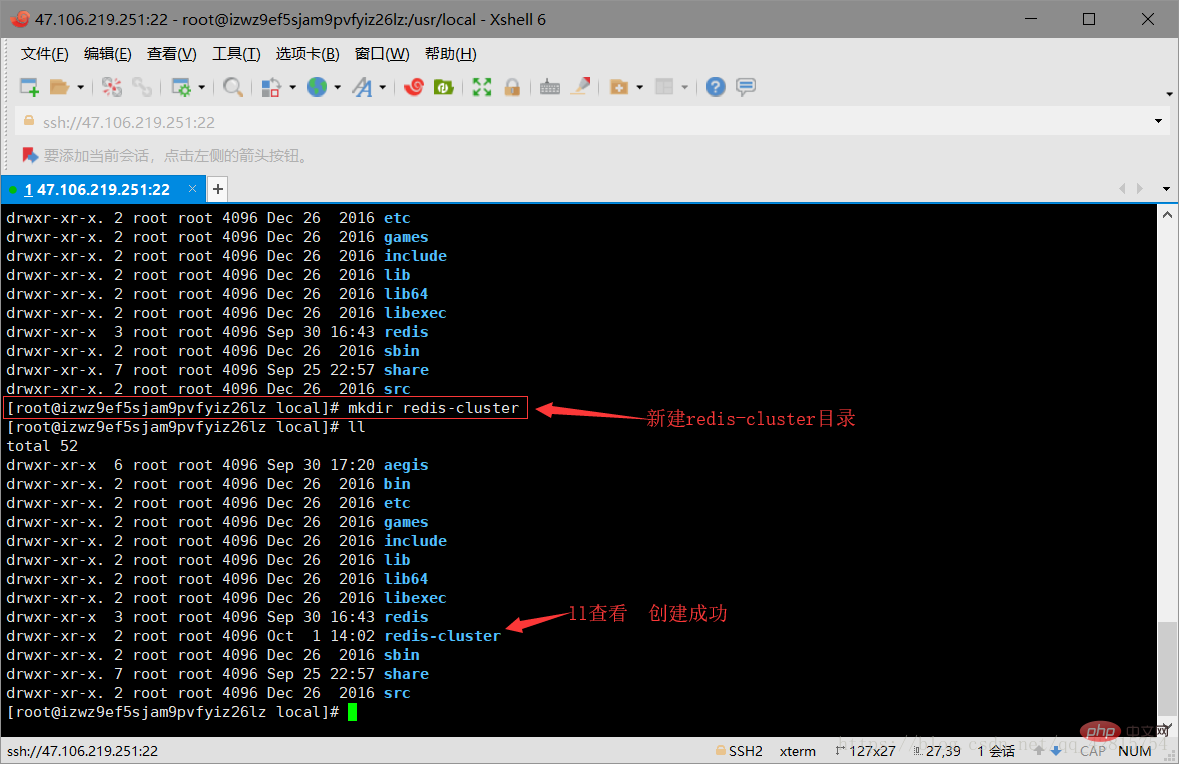
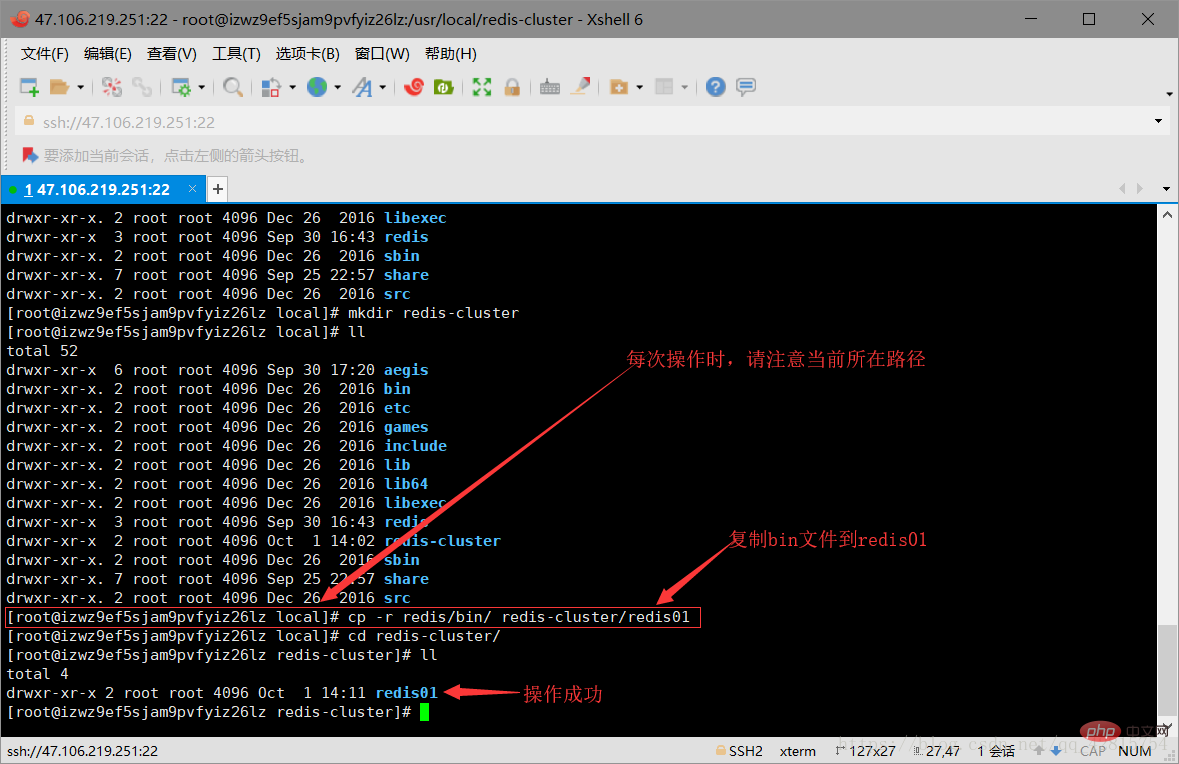
3.2 Copy all the files in the bin directory under the redis directory to the /usr/local/redis-cluster/redis01 directory. Don’t worry there is no redis01 directory here, it will be created automatically. The operation command is as follows (note the current path):
cp -r redis/bin/ redis-cluster/redis01
3.3 Delete the snapshot file dump.rdb in the redis01 directory, and modify the redis.cnf file in the directory. Specifically, modify two places: one is to change the port number to 7001, and the other is to open In cluster creation mode, just open comments. As shown in the figure below:
Delete the dump.rdb file 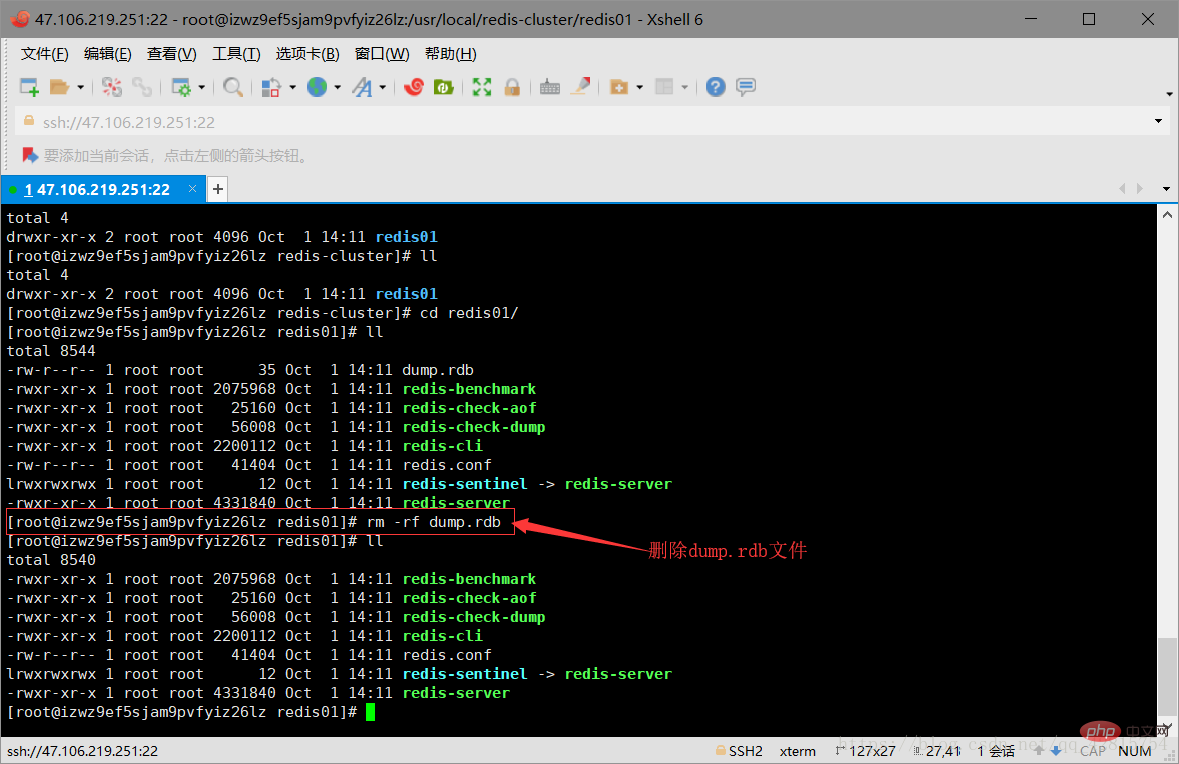
Modify the port number to 7001, the default is 6379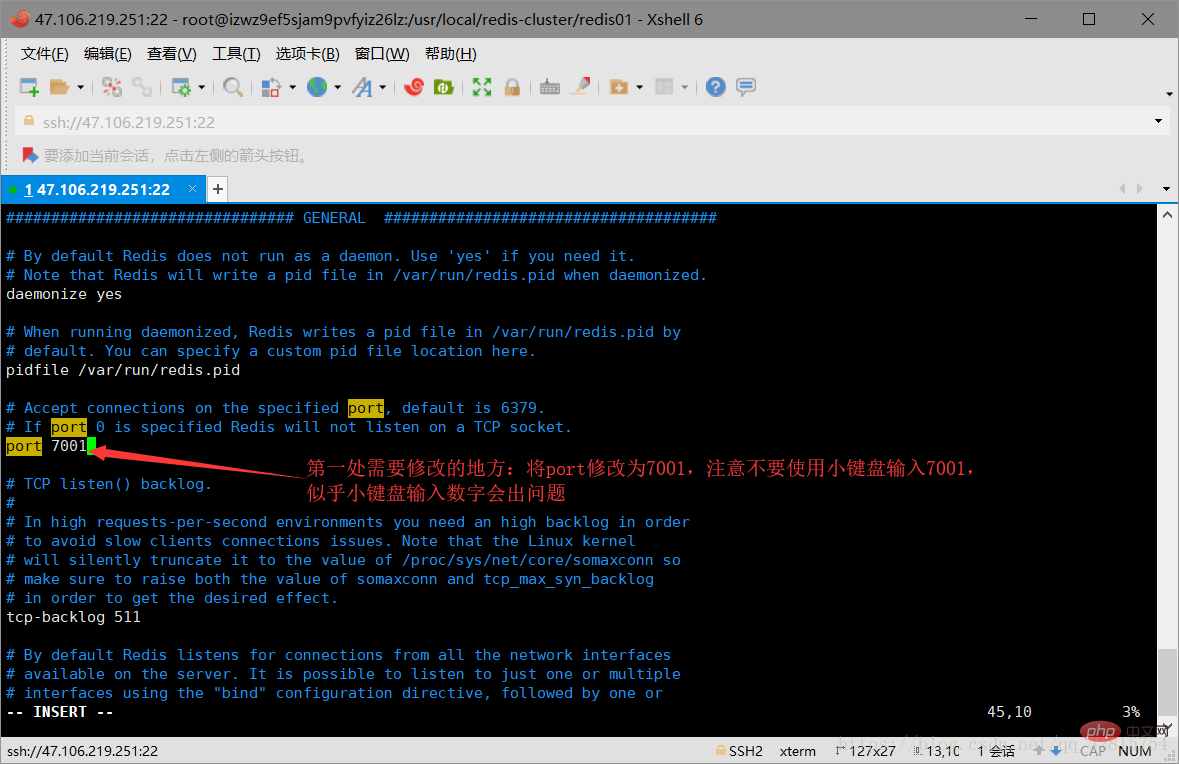
Turn on the comment of cluster-enabled yes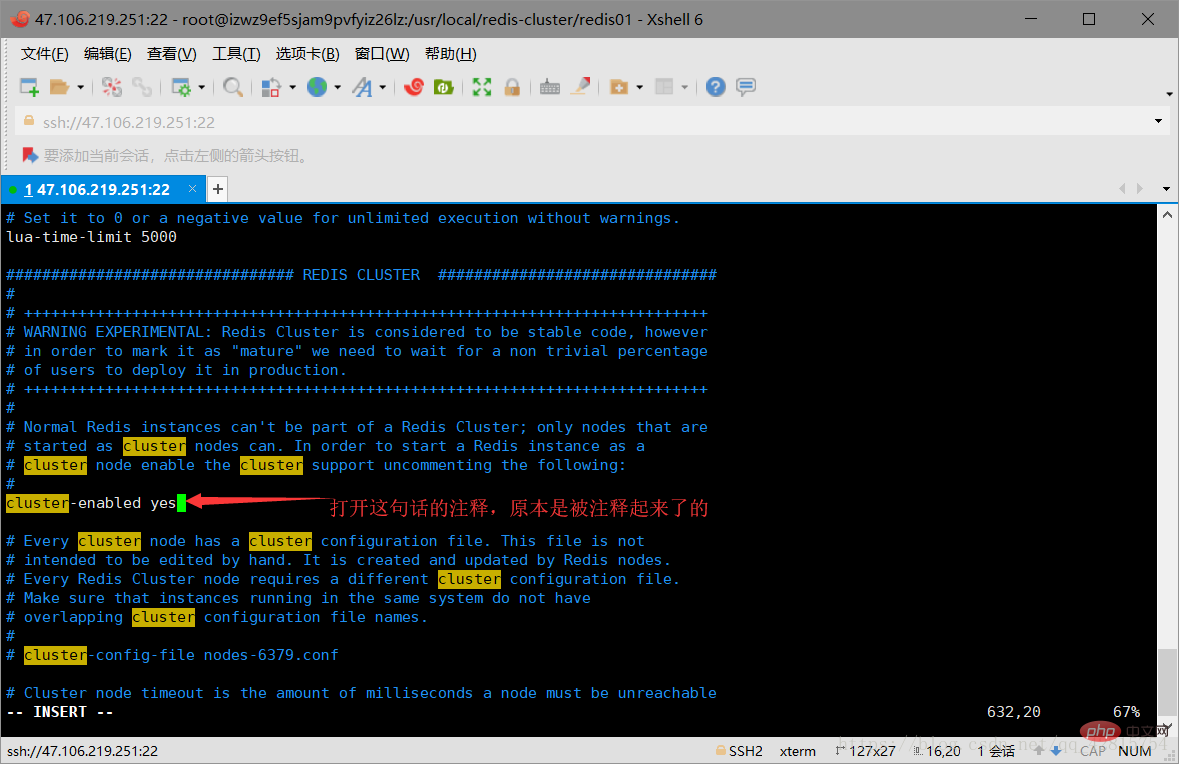
3.4 Copy 5 copies of the redis-cluster/redis01 file to the redis-cluster directory (redis02-redis06), create 6 redis instances, and simulate 6 nodes of the Redis cluster. Then change the port numbers in redis.conf under the remaining five files to 7002-7006 respectively. As shown in the figure below:
Create the redis02-06 directory 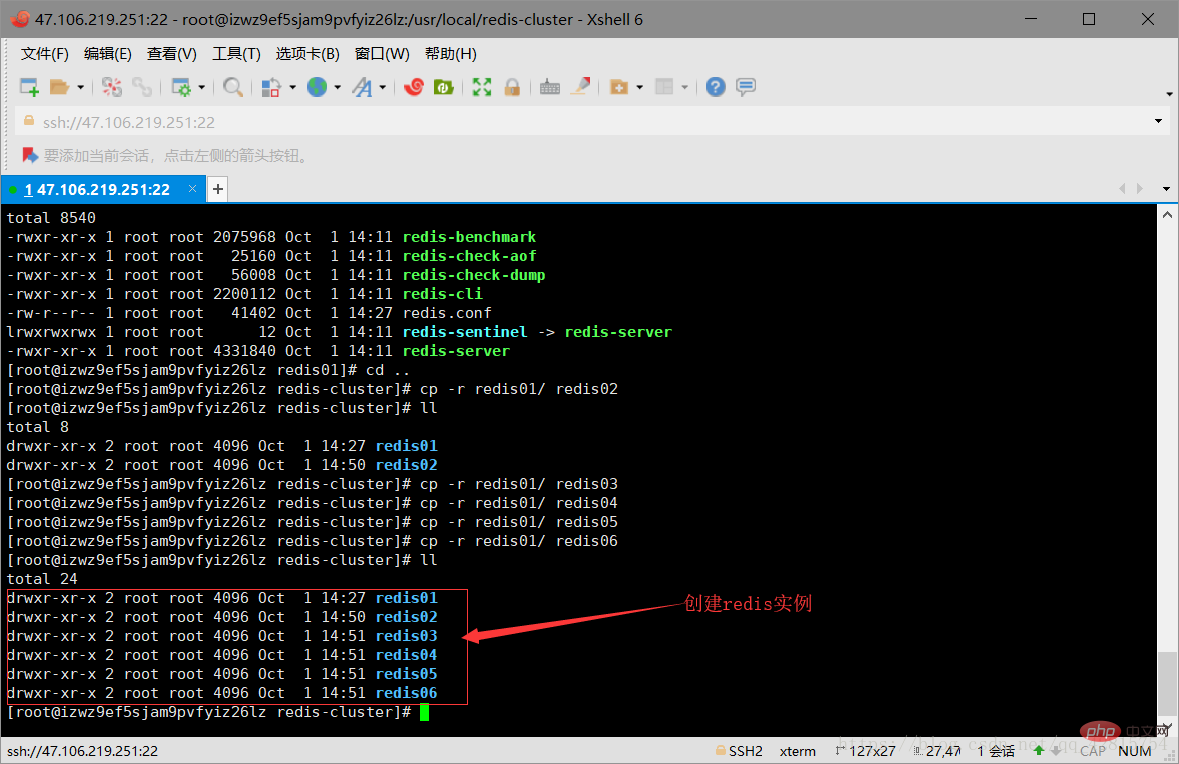
Modify the port number of the redis.conf file to 7002-7006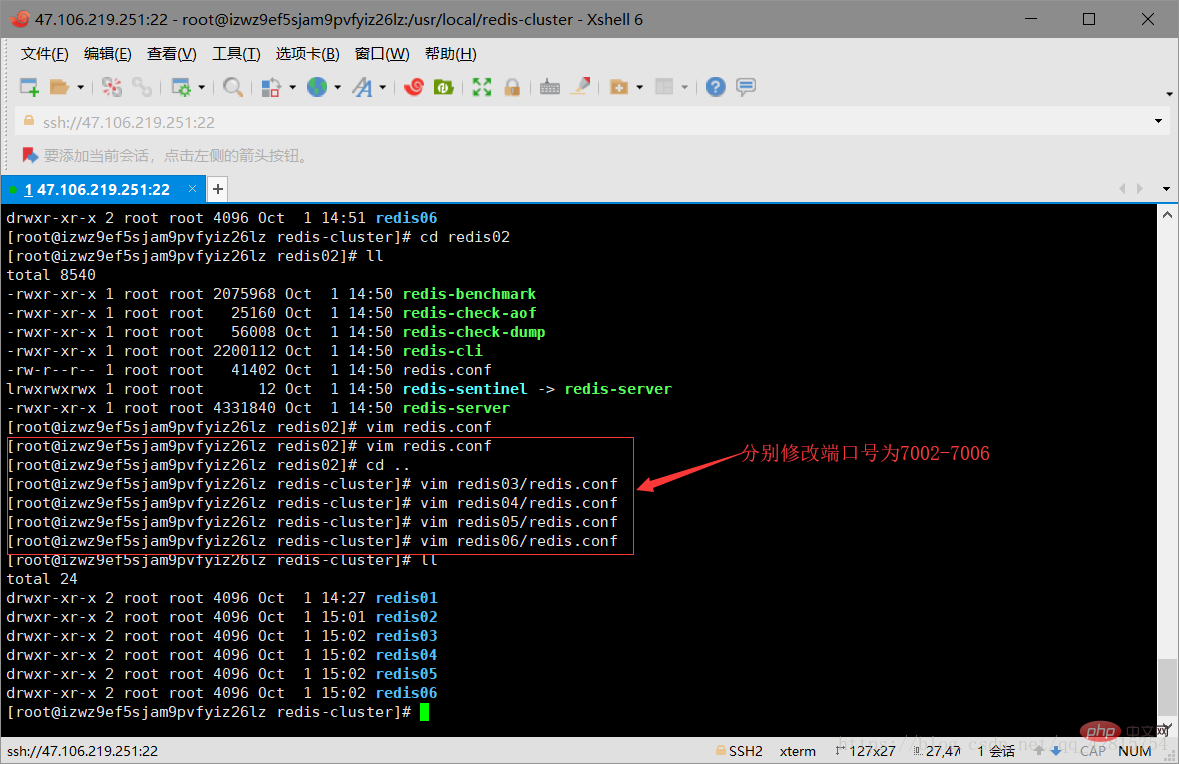
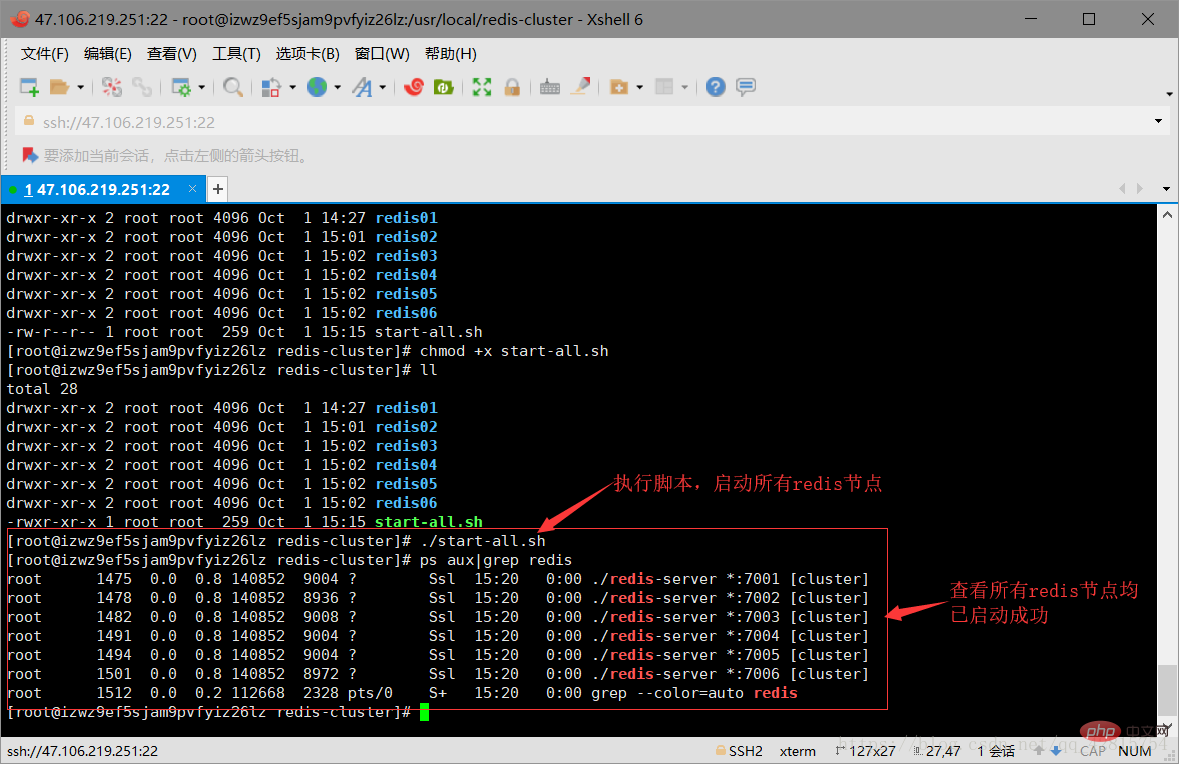
3.5 Then start Since starting all redis nodes one by one is too troublesome, here is a script file to start redis nodes in batches. The command is start-all.sh. The content of the file is as follows:
cd redis01
./redis-server redis.conf
cd ..
cd redis02
./redis-server redis.conf
cd ..
cd redis03
./redis-server redis.conf
cd ..
cd redis04
./redis-server redis.conf
cd ..
cd redis05
./redis-server redis.conf
cd ..
cd redis06
./redis-server redis.conf
cd ..
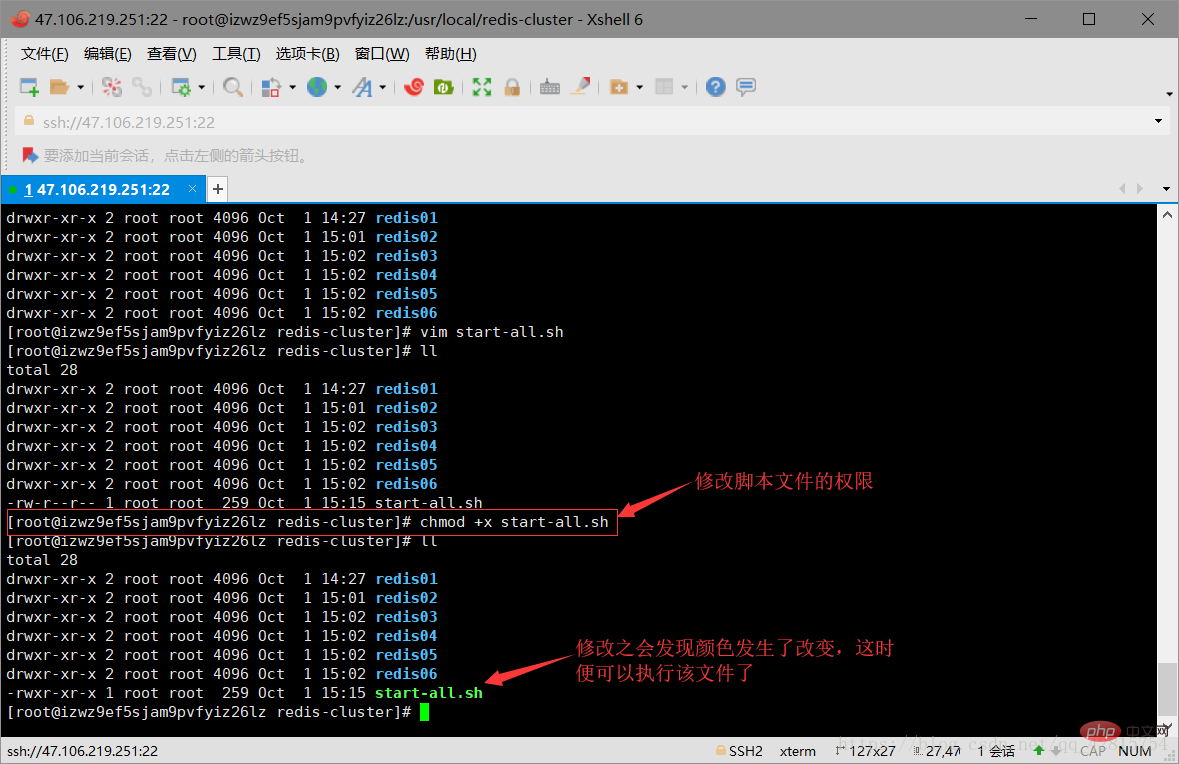
3.6 Create the startup script file After that, you need to modify the permissions of the script so that it can be executed. The instructions are as follows:
chmod +x start-all.sh
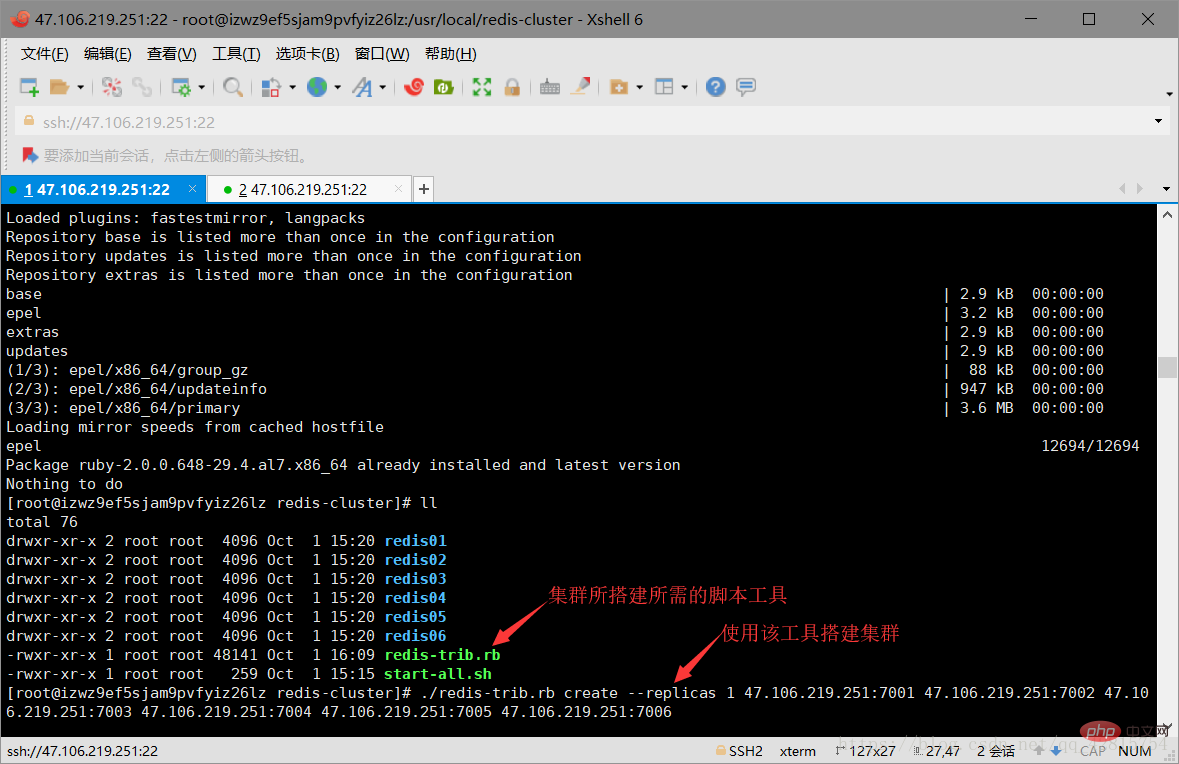
3.8 ok. So far, the six redis nodes have been started successfully. Next, the cluster will be officially started. The above are all preparatory conditions. Don’t think it’s troublesome because the pictures look lengthy. In fact, the above steps are just one sentence: create 6 redis instances (6 nodes) and start them. To build a cluster, you need to use a tool (script file), which is in the source code of the redis decompression file. Because this tool is a ruby script file, the running of this tool requires a ruby running environment, which is equivalent to the running of the java language on the jvm. So you need to install ruby. The instructions are as follows:
yum install ruby
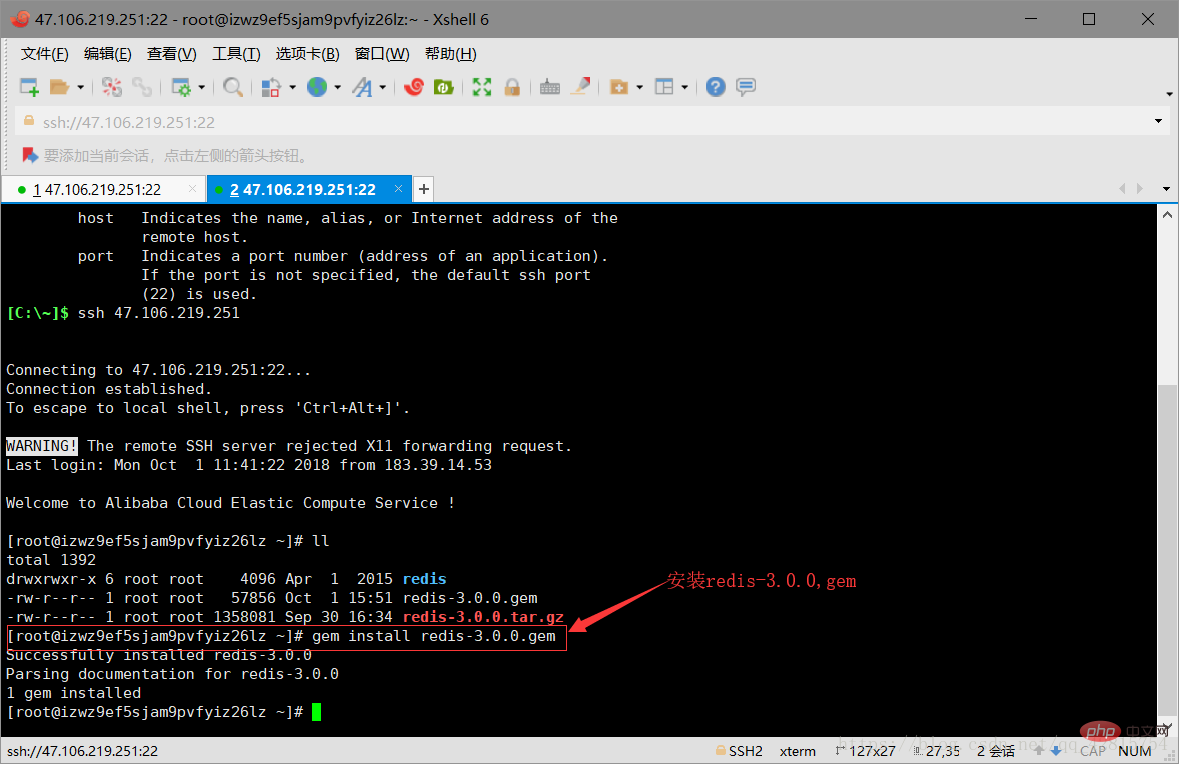
 The installation command is as follows:
gem install redis-3.0.0.gem

 3.10 Copy the ruby tool (redis-trib.rb) to the redis-cluster directory. The instructions are as follows:
cp redis-trib.rb /usr/local/redis-cluster
./redis-trib.rb create --replicas 1 47.106.219.251:7001 47.106.219.251:7002 47.106.219.251:7003 47.106.219.251:7004 47.106.219.251:7005 47.106.219.251:7006
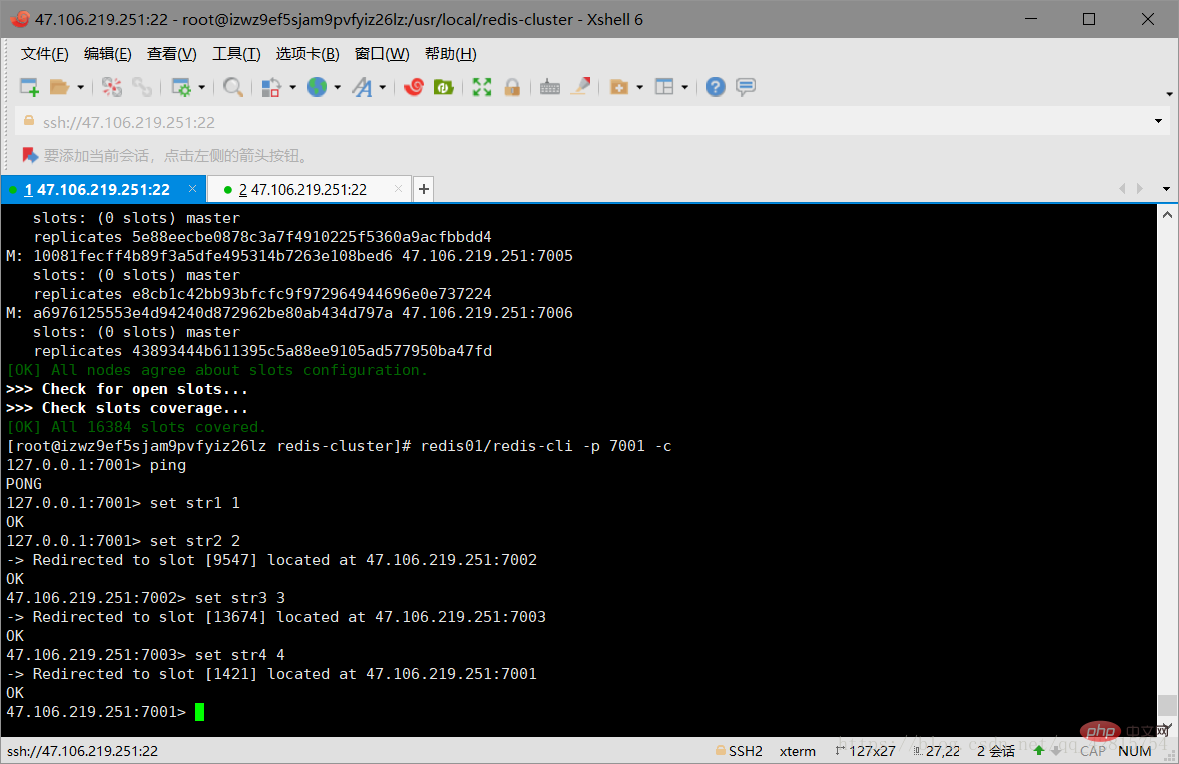
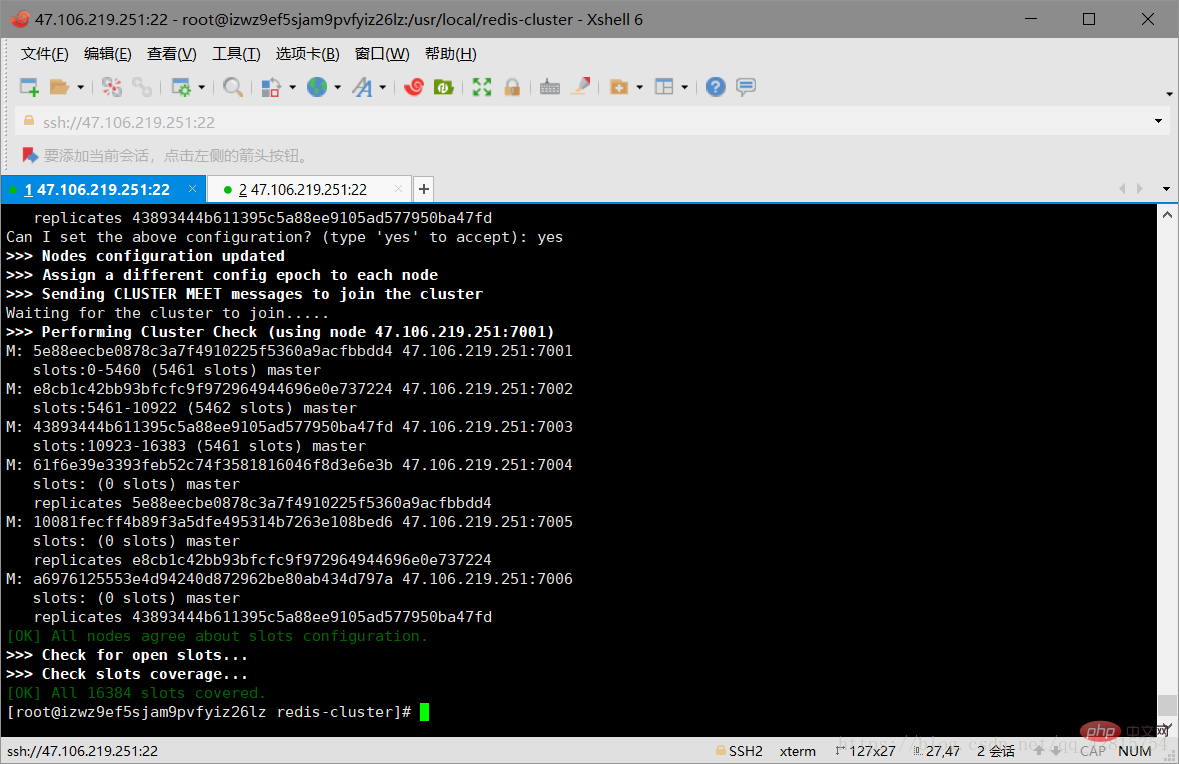 At this point, the Redi cluster is successfully established! Please pay attention to the last paragraph of text, which shows the slots (hash slots) assigned to each node. There are a total of 6 nodes here, 3 of which are slave nodes, so the 3 master nodes map 0-5460, 5461-10922, 10933-16383solts.
redis01/redis-cli -p 7001 -c
注意:一定要加上-c,不然节点之间是无法自动跳转的!如下图可以看到,存储的数据(key-value)是均匀分配到不同的节点的:
四、结语
呼~~~长舒一口气…终于搭建好了Redis集群。
整个过程其实挺简单,本篇主要正对入门级别的小伙伴,插入了很多图片,所以显得冗长,希望大家多多理解,如果不当之处,还望及时指正~
最后,加上两条redis集群基本命令:
1.查看当前集群信息
cluster info
2.查看集群里有多少个节点
cluster nodes
相关推荐:redis数据库教程
The above is the detailed content of Tutorial for beginners on redis cluster building. For more information, please follow other related articles on the PHP Chinese website!

Hot AI Tools

Undresser.AI Undress
AI-powered app for creating realistic nude photos

AI Clothes Remover
Online AI tool for removing clothes from photos.

Undress AI Tool
Undress images for free

Clothoff.io
AI clothes remover

AI Hentai Generator
Generate AI Hentai for free.

Hot Article
Hot Tools

Notepad++7.3.1
Easy-to-use and free code editor

SublimeText3 Chinese version
Chinese version, very easy to use

Zend Studio 13.0.1
Powerful PHP integrated development environment

Dreamweaver CS6
Visual web development tools

SublimeText3 Mac version
God-level code editing software (SublimeText3)
Hot Topics


 Solution to 0x80242008 error when installing Windows 11 10.0.22000.100
May 08, 2024 pm 03:50 PM
Solution to 0x80242008 error when installing Windows 11 10.0.22000.100
May 08, 2024 pm 03:50 PM
1. Start the [Start] menu, enter [cmd], right-click [Command Prompt], and select Run as [Administrator]. 2. Enter the following commands in sequence (copy and paste carefully): SCconfigwuauservstart=auto, press Enter SCconfigbitsstart=auto, press Enter SCconfigcryptsvcstart=auto, press Enter SCconfigtrustedinstallerstart=auto, press Enter SCconfigwuauservtype=share, press Enter netstopwuauserv , press enter netstopcryptS
 Analyze PHP function bottlenecks and improve execution efficiency
Apr 23, 2024 pm 03:42 PM
Analyze PHP function bottlenecks and improve execution efficiency
Apr 23, 2024 pm 03:42 PM
PHP function bottlenecks lead to low performance, which can be solved through the following steps: locate the bottleneck function and use performance analysis tools. Caching results to reduce recalculations. Process tasks in parallel to improve execution efficiency. Optimize string concatenation, use built-in functions instead. Use built-in functions instead of custom functions.
 Golang API caching strategy and optimization
May 07, 2024 pm 02:12 PM
Golang API caching strategy and optimization
May 07, 2024 pm 02:12 PM
The caching strategy in GolangAPI can improve performance and reduce server load. Commonly used strategies are: LRU, LFU, FIFO and TTL. Optimization techniques include selecting appropriate cache storage, hierarchical caching, invalidation management, and monitoring and tuning. In the practical case, the LRU cache is used to optimize the API for obtaining user information from the database. The data can be quickly retrieved from the cache. Otherwise, the cache can be updated after obtaining it from the database.
 Which one has better performance, erlang or golang?
Apr 21, 2024 am 03:24 AM
Which one has better performance, erlang or golang?
Apr 21, 2024 am 03:24 AM
There are performance differences between Erlang and Go. Erlang excels at concurrency, while Go has higher throughput and faster network performance. Erlang is suitable for systems that require high concurrency, while Go is suitable for systems that require high throughput and low latency.
 Caching mechanism and application practice in PHP development
May 09, 2024 pm 01:30 PM
Caching mechanism and application practice in PHP development
May 09, 2024 pm 01:30 PM
In PHP development, the caching mechanism improves performance by temporarily storing frequently accessed data in memory or disk, thereby reducing the number of database accesses. Cache types mainly include memory, file and database cache. Caching can be implemented in PHP using built-in functions or third-party libraries, such as cache_get() and Memcache. Common practical applications include caching database query results to optimize query performance and caching page output to speed up rendering. The caching mechanism effectively improves website response speed, enhances user experience and reduces server load.
 How to use Redis cache in PHP array pagination?
May 01, 2024 am 10:48 AM
How to use Redis cache in PHP array pagination?
May 01, 2024 am 10:48 AM
Using Redis cache can greatly optimize the performance of PHP array paging. This can be achieved through the following steps: Install the Redis client. Connect to the Redis server. Create cache data and store each page of data into a Redis hash with the key "page:{page_number}". Get data from cache and avoid expensive operations on large arrays.
 How to upgrade Win11 English 21996 to Simplified Chinese 22000_How to upgrade Win11 English 21996 to Simplified Chinese 22000
May 08, 2024 pm 05:10 PM
How to upgrade Win11 English 21996 to Simplified Chinese 22000_How to upgrade Win11 English 21996 to Simplified Chinese 22000
May 08, 2024 pm 05:10 PM
First you need to set the system language to Simplified Chinese display and restart. Of course, if you have changed the display language to Simplified Chinese before, you can just skip this step. Next, start operating the registry, regedit.exe, directly navigate to HKEY_LOCAL_MACHINESYSTEMCurrentControlSetControlNlsLanguage in the left navigation bar or the upper address bar, and then modify the InstallLanguage key value and Default key value to 0804 (if you want to change it to English en-us, you need First set the system display language to en-us, restart the system and then change everything to 0409) You must restart the system at this point.
 Can navicat connect to redis?
Apr 23, 2024 pm 05:12 PM
Can navicat connect to redis?
Apr 23, 2024 pm 05:12 PM
Yes, Navicat can connect to Redis, which allows users to manage keys, view values, execute commands, monitor activity, and diagnose problems. To connect to Redis, select the "Redis" connection type in Navicat and enter the server details.
