What needs to be installed to install vue.js
Installing vue.js requires installing node.js. The specific method of installing vue.js is: first install node.js; then install the Taobao image; then install Vue, and install the global vue-cli scaffolding; finally Just check whether Vue is installed successfully.

The operating environment of this tutorial: windows7 system, vue2.0&&Node.js v14.15.3 version, Dell G3 computer.
Related recommendations: "vue.js Tutorial"
What do I need to install before installing vue.js?
You need to install node.js before installing vue.js. Just install the latest version from the official website. The version should be greater than version 6.0.
In this way, you can use the npm tool that comes with node.js to install vue.js and its related tools.
npm: Package manager under Nodejs. npm can be used to install, share, distribute code, and manage project dependencies.
Using npm to install Vue can facilitate package management. Then use the Vue command directly, and use the webpack tool to create the project. The front-end build tool will make front-end development more efficient.
Steps to install vue.js using npm
Step 1: Install node.js
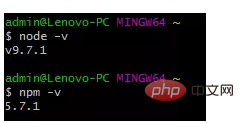
As shown in the figure below, enter the following command on the terminal Make sure node.js is installed on your computer and the npm version is greater than 3.0. If the npm version is less than 3.0, you can enter $ cnpm install npm -g to upgrade.

Step 2: Install Taobao image
Since npm installation speed is slow, this article uses Taobao image and its command cnpm to install, enter $ npm install - g cnpm --registry=https://registry.npm.taobao.org install Taobao mirror.
Step 3: Install Vue
Enter $ cnpm install vue, press Enter and wait for the terminal to respond.
Step 4: Install the global vue-cli scaffolding
Enter $ cnpm install --global vue-cli to install the global vue-cli scaffolding, which is used to quickly build large single-page applications.
Step 5: Check whether Vue is installed successfully
Enter $ vue -V to check whether the installation is successful. If the version number is returned, the installation is successful.

The version number appears indicating that the installation is successful
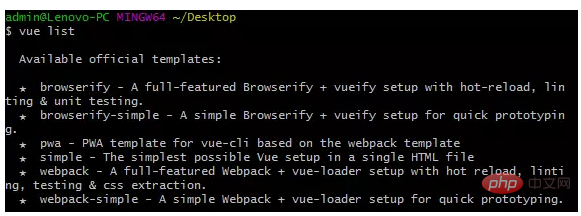
Step 6: Check the template provided by the official website (this step can be omitted)

Among the six templates, we mainly use webpack templates for the following reasons:
WebPack can be regarded as a module packager: what it does is to analyze your project structure and find JavaScript modules As well as other extension languages that cannot be run directly by browsers (Scss, TypeScript, etc.), they are packaged into a suitable format for use by browsers.
Step 7: Create a new project based on the webpack template
Switch the terminal to your target directory and create a project. Here is an example of creating a project called vue-project on the desktop: Enter vue init webpack vue-project, and the terminal will return the following content to you:
# 这里需要进行一些配置,默认回车即可
This will install Vue 2.x version of the template.
For Vue 1.x use: vue init webpack#1.0 vue-project
? Project name vue-project
? Project description A Vue.js project
? Author 5Iris5 <1847370****@163.com>
? Vue build standalone
? Use ESLint to lint your code? Yes
? Pick an ESLint preset Standard
? Setup unit tests with Karma + Mocha? Yes
? Setup e2e tests with Nightwatch? Yes
   vue-cli · Generated "my-project".
   To get started:

     cd vue-project
     npm install
     npm run dev

Documentation can be found at https://vuejs-templates.github.io/webpackThe original image is not placed here because I made a mistake in this link, and the reason will be recorded in detail later. Under normal circumstances, after running to this step, your interface should appear in sequence with the three commands shown above.
Step 8: Enter the following three commands in sequence according to the prompts
// 进入项目
$ cd vue-project
// 安装依赖
$ cnpm install
// 测试环境是否搭建成功
$ cnpm run dev
Step 9: Run
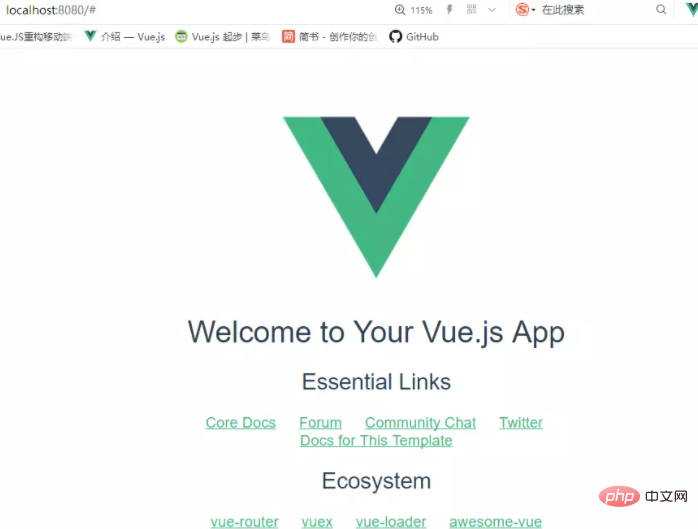
After successfully executing the above commands, visit http://localhost:8080/ and output the results As follows:

The above is the detailed content of What needs to be installed to install vue.js. For more information, please follow other related articles on the PHP Chinese website!

Hot AI Tools

Undresser.AI Undress
AI-powered app for creating realistic nude photos

AI Clothes Remover
Online AI tool for removing clothes from photos.

Undress AI Tool
Undress images for free

Clothoff.io
AI clothes remover

AI Hentai Generator
Generate AI Hentai for free.

Hot Article

Hot Tools

Notepad++7.3.1
Easy-to-use and free code editor

SublimeText3 Chinese version
Chinese version, very easy to use

Zend Studio 13.0.1
Powerful PHP integrated development environment

Dreamweaver CS6
Visual web development tools

SublimeText3 Mac version
God-level code editing software (SublimeText3)

Hot Topics
 Practical combat: Develop a plug-in in vscode that supports vue files to jump to definitions
Nov 16, 2022 pm 08:43 PM
vscode itself supports Vue file components to jump to definitions, but the support is very weak. Under the configuration of vue-cli, we can write many flexible usages, which can improve our production efficiency. But it is these flexible writing methods that prevent the functions provided by vscode itself from supporting jumping to file definitions. In order to be compatible with these flexible writing methods and improve work efficiency, I wrote a vscode plug-in that supports Vue files to jump to definitions.
 In-depth discussion of how vite parses .env files
Jan 24, 2023 am 05:30 AM
When using the Vue framework to develop front-end projects, we will deploy multiple environments when deploying. Often the interface domain names called by development, testing and online environments are different. How can we make the distinction? That is using environment variables and patterns.
 What is the difference between componentization and modularization in vue
Dec 15, 2022 pm 12:54 PM
The difference between componentization and modularization: Modularization is divided from the perspective of code logic; it facilitates code layered development and ensures that the functions of each functional module are consistent. Componentization is planning from the perspective of UI interface; componentization of the front end facilitates the reuse of UI components.
 Let's talk in depth about reactive() in vue3
Jan 06, 2023 pm 09:21 PM
Foreword: In the development of vue3, reactive provides a method to implement responsive data. This is a frequently used API in daily development. In this article, the author will explore its internal operating mechanism.
 Detailed graphic explanation of how to integrate the Ace code editor in a Vue project
Apr 24, 2023 am 10:52 AM
Ace is an embeddable code editor written in JavaScript. It matches the functionality and performance of native editors like Sublime, Vim, and TextMate. It can be easily embedded into any web page and JavaScript application. Ace is maintained as the main editor for the Cloud9 IDE and is the successor to the Mozilla Skywriter (Bespin) project.
 Explore how to write unit tests in Vue3
Apr 25, 2023 pm 07:41 PM
Vue.js has become a very popular framework in front-end development today. As Vue.js continues to evolve, unit testing is becoming more and more important. Today we’ll explore how to write unit tests in Vue.js 3 and provide some best practices and common problems and solutions.
 A brief analysis of how to handle exceptions in Vue3 dynamic components
Dec 02, 2022 pm 09:11 PM
How to handle exceptions in Vue3 dynamic components? The following article will talk about Vue3 dynamic component exception handling methods. I hope it will be helpful to everyone!
 Analyze the principle of Vue2 implementing composition API
Jan 13, 2023 am 08:30 AM
Since the release of Vue3, the word composition API has entered the field of vision of students who write Vue. I believe everyone has always heard how much better the composition API is than the previous options API. Now, due to the release of the @vue/composition-api plug-in, Vue2 Students can also get on the bus. Next, we will mainly use responsive ref and reactive to conduct an in-depth analysis of how this plug-in achieves this.


