

The savior presses f several times to enter safe mode

Lenovo Rescuer press f4 to enter safe mode. The specific method is: 1. Click "Settings" in the "Start" menu; 2. Click "Update and Recovery" - "Recovery" - "Restart Now"; 3. , click "Troubleshoot" - "Advanced Options" - "Startup Settings" - "Restart"; 4. After restarting, press the F4 key on the "Startup Settings" interface to enter safe mode.

#The operating environment of this tutorial: Windows 10 system, Lenovo Savior Y7000 computer.
Lenovo Rescuer press f4 to enter safe mode. Specific method:
1. After entering WIN10, click the start menu and then click [Computer Settings]

2. Update and recovery

3. Click [Recover] under the update and recovery interface, and then click [Restart Now] under Advanced Startup

4. Select an option and select [Troubleshooting]

5. Click [Advanced Options] during troubleshooting.

#6. Click [Startup Settings] in the advanced options

7. Click the [Restart] button.

#8. The computer will restart at this time. After restarting, you will see the interface as shown below. Click [F4] or the number [4] to select safe mode. Other modes are also selected using this method, and they will be entered directly after selection.

As shown in the picture below, it is the safe mode of WIN10. You can perform anti-virus and troubleshooting here.

To read more related articles, please visit PHP Chinese website! !
The above is the detailed content of The savior presses f several times to enter safe mode. For more information, please follow other related articles on the PHP Chinese website!

Hot AI Tools

Undresser.AI Undress
AI-powered app for creating realistic nude photos

AI Clothes Remover
Online AI tool for removing clothes from photos.

Undress AI Tool
Undress images for free

Clothoff.io
AI clothes remover

AI Hentai Generator
Generate AI Hentai for free.

Hot Article
Hot Tools

Notepad++7.3.1
Easy-to-use and free code editor

SublimeText3 Chinese version
Chinese version, very easy to use

Zend Studio 13.0.1
Powerful PHP integrated development environment

Dreamweaver CS6
Visual web development tools

SublimeText3 Mac version
God-level code editing software (SublimeText3)
Hot Topics
 1378
1378
 52
52

 How to remove graphics card driver in safe mode
Feb 20, 2024 am 11:57 AM
How to remove graphics card driver in safe mode
Feb 20, 2024 am 11:57 AM
How to uninstall the graphics card driver in safe mode With the continuous development of technology, computers have become one of the indispensable tools in people's lives and work. In the process of daily use of computers, netizens often encounter various problems, among which graphics card driver problems are a relatively common one. When there is a problem with the graphics card driver, sometimes we need to uninstall the driver in safe mode. This article will introduce the steps on how to uninstall the graphics card driver in safe mode. What is safe mode? Safe mode is a special mode used to repair and resolve computer problems. When electricity
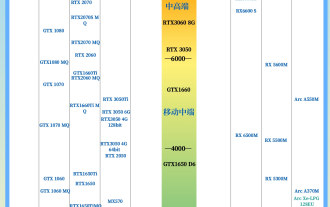 The latest laptop graphics card ladder chart in 2024
Feb 22, 2024 pm 01:55 PM
The latest laptop graphics card ladder chart in 2024
Feb 22, 2024 pm 01:55 PM
In 2023, a new version of RTX40 series graphics cards will be released. Therefore, many users are struggling with how to choose a graphics card that suits them so that it is more cost-effective. Different grade products correspond to different user groups. You can check the details. Find your needs in the ladder chart below, and then choose the appropriate price. Latest notebook graphics card ladder chart in 2024: Latest desktop graphics card ladder chart in 2024: Top ten graphics card rankings Knowledge related to graphics cards 1. Integrated graphics cards and discrete graphics cards 1. Thin and light notebooks generally have integrated graphics cards, and integrated graphics cards are included with the CPU, that is, Called core graphics card, this kind of graphics card has relatively weak computing power and cannot handle large-scale 3D games. If you play games, it will freeze or crash. 2. The independent graphics card is from the CPU
 Recommended computer configuration for 4k editing
Mar 14, 2024 pm 05:31 PM
Recommended computer configuration for 4k editing
Mar 14, 2024 pm 05:31 PM
Please ask for a 4k video editing computer with a CPU of at least i5, preferably i7 or above. If the computer configuration is not sufficient and the editing becomes laggy, you can use proxy editing. First, in the first step, we open the software and create a new project as usual. Then open the media library in the upper left corner. All the video and audio files you imported are also in the media library. Memory: 32GB DDR4 or above Hard drive: Configure a RAID storage system and use multiple high-speed NVMeSSD (solid-state drives). Multiple hard drives can make the editing process efficient. To play 4K videos, you need H.265 (HEVC) encoding, 10-bit color depth and HDR color (up to BT.2020 color gamut). For users of genuine discs, there is also BD-XL (double-layer 66GB108
 Recommended gaming laptops worth 3,000 to 4,000
Mar 23, 2024 am 09:20 AM
Recommended gaming laptops worth 3,000 to 4,000
Mar 23, 2024 am 09:20 AM
Please recommend a gaming laptop that costs around 3,000 yuan. In today’s article, the editor will recommend some value-for-money laptops that cost around 3,000 yuan. Hope to adopt. Dell Inspiron 14 Dell Inspiron 14 notebook is equipped with a Core i5 processor and 4GB of memory. Because they are all low-voltage versions, the power consumption of the entire machine is reduced to a certain extent. Lenovo Xiaoxin notebooks have launched a number of models this year. The Xiaoxin Air12 launched as early as March this year is priced at 2,999 yuan. Whether it is an all-metal body or hardware, it is currently the most worth buying in the 3,000 price range. However, the machine made concessions on the graphics card and equipped with integrated graphics. Lenovo IdeaPad 14 reference price starts at 2,999 yuan
 5000 gaming notebook
Mar 20, 2024 am 10:07 AM
5000 gaming notebook
Mar 20, 2024 am 10:07 AM
Which gaming laptop is better around 5,000? 1. Recommended laptops within 5,000: Lenovo Xiaoxin Air15 2021 Ryzen Edition, Lenovo Xiaoxin Air14 Performance Edition Thin and Light, Mechanical Revolution F12021 Standard Pressure Edition, Asus Adolbook 13 2021, RedmiBook Pro14 Sharp Dragon version. 2. For gaming laptops in this price range, you can choose the Colorful Hidden Star P16. Hidden Star P16 is a Hidden Star series game notebook released by Colorful in 2023. It will be officially launched on May 9, 2023. 3. In terms of battery life, Honor MagicBook14 has a built-in large battery with a capacity of 56Wh, which has a long-lasting battery life. It can play local videos for about 11 hours on a single charge.
 The computer beeps after adding a memory stick
Mar 24, 2024 am 08:01 AM
The computer beeps after adding a memory stick
Mar 24, 2024 am 08:01 AM
I changed the memory stick, but the computer keeps making a beeping sound when I turn it on, and it won't start. Plug in the original memory stick... It's probably because the memory stick is incompatible. The new one you bought can boot without plugging it in. Yeah, I suggest you find out what HZ your computer's memory stick is, 1333 or 1600, just buy it according to the frequency of your memory stick. Remove the new one. If it still barks, remove the old one and erase the gold finger. If the old memory stick is working fine, remove the old one and replace it with the new one. If the new one also works normally, it means that the two memory sticks cannot work at the same time. Clear cmos and try again. Swap the two memory sticks and try again. The only option is to replace the memory. Reinsert the memory module or replace the memory. AMIBIOS1 short: Memory refresh failed. Replace the memory module. 2 short: Memory ECC error checking
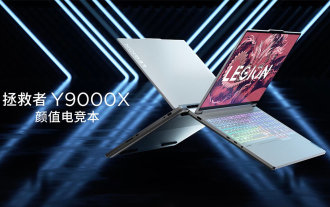 Lenovo's Savior Y9000X 2024 good-looking gaming notebook released: starting from 13,999 yuan, optional RTX 4060/4070
Feb 21, 2024 pm 05:22 PM
Lenovo's Savior Y9000X 2024 good-looking gaming notebook released: starting from 13,999 yuan, optional RTX 4060/4070
Feb 21, 2024 pm 05:22 PM
According to news from this site on January 17, Lenovo’s Savior Y9000X2024 high-end gaming notebook announced the price information today. Pre-sale will start at 10 o’clock on February 22: i9-14900HX+RTX4060+32GB+1TB. The initial price is 13,999 yuan. i9-14900HX +RTX4070+32GB+1TB initial price is 14,999 yuan. This machine is positioned as a "good-looking gaming notebook", available in Ice White color, using AED anode electrophoresis technology and CNC carved middle frame. This product is equipped with a 16-inch 3.2K gaming screen with a screen ratio of 16:10, supports 100% DCI-P3 wide color gamut, 165Hz refresh rate, Dolby Vision, 430nit brightness, X-Rite color management, 10bit color
 Lenovo notebook turns on vt
Mar 02, 2024 am 10:07 AM
Lenovo notebook turns on vt
Mar 02, 2024 am 10:07 AM
How to turn on vt on a Lenovo laptop? First, restart the computer. When the startup screen appears, keep pressing the computer shortcut key to enter the bios. After entering the bios interface, use the keyboard's direction keys to move to find the VT option in -, and then press the key to confirm. The method to turn on VT on Lenovo win10 computer is: open the control panel, click "Hardware and Sound", then click "Device Manager", find "System Devices" in the Device Manager, right-click "System Devices", and then click "Properties" ”, find “Virtualization Support” in the new window, and open it. First shut down the computer and enter BIOS mode; after entering BIOS, find VirtualizationTechno in CpuConfiguration