

Introduction to how to create a simple chat room with node.js

UsingnodejsHow to create a simple chat room? The following article will introduce it to you. It has certain reference value. Friends in need can refer to it. I hope it will be helpful to everyone.

Related recommendations: "nodejs video tutorial"
I just started learning js. This article is based on node.js and websocket to implement a Simple online chat room system (chat group).
This article is suitable for beginners to read.
Without further ado, let’s get started.
In the B/S architecture, if we want to get a data, we need to request the server, and then the server responds. So if our client does not send a request, will the server take the initiative to send something to our client (browser)?
The answer is no. The client and server connect through the TCP/IP protocol, and then request a connection through the HTTP protocol. The HTTP protocol is a request-response protocol, and it is a stateless protocol, that is, there is no relationship between each request and response.
And what do we need for our chat room?
1. Send a message 2. Receive a message
In receiving a message: a client sends a message to the server, the server receives the message, and then takes the initiativeSend to another client.
So HTTP cannot meet our requirements. Here we will use socket protocol. When the server and client are connected, both are always ready to send and receive messages.
First download the socket.io module in npm (node.js must be installed before). Open cmd.
(I created a node.js chat folder and the files are placed in it)
Then start writing our server code and create files server.js.
//server.js

var http = require('http');
var fs = require('fs');
var ws = require('socket.io'); //引入socket.io

var server = http.createServer(function (req, res) {
    var html = fs.readFileSync('./client.html');
   //client.html是发送给客户端的文件(客户端界面)

    res.end(html);
}).listen(8000);

var io = ws(server); //http服务与ws服务相关联, 返回io服务实例

//监听用户的连接事件
io.on('connection',function (socket) {
    //发生在用户连接io服务器时
    console.log('有新用户进入房间');

    //消息发送事件
    socket.on('message',function (obj) {
       console.log(obj);
       io.emit('message',obj); //发送消息给所有客户端(广播)
    });
});Then start writing the client.
Because our server uses socket.io, the service corresponding to socket.io should be used in the client. Here I directly introduced a js file.
Create the file client.html.
//client.html
<!DOCTYPE html>
<html lang="en">
<head>
<meta charset="UTF-8">
<title>Node.js+webSocket聊天室</title>
</head>
<body>
<h1>liky聊天室</h1>
<textarea name="" id="text" ></textarea>
<button id="btn">发送</button>
<script src="http://wulv5.com/js/socket.io.min.js"></script>
<script>
var socket = io.connect("/"); //连接聊天室的io服务器 io服务器的根地址
var oText = document.getElementById("text");
var oBtn = document.getElementById("btn");
var myMessage = "";
oBtn.onclick = function () {
var mes = oText.value;
//当消息为空时
if(!mes){
return;
}
myMessage = mes;
socket.send(mes); //发送消息到服务器
oText.value = ""; //清空文本框
}
//当服务器广播消息时,触发message事件,消息内容在回调函数中
socket.on('message',function (mm) {
var p = document.createElement('p');
p.innerText = mm;
if(myMessage === mm){
p.style.cssText = "color:red;margin-left:10%";
}
document.body.appendChild(p);
})
</script>
</body>
</html>At this point, the code part is completed. Next open cmd and run our file.

You can now open the browser to see the effect. Open the browser and visit the address http://localhost:8000/. Open a few more pages to try the effect.
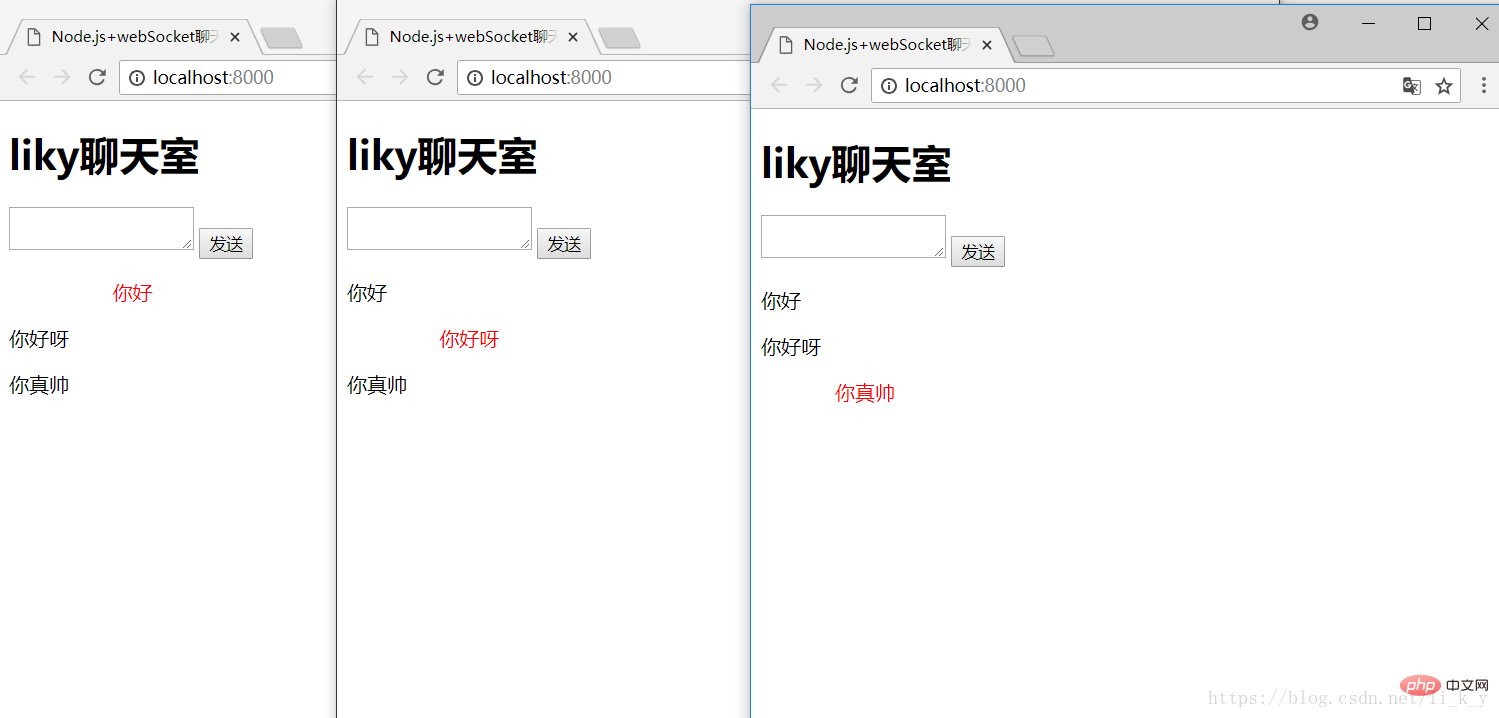
In this way, a simple local chat room is completed. You can transfer it to the server, and you can chat with others (I will write more about this when I have time).
For more programming-related knowledge, please visit: Programming Teaching! !
The above is the detailed content of Introduction to how to create a simple chat room with node.js. For more information, please follow other related articles on the PHP Chinese website!

Hot AI Tools

Undresser.AI Undress
AI-powered app for creating realistic nude photos

AI Clothes Remover
Online AI tool for removing clothes from photos.

Undress AI Tool
Undress images for free

Clothoff.io
AI clothes remover

AI Hentai Generator
Generate AI Hentai for free.

Hot Article
Hot Tools

Notepad++7.3.1
Easy-to-use and free code editor

SublimeText3 Chinese version
Chinese version, very easy to use

Zend Studio 13.0.1
Powerful PHP integrated development environment

Dreamweaver CS6
Visual web development tools

SublimeText3 Mac version
God-level code editing software (SublimeText3)
Hot Topics
 1378
1378
 52
52

 How to delete node in nvm
Dec 29, 2022 am 10:07 AM
How to delete node in nvm
Dec 29, 2022 am 10:07 AM
How to delete node with nvm: 1. Download "nvm-setup.zip" and install it on the C drive; 2. Configure environment variables and check the version number through the "nvm -v" command; 3. Use the "nvm install" command Install node; 4. Delete the installed node through the "nvm uninstall" command.
 How to use express to handle file upload in node project
Mar 28, 2023 pm 07:28 PM
How to use express to handle file upload in node project
Mar 28, 2023 pm 07:28 PM
How to handle file upload? The following article will introduce to you how to use express to handle file uploads in the node project. I hope it will be helpful to you!
 How to do Docker mirroring of Node service? Detailed explanation of extreme optimization
Oct 19, 2022 pm 07:38 PM
How to do Docker mirroring of Node service? Detailed explanation of extreme optimization
Oct 19, 2022 pm 07:38 PM
During this period, I was developing a HTML dynamic service that is common to all categories of Tencent documents. In order to facilitate the generation and deployment of access to various categories, and to follow the trend of cloud migration, I considered using Docker to fix service content and manage product versions in a unified manner. . This article will share the optimization experience I accumulated in the process of serving Docker for your reference.
 An in-depth analysis of Node's process management tool 'pm2”
Apr 03, 2023 pm 06:02 PM
An in-depth analysis of Node's process management tool 'pm2”
Apr 03, 2023 pm 06:02 PM
This article will share with you Node's process management tool "pm2", and talk about why pm2 is needed, how to install and use pm2, I hope it will be helpful to everyone!
 Pi Node Teaching: What is a Pi Node? How to install and set up Pi Node?
Mar 05, 2025 pm 05:57 PM
Pi Node Teaching: What is a Pi Node? How to install and set up Pi Node?
Mar 05, 2025 pm 05:57 PM
Detailed explanation and installation guide for PiNetwork nodes This article will introduce the PiNetwork ecosystem in detail - Pi nodes, a key role in the PiNetwork ecosystem, and provide complete steps for installation and configuration. After the launch of the PiNetwork blockchain test network, Pi nodes have become an important part of many pioneers actively participating in the testing, preparing for the upcoming main network release. If you don’t know PiNetwork yet, please refer to what is Picoin? What is the price for listing? Pi usage, mining and security analysis. What is PiNetwork? The PiNetwork project started in 2019 and owns its exclusive cryptocurrency Pi Coin. The project aims to create a one that everyone can participate
 Let's talk about how to use pkg to package Node.js projects into executable files.
Dec 02, 2022 pm 09:06 PM
Let's talk about how to use pkg to package Node.js projects into executable files.
Dec 02, 2022 pm 09:06 PM
How to package nodejs executable file with pkg? The following article will introduce to you how to use pkg to package a Node project into an executable file. I hope it will be helpful to you!
 What to do if npm node gyp fails
Dec 29, 2022 pm 02:42 PM
What to do if npm node gyp fails
Dec 29, 2022 pm 02:42 PM
npm node gyp fails because "node-gyp.js" does not match the version of "Node.js". The solution is: 1. Clear the node cache through "npm cache clean -f"; 2. Through "npm install -g n" Install the n module; 3. Install the "node v12.21.0" version through the "n v12.21.0" command.
 Token-based authentication with Angular and Node
Sep 01, 2023 pm 02:01 PM
Token-based authentication with Angular and Node
Sep 01, 2023 pm 02:01 PM
Authentication is one of the most important parts of any web application. This tutorial discusses token-based authentication systems and how they differ from traditional login systems. By the end of this tutorial, you will see a fully working demo written in Angular and Node.js. Traditional Authentication Systems Before moving on to token-based authentication systems, let’s take a look at traditional authentication systems. The user provides their username and password in the login form and clicks Login. After making the request, authenticate the user on the backend by querying the database. If the request is valid, a session is created using the user information obtained from the database, and the session information is returned in the response header so that the session ID is stored in the browser. Provides access to applications subject to
