

Introducing Centos to install PHP7 and configure php-fpm to start up


cd /usr/local/src
wget -c http://cn2.php.net/distributions/php-7.2.11.tar.gz
After downloading, unzip the php-7.2.11.tar.gz compressed package and enter the decompressed directorytar -xzvf php-7.2.11.tar.gz cd php-7.2.11Copy after login
Install some dependent library packages libxml2 and some other dependencies required for php7 Extension libraryyum -y install libxml2 yum -y install libxml2-devel yum -y install openssl yum -y install openssl-devel yum -y install curl-devel yum -y install libjpeg-devel yum -y install libpng-devel yum -y install freetype-devel yum -y install bzip2-devel yum -y install libmcrypt libmcrypt-devel yum -y install postgresql-devel yum -y install aspell-devel yum -y install readline-devel yum -y install libxslt-devel yum -y install net-snmp-devel yum -y install unixODBC-devel yum -y install libicu-devel yum -y install libc-client-devel yum -y install libXpm-devel yum -y install libvpx-devel yum -y install enchant-devel yum -y install openldap yum -y install openldap-devel yum -y install db4-devel yum -y install gmp-devel yum -y install sqlite-devel yum -y install mysql-develCopy after loginyum install oniguruma-devel -yCopy after login
Check the environment configuration before installation, check some dependent packages of php7 and start the php extension. If there is a lack of php dependent library packages during this process, there will be an error message. Add users and groups: (The user and group here are nginx, my username for nginx) groupadd -r nginx && useradd -r -g nginx -s /sbin/nologin
php installation configuration
Please choose the appropriate one according to the following A B C for installation configuration
A . PHP 7.2.10 Radio mode./configure --prefix=/usr/local/php --with-config-file-path=/usr/local/php/etc -- enable-fpm --with-fpm-user=nginx --with-fpm-group=nginx --enable-inline-optimization --disable-debug --disable-rpath --enable-shared --enable-soap -- with-xmlrpc --with-openssl --with-mcrypt --with-pcre-regex --with-sqlite3 --with-zlib --enable-bcmath --with-iconv --with-bz2 --enable-calendar --with-curl --with-cdb --enable-dom --enable-exif --enable-fileinfo --enable-filter --with-pcre-dir --enable-ftp --with-gd --with -openssl-dir --with-jpeg-dir --with-png-dir --with-freetype-dir --enable-gd-native-ttf --enable-gd-jis-conv --with-gettext -- with-gmp --with-mhash --enable-json --enable-mbstring --enable-mbregex --enable-mbregex-backtrack --with-libmbfl --with-onig --enable-pdo --with-mysqli =mysqlnd --with-pdo-mysql=mysqlnd --with-zlib-dir --with-pdo-sqlite --with-readline --enable-session --enable-shmop --enable-simplexml --enable-sockets --enable-sysvmsg --enable-sysvsem --enable-sysvshm --enable-wddx --with-libxml-dir --with-xsl --enable-zip --enable-mysqlnd-compression-support --with- pear --enable-opcacheB. PHP 7.2.10 multi-line mode
./configure \
--prefix=/usr/local/php \
--with-config-file-path=/usr/local/php/etc \
--enable-fpm \
--with-fpm-user=nginx \
--with-fpm-group=nginx \
--enable-inline-optimization \
--disable-debug \
--disable-rpath \
--enable-shared \
--enable-soap \
--with-xmlrpc \
--with-openssl \
--with-mcrypt \
--with-pcre-regex \
--with-sqlite3 \
--with-zlib \
--enable-bcmath \
--with-iconv \
--with-bz2 \
--enable-calendar \
--with-curl \
--with-cdb \
--enable-dom \
--enable-exif \
--enable-fileinfo \
--enable-filter \
--with-pcre-dir \
--enable-ftp \
--with-gd \
--with-openssl-dir \
--with-jpeg-dir \
--with-png-dir \
--with-freetype-dir \
--enable-gd-native-ttf \
--enable-gd-jis-conv \
--with-gettext \
--with-gmp \
--with-mhash \
--enable-json \
--enable-mbstring \
--enable-mbregex \
--enable-mbregex-backtrack \
--with-libmbfl \
--with-onig \
--enable-pdo \
--with-mysqli=mysqlnd \
--with-pdo-mysql=mysqlnd \
--with-zlib-dir \
--with-pdo-sqlite \
--with-readline \
--enable-session \
--enable-shmop \
--enable-simplexml \
--enable-sockets \
--enable-sysvmsg \
--enable-sysvsem \
--enable-sysvshm \
--enable-wddx \
--with-libxml-dir \
--with-xsl \
--enable-zip \
--enable-mysqlnd-compression-support \
--with-pear \
--enable-opcache
./configure \
--prefix=/usr/local/php \
--with-config-file-path=/usr/local/php/etc \
--enable-fpm \
--with-fpm-user=nginx \
--with-fpm-group=nginx \
--enable-inline-optimization \
--disable-debug \
--disable-rpath \
--enable-shared \
--enable-soap \
--with-xmlrpc \
--with-openssl \
--with-mcrypt \
--with-pcre-regex \
--with-sqlite3 \
--with-zlib \
--enable-bcmath \
--with-iconv \
--with-kerberos \
--with-libdir=lib64 \
--with-bz2 \
--enable-calendar \
--with-curl \
--with-cdb \
--enable-dom \
--enable-exif \
--enable-fileinfo \
--enable-filter \
--with-pcre-dir \
--enable-ftp \
--enable-gd \
--with-openssl-dir \
--with-jpeg-dir \
--with-png-dir \
--with-freetype-dir \
--enable-gd-native-ttf \
--enable-gd-jis-conv \
--with-gettext \
--with-gmp \
--with-mhash \
--enable-json \
--enable-mbstring \
--enable-mbregex \
--enable-mbregex-backtrack \
--with-libmbfl \
--with-onig \
--enable-pdo \
--with-mysqli=mysqlnd \
--with-pdo-mysql=mysqlnd \
--with-zlib-dir \
--with-pdo-sqlite \
--with-readline \
--enable-session \
--enable-shmop \
--enable-simplexml \
--enable-sockets \
--enable-sysvmsg \
--enable-sysvsem \
--enable-sysvshm \
--enable-wddx \
--with-libxml-dir \
--with-xsl \
--with-zip \
--enable-xml \
--enable-mysqlnd-compression-support \
--with-pear \
--enable-opcache \
--enable-pcntl
--with-zip configuration option when compiling PHP to provide zip support. For previous PHP versions, you need to use the --enable-zip option.
Compile and install php7make && make install
(If make: *** [sapi/ cli/php] Error 1 error, solve it by continuing to execute the make ZEND_EXTRA_LIBS='-liconv' commandCompilation is successful, check the php version/usr/local/php/bin /php -v
Run php-fpm/usr/local/php/sbin/php-fpm
The errors you may encounter when starting php-fpm are basically configuration file configuration and renaming issues:Error 1: Missing www.conf configuration file (WARNING: Nothing matches the include pattern /usr/local/php/etc/php-fpm.d/*.conf), you need to put www.conf.default in the /usr/local/php/etc/php-fpm.d/*.conf directory Rename to www.conf.
Error 2: Missing php-fpm.conf configuration file You need to put the default configuration in /usr/local/php/etc/php-fpm.conf Change the file php-fpm.conf.default to php-fpm.conf
Error three: Missing php.ini configuration file After php7 is compiled and installed, you will find that there is no php.ini configuration file. You need to copy php.ini-production or php.ini-development in the root directory of the unzipped package and rename it to php.ini to the /usr/local/php/etc folder in the php compiled installation directory.
Solutions to other errors: error: Package requirements (sqlite3 > 3.7.4) were not met
error: Package requirements (oniguruma) were not metyum install libsqlite3x-devel -yCopy after loginWhen yum install prompts "No software package available"yum install oniguruma-devel -yCopy after loginoff_t undefined error reportingyum install -y epel-releaseCopy after loginconfigure: error: off_t undefined; check your library configurationCopy after loginconfigure: WARNING: unrecognized options: --with-mcrypt, --enable-gd-native-ttf
php7.2 and later does not support –with-mcrypt , --enable-gd-native-ttf These two parameters need to be removed
After compiling and installing php in centos7, php will not be started after the system restarts. Therefore, you need to add a startup script to centos7 to start the service on PHP.
php7 compilation and installation method: http://zixuephp.net/article-207.htmlManual startup:
- /usr /local/php/sbin/php-fpm
Enable configuration php-fpm pid
- #找到php-fpm.conf配置文件
- /usr/local/php/etc/php-fpm.conf
- #开启pid ,去掉分号注释
- pid = run/php-fpm.pid
安装后要进行的操作:
1. 把安装目录下的 php.ini-development 复制到 /etc/ 目录下
2. 修改 /usr/local/php/etc/php-fpm.conf.default 名为 php-fpm.conf 并进入修改
3. 修改 /usr/local/php/etc/php-fpm.d/www.conf.default 为 www.conf 并进入修改
PHP 7.4.10 安装 ZIP
1 扩展包    wget https://pecl.php.net/get/zip-1.19.0.tgz
2 解压 并进入    tar -zxvf zip-1.19.0.tgz      2.2   cd  zip-1.19.0
3 /usr/local/php/bin/phpize
4 ./configure --with-php-config=/usr/local/php/bin/php-config   自己的php目录
5 make && make install

---------------------
然后下载最新的,解压

wget https://libzip.org/download/libzip-1.5.2.tar.gz
tar -zxvf libzip-1.5.2.tar.gz

这时发现还要安装cmake,再去下载cmake:
wget https://github.com/Kitware/CMake/releases/download/v3.15.4/cmake-3.15.4.tar.gz

解压:
tar -zxvf cmake-3.15.4.tar.gz

注意:cmake要按照文档安装
./bootstrap && make && sudo make install

漫长的等待,安装完成后,执行
cmake -version
出现版本号即表示cmake安装成功。

接下来, 再进入 cd libzip-1.5.2
mkdir build && cd build/
cmake -DCMAKE_INSTALL_PREFIX=/usr/local/libzip ..
make
make install

//检测libzip是否安装成功
whereis libzip
libzip: /usr/local/libzip
创建开机启动脚本
在Linux中将php-fpm配置成服务的方法
PHP 源文件路径: /usr/local/src/php-7.2.11/
PHP 安装后路径: /usr/local/php/
1. 配置 php-fpm.conf
vim /usr/local/php/etc/php-fpm.conf
php-fpm.pid 目录必须指向:/usr/local/php/var/run/php-fpm.pid
2. 拷贝php-fpm脚本至/etc/init.d目录
cp /usr/local/src/php-7.2.11/sapi/fpm/init.d.php-fpm /etc/init.d/php-fpm
#! /bin/sh

### BEGIN INIT INFO
# Provides:          php-fpm
# Required-Start:    $remote_fs $network
# Required-Stop:     $remote_fs $network
# Default-Start:     2 3 4 5
# Default-Stop:      0 1 6
# Short-Description: starts php-fpm
# Description:       starts the PHP FastCGI Process Manager daemon
### END INIT INFO

prefix=/usr/local/php
exec_prefix=${prefix}

php_fpm_BIN=${exec_prefix}/sbin/php-fpm
php_fpm_CONF=${prefix}/etc/php-fpm.conf
php_fpm_PID=${prefix}/var/run/php-fpm.pid


php_opts="--fpm-config $php_fpm_CONF --pid $php_fpm_PID"


wait_for_pid () {
	try=0

	while test $try -lt 35 ; do

		case "$1" in
			'created')
			if [ -f "$2" ] ; then
				try=''
				break
			fi
			;;

			'removed')
			if [ ! -f "$2" ] ; then
				try=''
				break
			fi
			;;
		esac

		echo -n .
		try=`expr $try + 1`
		sleep 1

	done

}

case "$1" in
	start)
		echo -n "Starting php-fpm "

		$php_fpm_BIN --daemonize $php_opts

		if [ "$?" != 0 ] ; then
			echo " failed"
			exit 1
		fi

		wait_for_pid created $php_fpm_PID

		if [ -n "$try" ] ; then
			echo " failed"
			exit 1
		else
			echo " done"
		fi
	;;

	stop)
		echo -n "Gracefully shutting down php-fpm "

		if [ ! -r $php_fpm_PID ] ; then
			echo "warning, no pid file found - php-fpm is not running ?"
			exit 1
		fi

		kill -QUIT `cat $php_fpm_PID`

		wait_for_pid removed $php_fpm_PID

		if [ -n "$try" ] ; then
			echo " failed. Use force-quit"
			exit 1
		else
			echo " done"
		fi
	;;

	status)
		if [ ! -r $php_fpm_PID ] ; then
			echo "php-fpm is stopped"
			exit 0
		fi

		PID=`cat $php_fpm_PID`
		if ps -p $PID | grep -q $PID; then
			echo "php-fpm (pid $PID) is running..."
		else
			echo "php-fpm dead but pid file exists"
		fi
	;;

	force-quit)
		echo -n "Terminating php-fpm "

		if [ ! -r $php_fpm_PID ] ; then
			echo "warning, no pid file found - php-fpm is not running ?"
			exit 1
		fi

		kill -TERM `cat $php_fpm_PID`

		wait_for_pid removed $php_fpm_PID

		if [ -n "$try" ] ; then
			echo " failed"
			exit 1
		else
			echo " done"
		fi
	;;

	restart)
		$0 stop
		$0 start
	;;

	reload)

		echo -n "Reload service php-fpm "

		if [ ! -r $php_fpm_PID ] ; then
			echo "warning, no pid file found - php-fpm is not running ?"
			exit 1
		fi

		kill -USR2 `cat $php_fpm_PID`

		echo " done"
	;;

	configtest)
		$php_fpm_BIN -t
	;;

	*)
		echo "Usage: $0 {start|stop|force-quit|restart|reload|status|configtest}"
		exit 1
	;;

esac3.设置权限并启动php-fpm:
chmod 755 /etc/init.d/php-fpm
/etc/init.d/php-fpm start
chkconfig –add php-fpm
最后,给出php-fpm以服务的方式启动、停止和重启:
service php-fpm start
service php-fpm stop
service php-fpm reload
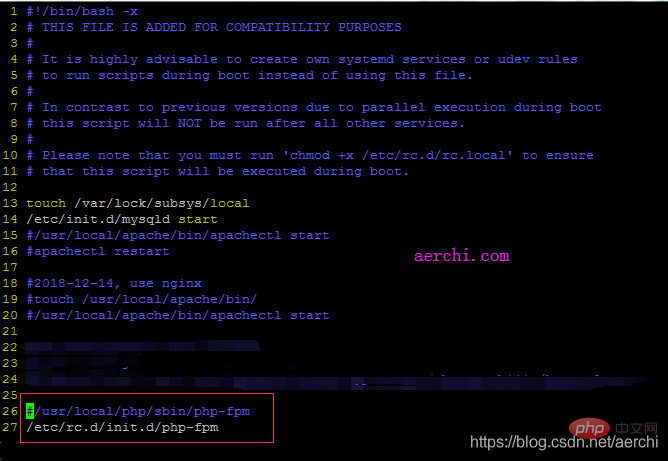
PHP-FPM 自启动配置服务:
vim /etc/rc.d/rc.local
查看开机启动的所有服务
chkconfig --list
nginx demo 配置:(不要忘记chown www-data:www-data 网站目录 不然没权限)
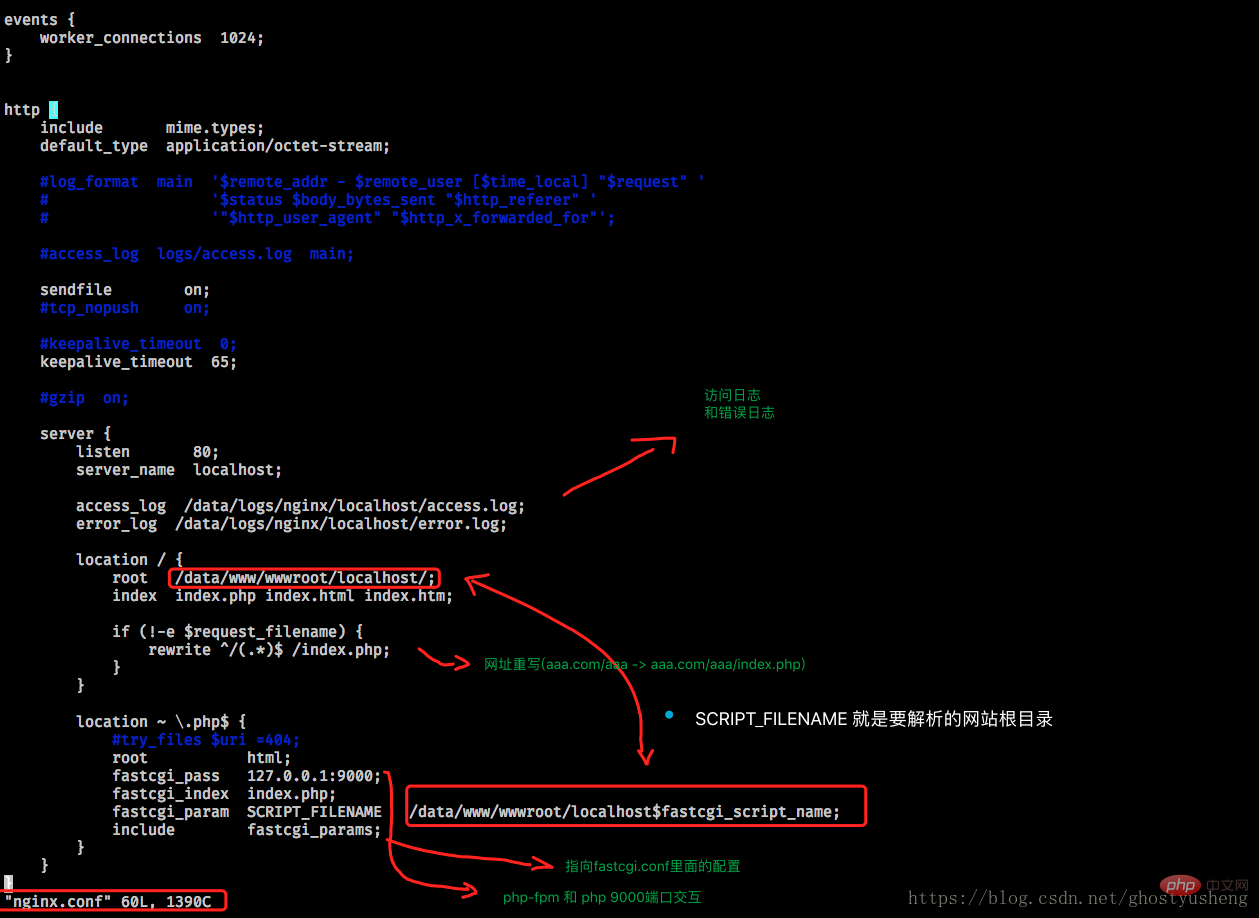
server {
	    listen      80;
	    server_name {{ server_name }};
	    access_log  /data/logs/nginx/{{ server_name }}/access.log;
	    error_log   /data/logs/nginx/{{ server_name }}/error.log;
    location / {
        index           index.php index.html index.htm;
        root            /data/www/wwwroot/{{ server_name }}/;

        if (!-e $request_filename) {
            rewrite ^/(.*)$ /index.php;
        }
    }

    location ~ \.php$ {
        include        fastcgi_params;
        fastcgi_pass   unix:/tmp/php-fcgi.sock;
        fastcgi_index  index.php;
    }
}php-fpm配置 (重命名两个文件 其他看实际情况配置(略。。。))
www.conf.default -> www.conf
php-fpm.conf.default -> php-fpm.conf
启动: php-fpm -D
nginx -s reload
The above is the detailed content of Introducing Centos to install PHP7 and configure php-fpm to start up. For more information, please follow other related articles on the PHP Chinese website!

Hot AI Tools

Undresser.AI Undress
AI-powered app for creating realistic nude photos

AI Clothes Remover
Online AI tool for removing clothes from photos.

Undress AI Tool
Undress images for free

Clothoff.io
AI clothes remover

Video Face Swap
Swap faces in any video effortlessly with our completely free AI face swap tool!

Hot Article
Hot Tools

Notepad++7.3.1
Easy-to-use and free code editor

SublimeText3 Chinese version
Chinese version, very easy to use

Zend Studio 13.0.1
Powerful PHP integrated development environment

Dreamweaver CS6
Visual web development tools

SublimeText3 Mac version
God-level code editing software (SublimeText3)
Hot Topics
 1387
1387
 52
52

 How to optimize CentOS HDFS configuration
Apr 14, 2025 pm 07:15 PM
How to optimize CentOS HDFS configuration
Apr 14, 2025 pm 07:15 PM
Improve HDFS performance on CentOS: A comprehensive optimization guide to optimize HDFS (Hadoop distributed file system) on CentOS requires comprehensive consideration of hardware, system configuration and network settings. This article provides a series of optimization strategies to help you improve HDFS performance. 1. Hardware upgrade and selection resource expansion: Increase the CPU, memory and storage capacity of the server as much as possible. High-performance hardware: adopts high-performance network cards and switches to improve network throughput. 2. System configuration fine-tuning kernel parameter adjustment: Modify /etc/sysctl.conf file to optimize kernel parameters such as TCP connection number, file handle number and memory management. For example, adjust TCP connection status and buffer size
 Centos stops maintenance 2024
Apr 14, 2025 pm 08:39 PM
Centos stops maintenance 2024
Apr 14, 2025 pm 08:39 PM
CentOS will be shut down in 2024 because its upstream distribution, RHEL 8, has been shut down. This shutdown will affect the CentOS 8 system, preventing it from continuing to receive updates. Users should plan for migration, and recommended options include CentOS Stream, AlmaLinux, and Rocky Linux to keep the system safe and stable.
 What are the backup methods for GitLab on CentOS
Apr 14, 2025 pm 05:33 PM
What are the backup methods for GitLab on CentOS
Apr 14, 2025 pm 05:33 PM
Backup and Recovery Policy of GitLab under CentOS System In order to ensure data security and recoverability, GitLab on CentOS provides a variety of backup methods. This article will introduce several common backup methods, configuration parameters and recovery processes in detail to help you establish a complete GitLab backup and recovery strategy. 1. Manual backup Use the gitlab-rakegitlab:backup:create command to execute manual backup. This command backs up key information such as GitLab repository, database, users, user groups, keys, and permissions. The default backup file is stored in the /var/opt/gitlab/backups directory. You can modify /etc/gitlab
 How to check CentOS HDFS configuration
Apr 14, 2025 pm 07:21 PM
How to check CentOS HDFS configuration
Apr 14, 2025 pm 07:21 PM
Complete Guide to Checking HDFS Configuration in CentOS Systems This article will guide you how to effectively check the configuration and running status of HDFS on CentOS systems. The following steps will help you fully understand the setup and operation of HDFS. Verify Hadoop environment variable: First, make sure the Hadoop environment variable is set correctly. In the terminal, execute the following command to verify that Hadoop is installed and configured correctly: hadoopversion Check HDFS configuration file: The core configuration file of HDFS is located in the /etc/hadoop/conf/ directory, where core-site.xml and hdfs-site.xml are crucial. use
 What is the CentOS MongoDB backup strategy?
Apr 14, 2025 pm 04:51 PM
What is the CentOS MongoDB backup strategy?
Apr 14, 2025 pm 04:51 PM
Detailed explanation of MongoDB efficient backup strategy under CentOS system This article will introduce in detail the various strategies for implementing MongoDB backup on CentOS system to ensure data security and business continuity. We will cover manual backups, timed backups, automated script backups, and backup methods in Docker container environments, and provide best practices for backup file management. Manual backup: Use the mongodump command to perform manual full backup, for example: mongodump-hlocalhost:27017-u username-p password-d database name-o/backup directory This command will export the data and metadata of the specified database to the specified backup directory.
 What steps are required to configure CentOS in HDFS
Apr 14, 2025 pm 06:42 PM
What steps are required to configure CentOS in HDFS
Apr 14, 2025 pm 06:42 PM
Building a Hadoop Distributed File System (HDFS) on a CentOS system requires multiple steps. This article provides a brief configuration guide. 1. Prepare to install JDK in the early stage: Install JavaDevelopmentKit (JDK) on all nodes, and the version must be compatible with Hadoop. The installation package can be downloaded from the Oracle official website. Environment variable configuration: Edit /etc/profile file, set Java and Hadoop environment variables, so that the system can find the installation path of JDK and Hadoop. 2. Security configuration: SSH password-free login to generate SSH key: Use the ssh-keygen command on each node
 Centos shutdown command line
Apr 14, 2025 pm 09:12 PM
Centos shutdown command line
Apr 14, 2025 pm 09:12 PM
The CentOS shutdown command is shutdown, and the syntax is shutdown [Options] Time [Information]. Options include: -h Stop the system immediately; -P Turn off the power after shutdown; -r restart; -t Waiting time. Times can be specified as immediate (now), minutes ( minutes), or a specific time (hh:mm). Added information can be displayed in system messages.
 What are the common misunderstandings in CentOS HDFS configuration?
Apr 14, 2025 pm 07:12 PM
What are the common misunderstandings in CentOS HDFS configuration?
Apr 14, 2025 pm 07:12 PM
Common problems and solutions for Hadoop Distributed File System (HDFS) configuration under CentOS When building a HadoopHDFS cluster on CentOS, some common misconfigurations may lead to performance degradation, data loss and even the cluster cannot start. This article summarizes these common problems and their solutions to help you avoid these pitfalls and ensure the stability and efficient operation of your HDFS cluster. Rack-aware configuration error: Problem: Rack-aware information is not configured correctly, resulting in uneven distribution of data block replicas and increasing network load. Solution: Double check the rack-aware configuration in the hdfs-site.xml file and use hdfsdfsadmin-printTopo
