How to install bootstrap
bootstrap installation method: 1. Download the Bootstrap file from the official Bootstrap website, and then use and <script> to reference; 2. Install through Bower; 3. Through npm to install; 4. Install through Composer. </script>

The operating environment of this tutorial: windows7 system, bootstrap3.3.7 version, Dell G3 computer.
Related tutorial recommendations: "bootstrap Tutorial"
Bootstrap is a popular framework in front-end development, simple and flexible. It is based on HTML, CSS and JavaScript. HTML defines page elements, CSS defines page layout, and JavaScript is responsible for the response of page elements. Bootstrap encapsulates HTML, CSS and JavaScript into functional components, which is simple and crude to use.
How to install Bootstrap?
1. Download the Bootstrap file from the official Bootstrap website, and then use and <script> to reference </script>
Log in to the official Bootstrap website

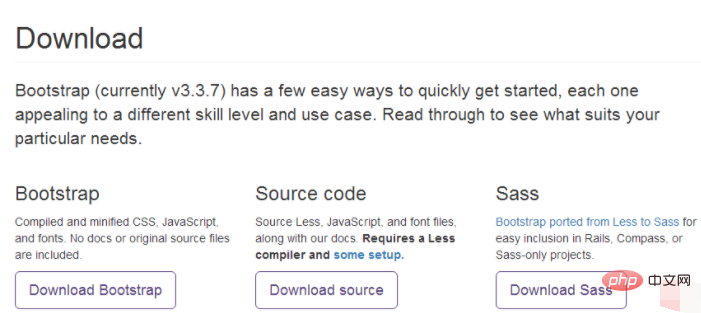
Download Bootstrap

Download Bootstrap: Download the precompiled and compressed version of Bootstrap (documentation and source code not included).
Download code: Bootstrap source code, as introduced on the official website, requires compilation of Less files and some installation.
If you are new to Bootstrap, it is recommended to download the first one and use it directly.
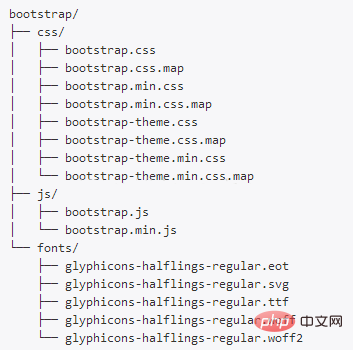
File structure
The downloaded file is a compressed package. After we decompress it, we can see the structure of the file.

htmlUsing Bootstrap
htmlUsing Bootstrap requires referencing jquery.js, bootstrap.min.js and bootstrap.min.css files, refer to these Files can turn a regular HTML file into a template using Bootstrap.
Method 1: Put the html and Bootstrap folders together
We have downloaded the pre-edited Bootstrap and decompressed it to get the Bootstrap folder. Just put the html and Bootstrap folders together. , and then use relative paths to reference the jquery.js, bootstrap.min.js and bootstrap.min.css files.
Method 2: HTML references jquery.js, bootstrap.min.js and bootstrap.min.css in CDN
Many CDN services have uploaded these files, just call them directly good.
For example:
<!DOCTYPE html>
<html>
<head>
 <meta charset="utf-8">
 <title>在线尝试 Bootstrap 实例</title>
 <link rel="stylesheet" href="http://cdn.static.runoob.com/libs/bootstrap/3.3.7/css/bootstrap.min.css">
 <script src="http://cdn.static.runoob.com/libs/jquery/2.1.1/jquery.min.js"></script>
 <script src="http://cdn.static.runoob.com/libs/bootstrap/3.3.7/js/bootstrap.min.js"></script>
</head>
<body>

  <h1 id="Hello-nbsp-world">Hello, world!</h1>

</body>
</html>
In addition, you can also use the following CDN service:
Domestic recommended use: https://www.staticfile.org/
International recommended use: https://cdnjs.com/
2. Install through Bower
You can also install and manage Bootstrap's Less, CSS, JavaScript and font files through Bower.
$ bower install bootstrap
3. Install through npm
You can also use the npm tool to install Bootstrap:
$ npm install bootstrap@3
require('bootstrap') The function of the code is to load all Bootstrap jQuery plugin. Among them, the bootstrap module itself does not export anything. You can manually load a single Bootstrap plug-in by loading the /js/*.js files in the top-level directory of the installation package.
Bootstrap's package.json file contains some additional metadata:
less - the path to the entry Less file of the Bootstrap source code
style - the uncompressed CSS file of Bootstrap Path
4. Install through Composer
You can also install the Bootstrap installation package through Composer (Chinese official website: Composer Chinese website), which includes Less, CSS, JavaScript and fonts files:
$ composer require twbs/bootstrap
Things to note when compiling Less/Sass source code
Bootstrap uses Autoprefixer to automatically add vendor-specific prefixes to certain CSS properties. If you are compiling Bootstrap from Less/Sass source and are not using the Gruntfile that comes with Bootstrap, you must integrate Autoprefixer into your compilation tools and process. If you are using our pre-compiled Bootstrap files or the Gruntfile files we provide, then there is no need to worry, we have already done this for you.
The above is the detailed content of How to install bootstrap. For more information, please follow other related articles on the PHP Chinese website!

Hot AI Tools

Undresser.AI Undress
AI-powered app for creating realistic nude photos

AI Clothes Remover
Online AI tool for removing clothes from photos.

Undress AI Tool
Undress images for free

Clothoff.io
AI clothes remover

AI Hentai Generator
Generate AI Hentai for free.

Hot Article

Hot Tools

Notepad++7.3.1
Easy-to-use and free code editor

SublimeText3 Chinese version
Chinese version, very easy to use

Zend Studio 13.0.1
Powerful PHP integrated development environment

Dreamweaver CS6
Visual web development tools

SublimeText3 Mac version
God-level code editing software (SublimeText3)

Hot Topics
 1382
1382
 52
52
 How to get the bootstrap search bar
Apr 07, 2025 pm 03:33 PM
How to use Bootstrap to get the value of the search bar: Determines the ID or name of the search bar. Use JavaScript to get DOM elements. Gets the value of the element. Perform the required actions.
 How to use bootstrap in vue
Apr 07, 2025 pm 11:33 PM
Using Bootstrap in Vue.js is divided into five steps: Install Bootstrap. Import Bootstrap in main.js. Use the Bootstrap component directly in the template. Optional: Custom style. Optional: Use plug-ins.
 How to write split lines on bootstrap
Apr 07, 2025 pm 03:12 PM
There are two ways to create a Bootstrap split line: using the tag, which creates a horizontal split line. Use the CSS border property to create custom style split lines.
 How to do vertical centering of bootstrap
Apr 07, 2025 pm 03:21 PM
Use Bootstrap to implement vertical centering: flexbox method: Use the d-flex, justify-content-center, and align-items-center classes to place elements in the flexbox container. align-items-center class method: For browsers that do not support flexbox, use the align-items-center class, provided that the parent element has a defined height.
 How to resize bootstrap
Apr 07, 2025 pm 03:18 PM
To adjust the size of elements in Bootstrap, you can use the dimension class, which includes: adjusting width: .col-, .w-, .mw-adjust height: .h-, .min-h-, .max-h-
 How to set up the framework for bootstrap
Apr 07, 2025 pm 03:27 PM
To set up the Bootstrap framework, you need to follow these steps: 1. Reference the Bootstrap file via CDN; 2. Download and host the file on your own server; 3. Include the Bootstrap file in HTML; 4. Compile Sass/Less as needed; 5. Import a custom file (optional). Once setup is complete, you can use Bootstrap's grid systems, components, and styles to create responsive websites and applications.
 How to insert pictures on bootstrap
Apr 07, 2025 pm 03:30 PM
There are several ways to insert images in Bootstrap: insert images directly, using the HTML img tag. With the Bootstrap image component, you can provide responsive images and more styles. Set the image size, use the img-fluid class to make the image adaptable. Set the border, using the img-bordered class. Set the rounded corners and use the img-rounded class. Set the shadow, use the shadow class. Resize and position the image, using CSS style. Using the background image, use the background-image CSS property.
 What to do if the Bootstrap Table uses AJAX to get data garbled
Apr 07, 2025 am 11:54 AM
Solutions to the garbled code of Bootstrap Table when using AJAX to obtain data from the server: 1. Set the correct character encoding of the server-side code (such as UTF-8). 2. Set the request header in the AJAX request and specify the accepted character encoding (Accept-Charset). 3. Use the "unescape" converter of the Bootstrap Table to decode the escaped HTML entity into original characters.


