

Usage of Bootstrap File Input


This article introduces how to use Bootstrap File Input (the best file upload component) to display and upload images, and how to upload files on the server side save.
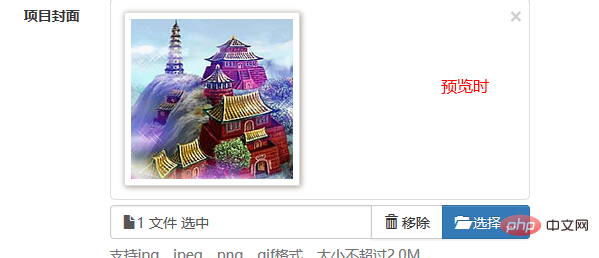
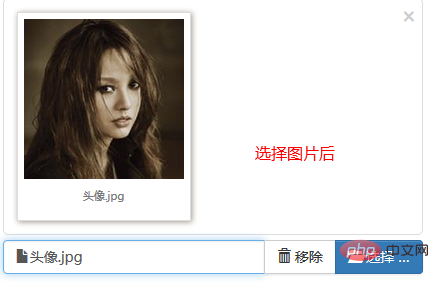
1. Let’s take a look at the renderings first

bootstrap basic tutorial》
2. Introducing the plug-in styles and scripts<link type="text/css" rel="stylesheet" href="${ctx}/components/fileinput/css/fileinput.css" />
<script type="text/javascript" src="${ctx}/components/fileinput/js/fileinput.js"></script>
<script type="text/javascript" src="${ctx}/components/fileinput/js/fileinput_locale_zh.js"></script>Copy after login
http://plugins.krajee.com/file-input, this is its official document, which There is a download address. 3. Add components to the page<link type="text/css" rel="stylesheet" href="${ctx}/components/fileinput/css/fileinput.css" />
<script type="text/javascript" src="${ctx}/components/fileinput/js/fileinput.js"></script>
<script type="text/javascript" src="${ctx}/components/fileinput/js/fileinput_locale_zh.js"></script><input type="file" name="image" class="projectfile" value="${deal.image}"/>Copy after login
<input type="file" name="image" class="projectfile" value="${deal.image}"/>- type=file and class=projectfile, indicating that it is an input file type.
- name specifies its acquisition key in the background.
- value specifies the image path when it is displayed.
projectfileoptions : {
showUpload : false,
showRemove : false,
language : 'zh',
allowedPreviewTypes : [ 'image' ],
allowedFileExtensions : [ 'jpg', 'png', 'gif' ],
maxFileSize : 2000,
},
// 文件上传框
$('input[class=projectfile]').each(function() {
var imageurl = $(this).attr("value");
if (imageurl) {
var op = $.extend({
initialPreview : [ // 预览图片的设置
"<img src="/static/imghw/default1.png" data-src="https://img.php.cn/upload/article/000/000/024/f1a455e09845f106ee9dbc2081f39ac1-4.png" class="lazy" src='" + imageurl + "' class='file-preview-image' alt="Usage of Bootstrap File Input" >", ]
}, projectfileoptions);
$(this).fileinput(op);
} else {
$(this).fileinput(projectfileoptions);
}
});Copy after login
projectfileoptions : {
showUpload : false,
showRemove : false,
language : 'zh',
allowedPreviewTypes : [ 'image' ],
allowedFileExtensions : [ 'jpg', 'png', 'gif' ],
maxFileSize : 2000,
},
// 文件上传框
$('input[class=projectfile]').each(function() {
var imageurl = $(this).attr("value");
if (imageurl) {
var op = $.extend({
initialPreview : [ // 预览图片的设置
"<img src="/static/imghw/default1.png" data-src="https://img.php.cn/upload/article/000/000/024/f1a455e09845f106ee9dbc2081f39ac1-4.png" class="lazy" src='" + imageurl + "' class='file-preview-image' alt="Usage of Bootstrap File Input" >", ]
}, projectfileoptions);
$(this).fileinput(op);
} else {
$(this).fileinput(projectfileoptions);
}
});- Get the corresponding input file through jquery, and then execute the fileinput method.
- showUpload sets whether there is an upload button.
- language specifies Chinese
allowedFileTypes and allowedFileExtensions. I don’t know why it doesn’t work? - maxFileSize specifies the upload file size
<form class="form-horizontal required-validate" action="${ctx}/save?callbackType=confirmTimeoutForward" enctype="multipart/form-data" method="post" οnsubmit="return iframeCallback(this, pageAjaxDone)">

	<div class="form-group">
		<label for="" class="col-md-1 control-label">项目封面</label>
		<div class="col-md-10 tl th">
			<input type="file" name="image" class="projectfile" value="${deal.image}" />
			<p class="help-block">支持jpg、jpeg、png、gif格式,大小不超过2.0M</p>
		</div>
	</div>
	<div class="form-group text-center ">
		<div class="col-md-10 col-md-offset-1">
			<button type="submit" class="btn btn-primary btn-lg">保存</button>
		</div>
	</div>
</form>- enctype="multipart/form-data" is essential. ##οnsubmit="return iframeCallback(this, pageAjaxDone)" method, submit the form (iframeCallback) through ajax, and call the callback function (pageAjaxDone) for the next step after the upload is successful.
- Then let’s introduce the callback function pageAjaxDone.
function pageAjaxDone(json) {
	YUNM.debug(json);
	YUNM.ajaxDone(json);

	if (json[YUNM.keys.statusCode] == YUNM.statusCode.ok) {
		var msg = json[YUNM.keys.message];
		// 弹出消息提示
		YUNM.debug(msg);

		if (YUNM.callbackType.confirmTimeoutForward == json.callbackType) {
			$.showSuccessTimeout(msg, function() {
				window.location = json.forwardUrl;
			});
		}
	}
}Its main function is to process the error message passed by the server through the ajaxDone method. If the server operation is successful, a prompt message will be displayed and then jump to the corresponding url.
6. Save images on the server side
Please refer to the backend springMVC file to save (http://blog.csdn.net/qing_gee/article/details/51027040#t8)
ps: The above blog left a little question, but I didn’t study it until a very good friend ihchenchen gave me the following reminder:allowedFileTypes, allowedFileExtensions I know Why it has no effect? Because the fileinput() method is called twice, once in the last few lines of fileinput.js, and once in the
$(this).fileinput()you wrote yourself. In fileinput.js, the allowedFileTypes and allowedFileExtensions values are not set.
There are two ways to change it:
1. Comment out the last few lines of calls in fileinput.js.
2. Use the "data-" method to do everything without writing $(this).fileinput().
I am very grateful to ihchenchen for his kind reminder. Although the explanation he provided did not solve my doubts, I really like such interactive technical exchanges. I wrote a lot of blogs before, and it rarely happened. Such a well-intentioned and effective answer. This reminds me of Chinese programmers and foreign programmers. The stories inside are shocking and a little bit embarrassing. So how to achieve "
Ask questions, get answers, no distractions." becomes particularly precious, and "ihchenchen" is full of this spirit! 6. Solve the doubts about allowedFileTypes and allowedFileExtensions
I was confused before about why bootstrap fileinput had no effect after setting these two attributes. In fact, it was my own misunderstanding. Now after some painful research After realizing it, it suddenly dawned on me!
①、allowedFileTypes
allowedFileTypesarray the list of allowed file types for upload. This by default is set to null which means the plugin supports all file types for upload. If an invalid file type is found, then a validation error message as set in msgInvalidFileType will be raised. The following types as set in fileTypeSettings are available for setup.['image', 'html', 'text', 'video', 'audio', 'flash', 'object']
Let's start with "allowedFileTypes". This attribute tells us the file selection type. Then we can easily think of this picture:
也就是说,我们希望此时的“所有文件”处不是“所有文件”,而是“image”之类的。显然这样的逻辑并没有错,但却不适合bootstrap fileinput!
那么,这个时候我就很容易认为“allowedFileTypes” 没有起到作用!
但请看下图: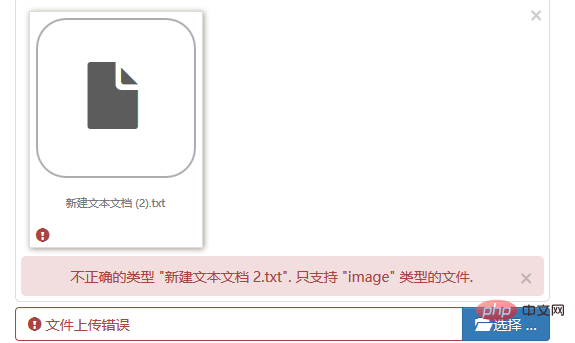
吼吼,原来是在你选择了文件后发生的类型检查!
②、allowedFileTypes工作原理
			$(this).fileinput({
				showUpload : false,
				showRemove : false,
				language : 'zh',
				allowedPreviewTypes: ['image'],
		        allowedFileTypes: ['image'],
		        allowedFileExtensions:  ['jpg', 'png'],
				maxFileSize : 2000,

});通过fileinput方法我们加载一个bootstrap fileinput组件,那么其内部是如何实现allowedFileTypes的呢?
通过在fileinput.js文件中搜索“allowedFileTypes”关键字,我们得到如下代码:
 var node = ctr + i, previewId = previewInitId + "-" + node, isText, file = files[i],
                    caption = self.slug(file.name), fileSize = (file.size || 0) / 1000, checkFile, fileExtExpr = '',
                    previewData = objUrl.createObjectURL(file), fileCount = 0, j, msg, typ, chk,
                    fileTypes = self.allowedFileTypes, strTypes = isEmpty(fileTypes) ? '' : fileTypes.join(', '),
fileExt = self.allowedFileExtensions, strExt = isEmpty(fileExt) ? '' : fileExt.join(', ');然后我们继续看到如下的代码:
if (!isEmpty(fileTypes) && isArray(fileTypes)) {
for (j = 0; j < fileTypes.length; j += 1) {
typ = fileTypes[j];
checkFile = settings[typ];
chk = (checkFile !== undefined && checkFile(file.type, caption));
fileCount += isEmpty(chk) ? 0 : chk.length;
}
if (fileCount === 0) {
msg = self.msgInvalidFileType.replace('{name}', caption).replace('{types}', strTypes);
self.isError = throwError(msg, file, previewId, i);
return;
}
}我们可以发现,文件类型的检查是发生在checkFile方法上,那么checkFile方法到底做了些什么呢?
 defaultFileTypeSettings = {
        image: function (vType, vName) {
            return (vType !== undefined) ? vType.match('image.*') : vName.match(/\.(png|jpe?g)$/i);
        },
...以上就是checkFile的内容。
也就是说当我们指定
allowedFileTypes: ['image'],时,就会进行image的类型检查。显然我们选择的txt文件不属于image类型,那么就会匹配不上,出现以上界面。
同时,该方法告诉我们,当不指定
allowedFileTypes: ['image'],,只指定allowedFileExtensions: ['jpg', 'png'],就会执行vName.match(/\.(png|jpe?g)$/i),也就是文件后缀类型的检查,这点很关键啊,为我们接下来介绍“allowedFileExtensions”奠定基础。
③、allowedFileExtensions什么时候起作用
上节我们讨论完“allowedFileTypes”,捎带说了“allowedFileExtensions”,那么如何让后缀进行check呢?
			$(this).fileinput({
				showUpload : false,
				showRemove : false,
				language : 'zh',
				allowedPreviewTypes: ['image'],
		        allowedFileExtensions:  ['jpg', 'png'],
				maxFileSize : 2000,

});fileinput组件此时指定的属性如上,没有了“allowedFileTypes”,并且指定允许的后缀类型为“[‘jpg’, ‘png’]”,也就是说,假如我们选择了gif的图片就会出现错误提示。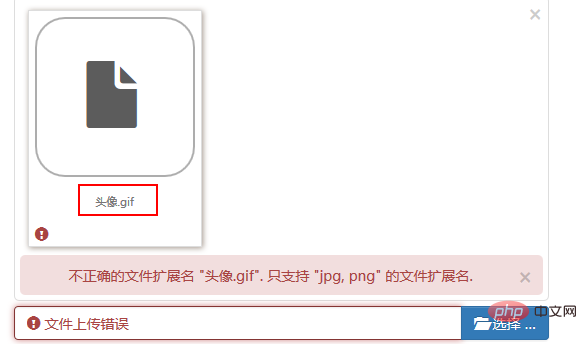
错误预期的发生了,那么请特别注意:
image: function (vType, vName) {
            return (vType !== undefined) ? vType.match('image.*') : vName.match(/\.(png|jpe?g)$/i);
},fileinput.js文件中原始的代码如下:
 image: function (vType, vName) {
            return (vType !== undefined) ? vType.match('image.*') : vName.match(/\.(gif|png|jpe?g)$/i);
},image类型的后缀当然默认包含了gif,我只是为了举例说明,代码做了调整,请注意!
更多编程相关知识,请访问:编程视频!!
The above is the detailed content of Usage of Bootstrap File Input. For more information, please follow other related articles on the PHP Chinese website!

Hot AI Tools

Undresser.AI Undress
AI-powered app for creating realistic nude photos

AI Clothes Remover
Online AI tool for removing clothes from photos.

Undress AI Tool
Undress images for free

Clothoff.io
AI clothes remover

AI Hentai Generator
Generate AI Hentai for free.

Hot Article
Hot Tools

Notepad++7.3.1
Easy-to-use and free code editor

SublimeText3 Chinese version
Chinese version, very easy to use

Zend Studio 13.0.1
Powerful PHP integrated development environment

Dreamweaver CS6
Visual web development tools

SublimeText3 Mac version
God-level code editing software (SublimeText3)
Hot Topics
 1377
1377
 52
52

 How to do vertical centering of bootstrap
Apr 07, 2025 pm 03:21 PM
How to do vertical centering of bootstrap
Apr 07, 2025 pm 03:21 PM
Use Bootstrap to implement vertical centering: flexbox method: Use the d-flex, justify-content-center, and align-items-center classes to place elements in the flexbox container. align-items-center class method: For browsers that do not support flexbox, use the align-items-center class, provided that the parent element has a defined height.
 How to get the bootstrap search bar
Apr 07, 2025 pm 03:33 PM
How to get the bootstrap search bar
Apr 07, 2025 pm 03:33 PM
How to use Bootstrap to get the value of the search bar: Determines the ID or name of the search bar. Use JavaScript to get DOM elements. Gets the value of the element. Perform the required actions.
 How to resize bootstrap
Apr 07, 2025 pm 03:18 PM
How to resize bootstrap
Apr 07, 2025 pm 03:18 PM
To adjust the size of elements in Bootstrap, you can use the dimension class, which includes: adjusting width: .col-, .w-, .mw-adjust height: .h-, .min-h-, .max-h-
 How to insert pictures on bootstrap
Apr 07, 2025 pm 03:30 PM
How to insert pictures on bootstrap
Apr 07, 2025 pm 03:30 PM
There are several ways to insert images in Bootstrap: insert images directly, using the HTML img tag. With the Bootstrap image component, you can provide responsive images and more styles. Set the image size, use the img-fluid class to make the image adaptable. Set the border, using the img-bordered class. Set the rounded corners and use the img-rounded class. Set the shadow, use the shadow class. Resize and position the image, using CSS style. Using the background image, use the background-image CSS property.
 How to use bootstrap button
Apr 07, 2025 pm 03:09 PM
How to use bootstrap button
Apr 07, 2025 pm 03:09 PM
How to use the Bootstrap button? Introduce Bootstrap CSS to create button elements and add Bootstrap button class to add button text
 How to set up the framework for bootstrap
Apr 07, 2025 pm 03:27 PM
How to set up the framework for bootstrap
Apr 07, 2025 pm 03:27 PM
To set up the Bootstrap framework, you need to follow these steps: 1. Reference the Bootstrap file via CDN; 2. Download and host the file on your own server; 3. Include the Bootstrap file in HTML; 4. Compile Sass/Less as needed; 5. Import a custom file (optional). Once setup is complete, you can use Bootstrap's grid systems, components, and styles to create responsive websites and applications.
 How to write split lines on bootstrap
Apr 07, 2025 pm 03:12 PM
How to write split lines on bootstrap
Apr 07, 2025 pm 03:12 PM
There are two ways to create a Bootstrap split line: using the tag, which creates a horizontal split line. Use the CSS border property to create custom style split lines.
 How to view the date of bootstrap
Apr 07, 2025 pm 03:03 PM
How to view the date of bootstrap
Apr 07, 2025 pm 03:03 PM
Answer: You can use the date picker component of Bootstrap to view dates in the page. Steps: Introduce the Bootstrap framework. Create a date selector input box in HTML. Bootstrap will automatically add styles to the selector. Use JavaScript to get the selected date.
