 Operation and Maintenance
 Windows Operation and Maintenance
 How to set up FTP service under Windows system
How to set up FTP service under Windows system

1. Introduction to ftp
(Learning video sharing: Introduction to Programming)
Before I started to build the FTP service, I First, let me briefly introduce the ftp protocol and ftp server.
ftp protocol: A file transfer protocol. File transfer between local and server.
ftp server: A server that supports the ftp transfer protocol. Generally, Windows comes with ftp service, but it is not started by default.
There are also many ftp related software, among which Server-U, FileZilla, VsFTP, and Apache's FtpServer are widely used.
Due to work needs, we often copy files to other computers. If we copy using a USB flash drive or other storage device, it is easy to get viruses. For this reason, we need to build an ftp server and put the files we need to share on the server. As long as the network is normal, it is easy to remove the files we need from the server.
Today we will introduce an open source ftp server. Apache FTPServerFtpServer is the protagonist this time. Apache FTPServer is a 100% pure Java FTP server. FTPServer can run independently as a Windows service or Unix/Linux daemon or be embedded in a Java application.
Next we will take FtpServer as an example to build the ftp service.
2. Download Apache FTPServer
You can download it from the official website: http://mina.apache.org/ftpserver-project/downloads.html The latest version is Apache FtpServer 1.1.1 Release. For stability reasons, what I downloaded here is version 1.0.6
3. Download and decompress the compressed package
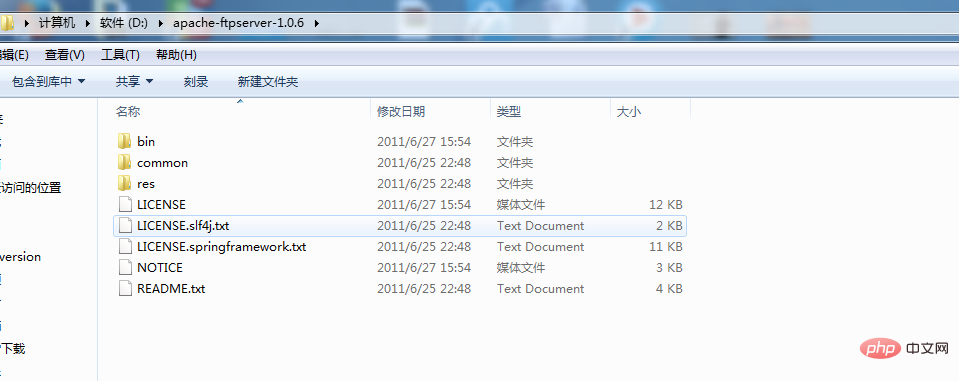
Extract the downloaded compressed package to the local computer. Mine is placed on the root of drive D. directory, the directory structure is as follows:

# Password is "admin"
ftpserver.user.admin.userpassword=admin
ftpserver.user.admin.homedirectory=./res/home
ftpserver.user.admin.enableflag=true
ftpserver.user.admin.writepermission=true
ftpserver.user.admin.maxloginnumber=0
ftpserver.user.admin.maxloginperip=0
ftpserver.user.admin.idletime=0
ftpserver.user.admin.uploadrate=0
ftpserver.user.admin.downloadrate=0
ftpserver.user.anonymous.userpassword=
ftpserver.user.anonymous.homedirectory=./res/home
ftpserver.user.anonymous.enableflag=true
ftpserver.user.anonymous.writepermission=false
ftpserver.user.anonymous.maxloginnumber=20
ftpserver.user.anonymous.maxloginperip=2
ftpserver.user.anonymous.idletime=300
ftpserver.user.anonymous.uploadrate=4800
ftpserver.user.anonymous.downloadrate=4800
#密码 配置新的用户
ftpserver.user.lxw.userpassword=123456
#主目录
ftpserver.user.lxw.homedirectory=./res/home
#当前用户可用
ftpserver.user.lxw.enableflag=true
#具有上传权限
ftpserver.user.lxw.writepermission=true
#最大登陆用户数为20
ftpserver.user.lxw.maxloginnumber=20
#同IP登陆用户数为2
ftpserver.user.lxw.maxloginperip=2
#空闲时间为300秒
ftpserver.user.lxw.idletime=300
#上传速率限制为480000字节每秒
ftpserver.user.lxw.uploadrate=48000000
#下载速率限制为480000字节每秒
ftpserver.user.lxw.downloadrate=48000000
<server xmlns="http://mina.apache.org/ftpserver/spring/v1"
    xmlns:xsi="http://www.w3.org/2001/XMLSchema-instance"
    xsi:schemaLocation="
       http://mina.apache.org/ftpserver/spring/v1 http://mina.apache.org/ftpserver/ftpserver-1.0.xsd
       "
    id="myServer">
    <listeners>
        <!-- 默认端口是2121,可以修改为自己的端口 -->
        <nio-listener name="default" port="2121">
            <ssl>
                <keystore file="./res/ftpserver.jks" password="password" />
            </ssl>
        </nio-listener>
    </listeners>
    <file-user-manager file="./res/conf/users.properties" encrypt-passwords="clear"/>
    <!-- 添加encrypt-passwords="clear",将密码加密方式修改给clear -->
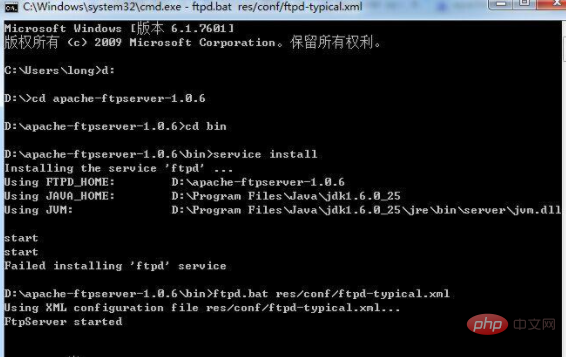
</server>service install ftpd.bat res/conf/ftpd-typical.xml


service install
ftpd.bat res/conf/ftpd-typical.xml
d:
cd D:\apache-ftpserver-1.0.5\bin
ftpd.bat res/conf/ftpd-typical.xml
The above is the detailed content of How to set up FTP service under Windows system. For more information, please follow other related articles on the PHP Chinese website!

Hot AI Tools

Undresser.AI Undress
AI-powered app for creating realistic nude photos

AI Clothes Remover
Online AI tool for removing clothes from photos.

Undress AI Tool
Undress images for free

Clothoff.io
AI clothes remover

AI Hentai Generator
Generate AI Hentai for free.

Hot Article

Hot Tools

Notepad++7.3.1
Easy-to-use and free code editor

SublimeText3 Chinese version
Chinese version, very easy to use

Zend Studio 13.0.1
Powerful PHP integrated development environment

Dreamweaver CS6
Visual web development tools

SublimeText3 Mac version
God-level code editing software (SublimeText3)

Hot Topics
 1381
1381
 52
52
 Can I install mysql on Windows 7
Apr 08, 2025 pm 03:21 PM
Yes, MySQL can be installed on Windows 7, and although Microsoft has stopped supporting Windows 7, MySQL is still compatible with it. However, the following points should be noted during the installation process: Download the MySQL installer for Windows. Select the appropriate version of MySQL (community or enterprise). Select the appropriate installation directory and character set during the installation process. Set the root user password and keep it properly. Connect to the database for testing. Note the compatibility and security issues on Windows 7, and it is recommended to upgrade to a supported operating system.
 How to speed up the loading speed of PS?
Apr 06, 2025 pm 06:27 PM
Solving the problem of slow Photoshop startup requires a multi-pronged approach, including: upgrading hardware (memory, solid-state drive, CPU); uninstalling outdated or incompatible plug-ins; cleaning up system garbage and excessive background programs regularly; closing irrelevant programs with caution; avoiding opening a large number of files during startup.
 In front-end development, how to use CSS and JavaScript to achieve searchlight effects similar to Windows 10 settings interface?
Apr 05, 2025 pm 10:21 PM
How to implement Windows-like in front-end development...
 How to pull the vertical reference line of PS
Apr 06, 2025 pm 08:18 PM
Pull vertical guides in Photoshop: Enable ruler view (View > ruler). Hover the mouse over the vertical edge of the ruler, and then the cursor becomes a vertical line with double arrows and hold and drag the mouse to pull out the reference line. Click Delete by dragging the guide, or hovering it into a cross.
 Solutions to the errors reported by MySQL on a specific system version
Apr 08, 2025 am 11:54 AM
The solution to MySQL installation error is: 1. Carefully check the system environment to ensure that the MySQL dependency library requirements are met. Different operating systems and version requirements are different; 2. Carefully read the error message and take corresponding measures according to prompts (such as missing library files or insufficient permissions), such as installing dependencies or using sudo commands; 3. If necessary, try to install the source code and carefully check the compilation log, but this requires a certain amount of Linux knowledge and experience. The key to ultimately solving the problem is to carefully check the system environment and error information, and refer to the official documents.
 MySQL can't be installed after downloading
Apr 08, 2025 am 11:24 AM
The main reasons for MySQL installation failure are: 1. Permission issues, you need to run as an administrator or use the sudo command; 2. Dependencies are missing, and you need to install relevant development packages; 3. Port conflicts, you need to close the program that occupies port 3306 or modify the configuration file; 4. The installation package is corrupt, you need to download and verify the integrity; 5. The environment variable is incorrectly configured, and the environment variables must be correctly configured according to the operating system. Solve these problems and carefully check each step to successfully install MySQL.
 Unable to access mysql from terminal
Apr 08, 2025 pm 04:57 PM
Unable to access MySQL from the terminal may be due to: MySQL service not running; connection command error; insufficient permissions; firewall blocks connection; MySQL configuration file error.
 How to solve mysql cannot connect to local host
Apr 08, 2025 pm 02:24 PM
The MySQL connection may be due to the following reasons: MySQL service is not started, the firewall intercepts the connection, the port number is incorrect, the user name or password is incorrect, the listening address in my.cnf is improperly configured, etc. The troubleshooting steps include: 1. Check whether the MySQL service is running; 2. Adjust the firewall settings to allow MySQL to listen to port 3306; 3. Confirm that the port number is consistent with the actual port number; 4. Check whether the user name and password are correct; 5. Make sure the bind-address settings in my.cnf are correct.


