How to break away from organizational management in win10
How to break away from organizational management in Windows 10: First, right-click the computer and select [Properties], click [Change Settings]; then click [Change], modify the workgroup name in the workgroup text box, and click [OK]; finally Restart the computer.
#The operating environment of this article: Windows 10 system, Dell G3 computer.
How to separate Windows 10 from organizational management:
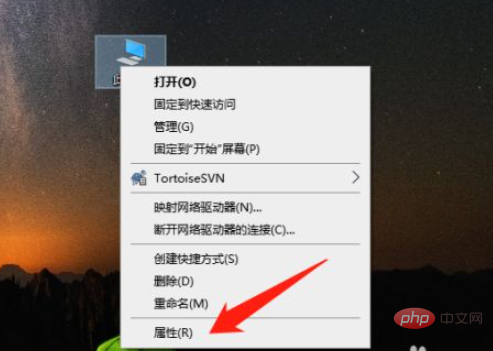
1. Right-click this computer on the desktop and click the menu [Properties].
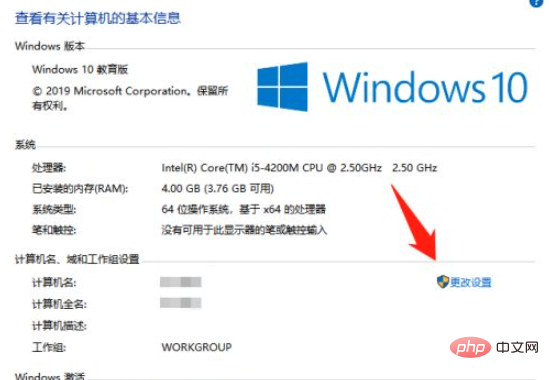
#2. After entering the computer properties, click [Change settings].
3. Click [Change].
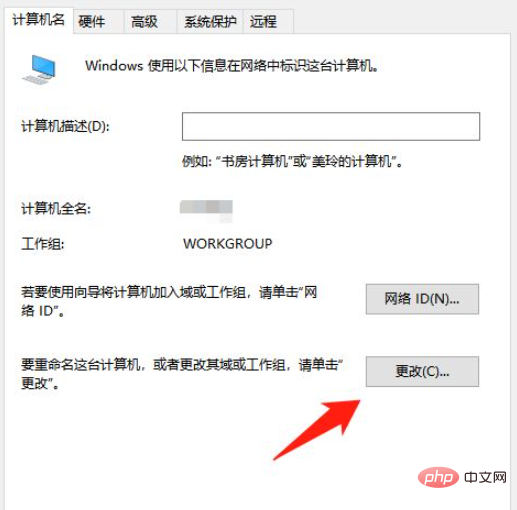
#4. Modify the workgroup name in the workgroup text box and click [OK].
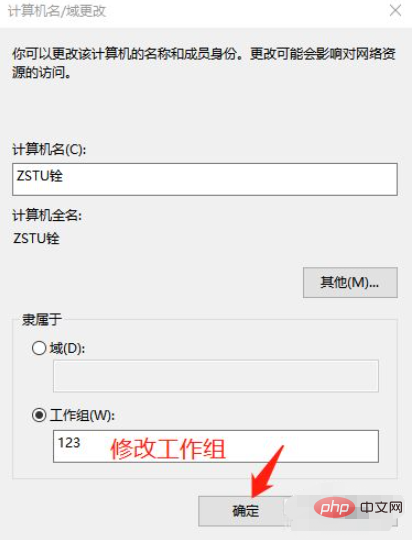
5. Click [OK].
tip: To change the settings, you need to restart the computer to take effect.
Related learning recommendations: windows server operation and maintenance tutorial
The above is the detailed content of How to break away from organizational management in win10. For more information, please follow other related articles on the PHP Chinese website!

Hot AI Tools

Undresser.AI Undress
AI-powered app for creating realistic nude photos

AI Clothes Remover
Online AI tool for removing clothes from photos.

Undress AI Tool
Undress images for free

Clothoff.io
AI clothes remover

AI Hentai Generator
Generate AI Hentai for free.

Hot Article

Hot Tools

Notepad++7.3.1
Easy-to-use and free code editor

SublimeText3 Chinese version
Chinese version, very easy to use

Zend Studio 13.0.1
Powerful PHP integrated development environment

Dreamweaver CS6
Visual web development tools

SublimeText3 Mac version
God-level code editing software (SublimeText3)

Hot Topics


Three commonly used methods: 1. The most convenient method is to press the Windows key and R key at the same time; 2. Access "Run" through the shortcut menu or start menu; 3. By entering specific commands, users can quickly start the program, Open files or folders, configure system settings, and more.

Solutions to failed Windows 10 installation: 1. Check the hardware; 2. Update the driver; 3. Use reliable installation media; 4. Clean the existing system; 5. Check the system requirements; 6. Adjust BIOS/UEFI settings; 7. Clear Virus.

Obtaining a Windows 10 activation key is key to fully experiencing its capabilities. The legal way is to purchase a genuine key and then activate it through the "Activate" option in the system settings. Using illegal or pirated keys can pose security risks and is a violation of intellectual property rights. This article will guide you through legal means to obtain and activate a Windows 10 activation key, ensuring the security of your computer and supporting the work of software developers.

Windows 10 has high stability, traditional interface, smooth performance, and good security. Windows 11 introduces new features, optimizes performance, performs well in games, and enhances security. However, Windows 11, as a new system, may have compatibility issues and needs to be carefully evaluated before upgrading.

The most commonly used shortcut keys: 1. Frame selection screenshot: Win Shift S, you can select a rectangle, window or area of any format to take a screenshot, and the screenshot is automatically copied to the clipboard; 2. Full screen screenshot: Win Printscreen, save the entire screenshot to " "This PC - Pictures - Screenshots" folder; 3. Take a full-screen screenshot and edit it: Win W, bring up the screen sketch tool, which can crop, edit and save or copy the screenshot; 4. Take a full-screen screenshot to the clipboard: Print Screen.

Method: 1. Press "win+R" to open the "Run" window, enter the "msconfig" command, and click "Confirm"; 2. In the msconfig setting interface, click the "Startup" tab and click "Open Task Manager"; 3. In the Task Manager interface, click the "Startup" tab; 4. Find and select the unwanted startup item, right-click the mouse, and select "Disable" in the pop-up menu.

Organization management functions are more common in general company computers or school computers. If you have enabled this feature, you will be effectively supervised by your organization. Many users may not know how to turn off this feature. The following provides you with a solution to the problem of how to turn off the organization management function in Win10 and cannot cancel it for your reference implementation. How to turn off the organization management function in Win10 and it cannot be canceled 1. Please right-click the icon on the desktop and select options in the right-click menu. 2. In the pop-up window, click the option to the right of the computer name. 3. In the new pop-up window, click the option in the tab. 4. In the next window, select the option shown in the picture below and press the button, then click the button to restart the computer.

Cause and solution: The "Windows update" service is still on, just disable the service. Disable method: 1. Press the "win+r" key combination to open the "Run" window, enter "services.msc" and press Enter; 2. In the "Services" interface, double-click the "Windows update" service; 3. In the pop-up window , change the startup type to "Disabled"; 4. Enter the "Recovery" tab and set the "First Failure", "Second Failure", and "Subsequent Failure" options to "No Action".