

Is Composer package development so easy?

The following column will introduce you to the Composer generation environment in the composer tutorial column. I hope it will be helpful to friends who need it!

#What is composer used for?
For students who don’t know composer, they will definitely have this question. The word
is often seen online, especially in GitHub, when using <span class="typ" style="font-size:14px;">Laravel</span>, <span class="typ" style="font-size:14px;">Yii</span> I often see this word. Is it recommended to use composer during installation? Is it just used during installation? I have also used other frameworks. Why don't <span class="typ" style="font-size:14px;">Thinkphp</span> and <span class="typ" style="font-size:14px;">Codeigniter</span> not be installed with composer?
With these questions, we study.
composer Official website: https://www.phpcomposer.com
composer is a tool used by PHP (5.3) to manage dependencies.
For a long time, PHP’s open source method has been project-level, which means that once it is open source, it is a project, such as a complete set of CMS (Dede, WordPress, discuz), and a complete set of frameworks (Thinkphp, Codeigniter). why? One of the very important reasons is that it is difficult to disassemble it. If you disassemble it, there is no effective management tool to combine it, resulting in no one paying attention to the disassembled small modules.
Then composer appeared. It is an effective management tool. It is responsible for managing the small modules that everyone has taken apart, and then effectively integrating them to make them a complete project.
For example, use monolog/monolog for logging, use guzzlehttp/guzzle for HTTP client, etc.
Composer package platform: https://packagist.org, which contains a large number of excellent installation packages. We can easily use excellent codes into our projects with just one composer command.
As a proud PHPer, we can't always just use other people's development packages. We must develop a package ourselves for others to use and for ourselves.
Now that we know that it has so many benefits, let us learn about it, starting with the installation of composer.
How is composer installed?
Official introductory document: https://docs.phpcomposer.com/00-intro.html
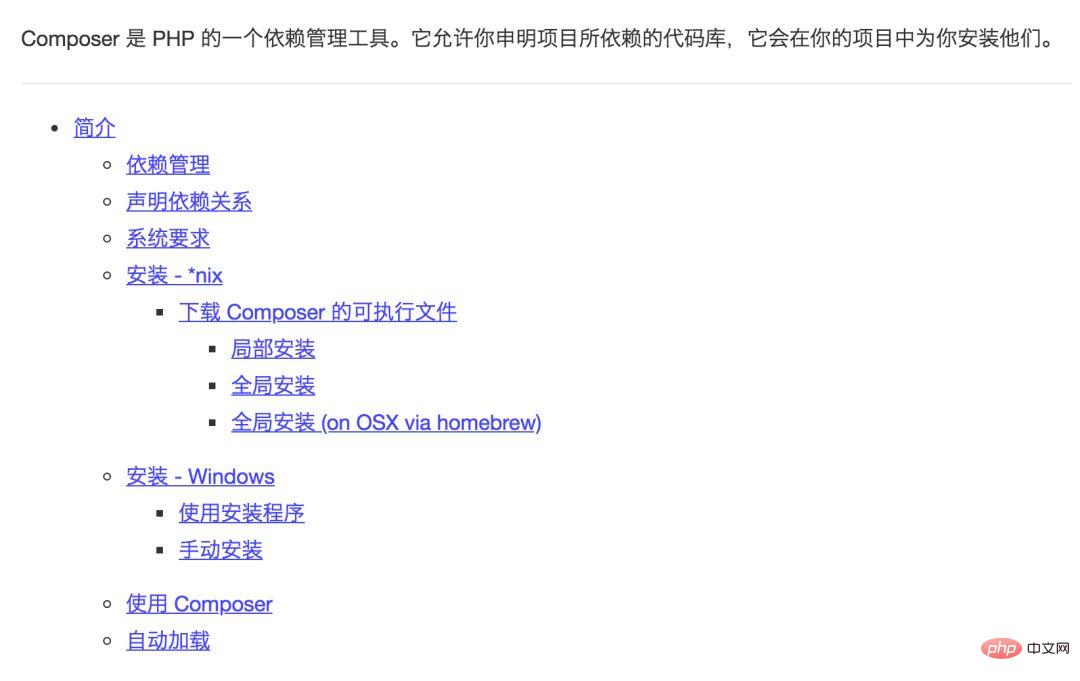
Through the above method, the installation can be completed.
Next, we will use GitHub combined with the Composer tool to give an example of how to develop a Composer package.
How is the composer package developed?
For example, develop a composer package for processing numbers.
Create a project on GitHub
Log in to GitHub (if you don’t have an account, please create one), click " " in the upper right corner, and select " New repository".
In the creation interface, fill in "numberFormat" for Repository name. Description is optional. Leave it blank for now. Then in Public (The method recommended by GitHub, free, accessible to everyone) and Private (paid, only accessible to designated people, free for individual developers after 2019-01-09), select "Public", and then check "Initialize this repository with a README", click the "Create Repository" button to create it successfully.
#At this point, it means that an empty project named "numberFormat" has been created on GitHub.
Next, you need to clone the remote project to the local (Git command line, Git client) for coding.
Learn to create composer.json
What parameters does composer.json have and how to write it? Please refer to the document: https://docs.phpcomposer.com/04-schema.html#composer.json
If a project wants to call the development package, you can know how to load the file through composer.json.
composer.json 可以使用两个方式创建,一种是 <span class="pln" style="font-size:14px;">composer init</span>,另一种是手工创建。
咱们一起先执行下 <span class="pln" style="font-size:14px;">composer init</span> 看看效果。
在本地创建numberFormat目录,然后 git clone 刚才创建的项目。
//进入到本地numberFormat目录
composer init
Welcome to the Composer config generator
This command will guide you through creating your composer.json config.
Package name (<vendor>/<name>) [root/number-format]:number-format/number-format
Description []:一个处理数字的包
Author [XinLiang <109760455@qq.com>, n to skip]:  //回车
Minimum Stability []: //回车
Package Type (e.g. library, project, metapackage, composer-plugin) []: //回车
License []: //回车
Define your dependencies.
Would you like to define your dependencies (require) interactively [yes]?no
Would you like to define your dev dependencies (require-dev) interactively [yes]?no
{
    "name": "number-format/number-format",
    "description": "一个处理数字的包",
    "authors": [
        {
            "name": "XinLiang",
            "email": "109760455@qq.com"
        }
    ],
    "require": {}
}
Do you confirm generation [yes]? //回车至此,本地numberFormat目录就看到 composer.json 文件了,当然可以直接在目录下按照这个格式进行手工创建,后期直接编辑该文件即可。
创建项目编码内容
开发包结构如下:
--src 源码目录(必须)
--tests 单元测试目录(非必须)
我们按照既定的目录结构去创建目录和文件,然后再到composer.json里面修改一下即可。
接下来,在src目录中创建一个类(NumberFormat.php):
/**
 * 数字格式化类
 * @author XinLiang
 */
namespace numberFormat;
class NumberFormat
{
    /**
     * 格式化字节
     * @param int $num       数字
     * @param int $precision 精准度
     * @return string
     */
    public static function byte_format($num = 0, $precision = 1)
    {
        if ($num >= 1000000000000)
        {
            $num = round($num / 1099511627776, $precision);
            $unit = 'TB';
        }
        elseif ($num >= 1000000000)
        {
            $num = round($num / 1073741824, $precision);
            $unit = 'GB';
        }
        elseif ($num >= 1000000)
        {
            $num = round($num / 1048576, $precision);
            $unit = 'MB';
        }
        elseif ($num >= 1000)
        {
            $num = round($num / 1024, $precision);
            $unit = 'KB';
        }
        else
        {
            return number_format($num).' Bytes';
        }
        return number_format($num, $precision).' '.$unit;
    }
}修改 composer.json
{
    "name": "number-format/number-format",
    "description": "一个处理数字的包",
    "authors": [
        {
            "name": "XinLiang",
            "email": "109760455@qq.com"
        }
    ],
    "minimum-stability": "dev",
    "require": {
        "php": ">=5.3.0"
    },
    "autoload": {
        "psr-4": {
            "numberFormat\\": "src/"
        }
    },
    "license": "MIT"
}至此,我们的开发包已经完成,接下来我们来测试下这个包是否可用。
测试开发包
在本地numberFormat目录下,通过 <span class="pln" style="font-size:14px;">composer install</span> 安装
composer install
Loading composer repositories with package information
Updating dependencies (including require-dev)
Nothing to install or update
Writing lock file
Generating autoload files
//表示安装成功
惊奇的发现,在本地numberFormat目录多一个 <span class="pln" style="font-size:14px;">vendor</span>目录。
在tests目录创建 NumberFormatTest.php
/**
 * 数字格式化测试类
 * @author XinLiang
 */
require '../vendor/autoload.php';
use \numberFormat;
$number = '102400010';
echo numberFormat\NumberFormat::byte_format($number);
//输出:97.7 MB
至此,测试成功,接下来就是要发布到packagist平台,给广大开发者见面了。
发布到 packagist 平台
packagist.org 为 composer 安装包的平台(可用GitHub账号登录)。
现将本地代码提交到GitHub。
发布到 packagist 平台,登录后在首页的右上角有一个"Submit"按钮,点击即可进入开发包提交的界面。在“Repository URL (Git/Svn/Hg)”输入框中,输入GitHub项目的地址,点击“Check”按钮,稍微等待几秒钟,会显示验证成功,并显示出“Submit”按钮,点击即完成了开发包的提交了。
恭喜你,这个开发包可以在任何支持 composer 的PHP框架中使用了。
那么问题来了,刚才我们的包写的有的简陋,后期我们维护代码,新增代码还需要按照原来的方式操作一遍吗?
不!因为我们可以在GitHub平台设置代码更新,同时能让 packagist.org 自动更新,是不是很酷!
在GitHub中找到代码仓库,然后选择"settings" -> “Webhooks” ,默认是绑定自动更新的。
如果未绑定,可以这样设置:"settings" -> “Webhooks” -> "Add webhook" ->
Payload URL填写:“https://packagist.org/api/github”
Content type填写:“application/json”
Secret填写:“packagist提供的token”
其他的默认即可
点击“Add webhook” 完成。
至此,后期我们更新代码后会自动同步到 packagist.org 上。
//其他开发者可以这样获取包
composer require number-format/number-format:dev-master
为什么会有:dev-master,为什么引用其他的包不用这样设置?
因为我们引用的其他包都是稳定包,默认为:-stable。
是因为我们 composer.json 中设置了 minimum-stability 属性,这个可以了解下“版本约束”,在这就不多说了。
当我们在发布包后,如果获取不到报错怎么办,有可能是镜像的问题。
composer 设置镜像地址
//查看全局设置
composer config -gl
//第一种:设置国内镜像
composer config -g repo.packagist composer https://packagist.phpcomposer.com
//第二种:设置国内镜像
composer config -g repo.packagist composer https://packagist.laravel-china.org
//第三种:设置国内镜像
composer config -g repos.packagist composer https://php.cnpkg.org
小结
通过这篇文章,解决了上述提到的三个问题:
composer 是用来干嘛的?
composer 是如何安装的?
composer 包是如何开发的?
看完后,是不是觉得 Composer 包开发原来这么简单,作为骄傲的程序员,去开发属于自己的 Composer 包吧!
The above is the detailed content of Is Composer package development so easy?. For more information, please follow other related articles on the PHP Chinese website!

Hot AI Tools

Undresser.AI Undress
AI-powered app for creating realistic nude photos

AI Clothes Remover
Online AI tool for removing clothes from photos.

Undress AI Tool
Undress images for free

Clothoff.io
AI clothes remover

AI Hentai Generator
Generate AI Hentai for free.

Hot Article
Hot Tools

Notepad++7.3.1
Easy-to-use and free code editor

SublimeText3 Chinese version
Chinese version, very easy to use

Zend Studio 13.0.1
Powerful PHP integrated development environment

Dreamweaver CS6
Visual web development tools

SublimeText3 Mac version
God-level code editing software (SublimeText3)
Hot Topics
 1382
1382
 52
52

 What is a composer used for?
Apr 06, 2025 am 12:02 AM
What is a composer used for?
Apr 06, 2025 am 12:02 AM
Composer is a dependency management tool for PHP. The core steps of using Composer include: 1) Declare dependencies in composer.json, such as "stripe/stripe-php":"^7.0"; 2) Run composerinstall to download and configure dependencies; 3) Manage versions and autoloads through composer.lock and autoload.php. Composer simplifies dependency management and improves project efficiency and maintainability.
 What is the difference between composer and orchestrator?
Apr 02, 2025 pm 02:49 PM
What is the difference between composer and orchestrator?
Apr 02, 2025 pm 02:49 PM
Composer is used to manage dependencies on PHP projects, while Orchestrator is used to manage and coordinate microservices or containerized applications. 1.Composer declares and manages dependencies of PHP projects through composer.json file. 2. Orchestrator manages the deployment and extension of services through configuration files (such as Kubernetes' YAML files), ensuring high availability and load balancing.
 How to debug a custom Composer package installation path?
Apr 01, 2025 am 08:36 AM
How to debug a custom Composer package installation path?
Apr 01, 2025 am 08:36 AM
Customize the Composer package installation directory and debugging methods When using Composer to manage dependencies, the package will be installed in the vendor directory by default. If needed...
 ThinkPHP connects to Alibaba Cloud MQTT error app\\controller\\Mosquitto\\Client: How to solve it?
Apr 01, 2025 am 08:24 AM
ThinkPHP connects to Alibaba Cloud MQTT error app\\controller\\Mosquitto\\Client: How to solve it?
Apr 01, 2025 am 08:24 AM
Using Mosquitto in ThinkPHP reports an error: app\\controller\\Mosquitto\\Client When using the ThinkPHP framework to connect to Alibaba Cloud MQTT service, the developer encountered an error...
 Production environment deployment: How to avoid Composer loading development dependencies?
Apr 01, 2025 am 07:36 AM
Production environment deployment: How to avoid Composer loading development dependencies?
Apr 01, 2025 am 07:36 AM
Efficiently manage Composer dependencies: How to avoid loading development dependencies in production environments. When using Composer to manage PHP project dependencies, we often make the development process...
 What are the official ai creative tools?
Nov 29, 2024 am 10:19 AM
What are the official ai creative tools?
Nov 29, 2024 am 10:19 AM
The official AI creative tool uses machine learning and advanced technology to provide creative exploration, content generation and optimization functions to enhance the creative process and improve productivity. Key tools include ChatGPT, Google AI Image/Video Generator, AWS DeepComposer, and Azure Cognitive Services. These tools can help users break down creative barriers, generate high-quality content, optimize creative output, promote team collaboration, and improve creativity and efficiency.
 How do autoloading and namespaces work in Composer?
Jun 04, 2024 pm 09:03 PM
How do autoloading and namespaces work in Composer?
Jun 04, 2024 pm 09:03 PM
How autoloading and namespaces work in Composer: Autoloading: Composer takes advantage of the autoloading feature to automatically load classes when needed, eliminating the tediousness of manual calls. Namespace: Namespace organizes code and avoids conflicts with the same class name. Composer supports namespaces through the PSR-4 standard, which specifies the mapping between namespaces and directories. Practical case: When using a third-party library, configure the require and autoload parts in composer.json, and specify the library name and mapping rules. This allows us to use classes from the library directly without having to manually load files.
 PHP Debugging Composer Dependencies: Solving Dependency Issues
Jun 06, 2024 pm 12:18 PM
PHP Debugging Composer Dependencies: Solving Dependency Issues
Jun 06, 2024 pm 12:18 PM
Debugging Composer dependency issues Ways to resolve dependency issues: Check the composer.lock file Use composershow-root-requires to force a dependency refresh Set debug mode Actual case: Package conflicts: Use composershow-root-requires to discover conflicts and manually upgrade incompatibilities package. Missing dependencies: Add missing dependencies to composer.json and reinstall. Obsolete dependencies: Use composerupdate to update obsolete packages.
