
Free learning recommendation: js video tutorial
##About JavaScript event flow
##ForewordBefore reading this article, I suggest you take a look at the JavaScript event loop. Of course, for those who already know it No need! This article will discuss the event flow of js.
TextWe all know that when we perform certain types of operations on a web page, such as clicking, sliding, etc., some corresponding events will be triggered. We also know that the entire web page is actually parsed into a DOM tree by the browser. When a node generates an event, the event will be propagated in a certain order between the node and the root node, and all nodes passing through this propagation path will receive the event. This entire process is called
DOM event flow.
What are events?The interaction between js and html is actually achieved through "events". All user clicks, selections, slides, etc. on web pages are all events in the js world.
For events, when an event occurs, there must be a response. In js, the so-called response is the listener. Just like the observer pattern, the event is our subject, and when the event occurs, all listeners corresponding to the event (subject) must be notified to perform corresponding responses.
What is event flow?Event flow describes the order in which events are received from the page. Mainly divided into the following two types:
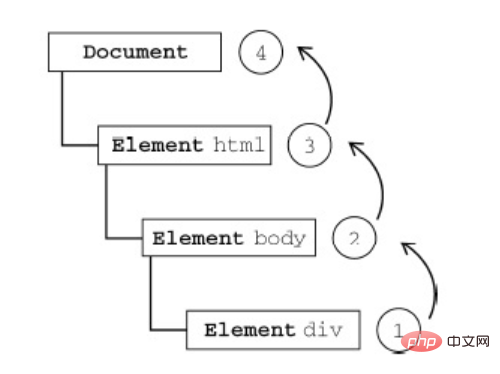
IE's event bubblingThe event flow model proposed by IE is event bubbling, that is, from bottom to top, it propagates upward step by step from the element triggered by the target, all the way to the document object.
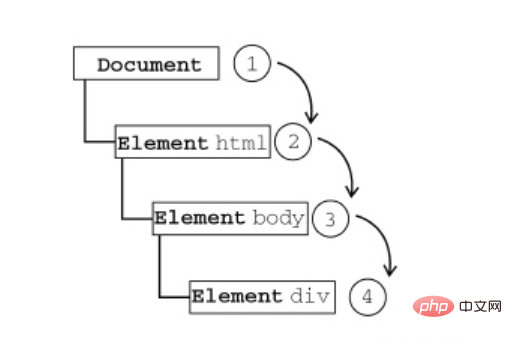
 The event flow model proposed by Netscape is event capturing. Contrary to event bubbling, it is from top to bottom, that is, it is propagated from the document object to the target object step by step.
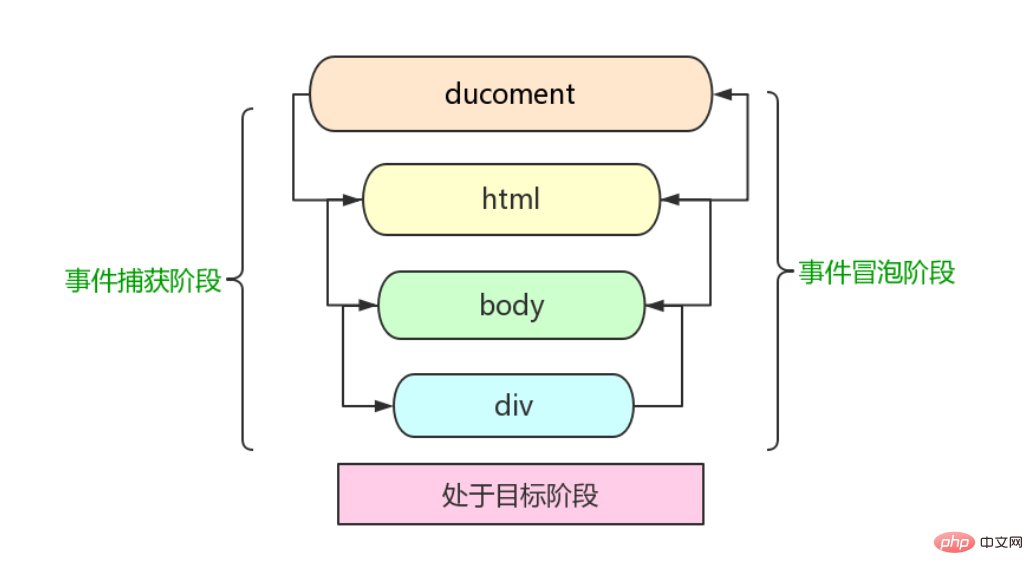
 The above is the event flow mechanism under the DOM0 standard. Later, ECMAScript further standardized the event flow in DOM2. In DOM2, the event stream contained in an event is divided into the following three stages:
When an event occurs on a DOM node, of course you need to do the corresponding Department, and DOM events are divided into 4 levels, as follows:
Among them, the more important ones are DOM0/DOM2, so we will focus on them below. 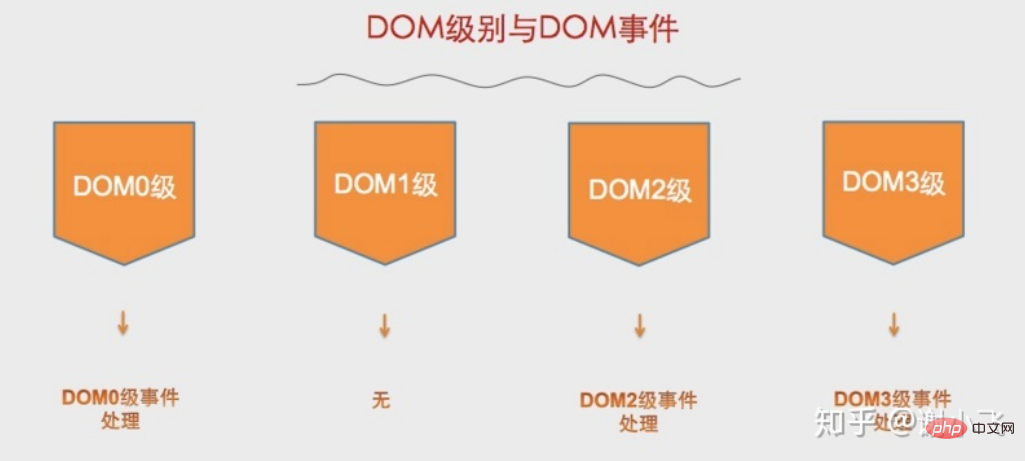
There are two main ways to implement DOM0-level events. The first is the inline model, which directly uses the function name as the event attribute in the html tag. attribute value. As follows:
// js code// eventDOM.jsfunction btnClick() {
console.log('Hello World')}<!-- html code --><html> <head> <title>eventDOM demo</title> </head> <body> <p onclick="btnClick()" style="width: 30px; height: 30px; background-color:black"></p> <script type="text/javascript" src="eventDOM.js"></script> </body></html>
However, the inline model has obvious shortcomings, that is, it violates the W3C requirement for the separation of content (html) and behavior (js). So there is the second type, which is the script model (dynamic binding model). The specific method is to select a specific DOM node through a js script, and then add event attributes and attribute values to the node. As follows:
// js code// eventDOM.jslet btn = document.getElementById('btn')let btnClick = function() {
console.log('Hello World')}btn.onclick = btnClick<!-- html code --><html> <head> <title>eventDOM demo</title> </head> <body> <p id="btn" style="width: 30px; height: 30px; background-color:black"></p> <script type="text/javascript" src="eventDOM.js"></script> </body></html>
Click and
Hello World will appear, no problem. But the script model also has shortcomings. Based on the above html code, add a little js, as follows: <div class="code" style="position:relative; padding:0px; margin:0px;"><pre class="brush:php;toolbar:false">// js code// eventDOM.jslet btn = document.getElementById('btn')let btnClick = function() {
console.log('Hello World')}let btnClick2 = function() {
console.log('Hello World again')}btn.onclick = btnClick
btn.onclick = btnClick2</pre><div class="contentsignin">Copy after login</div></div>We found that now clicking only
will appear. Therefore, the script model only allows one node to add events of the same type once, and subsequent ones will overwrite the previous ones. Finally let us look at an interesting example:
<!-- html code --><html>
    <head>
        <title>eventDOM demo</title>
    </head>
    <body>
        <p id="btn3" style="width: 400px; height: 400px; background-color:pink">
            btn3            <p id="btn2" style="width: 300px; height: 300px; background-color:skyblue">
                btn2                <p id="btn1" style="width: 200px; height: 200px; background-color:lightgreen">
                    btn1                </p>
            </p>
        </p>
        <script type="text/javascript" src="eventDOM.js"></script>
    </body></html>
// js code// eventDOM.jslet btn1 = document.getElementById('btn1')let btn2 = document.getElementById('btn2')let btn3 = document.getElementById('btn3')btn1.onclick = function() {
    console.log('1')}btn2.onclick = function() {
    console.log('2')}btn3.onclick = function() {
console.log('3')}When we click btn3, the output is as follows: 
It is in line with expectations, but what if we click btn1? The output is as follows: 
This is a bit strange, Obviously we only added one listener for btn1, why does it feel like we added it together with btn2 and btn3? The reason is because, although DOM0 has two models: event bubbling proposed by IE and event capturing proposed by Netscape, in fact DOM0 only supports event bubbling. Therefore, the event flow of clicking btn1 is as follows: 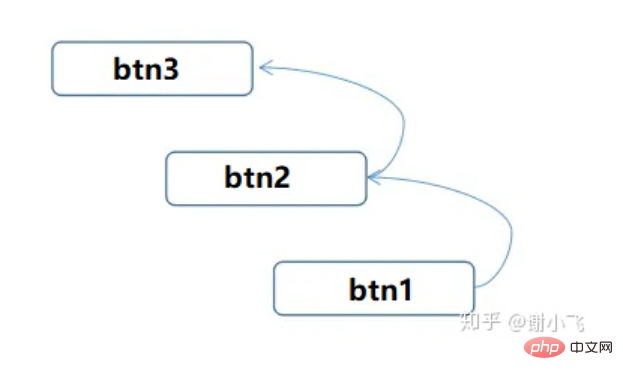
That is, the event flow also passes through btn2 and btn3, so their event processing is triggered. But obviously, this is not the result we want.
DOM2 events
After further specification, there is a DOM2-level event handler. Two methods are defined:
These two functions There are three parameters in the following table:
| Parameter | Type | Description |
|---|---|---|
| String | The name of the event to be monitored, such as 'click'. Note that there is no need to "on" here | |
| function | The callback function to be executed to trigger the event | |
| Boolean(default:false) | Whether the event is processed in the capture phase |
The above is the detailed content of An introduction to JavaScript's event flow. For more information, please follow other related articles on the PHP Chinese website!