
 CMS Tutorial
WordPress
[Tutorial] Wordpress slow domestic network speed acceleration and fast CF switching to prevent DDOS attacks
CMS Tutorial
WordPress
[Tutorial] Wordpress slow domestic network speed acceleration and fast CF switching to prevent DDOS attacks
[Tutorial] Wordpress slow domestic network speed acceleration and fast CF switching to prevent DDOS attacks

The following tutorial column of WordPress will introduce to you the tutorial on accelerating the slow domestic network speed of WordPress and preventing DDOS attacks and fast CF switching tutorial. I hope it will be helpful to friends in need!
![[Tutorial] Wordpress slow domestic network speed acceleration and fast CF switching to prevent DDOS attacks](https://img.php.cn/upload/article/000/000/020/6030d432e1507971.jpg)
Recently, a customer said that his website is abroad, but the domestic website is very slow to open, because domestic and foreign users visit more frequently, and they hope to have their website www.pjcourse .com domestic access speed will be improved. Their program uses wordpress. In general, WordPress plug-in templates load a lot of data, even if a caching plug-in such as wprocket is installed, js, css compression, or database optimization is performed. In fact, the speed of the website will not be greatly improved.
After some simple analysis, I plan to move their website to the cn2 gia line space provider. This may be the fastest way to improve the website speed. The following is some of my practical sharing, and how to quickly switch data when the website is attacked.
Note: Although this machine is placed abroad, the probability of Baidu spider crawling errors such as 403 is almost non-existent.
1. Analysis of the current website situation
Before the website was relocated, the space was placed in Digitalocean, and the CDN was cloudflare. Although digitalocean is a very good space provider abroad, for domestic users, cloudflare is used for access, so the speed is still very slow.
In addition, although it is possible to use separate line dns for analysis, the operation will be more troublesome. So this article does not discuss it.

Through the incognito browser chrome, it can be seen that it takes 6.35 seconds to fully open. The early rendering took 4.46 seconds.
In addition, it can also be seen through the webmaster home speed test. Telecom lines are slightly faster. However, the speed of China Unicom and China Mobile is obviously more than 4 seconds.
# 2. Website relocation
Regarding the choice of space provider, in fact, as long as Choose the right stable space and good lines. Basically everything is possible. What I choose now is cn2 gia ecommerce which is used by bricklayers. The biggest advantage of cn2 gia is that access to all three domestic networks is very fast. And this space quotient is also the most stable speed. My current quarter is $49.99, which is actually equivalent to $16 a month.
SSD: 20 GB RAID-10
RAM: 1 GB
CPU: 2x Intel Xeon
Transfer: 1000 GB/mo
You can choose different hosts according to each person's situation. However, it is recommended that you do not need to buy a particularly good host when the traffic is not very large at the beginning. You can expand the capacity later.
##1. Operating system selection
I am using ubuntu 20.04. php 7.4 nginx mysql. Why choose this? Because php 7.4 is 30% faster than php 7.2.
##2. Command line
Why not use Pagoda? Because there was a big loophole in the pagoda some time ago. And for this part of the website, I feel that it is better to use other third-party tools as little as possible. In addition, the VPS you build can also be as clean and tidy as possible. Fewer external programs.
The following command line is based on ubuntu 20.04. Just follow the command. Basically nothing wrong.
ssh root@... -p port number
The asterisk above is IP address. -p is the specified port. Because the default ssh port of Bricklayer is not 22, it needs to be specified here.
Step 1: Install nginxsudo apt updatesudo apt install nginxStep 2: Turn on the firewall
sudo ufw app list
sudo ufw allow 'OpenSSH'
sudo ufw allow 'Nginx HTTPS'
sudo ufw allow 'Nginx HTTP'
sudo ufw enable — After typing this command, you will be prompted that the ssh connection may be interrupted. Just enter y and press Enter.
Step 3: Install mysqlsudo apt install mysql-server sudo mysql_secure_installation (This step is optional, this is a security script).
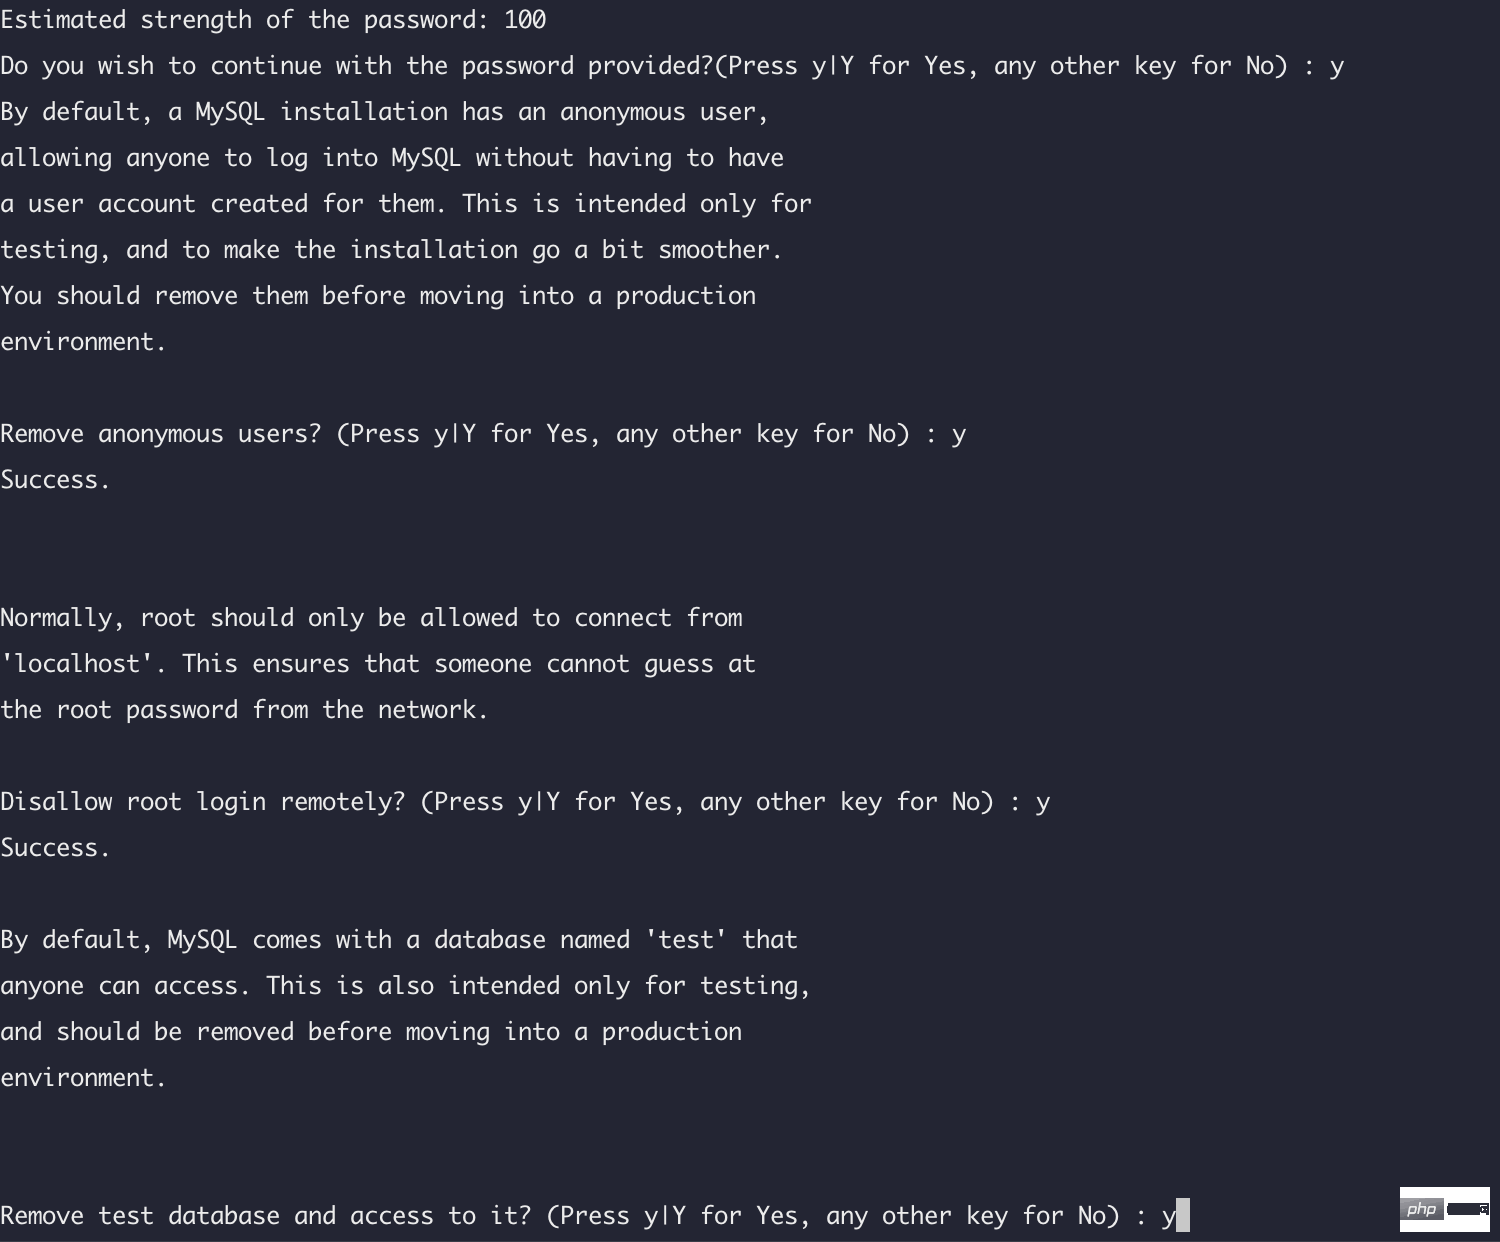 Enter y and press Enter, select 2, the strongest password, and enter a new password. This password is the root password of mysql.
Step 4: Install php module
sudo apt install php-imagick php7.4-fpm php7.4-mbstring php7.4-bcmath php7.4-xml php7.4-mysql php7.4 -common php7.4-gd php7.4-json php7.4-cli php7.4-curl php7.4-zip
This is a command, just copy the entire code. This basically contains all the modules that WordPress can use.
sudo systemctl reload php7.4-fpm nginx (restart and load configuration)
Step 5: Move the website data overBecause my website is WordPress, your website may be written by another program, so the content is different. I won’t write it down here. In addition, remember to make nginx.conf
server {
listen 80;
server_name your_domain www.your_domain;
index index.html index.htm index.php;location / {
    try_files $uri $uri/ =404;}location ~ \.php$ {
    include snippets/fastcgi-php.conf;
    fastcgi_pass unix:/var/run/php/php7.4-fpm.sock;
 }location ~ /\.ht {
deny all;}Step 6: Configure and install ssl
SSL I use let's encrypt.
sudo apt install certbot python3-certbot-nginx
sudo certbot –nginx -d example.com -d www.example.com
Replace example.com with your own The domain name of the website. If there are multiple subdomains. Just add it yourself.
Please note here that you must first point the dns to the current VPS, otherwise the configuration will not be successful, if you are using Cloudflare. To turn off CDN. 
See the last sentence. Congratulations! Your certificate and chain have been saved at:
, which means the installation is successful.
This certificate is valid for 90 days, but certbot will run two systemd timers every day to check the validity of the certificate and automatically renew the certificate. You need to check if the timer is valid.
sudo systemctl status certbot.timer
The output result is as follows, which means it is normal.
● certbot.timer - Run certbot twice daily
Loaded: loaded (/lib/systemd/system/certbot.timer; enabled; vendor preset: enabled)
Active: active (waiting) since Mon 2020-05-04 20:04:36 UTC; 2 weeks 1 days ago
Triggers: ● certbot.service
##3. Test the network speed of the new website
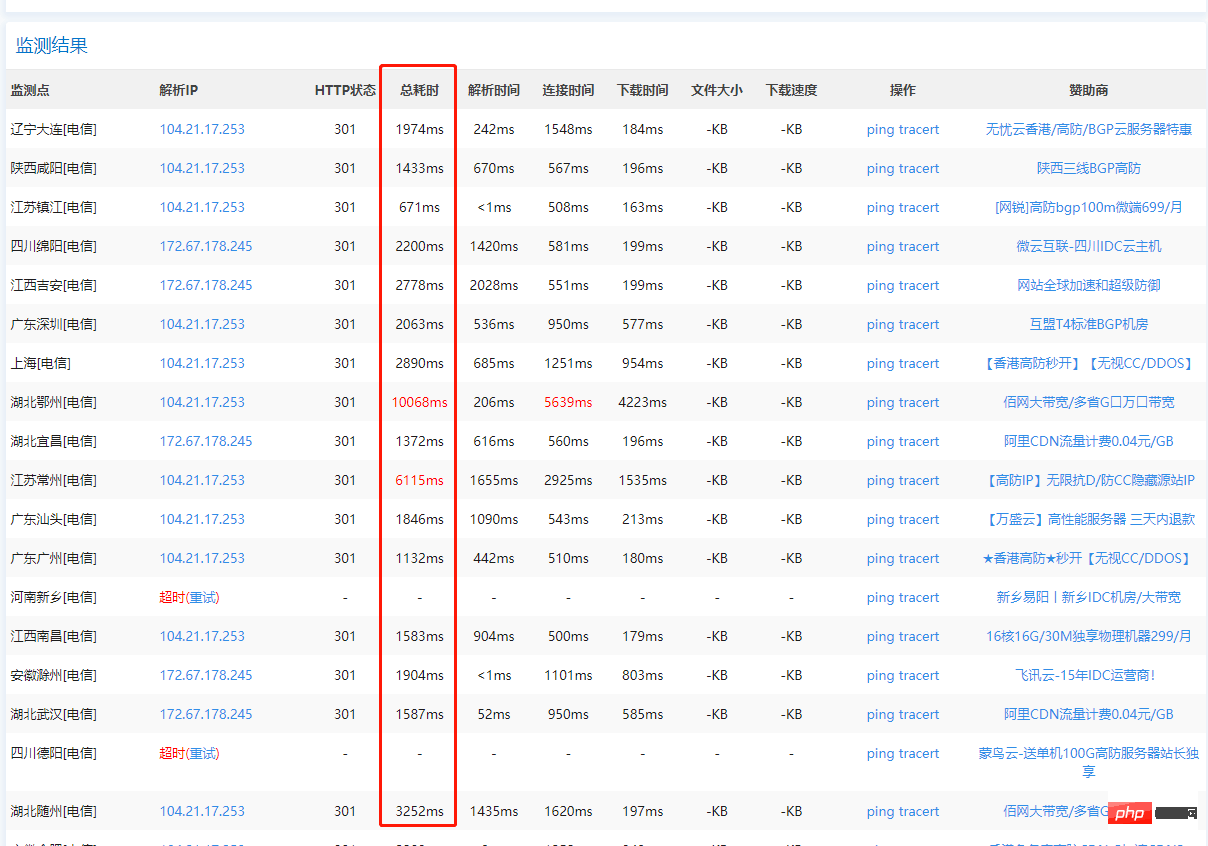
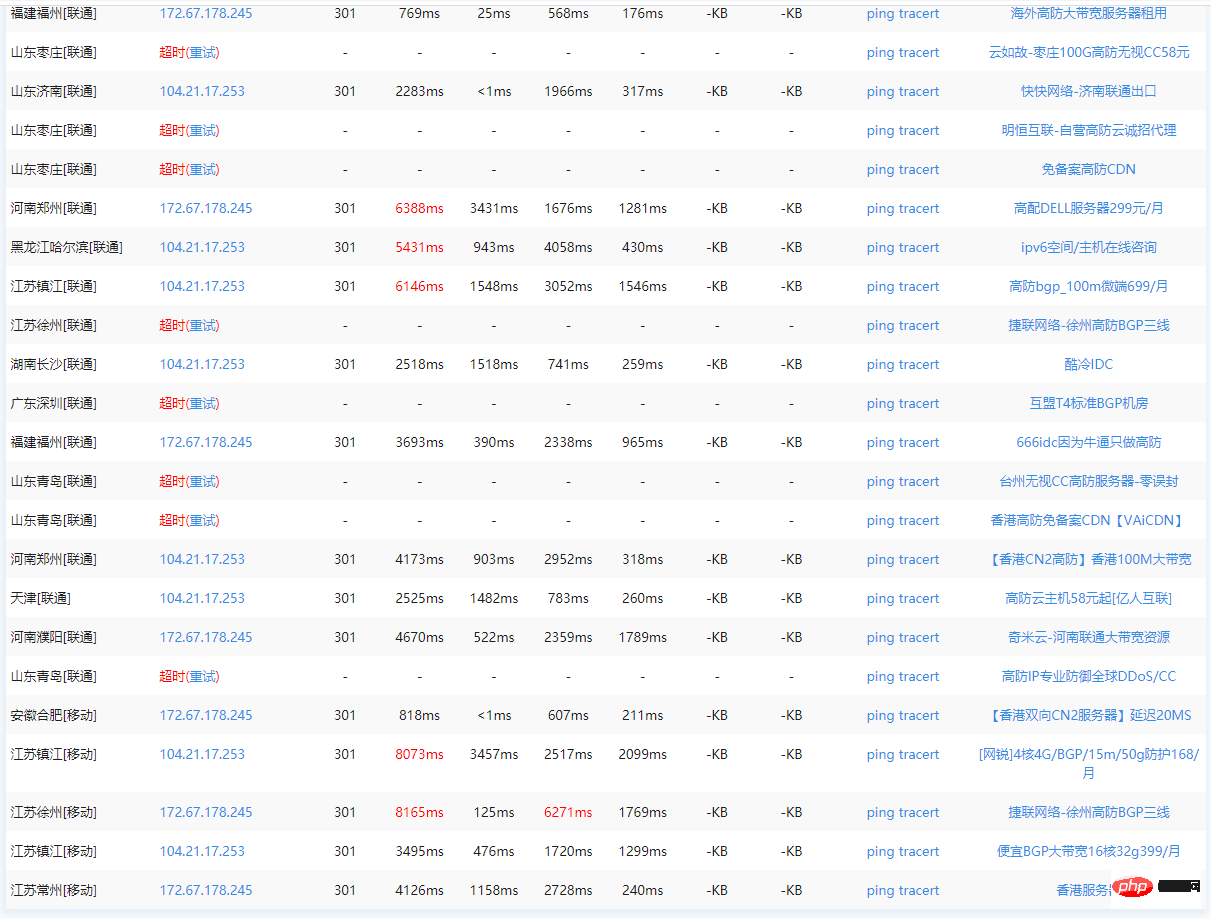
Directly use domestic telecommunications to access the website, and the website opening time has been significantly improved. Compared with the previous speed, it has been increased by about 2-3 times. And this is the speed at night. The access speed at night is not affected at all. 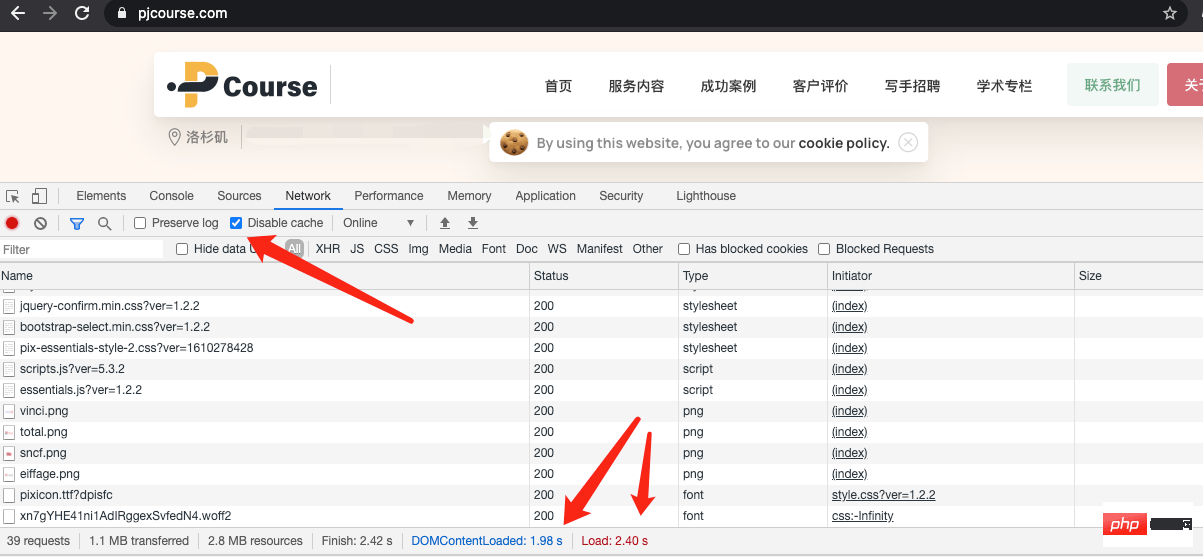
Except for the address marked in red, the dns resolution has not yet taken effect, and the other IP speeds that have taken effect are obviously opened within 2 seconds. 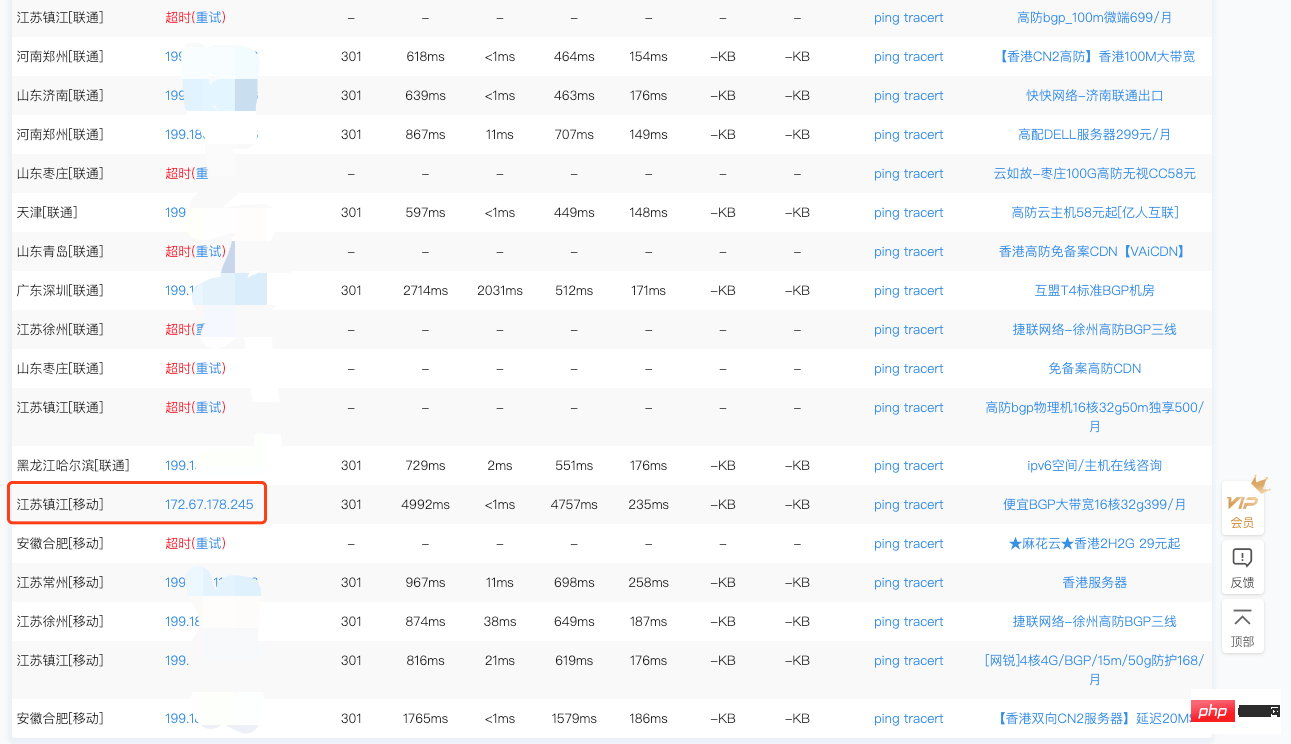
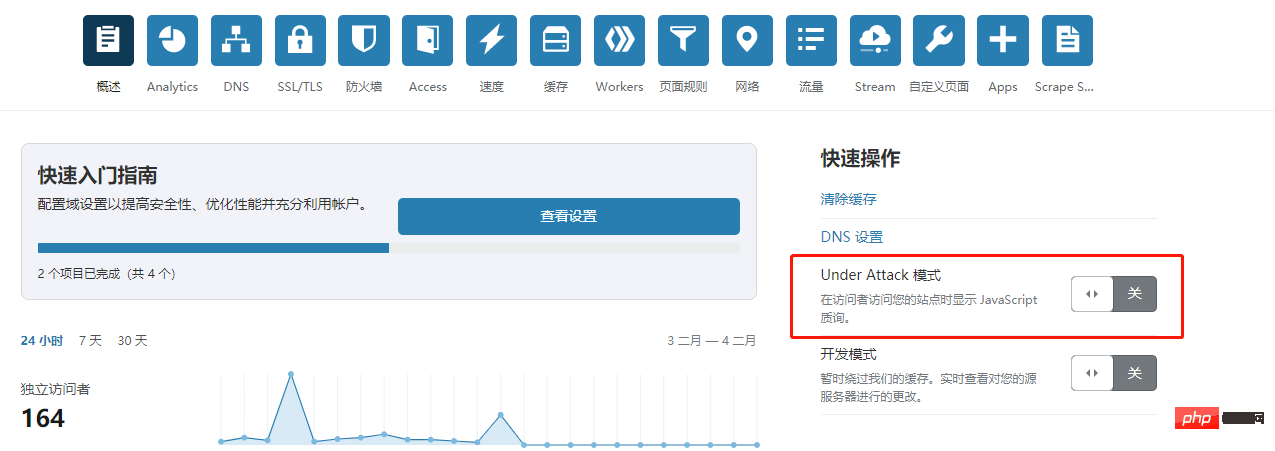
##4. Prevent DDOS attacks and quickly switch between attack and defense with cloudflare
The above is the detailed content of [Tutorial] Wordpress slow domestic network speed acceleration and fast CF switching to prevent DDOS attacks. For more information, please follow other related articles on the PHP Chinese website!

Hot AI Tools

Undresser.AI Undress
AI-powered app for creating realistic nude photos

AI Clothes Remover
Online AI tool for removing clothes from photos.

Undress AI Tool
Undress images for free

Clothoff.io
AI clothes remover

Video Face Swap
Swap faces in any video effortlessly with our completely free AI face swap tool!

Hot Article
Hot Tools

Notepad++7.3.1
Easy-to-use and free code editor

SublimeText3 Chinese version
Chinese version, very easy to use

Zend Studio 13.0.1
Powerful PHP integrated development environment

Dreamweaver CS6
Visual web development tools

SublimeText3 Mac version
God-level code editing software (SublimeText3)
Hot Topics
 1386
1386
 52
52

 PHP vs. Flutter: The best choice for mobile development
May 06, 2024 pm 10:45 PM
PHP vs. Flutter: The best choice for mobile development
May 06, 2024 pm 10:45 PM
PHP and Flutter are popular technologies for mobile development. Flutter excels in cross-platform capabilities, performance and user interface, and is suitable for applications that require high performance, cross-platform and customized UI. PHP is suitable for server-side applications with lower performance and not cross-platform.
 How to change page width in wordpress
Apr 16, 2024 am 01:03 AM
How to change page width in wordpress
Apr 16, 2024 am 01:03 AM
You can easily modify your WordPress page width by editing your style.css file: Edit your style.css file and add .site-content { max-width: [your preferred width]; }. Edit [your preferred width] to set the page width. Save changes and clear cache (optional).
 In which folder are wordpress articles located?
Apr 16, 2024 am 10:29 AM
In which folder are wordpress articles located?
Apr 16, 2024 am 10:29 AM
WordPress posts are stored in the /wp-content/uploads folder. This folder uses subfolders to categorize different types of uploads, including articles organized by year, month, and article ID. Article files are stored in plain text format (.txt), and the filename usually includes its ID and title.
 How to create a product page in wordpress
Apr 16, 2024 am 12:39 AM
How to create a product page in wordpress
Apr 16, 2024 am 12:39 AM
Create a product page in WordPress: 1. Create the product (name, description, pictures); 2. Customize the page template (add title, description, pictures, buttons); 3. Enter product information (stock, size, weight); 4 . Create variations (different colors, sizes); 5. Set visibility (public or hidden); 6. Enable/disable comments; 7. Preview and publish the page.
 Where is the wordpress template file?
Apr 16, 2024 am 11:00 AM
Where is the wordpress template file?
Apr 16, 2024 am 11:00 AM
WordPress template files are located in the /wp-content/themes/[theme name]/ directory. They are used to determine the appearance and functionality of the website, including header (header.php), footer (footer.php), main template (index.php), single article (single.php), page (page.php), Archive (archive.php), category (category.php), tag (tag.php), search (search.php) and 404 error page (404.php). By editing and modifying these files, you can customize the appearance of your WordPress website
 How to search for authors in WordPress
Apr 16, 2024 am 01:18 AM
How to search for authors in WordPress
Apr 16, 2024 am 01:18 AM
Search for authors in WordPress: 1. Once logged in to your admin panel, navigate to Posts or Pages, enter the author name using the search bar, and select Author in Filters. 2. Other tips: Use wildcards to broaden your search, use operators to combine criteria, or enter author IDs to search for articles.
 Which version of wordpress is stable?
Apr 16, 2024 am 10:54 AM
Which version of wordpress is stable?
Apr 16, 2024 am 10:54 AM
The most stable WordPress version is the latest version because it contains the latest security patches, performance enhancements, and introduces new features and improvements. In order to update to the latest version, log into your WordPress dashboard, go to the Updates page and click Update Now.
 Does wordpress need to be registered?
Apr 16, 2024 pm 12:07 PM
Does wordpress need to be registered?
Apr 16, 2024 pm 12:07 PM
WordPress requires registration. According to my country's "Internet Security Management Measures", websites that provide Internet information services within the country must register with the local provincial Internet Information Office, including WordPress. The registration process includes steps such as selecting a service provider, preparing information, submitting an application, reviewing and publishing, and obtaining a registration number. The benefits of filing include legal compliance, improving credibility, meeting access requirements, ensuring normal access, etc. The filing information must be true and valid, and must be updated regularly after filing.
