How to use the list group component of Bootstrap learning
This article will show you how to use the list group component in Bootstrap. It has certain reference value. Friends in need can refer to it. I hope it will be helpful to everyone.

Related recommendations: "bootstrap Tutorial"
The list group can be used to create lists, vertical navigation and other effects, and can also Cooperate with other components to create more beautiful components. The list group is also an independent component in the bootstrap framework, so it also has its own independent source code:
LESS: list-group.less
SASS:_list-group.scss
The list group looks like a list item with the list symbol removed, and with some specific Style, the basic list group in the bootstrap framework mainly includes two parts:
list-group: List group container, commonly used is the ul element, or it can be the ol or p element
list-group-item: list item, commonly used is the li element, or the p element
does not do anything for the basic list group Too many style settings, mainly setting the spacing, borders and rounded corners;
.list-group {
  padding-left: 0;
  margin-bottom: 20px;
}
.list-group-item {
  position: relative;
  display: block;
  padding: 10px 15px;
  margin-bottom: -1px;
  background-color: #fff;
  border: 1px solid #ddd;
}
.list-group-item:first-child {
  border-top-left-radius: 4px;
  border-top-right-radius: 4px;
}
.list-group-item:last-child {
  margin-bottom: 0;
  border-bottom-right-radius: 4px;
  border-bottom-left-radius: 4px;
}Let’s take a look at an example:
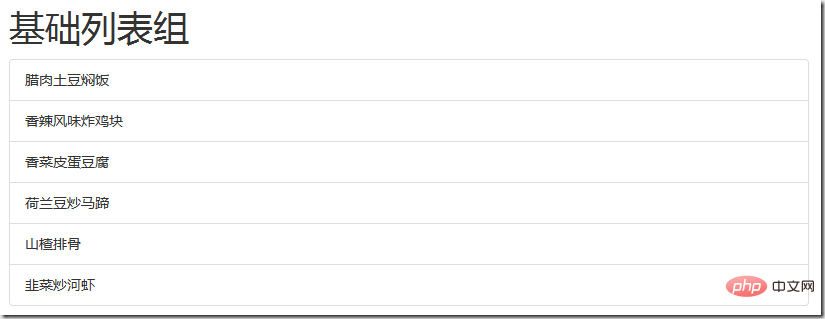
<h1 id="基础列表组">基础列表组</h1>
    <ul class="list-group">
        <li class="list-group-item">腊肉土豆焖饭</li>
        <li class="list-group-item">香辣风味炸鸡块</li>
        <li class="list-group-item">香菜皮蛋豆腐</li>
        <li class="list-group-item">荷兰豆炒马蹄</li>
        <li class="list-group-item">山楂排骨</li>
        <li class="list-group-item">韭菜炒河虾</li>
    </ul>
With List group of badges
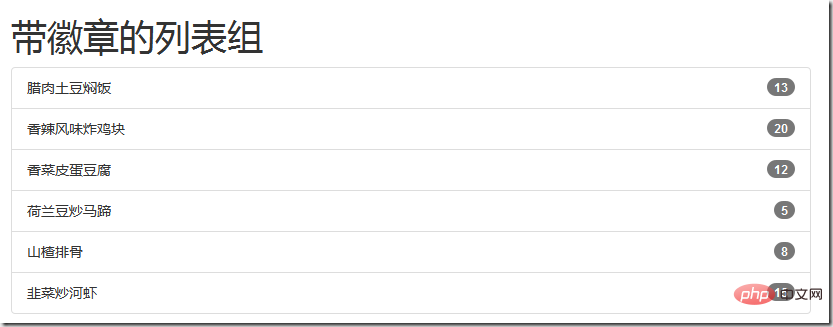
The list group with badges is actually an effect that combines the badge component and the basic list component in the bootstrap framework. The specific method is very simple, just add .list-group -Add the badge component "badge" on the basis of -item
Implementation principle:
Set a right float for the badge, of course, if two badges are in the same list item at the same time When appearing in, the distance between them is also set
.list-group-item > .badge {
  float: right;
}
.list-group-item > .badge + .badge {
  margin-right: 5px;
}Example:
<h1 id="带徽章的列表组">带徽章的列表组</h1>
    <ul class="list-group">
        <li class="list-group-item">
            <span class="badge">13</span>
            腊肉土豆焖饭
        </li>
        <li class="list-group-item">
            <span class="badge">20</span>
            香辣风味炸鸡块
        </li>
        <li class="list-group-item">
            <span class="badge">12</span>
            香菜皮蛋豆腐
        </li>
        <li class="list-group-item">
            <span class="badge">5</span>
            荷兰豆炒马蹄
        </li>
        <li class="list-group-item">
            <span class="badge">8</span>
            山楂排骨
        </li>
        <li class="list-group-item">
            <span class="badge">15</span>
            韭菜炒河虾
        </li>
    </ul>
List group with links
A connected list group actually means that each list item has a link effect. What people generally think of is to add links to the text of the list items based on the basic list group, such as:
<ul class="list-group">
        <li class="list-group-item"><a href="#">腊肉土豆焖饭</a></li>
        <li class="list-group-item"><a href="#">香辣风味炸鸡块</a></li>
        <li class="list-group-item"><a href="#">香菜皮蛋豆腐</a></li>
        <li class="list-group-item"><a href="#">荷兰豆炒马蹄</a></li>
        <li class="list-group-item"><a href="#">山楂排骨</a></li>
        <li class="list-group-item"><a href="#">韭菜炒河虾</a></li>
</ul>The effect is as follows:

There is a shortcoming in this, that is, the click area of the link is only valid on the text; but many times you want to click on any area of the list item. To be clickable, this requires adding an additional style to the link tag: display: block; but in the bootstrap framework, another implementation method is used, which is to use p.list-group for ul.list-group. Replace, li.list-group-item with a.list-group-item, so as to achieve the desired effect.
Implementation principle:
If you use a.list-group-item, the style needs to be processed to a certain extent, such as: removing the underline of the text, adding a floating effect, etc.; The following is the css source code:
a.list-group-item {
  color: #555;
}
a.list-group-item .list-group-item-heading {
  color: #333;
}
a.list-group-item:hover,
a.list-group-item:focus {
  color: #555;
  text-decoration: none;
  background-color: #f5f5f5;
}Application of linked list group:
<h1 id="带链接的列表组">带链接的列表组</h1>
    <ul class="list-group">
        <a class="list-group-item" href="#">腊肉土豆焖饭</a>
        <a class="list-group-item" href="#">香辣风味炸鸡块</a>
        <a class="list-group-item" href="#">香菜皮蛋豆腐</a>
        <a class="list-group-item" href="#">荷兰豆炒马蹄</a>
        <a class="list-group-item" href="#">山楂排骨</a>
        <a class="list-group-item" href="#">韭菜炒河虾</a>
</ul>The effect is as follows:

Customized list Group
The bootstrap framework adds two styles based on the linked list group:
.list-group-item-heading: used to define the list item header style
.list-group-item-text: Used to define the main content of the list item
The biggest role of these two styles is to help developers customize the content of the list item
Implementation principle:
These two styles mainly control the text color in the incompatible state. The following is the css source code:
a.list-group-item .list-group-item-heading {
  color: #333;
}

.list-group-item.disabled .list-group-item-heading,
.list-group-item.disabled:hover .list-group-item-heading,
.list-group-item.disabled:focus .list-group-item-heading {
  color: inherit;
}
.list-group-item.disabled .list-group-item-text,
.list-group-item.disabled:hover .list-group-item-text,
.list-group-item.disabled:focus .list-group-item-text {
  color: #777;
}

.list-group-item.active .list-group-item-heading,
.list-group-item.active:hover .list-group-item-heading,
.list-group-item.active:focus .list-group-item-heading,
.list-group-item.active .list-group-item-heading > small,
.list-group-item.active:hover .list-group-item-heading > small,
.list-group-item.active:focus .list-group-item-heading > small,
.list-group-item.active .list-group-item-heading > .small,
.list-group-item.active:hover .list-group-item-heading > .small,
.list-group-item.active:focus .list-group-item-heading > .small {
  color: inherit;
}
.list-group-item.active .list-group-item-text,
.list-group-item.active:hover .list-group-item-text,
.list-group-item.active:focus .list-group-item-text {
  color: #e1edf7;
}

.list-group-item-heading {
  margin-top: 0;
  margin-bottom: 5px;
}
.list-group-item-text {
  margin-bottom: 0;
  line-height: 1.3;
}Use of custom list group
<h1 id="自定义列表组">自定义列表组</h1>
    <ul class="list-group">
        <a class="list-group-item">
           <h4 id="列表-标题">列表1标题</h4>
           <p class="list-group-item-text">列表1内容列表1内容列表1内容列表1内容列表1内容列表1内容列表1内容列表1内容列表1内容</p>
        </a>
        <a class="list-group-item">
            <h4 id="列表-标题">列表2标题</h4>
            <p class="list-group-item-text">列表2内容列表2内容列表2内容列表2内容列表2内容列表2内容列表2内容列表2内容列表2内容列表2内容列表2内容列表2内容</p>
        </a>
        <a class="list-group-item">
            <h4 id="列表-标题">列表3标题</h4>
            <p class="list-group-item-text">列表3内容列表3内容列表3内容列表3内容列表3内容列表3内容列表3内容列表3内容列表3内容列表3内容列表3内容列表3内容列表3内容列表3内容列表3内容列表3内容列表3内容列表3内容列表3内容</p>
        </a>
        <a class="list-group-item">
            <h4 id="列表-标题">列表4标题</h4>
            <p class="list-group-item-text">列表4内容列表4内容列表4内容列表4内容列表4内容列表4内容列表4内容列表4内容列表4内容列表4内容列表4内容列表4内容列表4内容列表4内容列表4内容列表4内容列表4内容列表4内容</p>
        </a>
        <a class="list-group-item">
            <h4 id="列表-标题">列表5标题</h4>
            <p class="list-group-item-text">列表5内容列表5内容列表5内容列表5内容列表5内容列表5内容列表5内容列表5内容列表5内容列表5内容列表5内容列表5内容</p>
        </a>
        <a class="list-group-item">
            <h4 id="列表-标题">列表6标题</h4>
            <p class="list-group-item-text">列表6内容列表6内容列表6内容列表6内容列表6内容列表6内容列表6内容列表6内容列表6内容列表6内容列表6内容列表6内容列表6内容列表6内容列表6内容列表6内容列表6内容列表6内容列表6内容列表6内容列表6内容列表6内容列表6内容列表6内容列表6内容列表6内容列表6内容列表6内容列表6内容列表6内容</p>
        </a>
    </ul>
列表项的状态设置
bootstrap框架中也给组合列表项提供了状态效果,特别是链接列表组,实现方法和前面介绍的组件类似,在列表组中只需在对应的列表项中添加类名:.active(表示当前状态)、.disabled(表示禁用状态)
实现原理:
在样式上主要对列表项的背景色和文本做了样式设置,下面是css源码:
.list-group-item.disabled,
.list-group-item.disabled:hover,
.list-group-item.disabled:focus {
  color: #777;
  background-color: #eee;
}

.list-group-item.active,
.list-group-item.active:hover,
.list-group-item.active:focus {
  z-index: 2;
  color: #fff;
  background-color: #428bca;
  border-color: #428bca;
}例子:
<h1 id="列表组状态设置">列表组状态设置</h1>
    <ul class="list-group">
        <a class="list-group-item active">
            <h4 id="列表-标题">列表1标题</h4>
            <p class="list-group-item-text">列表1内容列表1内容列表1内容列表1内容列表1内容列表1内容列表1内容列表1内容列表1内容</p>
        </a>
        <a class="list-group-item">
            <h4 id="列表-标题">列表2标题</h4>
            <p class="list-group-item-text">列表2内容列表2内容列表2内容列表2内容列表2内容列表2内容列表2内容列表2内容列表2内容列表2内容列表2内容列表2内容</p>
        </a>
        <a class="list-group-item disabled">
            <h4 id="列表-标题">列表3标题</h4>
            <p class="list-group-item-text">列表3内容列表3内容列表3内容列表3内容列表3内容列表3内容列表3内容列表3内容列表3内容列表3内容列表3内容列表3内容列表3内容列表3内容列表3内容列表3内容列表3内容列表3内容列表3内容</p>
        </a>
        <a class="list-group-item">
            <h4 id="列表-标题">列表4标题</h4>
            <p class="list-group-item-text">列表4内容列表4内容列表4内容列表4内容列表4内容列表4内容列表4内容列表4内容列表4内容列表4内容列表4内容列表4内容列表4内容列表4内容列表4内容列表4内容列表4内容列表4内容</p>
        </a>
        <a class="list-group-item">
            <h4 id="列表-标题">列表5标题</h4>
            <p class="list-group-item-text">列表5内容列表5内容列表5内容列表5内容列表5内容列表5内容列表5内容列表5内容列表5内容列表5内容列表5内容列表5内容</p>
        </a>
        <a class="list-group-item">
            <h4 id="列表-标题">列表6标题</h4>
            <p class="list-group-item-text">列表6内容列表6内容列表6内容列表6内容列表6内容列表6内容列表6内容列表6内容列表6内容列表6内容列表6内容列表6内容列表6内容列表6内容列表6内容列表6内容列表6内容列表6内容列表6内容列表6内容列表6内容列表6内容列表6内容列表6内容列表6内容列表6内容列表6内容列表6内容列表6内容列表6内容</p>
        </a>
</ul>效果如下(第三个列表项是禁用状态,鼠标移放在它上面有个禁用图标,这里是直接截的图,看不到这个效果):

多彩列表组
列表组组件和警告组件一样,bootstrap为不同的状态提供了不同的背景色和文本色,可以使用这几个类名定义不同背景色的列表项:
.list-group-item-success:成功 绿色(背景色)
.list-group-item-info:信息 蓝色(背景色)
.list-group-item-warning:警告 黄色(背景色)
.list-group-item-danger:错误 红色(背景色)
实现原理:
这几个类名仅修改了背景色和文本色,对应的源码如下:
.list-group-item-success {
  color: #3c763d;
  background-color: #dff0d8;
}
a.list-group-item-success {
  color: #3c763d;
}
a.list-group-item-success .list-group-item-heading {
  color: inherit;
}
a.list-group-item-success:hover,
a.list-group-item-success:focus {
  color: #3c763d;
  background-color: #d0e9c6;
}
a.list-group-item-success.active,
a.list-group-item-success.active:hover,
a.list-group-item-success.active:focus {
  color: #fff;
  background-color: #3c763d;
  border-color: #3c763d;
}其它状态样式代码请查看源码文件,如果想给列表项添加背景色,只需在类.lis-group-item的基础上追加对应的类名即可。
多彩列表组的运用:
<h1 id="多彩列表组">多彩列表组</h1>
    <ul class="list-group">
        <a href="#" class="list-group-item active">
            列表项1
            <span class="badge">10</span>
        </a>
        <a href="#" class="list-group-item list-group-item-success">
            列表项1
            <span class="badge">10</span>
        </a>
        <a href="#" class="list-group-item list-group-item-info">
            列表项1
            <span class="badge">10</span>
        </a>
        <a href="#" class="list-group-item list-group-item-warning">
            列表项1
            <span class="badge">10</span>
        </a>
        <a href="#" class="list-group-item list-group-item-danger">
            列表项1
            <span class="badge">10</span>
        </a>
</ul>效果如下:

更多编程相关知识,请访问:编程教学!!
The above is the detailed content of How to use the list group component of Bootstrap learning. For more information, please follow other related articles on the PHP Chinese website!

Hot AI Tools

Undresser.AI Undress
AI-powered app for creating realistic nude photos

AI Clothes Remover
Online AI tool for removing clothes from photos.

Undress AI Tool
Undress images for free

Clothoff.io
AI clothes remover

Video Face Swap
Swap faces in any video effortlessly with our completely free AI face swap tool!

Hot Article

Hot Tools

Notepad++7.3.1
Easy-to-use and free code editor

SublimeText3 Chinese version
Chinese version, very easy to use

Zend Studio 13.0.1
Powerful PHP integrated development environment

Dreamweaver CS6
Visual web development tools

SublimeText3 Mac version
God-level code editing software (SublimeText3)

Hot Topics
 1390
1390
 52
52
 How to get the bootstrap search bar
Apr 07, 2025 pm 03:33 PM
How to use Bootstrap to get the value of the search bar: Determines the ID or name of the search bar. Use JavaScript to get DOM elements. Gets the value of the element. Perform the required actions.
 How to use bootstrap in vue
Apr 07, 2025 pm 11:33 PM
Using Bootstrap in Vue.js is divided into five steps: Install Bootstrap. Import Bootstrap in main.js. Use the Bootstrap component directly in the template. Optional: Custom style. Optional: Use plug-ins.
 How to do vertical centering of bootstrap
Apr 07, 2025 pm 03:21 PM
Use Bootstrap to implement vertical centering: flexbox method: Use the d-flex, justify-content-center, and align-items-center classes to place elements in the flexbox container. align-items-center class method: For browsers that do not support flexbox, use the align-items-center class, provided that the parent element has a defined height.
 How to write split lines on bootstrap
Apr 07, 2025 pm 03:12 PM
There are two ways to create a Bootstrap split line: using the tag, which creates a horizontal split line. Use the CSS border property to create custom style split lines.
 How to use bootstrap button
Apr 07, 2025 pm 03:09 PM
How to use the Bootstrap button? Introduce Bootstrap CSS to create button elements and add Bootstrap button class to add button text
 How to resize bootstrap
Apr 07, 2025 pm 03:18 PM
To adjust the size of elements in Bootstrap, you can use the dimension class, which includes: adjusting width: .col-, .w-, .mw-adjust height: .h-, .min-h-, .max-h-
 How to set up the framework for bootstrap
Apr 07, 2025 pm 03:27 PM
To set up the Bootstrap framework, you need to follow these steps: 1. Reference the Bootstrap file via CDN; 2. Download and host the file on your own server; 3. Include the Bootstrap file in HTML; 4. Compile Sass/Less as needed; 5. Import a custom file (optional). Once setup is complete, you can use Bootstrap's grid systems, components, and styles to create responsive websites and applications.
 How to insert pictures on bootstrap
Apr 07, 2025 pm 03:30 PM
There are several ways to insert images in Bootstrap: insert images directly, using the HTML img tag. With the Bootstrap image component, you can provide responsive images and more styles. Set the image size, use the img-fluid class to make the image adaptable. Set the border, using the img-bordered class. Set the rounded corners and use the img-rounded class. Set the shadow, use the shadow class. Resize and position the image, using CSS style. Using the background image, use the background-image CSS property.


