How to add keyframes in ae
aeHow to add keyframes: First click synthesis and import the material; then click the transform option, select the position of the video track, and click the stopwatch icon; finally move the timeline and adjust the scaling parameters.

The operating environment of this article: Windows 7 system, Adobe After Effects version 17.12, Dell G3 computer.
ae How to add key frames:
1. Enter the ae interface and click New Composition.

#2. Import a material picture or text.

#3. Click the small triangle icon below the picture material and click the transform option.

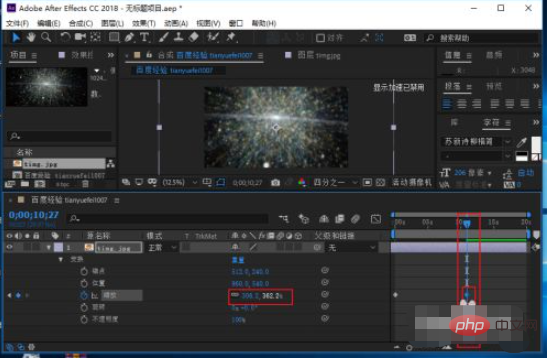
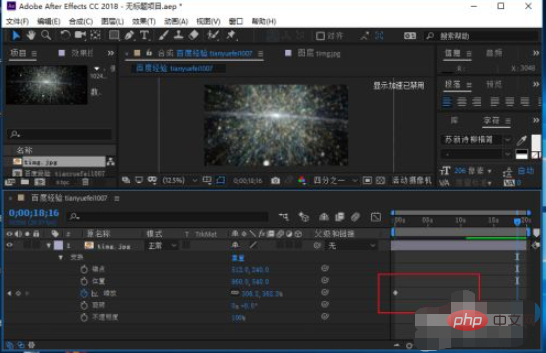
#4. Under the transformation option, you can see an icon with a small stopwatch in front. This can also be said to be a switch for adding key frames. Select the position of the video track. Click the stopwatch icon (here is the zoom option).

#5. A small diamond-shaped icon will appear on the video track. This is the key frame.

#6. Move the timeline, then adjust the zoom parameters, and a keyframe will be automatically added.

#7. Key frames can be added infinitely, as long as a certain effect is achieved.

Related free learning recommendations: php programming(Video)
The above is the detailed content of How to add keyframes in ae. For more information, please follow other related articles on the PHP Chinese website!

Hot AI Tools

Undresser.AI Undress
AI-powered app for creating realistic nude photos

AI Clothes Remover
Online AI tool for removing clothes from photos.

Undress AI Tool
Undress images for free

Clothoff.io
AI clothes remover

AI Hentai Generator
Generate AI Hentai for free.

Hot Article

Hot Tools

Notepad++7.3.1
Easy-to-use and free code editor

SublimeText3 Chinese version
Chinese version, very easy to use

Zend Studio 13.0.1
Powerful PHP integrated development environment

Dreamweaver CS6
Visual web development tools

SublimeText3 Mac version
God-level code editing software (SublimeText3)

Hot Topics
 ae has disabled refresh please release caps lock how to solve
Jan 05, 2021 pm 03:39 PM
The reason why "AE has disabled refreshing, please release Caps Lock" appears in the AE editing interface is that Caps Lock is turned on. The solution is to press the "CapsLock" key on the computer keyboard to turn off Caps Lock.
 Where are the keyframes for the clipping? Tutorial on using keyframes for Windows version of clipping
Mar 13, 2024 pm 10:04 PM
Many friends want to set video keyframes when using clipping, but they have never found the keyframes of the clipping and cannot set them? So today the editor will bring you a detailed tutorial on adding keyframes to the Windows version of clipping. Users in need should take a look! 1. Where are the key frames in the computer version? 1. Click on the video where key frames need to be added in the timeline, and place the frame header at the location where key frames need to be added: 2. Go to the right side, usually there is no need to manually select, it will default to the first basic tab in the screen panel, each One item, such as zoom, position, rotation, etc., there is a diamond icon at the end, click to add keyframes: 3. Click to complete the addition of keyframes at the location of the frame header just now. 2. If
 How to use clipping keyframes? -How to change the voice and dub the movie?
Mar 18, 2024 pm 01:00 PM
How to use clipping keyframes? Step 1: First enter the editing, click to start creating. Step 2: Select the material to be edited, click on the lower right corner to add, click on the material. Step 3: Move the cursor to the initial position, click on the key frame, and move the screen to the upper left corner. Step 4 Move the cursor to the end and move the screen to the lower right corner, so that a moving screen is ready. Step 5 Note: Multiple key frames can be added to the picture, and the specific situation can be edited according to the requirements of the work. How to change the voice and dub in clipping? 1. Open the clipping App: Find and open the clipping App on your phone. 2. Import video material: Click the "Clip" button at the bottom of the screen, select the video material to be edited and import it into the clip. 3. Enter the audio editing interface: In the editing page, find and click the screen
 What currency is AE?
Feb 26, 2024 am 10:28 AM
What currency is AE? AE (Aeternity) is a cryptocurrency based on blockchain technology and is committed to providing secure, efficient and scalable blockchain solutions to global users. It aims to solve the challenges faced by current blockchain technology, such as scalability, privacy protection and smart contract execution efficiency. Through AE, users can transfer and store digital assets more conveniently, while providing a development platform and operating environment for decentralized applications (DApp). The launch of AE brings a new digital currency experience to users and opens up new possibilities for the development of the blockchain industry. Features and Benefits AE uses a technology called "state channels" to help reduce transaction pressure on the blockchain. With the help of state channels, transactions can be
 What software is ae? What is ae?
Feb 22, 2024 pm 05:40 PM
AE is a video and graphics processing software. Analysis 1AE is a video and graphics processing software, the full name is AdobeAfterEffects. It is an editing software for creating dynamic images and visual effects. Supports designing special effects skills, making animations, and post-production. ae can help customers create dynamic graphics efficiently and bring visual impact. Supplement: What Ae is good at 1Ae is good at special effects and post-production for short content, such as UI animation effects, MG animation or specific elements production, column packaging and ending production, etc. Add refreshing effects to movies, short videos, DVDs, etc. Summary/Notes AE is suitable for designing special effects technology, making animations and video post-production
 How to use clipping keyframes
Mar 28, 2024 pm 04:40 PM
How to use keyframes for clipping? In the clipping APP, you can adjust the video to the key frame rate, but many friends don’t know how to use keyframes. Next is the tutorial on how to use keyframes for clipping brought by the editor. , interested users come and take a look! "Tutorial on the use of video clipping" How to use clipping key frames 1. First open the clipping APP and enter the main page, select the [+ start creating] border; 2. Then jump to the material library function page and select the material to be used to make a video. Select; 3. Then enter the editing function page, move the cursor shown by the arrow in the figure below to the far left and click [Keyframe]; 4. Finally, move the cursor to the far right to adjust it to a key frame.
 What are the functions of ps ai ae pr?
Jan 18, 2021 am 11:14 AM
ps is used for image editing. Using its many editing and drawing tools, you can effectively edit images. AI is mainly used in printing and publishing, poster images, book cover design, professional illustrations, etc. It is a vector graphics processing software. ae is used for 2D and 3D synthesis, animation and visual effects; the introduction of the middle layer allows AE to control multi-layer composite images and create seamless composite effects. PR is used for video editing, has good compatibility, and is widely used in advertising production and TV program production.
 How to export video from ae
Jan 02, 2021 am 11:55 AM
How to export video from ae: 1. Create a new file using AE on your computer; 2. Click the "Composite" option in the top toolbar; 3. Click "Add to Render Queue"; 4. Click the "Output Module" below, Adjust the quality of the output video; 5. Click the "Render" button to export the video.


