

How to import cad into ps to make color flat drawings

How to import ps from cad to make color flat drawings: first click [Tools-Wizard-Plotter]; then click [Next]; then enter the name of the plotter and select [File-Print]; Finally, select [Print to file], set parameters, and click [OK].

The operating environment of this article: Windows 7 system, autocad2020 version, Dell G3 computer.
How to import CAD into PS to make color flat drawings:
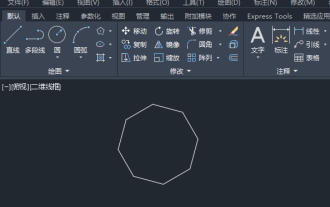
1. Draw the graphics in CAD and click Tools-Wizard-Plotter.

#2. Click [Next] in the pop-up window.

3. Press the selection in the red box and click [Next].

#4. Enter the name of the plotter.

5. Select [File]-[Print].

#6. Select [Print to file], set parameters, click [OK], and repeat the operation to practice mastering.

Related free learning recommendations: php programming(Video)
The above is the detailed content of How to import cad into ps to make color flat drawings. For more information, please follow other related articles on the PHP Chinese website!

Hot AI Tools

Undresser.AI Undress
AI-powered app for creating realistic nude photos

AI Clothes Remover
Online AI tool for removing clothes from photos.

Undress AI Tool
Undress images for free

Clothoff.io
AI clothes remover

AI Hentai Generator
Generate AI Hentai for free.

Hot Article
Hot Tools

Notepad++7.3.1
Easy-to-use and free code editor

SublimeText3 Chinese version
Chinese version, very easy to use

Zend Studio 13.0.1
Powerful PHP integrated development environment

Dreamweaver CS6
Visual web development tools

SublimeText3 Mac version
God-level code editing software (SublimeText3)
Hot Topics


 Introduction to the process of extracting line drawings in PS
Apr 01, 2024 pm 12:51 PM
Introduction to the process of extracting line drawings in PS
Apr 01, 2024 pm 12:51 PM
1. Open the software and import a piece of material, as shown in the picture below. 2. Then ctrl+shift+u to remove color. 3. Then press ctrl+J to copy the layer. 4. Then reverse ctrl+I, and then set the layer blending mode to Color Dodge. 5. Click Filter--Others--Minimum. 6. In the pop-up dialog box, set the radius to 2 and click OK. 7. Finally, you can see the line draft extracted.
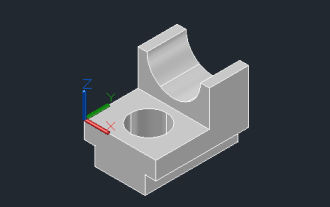
 How to draw three-dimensional graphics in CAD
Feb 27, 2024 pm 07:00 PM
How to draw three-dimensional graphics in CAD
Feb 27, 2024 pm 07:00 PM
In CAD software, the three-dimensional drawing function allows designers to express design concepts more intuitively and create three-dimensional graphics. However, many users may not yet understand how to use CAD to draw three-dimensional graphics, so this article will introduce you in detail how to use CAD software to draw three-dimensional graphics to help you master this key skill. If you want to know more, please continue reading this article. I believe this tutorial guide will be helpful to you. Steps for drawing three-dimensional graphics in CAD: 1. Open the CAD2023 software and create a blank document. Create an 8-sided shape. As shown below: 2. Click the area tool in the drawing. Or enter a space after entering the REGION command. As shown below: 3. Select the object in REGION.
 How to merge a graphic after CAD rectangles are scattered
Feb 28, 2024 pm 12:10 PM
How to merge a graphic after CAD rectangles are scattered
Feb 28, 2024 pm 12:10 PM
When using CAD software, we often encounter situations where we need to recombine "scattered" rectangular objects into a single graphic. This need arises in many fields, such as space planning, mechanical design and architectural drawings. In order to meet this demand, we need to understand and master some key functions in CAD software. Next, the editor of this website will introduce you in detail how to complete this task in the CAD environment. Users who have doubts can come and follow this article to learn. Method for merging CAD rectangles into one graphic after breaking them up: 1. Open the CAD2023 software, create a rectangle, and then enter the X command and a space. As shown below: 2. Select the rectangular object and space it. You can break up the objects. 3. Select all open lines
 Complete list of ps shortcut keys
Mar 11, 2024 pm 04:31 PM
Complete list of ps shortcut keys
Mar 11, 2024 pm 04:31 PM
1. Ctrl + N: Create a new document. 2. Ctrl + O: Open a file. 3. Ctrl + S: Save the current file. 4. Ctrl + Shift + S: Save as. 5. Ctrl + W: Close the current document. 6. Ctrl + Q: Exit Photoshop. 7. Ctrl + Z: Undo. 8. Ctrl + Y: Redo. 9. Ctrl + X: Cut the selected content. 10. Ctrl + C: Copy the selected content.
 How to use ps vanishing point - how to use ps vanishing point
Mar 05, 2024 am 09:00 AM
How to use ps vanishing point - how to use ps vanishing point
Mar 05, 2024 am 09:00 AM
Recently, many friends have asked the editor how to use PS vanishing point. Next, let us learn how to use PS vanishing point. I hope it can help everyone. Step one: First open the ps software and import a picture with a three-dimensional perspective effect (as shown in the picture). Step 2: Then import a material picture, any picture can be used (as shown in the picture). Step 3: Then select the material picture, then ctrl+c to copy the material picture, hide the eyes in front, select the stereoscopic perspective effect picture, and then click the vanishing point option in the filter options (as shown in the picture). Step 4: Enter the editing window of the vanishing point filter and select the Create Plane tool on the left (as shown in the picture). Step 5: Click on the four corners of the object in the three-dimensional perspective rendering to form a closed circle
 How to use cad imprinting tool
Feb 27, 2024 pm 05:46 PM
How to use cad imprinting tool
Feb 27, 2024 pm 05:46 PM
CAD imprinting tools are a powerful assistant for designers and engineers when designing complex 3D models. It gives designers the powerful ability to add a variety of details to the surface of the model, whether it is debossed text, raised images, or any other type of detail, all with ease. Moreover, using this tool is quite simple, and it only takes a few steps to complete the design. So how to use the CAD imprint tool? This tutorial guide will bring you a detailed guide introduction, I hope it can help everyone. How to use the cad imprinting tool Step 1. Open the CAD2023 software and create a new three-dimensional graphic. As shown below: 2. Create a two-dimensional polyline on the surface of the three-dimensional entity. As shown below: 3. Click the triangle icon behind the extracted edge and select
 binance official website URL Binance official website entrance latest genuine entrance
Dec 16, 2024 pm 06:15 PM
binance official website URL Binance official website entrance latest genuine entrance
Dec 16, 2024 pm 06:15 PM
This article focuses on the latest genuine entrances to Binance’s official website, including Binance Global’s official website, the US official website and the Academy’s official website. In addition, the article also provides detailed access steps, including using a trusted device, entering the correct URL, double-checking the website interface, verifying the website certificate, contacting customer support, etc., to ensure safe and reliable access to the Binance platform.
 How to make blue fluorescent effect in PS
Feb 27, 2024 pm 12:55 PM
How to make blue fluorescent effect in PS
Feb 27, 2024 pm 12:55 PM
The editor of this website brings you this tutorial to take you into the wonderful world of Photoshop and learn how to create a charming blue fluorescent effect. Whether you are new to Photoshop or an experienced user, you can find inspiration and practical tips from this tutorial. So how to create the blue fluorescent effect in PS? This tutorial guide will give you a detailed introduction, I hope it can help you. PS blue fluorescence effect production method steps final effect: 1. Adjust the brightness of the picture. 2. Add curves to adjust the overall light and dark contrast of the picture. 3. Use a pen to hook out the "edge strips" of the shoes. 4. After cutting out, create a selection and fill it with white. 5. Select the blur tool and blur the hooked white part. 5. Use a pen to mark the shoelaces