What is the php file upload process?
php file upload process: first configure the PHP file and set the front-end form; then save the temporary file in the set directory by default; then judge and process the error attribute in the file array; finally, in the front-end you can Limit the type and size of uploaded files.

The operating environment of this tutorial: Windows 7 system, PHP version 5.6, DELL G3 computer. This method is suitable for all brands of computers.
php file upload process:
1. PHP configuration file
The file uploads section in the php.ini file defines the relevant file upload configuration.
file_uploads = On Turn on file uploads
upload_tmp_dir =Temporary directory
upload_max_filesize = 2M maximum Upload size
max_file_uploads = 20 Maximum number of files uploaded at a time
2. Front-end form
<form action="test.php" method="post" enctype="multipart/form-data">
  <input type="file" name="myfile">
  <input type="submit" value="上传">
</form>
When using the file When uploading the form of the control, the enctype of the form must be set to "multipart/form-data".
You can limit the size and type of uploaded files on the client side:
<input type="hidden" name="MAX_FILE_SIZE" value="8096">
<input type="file" name="myfile" accept="image/jpeg,image/png">
3. Background processing
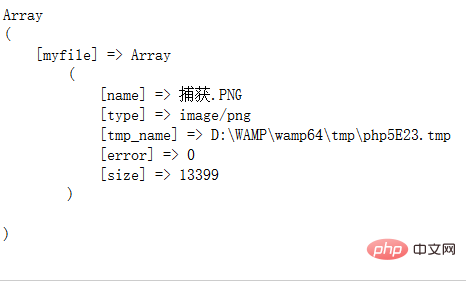
After uploading, you will get a $_FILES on the server side The file array is as follows:

The temporary files uploaded to the server are saved by default in the directory set by upload_tmp_dir in php.ini, we need Move the file to the specified location:
<?php header('Content-type:text/html;charset=utf-8'); $myfile=$_FILES['myfile']; //获取文件数组['myfile']的属性tmp_name与name $tmp=$myfile['tmp_name']; $picname=$myfile['name']; //windows采用GBK编码,php采用utf-8编码,需要改变文件名的编码格式 $picname=iconv('utf-8','GBK',$picname); //将零时文件$tmp移动到指定目录userpic并命名为$picname copy($tmp,"userpic/".$picname);
4. Error handling
Judge and process the error attribute in the file array:
$error=$myfile['myfile']['error'];
  if ($error==0){//为0,代表上传成功
    if (move_uploaded_file($tmp,"userpic/".$picname)) {
      echo "移动文件成功";
    }else{
      echo "移动文件失败";
    }
  }else{//不为0,匹配错误信息
    switch ($error){
      case 1:
        echo "超过文件最大上传限制";//php.ini中upload_max_filesize
        break;
      case 2:
        echo "超过表单文件大小限制";//HTML表单中MAX_FILE_SIZE选项
        break;
      case 3:
        echo "文件部分被上传";
        break;
      case 4:
        echo "未选择上传文件";
        break;
      case 7://文件写入失败
      case 8:
        echo "系统错误";
        break;
    }
}5. Upload restrictions
On the front end, you can limit the type and size of uploaded files:
<!--表单隐藏域对上传大小进行限制-->
<input type="hidden" name="MAX_FILE_SIZE" value="2097152">
<!--accept 对文件类型限制-->
<input type="file" name="myfile" accept="image/jpeg,image/png">
Note that the limit is in bytes
There are also response restrictions on the server side:
$size=$myfile['size'];//获取文件大小
$MaxSize=2097152;//设置最大允许字节
$type=$myfile['type'];//获取图片类型
$AllowTypr=array('image/jpeg','image/png','image/gif');//允许类型数组
if ($error==0){//为0,代表上传成功
if ($size>$MaxSize){
echo "<script>alert('文件大小超过限制');</script>";
echo "<script>history.back(1);</script>";
exit();
}
if (!in_array($type,$AllowTypr)){
echo "<script>alert('请上传正确图片类型');</script>";
echo "<script>history.back(1);</script>";
exit();
}Related video recommendations: PHP programming from entry to proficiency
The above is the detailed content of What is the php file upload process?. For more information, please follow other related articles on the PHP Chinese website!

Hot AI Tools

Undresser.AI Undress
AI-powered app for creating realistic nude photos

AI Clothes Remover
Online AI tool for removing clothes from photos.

Undress AI Tool
Undress images for free

Clothoff.io
AI clothes remover

AI Hentai Generator
Generate AI Hentai for free.

Hot Article

Hot Tools

Notepad++7.3.1
Easy-to-use and free code editor

SublimeText3 Chinese version
Chinese version, very easy to use

Zend Studio 13.0.1
Powerful PHP integrated development environment

Dreamweaver CS6
Visual web development tools

SublimeText3 Mac version
God-level code editing software (SublimeText3)

Hot Topics
 1371
1371
 52
52
 CakePHP Project Configuration
Sep 10, 2024 pm 05:25 PM
In this chapter, we will understand the Environment Variables, General Configuration, Database Configuration and Email Configuration in CakePHP.
 PHP 8.4 Installation and Upgrade guide for Ubuntu and Debian
Dec 24, 2024 pm 04:42 PM
PHP 8.4 brings several new features, security improvements, and performance improvements with healthy amounts of feature deprecations and removals. This guide explains how to install PHP 8.4 or upgrade to PHP 8.4 on Ubuntu, Debian, or their derivati
 CakePHP Date and Time
Sep 10, 2024 pm 05:27 PM
To work with date and time in cakephp4, we are going to make use of the available FrozenTime class.
 CakePHP Working with Database
Sep 10, 2024 pm 05:25 PM
Working with database in CakePHP is very easy. We will understand the CRUD (Create, Read, Update, Delete) operations in this chapter.
 CakePHP File upload
Sep 10, 2024 pm 05:27 PM
To work on file upload we are going to use the form helper. Here, is an example for file upload.
 Discuss CakePHP
Sep 10, 2024 pm 05:28 PM
CakePHP is an open-source framework for PHP. It is intended to make developing, deploying and maintaining applications much easier. CakePHP is based on a MVC-like architecture that is both powerful and easy to grasp. Models, Views, and Controllers gu
 CakePHP Routing
Sep 10, 2024 pm 05:25 PM
In this chapter, we are going to learn the following topics related to routing ?
 CakePHP Creating Validators
Sep 10, 2024 pm 05:26 PM
Validator can be created by adding the following two lines in the controller.


