Cool CSS border animation, come and collect it!
This article will share with you several cool border animations implemented using CSS. It has certain reference value. Friends in need can refer to it. I hope it will be helpful to everyone.
[Recommended tutorial: CSS video tutorial]
It’s very interesting to see such an interface today:

I think its style is very unique, especially some of the borders.
Hey, let’s do a special border article to see what tricks can be done on the border using CSS.
border attribute
When it comes to borders, the first thing that comes to mind is border. The most commonly used ones are solid and dashed , dashed appears in the picture above.
In addition to the most common solid, dashed, CSS border also supports none, hidden, dotted , double, groove, ridge, inset, outset and other styles. Except none, hidden, take a look at all the natively supported border styles:

These are the basics, if you want to implement A border of other styles, or adding animation to the border, requires some other attributes, or a lot of imagination. OK, let’s take a look at some additional interesting borders.
Border length change
Let’s start with a relatively simple one to achieve a border effect similar to this:

This is actually borrowed Two pseudo-elements of the element. The two pseudo-elements only set the top and left borders, and the bottom and right borders respectively. When passing hover, the height and width of the two pseudo-elements can be changed. Very easy to understand.
div {position: relative;border: 1px solid #03A9F3;&::before,&::after {content: "";position: absolute;width: 20px;height: 20px;}&::before {top: -5px;left: -5px;border-top: 1px solid var(--borderColor);border-left: 1px solid var(--borderColor);}&::after {right: -5px;bottom: -5px;border-bottom: 1px solid var(--borderColor);border-right: 1px solid var(--borderColor);}&:hover::before,&:hover::after {width: calc(100% + 9px);height: calc(100% + 9px);}}复制代码CodePen Demo -- width border animation
Next, we will start to deepen the difficulty.
Dotted border animation
Use the dashed keyword to easily create a dotted border.
div {border: 1px dashed #333;}复制代码
Of course, our goal is to make the border move. There's no way around it using the dashed keyword. But there are many ways to implement dotted lines in CSS. For example, gradient is a good way:
div {background: linear-gradient(90deg, #333 50%, transparent 0) repeat-x;background-size: 4px 1px;background-position: 0 0;}复制代码Look, the dotted line simulated using gradient is as follows:

Okay, gradient supports multiple gradients. We can use gradients to represent the four sides of the container:
div {background:linear-gradient(90deg, #333 50%, transparent 0) repeat-x,linear-gradient(90deg, #333 50%, transparent 0) repeat-x,linear-gradient(0deg, #333 50%, transparent 0) repeat-y,linear-gradient(0deg, #333 50%, transparent 0) repeat-y;background-size: 4px 1px, 4px 1px, 1px 4px, 1px 4px;background-position: 0 0, 0 100%, 0 0, 100% 0;}复制代码The effect is as follows:

OK, at this point, our dotted border animation is actually more than half completed. Although border-style: dashed does not support animation, gradient does. We add a hover effect to the above div, add a animation animation when hover, and change the background-position of the element. That’s it.
div:hover {animation: linearGradientMove .3s infinite linear;}@keyframes linearGradientMove {100% {background-position: 4px 0, -4px 100%, 0 -4px, 100% 4px;}}复制代码OK, look at the effect. When you hover up, the border will move, because the entire animation is connected end to end, and the infinite loop animation looks like a dotted border. Keep moving, this is a little trick or trick:

There is another little trick here, if we want the dotted border animation to transition from other borders to Dashed border, then march animation. It is also possible to simulate it completely by gradient. If you want to save some code, it will be faster to use border, for example:
div {border: 1px solid #333;&:hover {border: none;background:linear-gradient(90deg, #333 50%, transparent 0) repeat-x,linear-gradient(90deg, #333 50%, transparent 0) repeat-x,linear-gradient(0deg, #333 50%, transparent 0) repeat-y,linear-gradient(0deg, #333 50%, transparent 0) repeat-y;background-size: 4px 1px, 4px 1px, 1px 4px, 1px 4px;background-position: 0 0, 0 100%, 0 0, 100% 0;}}复制代码Due to the difference in the positions of border and background on the box model, There will be a very obvious feeling of dislocation visually:

要想解决这个问题,我们可以把 border 替换成 outline,因为 outline 可以设置 outline-offset。便能完美解决这个问题:
div {outline: 1px solid #333;outline-offset: -1px;&:hover {outline: none;}}复制代码最后看看运用到实际按钮上的效果:

上述 Demo 完整代码如下:
CodePen Demo -- dashed border animation
其实由于背景和边框的特殊关系,使用 border 的时候,通过修改
background-position也是可以解决的,就是比较绕。关于背景和边框的填充关系,可以看这篇文章:条纹边框的多种实现方式
渐变的其他妙用
利用渐变,不仅仅只是能完成上述的效果。
我们继续深挖渐变,利用渐变实现这样一个背景:
div {position: relative;&::after {content: '';position: absolute;left: -50%;top: -50%;width: 200%;height: 200%;background-repeat: no-repeat;background-size: 50% 50%, 50% 50%;background-position: 0 0, 100% 0, 100% 100%, 0 100%;background-image: linear-gradient(#399953, #399953), linear-gradient(#fbb300, #fbb300), linear-gradient(#d53e33, #d53e33), linear-gradient(#377af5, #377af5);}}复制代码注意,这里运用了元素的伪元素生成的这个图形,并且,宽高都是父元素的 200%,超出则 overflow: hidden。

接下来,给它加上旋转:
div {animation: rotate 4s linear infinite;}@keyframes rotate { 100% {transform: rotate(1turn); }}复制代码看看效果:
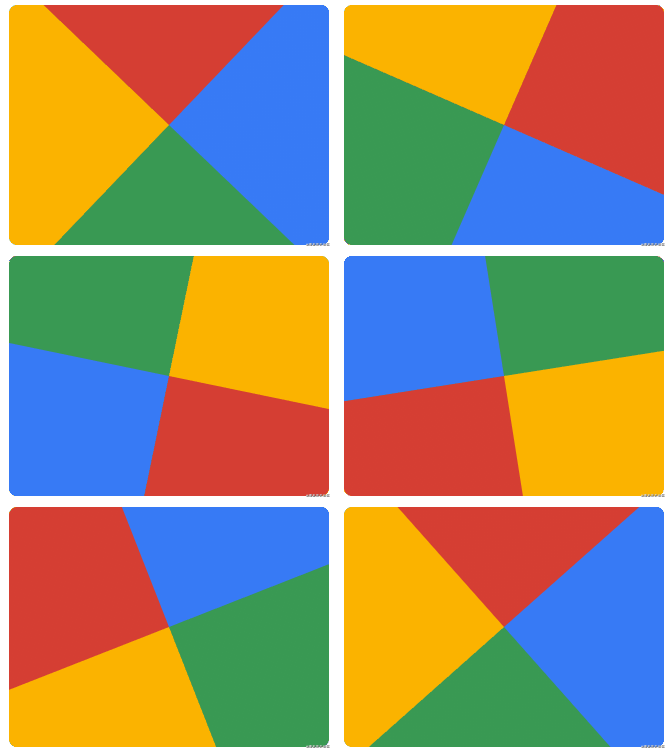
最后,再利用一个伪元素,将中间遮罩起来,一个 Nice 的边框动画就出来了 (动画会出现半透明元素,方便示意看懂原理):
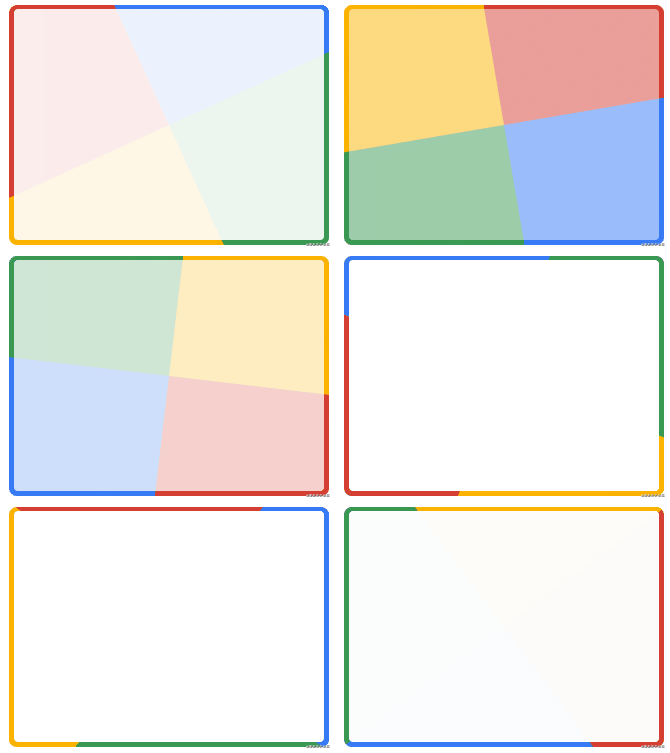
上述 Demo 完整代码如下,这个效果我最早见于这位作者 -- Jesse B
CodePen Demo -- gradient border animation
改变渐变的颜色
掌握了上述的基本技巧之后,我们可以再对渐变的颜色做一些调整,我们将 4 种颜色变成 1 种颜色:
div::after {content: '';position: absolute;left: -50%;top: -50%;width: 200%;height: 200%;background-color: #fff;background-repeat: no-repeat;background-size: 50% 50%;background-position: 0 0;background-image: linear-gradient(#399953, #399953);}复制代码得到这样一个图形:

同样的,让它旋转一起,一个单色追逐的边框动画就出来了:

CodePen Demo -- gradient border animation 2
Wow,很不错的样子。不过如果是单线条,有个很明显的缺陷,就是边框的末尾是一个小三角而不是垂直的,可能有些场景不适用或者 PM 接受不了。
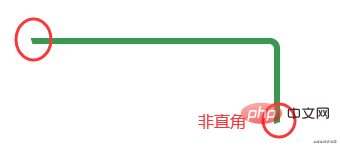
那有没有什么办法能够消除掉这些小三角呢?有的,在下文中我们再介绍一种方法,利用 clip-path ,消除掉这些小三角。
conic-gradient 的妙用
再介绍 clip-path 之前,先讲讲角向渐变。
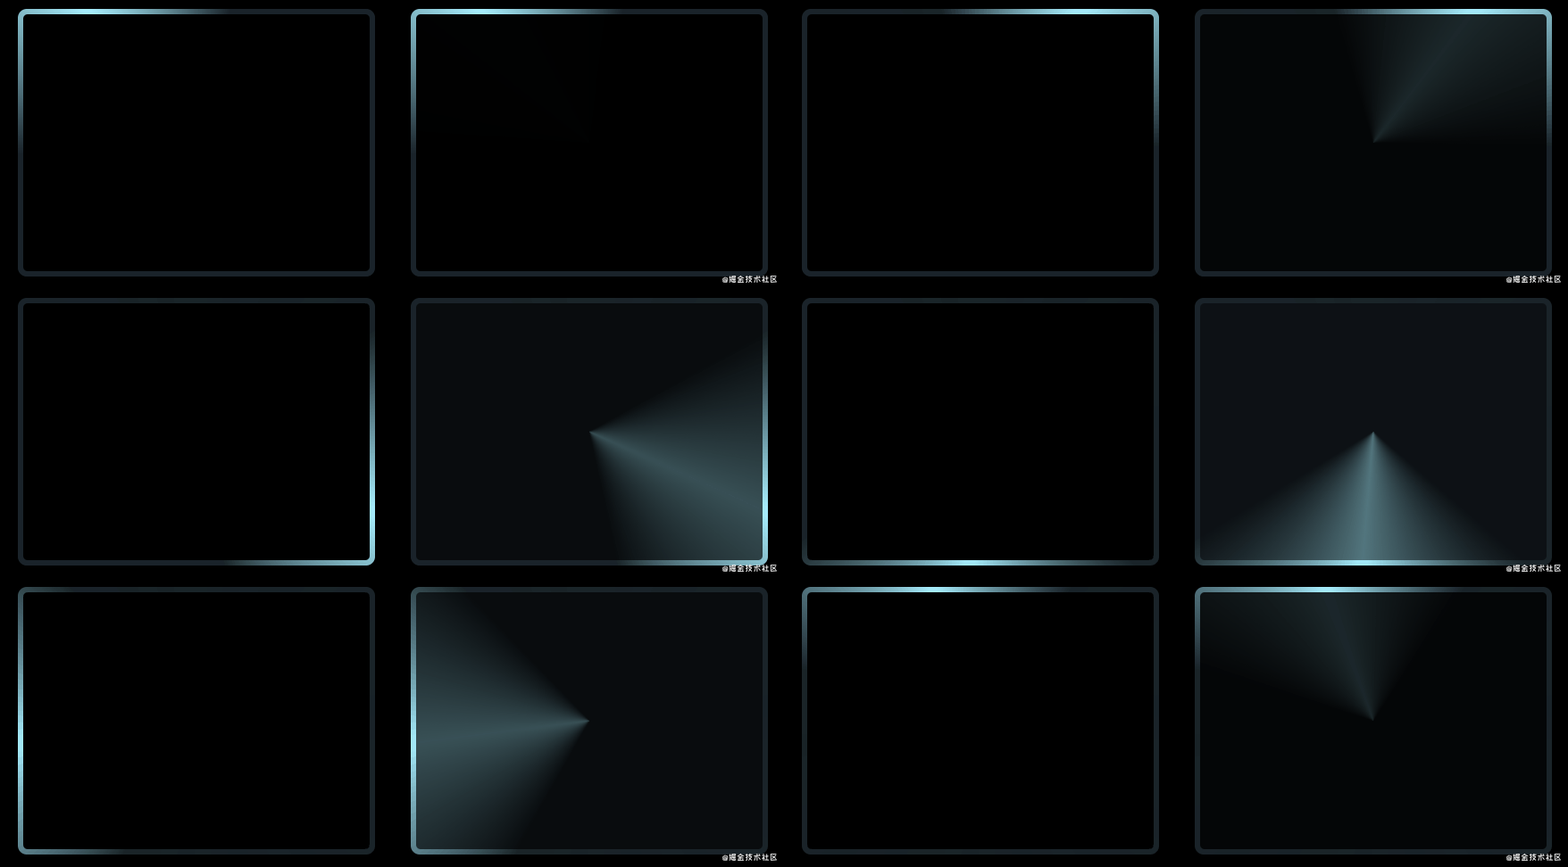
上述主要用到了的是线性渐变 linear-gradient 。我们使用角向渐变 conic-gradient 其实完全也可以实现一模一样的效果。
我们试着使用 conic-gradient 也实现一次,这次换一种暗黑风格。核心代码如下:
.conic {position: relative; &::before {content: '';position: absolute;left: -50%;top: -50%;width: 200%;height: 200%;background: conic-gradient(transparent, rgba(168, 239, 255, 1), transparent 30%);animation: rotate 4s linear infinite; }}@keyframes rotate { 100% {transform: rotate(1turn); }}复制代码效果图和示意图如下,旋转一个部分角向渐变的图形,中间的部分使用另外一个伪元素进行遮罩,只漏出线条部分即可:
CodePen Demo -- Rotating border 3
clip-path 的妙用
又是老朋友 clip-path,有意思的事情它总不会缺席。
clip-path 本身是可以进行坐标点的动画的,从一个裁剪形状变换到另外一个裁剪形状。
利用这个特点,我们可以巧妙的实现这样一种 border 跟随效果。伪代码如下:
div {position: relative;&::before {content: "";position: absolute;top: 0;left: 0;right: 0;bottom: 0;border: 2px solid gold;animation: clippath 3s infinite linear;}}@keyframes clippath {0%,100% {clip-path: inset(0 0 95% 0);}25% {clip-path: inset(0 95% 0 0);}50% {clip-path: inset(95% 0 0 0);}75% {clip-path: inset(0 0 0 95%);}}复制代码效果图与示意图一起:

CodePen - clip-path border animation
这里,因为会裁剪元素,借用伪元素作为背景进行裁剪并动画即可,使用 clip-path 的优点了,切割出来的边框不会产生小三角。同时,这种方法,也是支持圆角 border-radius 的。
如果我们把另外一个伪元素也用上,实际实现一个按钮样式,可以得到这样的效果:

CodePen - clip-path border animation 2
overflow 的妙用
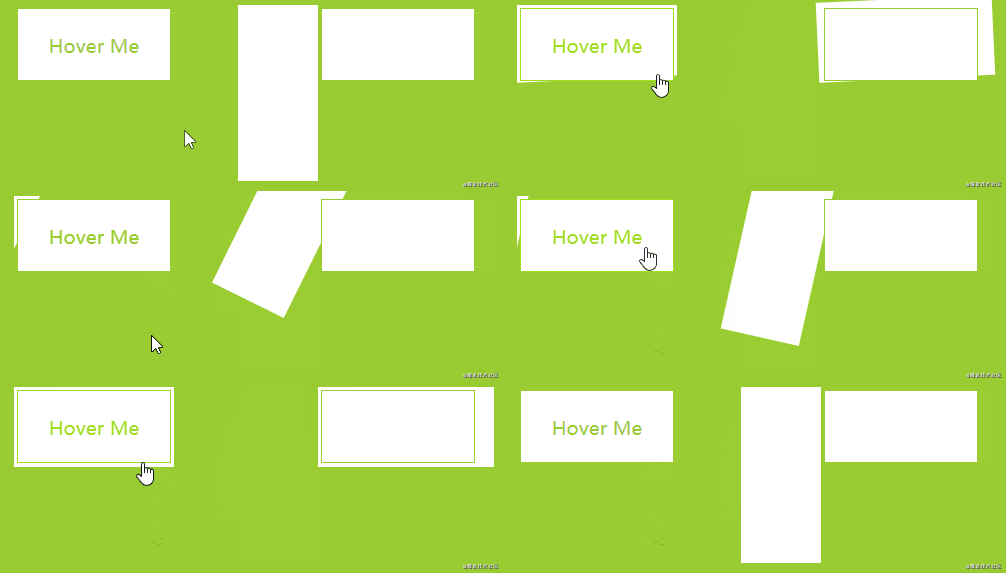
下面这个技巧利用 overflow 实现。实现这样一个边框动画:

为何说是利用 overflow 实现?
贴个示意图:
CodePen Demo -- 巧用overflow及transform实现线条hover效果
两个核心点:
- 我们利用
overflow: hidden,把原本在容器外的一整个元素隐藏了起来 - 利用了
transform-origin,控制了元素的旋转中心
发现没,其实几乎大部分的有意思的 CSS 效果,都是运用了类似技巧:
简单的说就是,我们看到的动画只是原本现象的一小部分,通过特定的裁剪、透明度的变化、遮罩等,让我们最后只看到了原本现象的一部分。
border-image 的妙用
利用 border-image,我们也可以实现一些有意思的边框动画。关于 border-image,有一篇非常好的讲解文章 -- border-image 的正确用法,本文不对基本定义做过多的讲解。
如果我们有这样一张图:

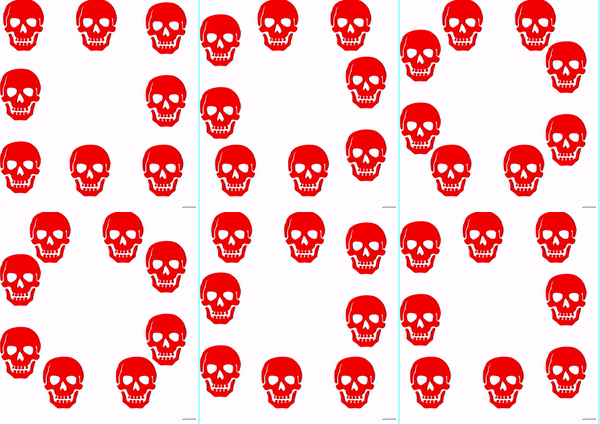
便可以利用 border-image-slice 及 border-image-repeat 的特性,得到类似的边框图案:
div {width: 200px;height: 120px;border: 24px solid;border-image: url(image-url);border-image-slice: 32;border-image-repeat: round;}复制代码在这个基础上,可以随便改变元素的高宽,如此便能扩展到任意大小的容器边框中:
CodePen Demo -- border-image Demo
接着,在这篇文章 -- How to Animate a SVG with border-image 中,还讲解了一种利用 border-image 的边框动画,非常的酷炫。
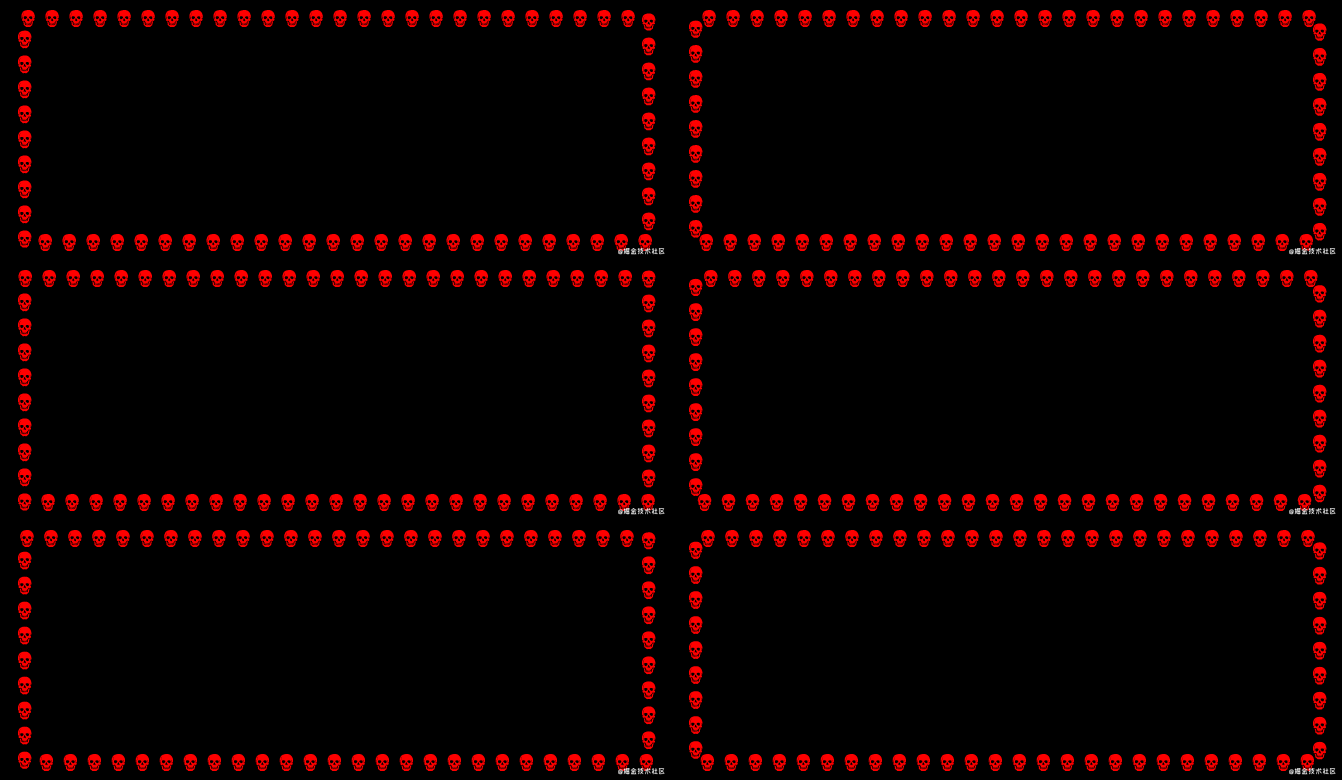
与上面例子不一样的是,我们只需要让我们的图案,动起来,就是我们需要这样一个背景图(掘金不支持 SVG 动图,原图地址):

那么,我们也就能得到运动的边框图,代码完全一样,但是,边框是运动的:
CodePen Demo -- Dancing Skull Border
border-image 使用渐变
border-image 除了贴图引用 url 之外,也是可以直接填充颜色或者是渐变的。
之前也有一篇关于 border-image 的文章 -- 巧妙实现带圆角的渐变边框
我们可以利用 border-image + filter + clip-path 实现渐变变换的圆角边框:
.border-image-clip-path {width: 200px;height: 100px;border: 10px solid;border-image: linear-gradient(45deg, gold, deeppink) 1;clip-path: inset(0px round 10px);animation: huerotate 6s infinite linear;filter: hue-rotate(360deg);}@keyframes huerotate {0% {filter: hue-rotate(0deg);}100% {filter: hue-rotate(360deg);}}复制代码
CodePen Demo -- clip-path、border-image 加 filter 实现圆角渐变边框
更多编程相关知识,请访问:编程视频!!
The above is the detailed content of Cool CSS border animation, come and collect it!. For more information, please follow other related articles on the PHP Chinese website!

Hot AI Tools

Undresser.AI Undress
AI-powered app for creating realistic nude photos

AI Clothes Remover
Online AI tool for removing clothes from photos.

Undress AI Tool
Undress images for free

Clothoff.io
AI clothes remover

AI Hentai Generator
Generate AI Hentai for free.

Hot Article

Hot Tools

Notepad++7.3.1
Easy-to-use and free code editor

SublimeText3 Chinese version
Chinese version, very easy to use

Zend Studio 13.0.1
Powerful PHP integrated development environment

Dreamweaver CS6
Visual web development tools

SublimeText3 Mac version
God-level code editing software (SublimeText3)

Hot Topics
 1386
1386
 52
52
 How to use bootstrap in vue
Apr 07, 2025 pm 11:33 PM
Using Bootstrap in Vue.js is divided into five steps: Install Bootstrap. Import Bootstrap in main.js. Use the Bootstrap component directly in the template. Optional: Custom style. Optional: Use plug-ins.
 The Roles of HTML, CSS, and JavaScript: Core Responsibilities
Apr 08, 2025 pm 07:05 PM
HTML defines the web structure, CSS is responsible for style and layout, and JavaScript gives dynamic interaction. The three perform their duties in web development and jointly build a colorful website.
 How to write split lines on bootstrap
Apr 07, 2025 pm 03:12 PM
There are two ways to create a Bootstrap split line: using the tag, which creates a horizontal split line. Use the CSS border property to create custom style split lines.
 Understanding HTML, CSS, and JavaScript: A Beginner's Guide
Apr 12, 2025 am 12:02 AM
WebdevelopmentreliesonHTML,CSS,andJavaScript:1)HTMLstructurescontent,2)CSSstylesit,and3)JavaScriptaddsinteractivity,formingthebasisofmodernwebexperiences.
 How to resize bootstrap
Apr 07, 2025 pm 03:18 PM
To adjust the size of elements in Bootstrap, you can use the dimension class, which includes: adjusting width: .col-, .w-, .mw-adjust height: .h-, .min-h-, .max-h-
 How to set up the framework for bootstrap
Apr 07, 2025 pm 03:27 PM
To set up the Bootstrap framework, you need to follow these steps: 1. Reference the Bootstrap file via CDN; 2. Download and host the file on your own server; 3. Include the Bootstrap file in HTML; 4. Compile Sass/Less as needed; 5. Import a custom file (optional). Once setup is complete, you can use Bootstrap's grid systems, components, and styles to create responsive websites and applications.
 How to insert pictures on bootstrap
Apr 07, 2025 pm 03:30 PM
There are several ways to insert images in Bootstrap: insert images directly, using the HTML img tag. With the Bootstrap image component, you can provide responsive images and more styles. Set the image size, use the img-fluid class to make the image adaptable. Set the border, using the img-bordered class. Set the rounded corners and use the img-rounded class. Set the shadow, use the shadow class. Resize and position the image, using CSS style. Using the background image, use the background-image CSS property.
 How to use bootstrap button
Apr 07, 2025 pm 03:09 PM
How to use the Bootstrap button? Introduce Bootstrap CSS to create button elements and add Bootstrap button class to add button text


