
 Backend Development
PHP7
Explain how to install PHP7 on Centos and configure php-fpm to start up
Backend Development
PHP7
Explain how to install PHP7 on Centos and configure php-fpm to start up
Explain how to install PHP7 on Centos and configure php-fpm to start up

centos 7 Steps to compile and install php-7.2.11
Download the php compressed package of php-7.2.11 from the official website , steps to install php-7.2.11 on centos 7, http://cn2.php.net/distributions/php-7.2.11.tar.gz
cd /usr/local/src
wget -c http://cn2.php.net/distributions/php-7.2.11.tar.gz
After downloading, unzip it php-7.2.11.tar.gz compress the package and enter the decompressed directory
tar -xzvf php-7.2.11.tar.gz
cd php-7.2.11
Install some dependent library packages libxml2 and some other dependent extension libraries required by php7
Recommended (free): PHP7
yum -y install libxml2
yum -y install libxml2-devel
yum -y install openssl
yum -y install openssl-devel
yum -y install curl-devel
yum -y install libjpeg-devel
yum -y install libpng-devel
yum -y install freetype-devel
yum -y install bzip2-devel
yum -y install libmcrypt libmcrypt-devel
yum -y install postgresql-devel
yum -y install aspell-devel
yum -y install readline-devel
yum -y install libxslt-devel
yum -y install net-snmp-devel
yum -y install unixODBC-devel
yum -y install libicu-devel
yum -y install libc-client-devel
yum -y install libXpm-devel
yum -y install libvpx-devel
yum -y install enchant-devel
yum -y install openldap
yum -y install openldap-devel
yum -y install db4-devel
yum -y install gmp-devel
yum -y install sqlite-devel
yum -y install mysql-devel
yum install oniguruma-devel -y
Environment configuration check before installation, some of php7 Checking dependent packages and starting php extensions. If there is a lack of library packages that php depends on during this process, an error message will be reported.
Add users and groups: (The user and group here are nginx, my username for nginx) groupadd -r nginx && useradd -r -g nginx -s /sbin/nologin
php installation configuration
Please choose the appropriate one according to the following A B C for installation configuration
A . PHP 7.2.10 Radio mode
./configure --prefix=/usr/local/php --with-config-file-path=/usr/local/php/etc -- enable-fpm --with-fpm-user=nginx --with-fpm-group=nginx --enable-inline-optimization --disable-debug --disable-rpath --enable-shared --enable-soap -- with-xmlrpc --with-openssl --with-mcrypt --with-pcre-regex --with-sqlite3 --with-zlib --enable-bcmath --with-iconv --with-bz2 --enable-calendar --with-curl --with-cdb --enable-dom --enable-exif --enable-fileinfo --enable-filter --with-pcre-dir --enable-ftp --with-gd --with -openssl-dir --with-jpeg-dir --with-png-dir --with-freetype-dir --enable-gd-native-ttf --enable-gd-jis-conv --with-gettext -- with-gmp --with-mhash --enable-json --enable-mbstring --enable-mbregex --enable-mbregex-backtrack --with-libmbfl --with-onig --enable-pdo --with-mysqli =mysqlnd --with-pdo-mysql=mysqlnd --with-zlib-dir --with-pdo-sqlite --with-readline --enable-session --enable-shmop --enable-simplexml --enable-sockets --enable-sysvmsg --enable-sysvsem --enable-sysvshm --enable-wddx --with-libxml-dir --with-xsl --enable-zip --enable-mysqlnd-compression-support --with- pear --enable-opcache
B. PHP 7.2.10 multi-line mode
./configure \
--prefix=/usr/local/php \
--with-config-file-path=/usr/local/php/etc \
--enable-fpm \
--with-fpm-user=nginx \
--with-fpm-group=nginx \
--enable-inline-optimization \
--disable-debug \
--disable-rpath \
--enable-shared \
--enable-soap \
--with-xmlrpc \
--with-openssl \
--with-mcrypt \
--with-pcre-regex \
--with-sqlite3 \
--with-zlib \
--enable-bcmath \
--with-iconv \
--with-bz2 \
--enable-calendar \
--with-curl \
--with-cdb \
--enable-dom \
--enable-exif \
--enable-fileinfo \
--enable-filter \
--with-pcre-dir \
--enable-ftp \
--with-gd \
--with-openssl-dir \
--with-jpeg-dir \
--with-png-dir \
--with-freetype-dir \
--enable-gd-native-ttf \
--enable-gd-jis-conv \
--with-gettext \
--with-gmp \
--with-mhash \
--enable-json \
--enable-mbstring \
--enable-mbregex \
--enable-mbregex-backtrack \
--with-libmbfl \
--with-onig \
--enable-pdo \
--with-mysqli=mysqlnd \
--with-pdo-mysql=mysqlnd \
--with-zlib-dir \
--with-pdo-sqlite \
--with-readline \
--enable-session \
--enable-shmop \
--enable-simplexml \
--enable-sockets \
--enable-sysvmsg \
--enable-sysvsem \
--enable-sysvshm \
--enable-wddx \
--with-libxml-dir \
--with-xsl \
--enable-zip \
--enable-mysqlnd-compression-support \
--with-pear \
--enable-opcache
C. PHP 7.4.10
./configure \
--prefix=/usr/local/php \
--with-config-file-path=/usr/local/php/etc \
--enable-fpm \
--with-fpm-user=nginx \
--with-fpm-group=nginx \
--enable-inline-optimization \
--disable-debug \
--disable-rpath \
--enable-shared \
--enable-soap \
--with-xmlrpc \
--with-openssl \
--with-mcrypt \
--with-pcre-regex \
--with-sqlite3 \
--with-zlib \
--enable-bcmath \
--with-iconv \
--with-kerberos \
--with-libdir=lib64 \
--with-bz2 \
--enable-calendar \
--with-curl \
--with-cdb \
--enable-dom \
--enable-exif \
--enable-fileinfo \
--enable-filter \
--with-pcre-dir \
--enable-ftp \
--enable-gd \
--with-openssl-dir \
--with-jpeg-dir \
--with-png-dir \
--with-freetype-dir \
--enable-gd-native-ttf \
--enable-gd-jis-conv \
--with-gettext \
--with-gmp \
--with-mhash \
--enable-json \
--enable-mbstring \
--enable-mbregex \
--enable-mbregex-backtrack \
--with-libmbfl \
--with-onig \
--enable-pdo \
--with-mysqli=mysqlnd \
--with-pdo-mysql=mysqlnd \
--with-zlib-dir \
--with-pdo-sqlite \
--with-readline \
--enable-session \
--enable-shmop \
--enable-simplexml \
--enable-sockets \
--enable-sysvmsg \
--enable-sysvsem \
--enable-sysvshm \
--enable-wddx \
--with-libxml-dir \
--with-xsl \
--with-zip \
--enable-xml \
--enable-mysqlnd-compression-support \
--with-pear \
--enable-opcache \
--enable-pcntl
Starting from PHP 7.4.0 , you must use the --with-zip configuration option when compiling PHP to provide zip support. For previous PHP versions, you need to use the --enable-zip option.
Compile and install php7
make && make install
(If make: *** [sapi/ cli/php] Error 1 error, solve it by continuing to execute the make ZEND_EXTRA_LIBS='-liconv' command
Compilation is successful, check the php version
/usr/local/php/bin /php -v
Run php-fpm
/usr/local/php/sbin/php-fpm
The errors you may encounter when starting php-fpm are basically configuration file configuration and renaming issues:
Error 1: Missing www.conf configuration file (WARNING: Nothing matches the include pattern /usr/local/php/etc/php-fpm.d/*.conf), you need to put www.conf.default in the /usr/local/php/etc/php-fpm.d/*.conf directory Rename to www.conf.
Error 2: Missing php-fpm.conf configuration file You need to put the default configuration in /usr/local/php/etc/php-fpm.conf Change the file php-fpm.conf.default to php-fpm.conf
Error three: Missing php.ini configuration file After php7 is compiled and installed, you will find that there is no php.ini configuration file. You need to copy php.ini-production or php.ini-development in the root directory of the unzipped package and rename it to php.ini to the /usr/local/php/etc folder in the php compiled installation directory.
Solutions to other errors:
error: Package requirements (sqlite3 > 3.7.4) were not metyum install libsqlite3x-devel -yCopy after loginerror: Package requirements (oniguruma) were not met
yum install oniguruma-devel -yCopy after loginWhen yum install prompts "No available software package"
yum install -y epel-releaseCopy after loginoff_t undefined error
configure: error: off_t undefined; check your library configurationCopy after loginconfigure: WARNING: unrecognized options: --with-mcrypt, --enable-gd-native-ttf
php7.2 and later will not support these two parameters --with-mcrypt, --enable-gd-native-ttf, which are required Remove
After compiling and installing php in centos7, php will not be started after the system is restarted, so you need to add a startup script to centos7 to start the php service.
php7 compilation and installation method: http://zixuephp.net/article-207.html
Manual startup:
- /usr /local/php/sbin/php-fpm
Automatic startup at boot:
Enable configuration php-fpm pid
- #找到php-fpm.conf配置文件
- /usr/local/php/etc/php-fpm.conf
- #开启pid ,去掉分号注释
- pid = run/php-fpm.pid
安装后要进行的操作:
1. 把安装目录下的 php.ini-development 复制到 /etc/ 目录下
2. 修改 /usr/local/php/etc/php-fpm.conf.default 名为 php-fpm.conf 并进入修改
3. 修改 /usr/local/php/etc/php-fpm.d/www.conf.default 为 www.conf 并进入修改
PHP 7.4.10 安装 ZIP
1 扩展包    wget https://pecl.php.net/get/zip-1.19.0.tgz
2 解压 并进入    tar -zxvf zip-1.19.0.tgz      2.2   cd  zip-1.19.0
3 /usr/local/php/bin/phpize
4 ./configure --with-php-config=/usr/local/php/bin/php-config   自己的php目录
5 make && make install

---------------------
然后下载最新的,解压

wget https://libzip.org/download/libzip-1.5.2.tar.gz
tar -zxvf libzip-1.5.2.tar.gz

这时发现还要安装cmake,再去下载cmake:
wget https://github.com/Kitware/CMake/releases/download/v3.15.4/cmake-3.15.4.tar.gz

解压:
tar -zxvf cmake-3.15.4.tar.gz

注意:cmake要按照文档安装
./bootstrap && make && sudo make install

漫长的等待,安装完成后,执行
cmake -version
出现版本号即表示cmake安装成功。

接下来, 再进入 cd libzip-1.5.2
mkdir build && cd build/
cmake -DCMAKE_INSTALL_PREFIX=/usr/local/libzip ..
make
make install

//检测libzip是否安装成功
whereis libzip
libzip: /usr/local/libzip
创建开机启动脚本
在Linux中将php-fpm配置成服务的方法
PHP 源文件路径: /usr/local/src/php-7.2.11/
PHP 安装后路径: /usr/local/php/
1、配置 php-fpm.conf
vim /usr/local/php/etc/php-fpm.conf
php-fpm.pid 目录必须指向:/usr/local/php/var/run/php-fpm.pid
2、拷贝php-fpm脚本至/etc/init.d目录
cp /usr/local/src/php-7.2.11/sapi/fpm/init.d.php-fpm /etc/init.d/php-fpm
#! /bin/sh

### BEGIN INIT INFO
# Provides:          php-fpm
# Required-Start:    $remote_fs $network
# Required-Stop:     $remote_fs $network
# Default-Start:     2 3 4 5
# Default-Stop:      0 1 6
# Short-Description: starts php-fpm
# Description:       starts the PHP FastCGI Process Manager daemon
### END INIT INFO

prefix=/usr/local/php
exec_prefix=${prefix}

php_fpm_BIN=${exec_prefix}/sbin/php-fpm
php_fpm_CONF=${prefix}/etc/php-fpm.conf
php_fpm_PID=${prefix}/var/run/php-fpm.pid


php_opts="--fpm-config $php_fpm_CONF --pid $php_fpm_PID"


wait_for_pid () {
	try=0

	while test $try -lt 35 ; do

		case "$1" in
			'created')
			if [ -f "$2" ] ; then
				try=''
				break
			fi
			;;

			'removed')
			if [ ! -f "$2" ] ; then
				try=''
				break
			fi
			;;
		esac

		echo -n .
		try=`expr $try + 1`
		sleep 1

	done

}

case "$1" in
	start)
		echo -n "Starting php-fpm "

		$php_fpm_BIN --daemonize $php_opts

		if [ "$?" != 0 ] ; then
			echo " failed"
			exit 1
		fi

		wait_for_pid created $php_fpm_PID

		if [ -n "$try" ] ; then
			echo " failed"
			exit 1
		else
			echo " done"
		fi
	;;

	stop)
		echo -n "Gracefully shutting down php-fpm "

		if [ ! -r $php_fpm_PID ] ; then
			echo "warning, no pid file found - php-fpm is not running ?"
			exit 1
		fi

		kill -QUIT `cat $php_fpm_PID`

		wait_for_pid removed $php_fpm_PID

		if [ -n "$try" ] ; then
			echo " failed. Use force-quit"
			exit 1
		else
			echo " done"
		fi
	;;

	status)
		if [ ! -r $php_fpm_PID ] ; then
			echo "php-fpm is stopped"
			exit 0
		fi

		PID=`cat $php_fpm_PID`
		if ps -p $PID | grep -q $PID; then
			echo "php-fpm (pid $PID) is running..."
		else
			echo "php-fpm dead but pid file exists"
		fi
	;;

	force-quit)
		echo -n "Terminating php-fpm "

		if [ ! -r $php_fpm_PID ] ; then
			echo "warning, no pid file found - php-fpm is not running ?"
			exit 1
		fi

		kill -TERM `cat $php_fpm_PID`

		wait_for_pid removed $php_fpm_PID

		if [ -n "$try" ] ; then
			echo " failed"
			exit 1
		else
			echo " done"
		fi
	;;

	restart)
		$0 stop
		$0 start
	;;

	reload)

		echo -n "Reload service php-fpm "

		if [ ! -r $php_fpm_PID ] ; then
			echo "warning, no pid file found - php-fpm is not running ?"
			exit 1
		fi

		kill -USR2 `cat $php_fpm_PID`

		echo " done"
	;;

	configtest)
		$php_fpm_BIN -t
	;;

	*)
		echo "Usage: $0 {start|stop|force-quit|restart|reload|status|configtest}"
		exit 1
	;;

esac3、设置权限并启动php-fpm:
chmod 755 /etc/init.d/php-fpm
/etc/init.d/php-fpm start
chkconfig –add php-fpm
最后,给出php-fpm以服务的方式启动、停止和重启:
service php-fpm start
service php-fpm stop
service php-fpm reload
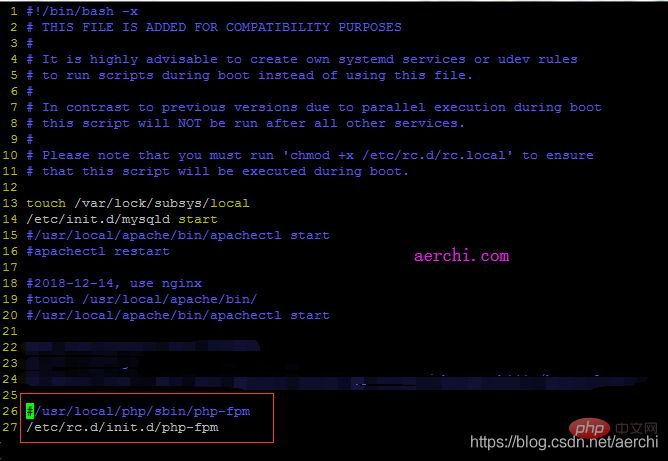
PHP-FPM 自启动配置服务:
vim /etc/rc.d/rc.local
查看开机启动的所有服务
chkconfig --list
nginx demo 配置:(不要忘记chown www-data:www-data 网站目录 不然没权限)
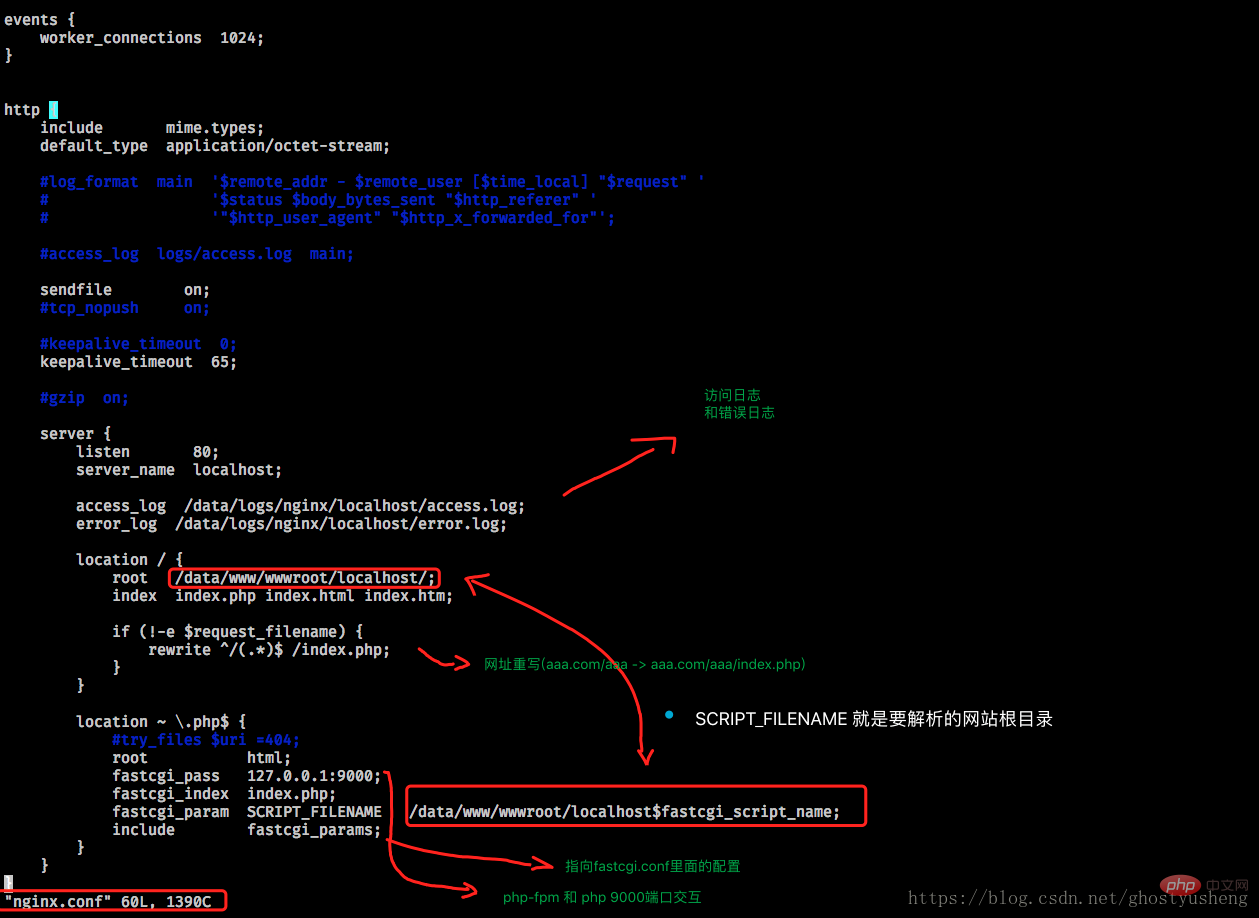
server {
	    listen      80;
	    server_name {{ server_name }};
	    access_log  /data/logs/nginx/{{ server_name }}/access.log;
	    error_log   /data/logs/nginx/{{ server_name }}/error.log;
    location / {
        index           index.php index.html index.htm;
        root            /data/www/wwwroot/{{ server_name }}/;

        if (!-e $request_filename) {
            rewrite ^/(.*)$ /index.php;
        }
    }

    location ~ \.php$ {
        include        fastcgi_params;
        fastcgi_pass   unix:/tmp/php-fcgi.sock;
        fastcgi_index  index.php;
    }
}php-fpm配置 (重命名两个文件 其他看实际情况配置(略。。。))
www.conf.default -> www.conf
php-fpm.conf.default -> php-fpm.conf
启动: php-fpm -D
nginx -s reload
The above is the detailed content of Explain how to install PHP7 on Centos and configure php-fpm to start up. For more information, please follow other related articles on the PHP Chinese website!

Hot AI Tools

Undresser.AI Undress
AI-powered app for creating realistic nude photos

AI Clothes Remover
Online AI tool for removing clothes from photos.

Undress AI Tool
Undress images for free

Clothoff.io
AI clothes remover

AI Hentai Generator
Generate AI Hentai for free.

Hot Article
Hot Tools

Notepad++7.3.1
Easy-to-use and free code editor

SublimeText3 Chinese version
Chinese version, very easy to use

Zend Studio 13.0.1
Powerful PHP integrated development environment

Dreamweaver CS6
Visual web development tools

SublimeText3 Mac version
God-level code editing software (SublimeText3)
Hot Topics


 How to input Chinese in centos
Apr 07, 2024 pm 08:21 PM
How to input Chinese in centos
Apr 07, 2024 pm 08:21 PM
Methods for using Chinese input in CentOS include: using the fcitx input method: install and enable fcitx, set shortcut keys, press the shortcut keys to switch input methods, and input pinyin to generate candidate words. Use iBus input method: Install and enable iBus, set shortcut keys, press the shortcut keys to switch input methods, and input pinyin to generate candidate words.
 How to read USB disk files in centos7
Apr 07, 2024 pm 08:18 PM
How to read USB disk files in centos7
Apr 07, 2024 pm 08:18 PM
To read U disk files in CentOS 7, you need to first connect the U disk and confirm its device name. Then, use the following steps to read the file: Mount the USB flash drive: mount /dev/sdb1 /media/sdb1 (replace "/dev/sdb1" with the actual device name) Browse the USB flash drive file: ls /media/sdb1; cd /media /sdb1/directory; cat file name
 How to enter root permissions in centos7
Apr 02, 2024 pm 08:57 PM
How to enter root permissions in centos7
Apr 02, 2024 pm 08:57 PM
There are two ways to enter the root authority of CentOS 7: use the sudo command: enter sudo su - in the terminal and enter the current user password. Log in directly as the root user: Select "Other" on the login screen, enter "root" and the root password. Note: Operate carefully with root privileges, perform tasks with sudo privileges, and change the root password regularly.
 What to do if you forget your password to log in to centos
Apr 07, 2024 pm 07:33 PM
What to do if you forget your password to log in to centos
Apr 07, 2024 pm 07:33 PM
Solutions for forgotten CentOS passwords include: Single-user mode: Enter single-user mode and reset the password using passwd root. Rescue Mode: Boot from CentOS Live CD/USB, mount root partition and reset password. Remote access: Use SSH to connect remotely and reset the password with sudo passwd root.
 SCP usage tips-recursively exclude files
Apr 22, 2024 am 09:04 AM
SCP usage tips-recursively exclude files
Apr 22, 2024 am 09:04 AM
One can use the scp command to securely copy files between network hosts. It uses ssh for data transfer and authentication. Typical syntax is: scpfile1user@host:/path/to/dest/scp -r/path/to/source/user@host:/path/to/dest/scp exclude files I don't think you can when using scp command Filter or exclude files. However, there is a good workaround to exclude the file and copy it securely using ssh. This page explains how to filter or exclude files when copying directories recursively using scp. How to use rsync command to exclude files The syntax is: rsyncav-essh-
 What should I do if I forget my centos username and password?
Apr 02, 2024 pm 08:54 PM
What should I do if I forget my centos username and password?
Apr 02, 2024 pm 08:54 PM
After forgetting your CentOS username and password, there are two ways to restore access: Reset the root password: Restart the server, edit the kernel command line in the GRUB menu, add "rw init=/sysroot/bin/sh" and press Ctrl+x ;Mount the root file system and reset the password in single-user mode. Use rescue mode: Start the server from the CentOS installation ISO image, select rescue mode; mount the root file system, copy the chroot environment from the ISO image, reset the password, exit the chroot environment and restart the server.
 How to enable root permissions in centos7
Apr 07, 2024 pm 08:03 PM
How to enable root permissions in centos7
Apr 07, 2024 pm 08:03 PM
CentOS 7 disables root permissions by default. You can enable it by following the following steps: Temporarily enable it: Enter "su root" on the terminal and enter the root password. Permanently enabled: Edit "/etc/ssh/sshd_config", change "PermitRootLogin no" to "yes", and restart the SSH service.
 What should I do if I forget my centos7 password?
Apr 02, 2024 pm 08:51 PM
What should I do if I forget my centos7 password?
Apr 02, 2024 pm 08:51 PM
Three solutions for forgotten passwords in CentOS 7: Single-user mode: Restart the system, edit the kernel options, change ro to rw init=/sysroot/bin/sh, and use the passwd command to reset the root password. Rescue mode: Boot from the installation media, select rescue mode, mount the root file system, chroot to the root file system, and use the passwd command to reset the root password. Grub2 command line: Restart the system, press c to enter the command line, load the kernel, mount the root file system, chroot to the root file system, and use the passwd command to reset the root password.
