Use css to implement a lottery animation effect

First of all, let’s take a look at the final running effect:

We can see from the renderings that the lottery will proceed automatically , and display winning information.
This effect is basically achieved using CSS, without using pictures, and adding some JS. No consideration was given to compatibility at all.
The specific steps are as follows:
First draw a turntable
<!DOCTYPE html>
<html>
<head>
  <meta charset="UTF-8">
  <title>幸运大转盘</title>
  <style>
    /* 重置默认样式 */
    * {
      margin: 0;
      padding: 0;
      border: none;
      outline: none;
    }
    .wrapper {
      position: relative;
      height: 200px;
      width: 200px;
      padding: 20px;
      margin: 20px;
      background-color: #c0381f;
      box-shadow: #000000 0px 0px 10px;
      border-radius: 50%;
    }
    .panel {
      position: relative;
      height: 200px;
      width: 200px;
      background-color: #b7b7b7;
      border-radius: 100px;
    }
    .pointer {
      position: absolute;
      left: 79px;
      top: 79px;
      z-index: 10;
      height: 30px;
      width: 30px;
      padding: 6px;
      color: #fff899;
      line-height: 15px;
      font-size: 12px;
      text-align: center;
      background-color: #dc5b5b;
      border-radius: 50%;
      border: 1px solid #c0381f;
    }
  </style>
</head>
<body>
  <div>
    <div>
      <div>开始抽奖</div>
    </div>
  </div>
</body>
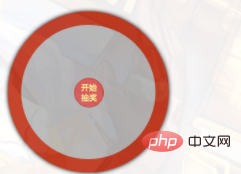
</html>The effect is as follows. Don’t worry about the color matching, it may be ugly. . .
Then write the small arrow of the lottery pointer. Drawing a triangle with CSS is a common problem. This is achieved by setting width and height to 0, and then using border.
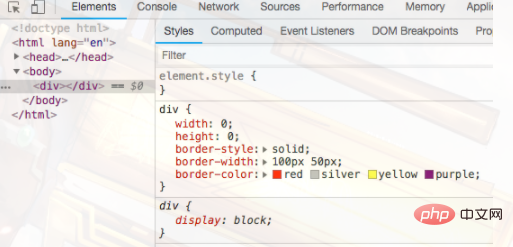
As shown in the picture, the rectangle is composed of four triangle borders. As long as the color of the other sides is set to transparent, you can get a separate triangle.
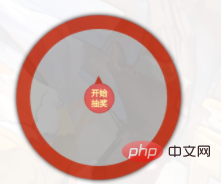
Here the triangle is implemented through the pseudo element after, and the triangle is positioned to the top of the small circle in the middle through absolute positioning.
.pointer::after {
      content: '';
      position: absolute;
      left: 14px;
      top: -24px;
      border-width: 12px 6px;
      border-style: solid;
      border-color: transparent;
      border-bottom-color: #c0381f;
}Now it looks like a pointer.
The next step is to implement the turntable background. Different sectors correspond to different prizes, so there is a requirement: to realize a sector shape at any angle.
You may take it for granted that it is the same as a triangle, but it just adds a border-radius. The height is the radius of the circle and the width is tan(θ/2). However, the effect achieved is not the same as imagined... (You may need to do some other operations to achieve the effect, but I didn't expect it.
Finally, I turned to the search engine for help. I have to admit that Dalao is really nb, qaq... The idea of implementing through linear-gradient is It's really great. But there are many complicated implementations that I don't understand very well = =
How to draw a circle sector in CSS?
Segments in a circle using CSS3
3 ways to realize a 12-color rainbow gradient ring with a hollow middle using pure CSS
The implementation is to take the intersecting area through two squares.
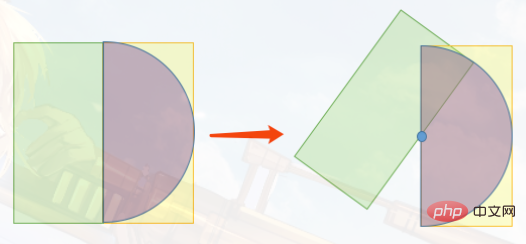
I think the picture It's quite good :D
I didn't use pseudo elements to implement it, because I still need to add text. As for the position of the text, I really adjusted it blindly. Anyway, I wouldn't write like this when writing code = =
<!DOCTYPE html>
<html>
<head>
    <meta charset="UTF-8">
    <title>Document</title>
    <style>
        .sector {
            position: absolute;
            width: 100px;
            height: 200px;
            margin: 100px;
            border-radius: 0px 100px 100px 0;
            overflow: hidden;
            transform: rotate(-18deg);
        }
        .sector-inner {
            text-align: center;
            display: block;
            width: 40px;
            padding: 5px 3px 0 57px;
            height: 195px;
            background: #ffeab1;
            transform: translateX(-100px) rotate(36deg);
            transform-origin: right center;
            border-radius: 100px 0 0 100px;
        }
        .sector-inner span {
            display: block;
            transform-origin: center;
            transform: rotate(-19deg);
            color: #d46854;
        }
    </style>
</head>
<body>
    <div>
        <div>
            <span>谢谢参与</span>
        </div>
    </div>
</body>
</html>The effect is as follows, a small fan shape with text~~
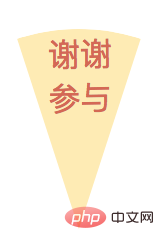
OK, now write a bunch of fan shapes and put them on the turntable at the beginning.
The current code is Jiang Zi Di~~It’s too long and folded up.
<!DOCTYPE html>
<html>
<head>
<meta charset="UTF-8">
<title>幸运大转盘</title>
<style>
/* 重置默认样式 */
* {
margin: 0;
padding: 0;
border: none;
outline: none;
}
.wrapper {
position: relative;
height: 200px;
width: 200px;
padding: 20px;
margin: 20px;
background-color: #c0381f;
box-shadow: #000000 0px 0px 10px;
border-radius: 50%;
}
.panel {
position: relative;
height: 200px;
width: 200px;
background-color: #b7b7b7;
border-radius: 100px;
}
.sector {
position: absolute;
width: 100px;
height: 200px;
border-radius: 0px 100px 100px 0;
overflow: hidden;
left: 100px;
top: 0px;
transform-origin: left center;
}
.sector:nth-child(1) {
transform: rotate(-18deg);
}
.sector:nth-child(2) {
transform: rotate(18deg);
}
.sector:nth-child(3) {
transform: rotate(54deg);
}
.sector:nth-child(4) {
transform: rotate(90deg);
}
.sector:nth-child(5) {
transform: rotate(126deg);
}
.sector:nth-child(6) {
transform: rotate(162deg);
}
.sector:nth-child(7) {
transform: rotate(198deg);
}
.sector:nth-child(8) {
transform: rotate(234deg);
}
.sector:nth-child(9) {
transform: rotate(270deg);
}
.sector:nth-child(10) {
transform: rotate(306deg);
}
.sector:nth-child(2n+1) .sector-inner {
background: #fef6e0;
}
.sector:nth-child(2n) .sector-inner {
background: #ffffff;
}
.sector-inner {
text-align: center;
display: block;
width: 40px;
padding: 5px 3px 0 57px;
height: 195px;
transform: translateX(-100px) rotate(36deg);
transform-origin: right center;
border-radius: 100px 0 0 100px;
}
.sector-inner span {
display: block;
transform-origin: center;
transform: rotate(-19deg);
color: #d46854;
}
.pointer {
position: absolute;
left: 79px;
top: 79px;
z-index: 10;
height: 30px;
width: 30px;
padding: 6px;
color: #fff899;
line-height: 15px;
font-size: 12px;
text-align: center;
background-color: #dc5b5b;
border-radius: 50%;
border: 1px solid #c0381f;
}
.pointer::after {
content: '';
position: absolute;
left: 14px;
top: -24px;
border-width: 12px 6px;
border-style: solid;
border-color: transparent;
border-bottom-color: #c0381f;
}
</style>
</head>
<body>
<div>
<div>
<div>
<div>
<span>谢谢参与</span>
</div>
</div>
<div>
<div>
<span> 50 积分</span>
</div>
</div>
<div>
<div>
<span>谢谢参与</span>
</div>
</div>
<div>
<div>
<span>100话费</span>
</div>
</div>
<div>
<div>
<span> 50 积分</span>
</div>
</div>
<div>
<div>
<span>谢谢参与</span>
</div>
</div>
<div>
<div>
<span>100话费</span>
</div>
</div>
<div>
<div>
<span>谢谢参与</span>
</div>
</div>
<div>
<div>
<span> 50 积分</span>
</div>
</div>
<div>
<div>
<span>10元话费</span>
</div>
</div>
<div>开始抽奖</div>
</div>
</div>
</body>
</html>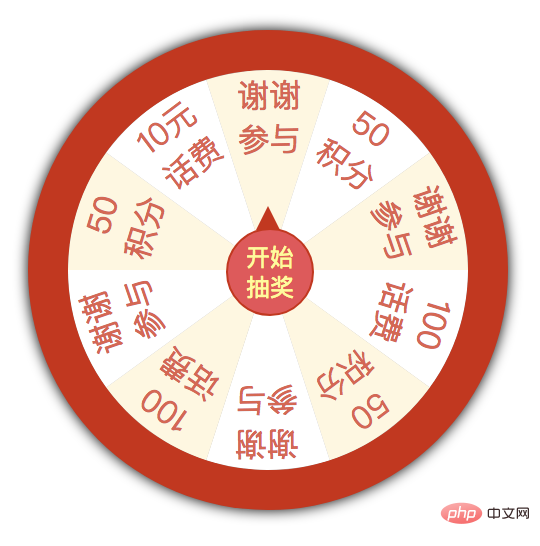
Hee hee, now it looks like a lottery wheel~~~
(Learning video sharing: css video tutorial)
Finally add some exaggerated lights.
<!DOCTYPE html>
<html>
<head>
<meta charset="UTF-8">
<title>幸运大转盘</title>
<style>
/* 重置默认样式 */
* {
margin: 0;
padding: 0;
border: none;
outline: none;
}
.wrapper {
position: relative;
height: 200px;
width: 200px;
padding: 20px;
margin: 20px;
background-color: #c0381f;
box-shadow: #000000 0px 0px 10px;
border-radius: 50%;
}
.light {
position: absolute;
height: 10px;
width: 10px;
border-radius: 50%;
top: 5px;
left: 115px;
transform-origin: 5px 115px;
}
.light:nth-child(2n) {
background-color: #fafce7;
}
.light:nth-child(2n+1) {
background-color: #ffe58b;
}
.light:nth-child(2) {
transform: rotate(36deg);
}
.light:nth-child(3) {
transform: rotate(72deg);
}
.light:nth-child(4) {
transform: rotate(108deg);
}
.light:nth-child(5) {
transform: rotate(144deg);
}
.light:nth-child(6) {
transform: rotate(180deg);
}
.light:nth-child(7) {
transform: rotate(216deg);
}
.light:nth-child(8) {
transform: rotate(252deg);
}
.light:nth-child(9) {
transform: rotate(288deg);
}
.light:nth-child(10) {
transform: rotate(324deg);
}
.panel {
position: relative;
height: 200px;
width: 200px;
background-color: #b7b7b7;
border-radius: 100px;
}
.sector {
position: absolute;
width: 100px;
height: 200px;
border-radius: 0px 100px 100px 0;
overflow: hidden;
left: 100px;
top: 0px;
transform-origin: left center;
}
.sector:nth-child(1) {
transform: rotate(-18deg);
}
.sector:nth-child(2) {
transform: rotate(18deg);
}
.sector:nth-child(3) {
transform: rotate(54deg);
}
.sector:nth-child(4) {
transform: rotate(90deg);
}
.sector:nth-child(5) {
transform: rotate(126deg);
}
.sector:nth-child(6) {
transform: rotate(162deg);
}
.sector:nth-child(7) {
transform: rotate(198deg);
}
.sector:nth-child(8) {
transform: rotate(234deg);
}
.sector:nth-child(9) {
transform: rotate(270deg);
}
.sector:nth-child(10) {
transform: rotate(306deg);
}
.sector:nth-child(2n+1) .sector-inner {
background: #fef6e0;
}
.sector:nth-child(2n) .sector-inner {
background: #ffffff;
}
.sector-inner {
text-align: center;
display: block;
width: 40px;
padding: 5px 3px 0 57px;
height: 195px;
transform: translateX(-100px) rotate(36deg);
transform-origin: right center;
border-radius: 100px 0 0 100px;
}
.sector-inner span {
display: block;
transform-origin: center;
transform: rotate(-19deg);
color: #d46854;
}
.pointer {
position: absolute;
left: 79px;
top: 79px;
z-index: 10;
height: 30px;
width: 30px;
padding: 6px;
color: #fff899;
line-height: 15px;
font-size: 12px;
text-align: center;
background-color: #dc5b5b;
border-radius: 50%;
border: 1px solid #c0381f;
}
.pointer::after {
content: '';
position: absolute;
left: 14px;
top: -24px;
border-width: 12px 6px;
border-style: solid;
border-color: transparent;
border-bottom-color: #c0381f;
}
</style>
</head>
<body>
<div>
<div></div>
<div></div>
<div></div>
<div></div>
<div></div>
<div></div>
<div></div>
<div></div>
<div></div>
<div></div>
<div>
<div>
<div>
<span>谢谢参与</span>
</div>
</div>
<div>
<div>
<span> 50 积分</span>
</div>
</div>
<div>
<div>
<span>谢谢参与</span>
</div>
</div>
<div>
<div>
<span>100话费</span>
</div>
</div>
<div>
<div>
<span> 50 积分</span>
</div>
</div>
<div>
<div>
<span>谢谢参与</span>
</div>
</div>
<div>
<div>
<span>100话费</span>
</div>
</div>
<div>
<div>
<span>谢谢参与</span>
</div>
</div>
<div>
<div>
<span> 50 积分</span>
</div>
</div>
<div>
<div>
<span>10元话费</span>
</div>
</div>
<div>开始抽奖</div>
</div>
</div>
</body>
</html>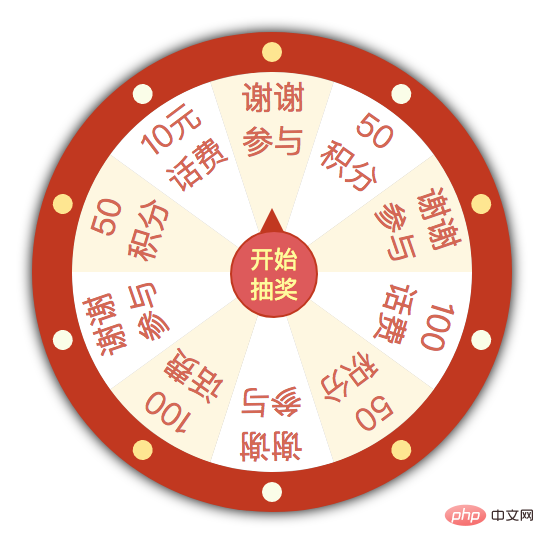
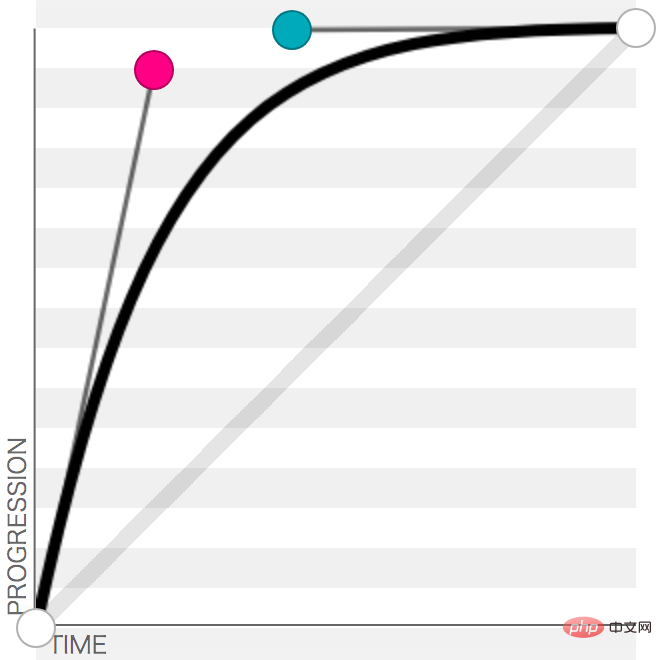
Now The CSS part of the turntable is basically completed. Simply write the JS part. When you click the middle pointer, the pointer will rotate and you can draw a Bezier curve to control the speed of the animation.
The Bezier curve can be simply viewed as It is a time-distance curve, and the slope is the speed. Because the speed of the turntable must be fast first and then slow, just pull one.
http://cubic-bezier.com/#.2,.93,.43 ,1
Add attributes in css
.pointer {
  // ...
  transition: transform 3s cubic-bezier(.2,.93,.43,1);
}When you click to start the lottery, add a rotation angle to the middle pointer. Here is a The problem is that the probability of drawing different sectors is the same. Changing it to different ones should be... quite simple, but mainly because I want to practice CSS, I just wrote JS casually.
JS part of the code...
let getEle = document.getElementsByClassName.bind(document);
let pointer = getEle('pointer')[0];
let result = getEle('result')[0];

let onRotation = false; // 记录当前是否正在旋转,如果正在旋转,就不能继续点击了
let reward = ['谢谢参与', '50积分', '谢谢参与', '100元话费', '50积分',
'谢谢参与', '100元话费', '谢谢参与', '50积分', '10元话费'];

// 根据随机角度获取奖励
let getReward = (function() {
  currentDeg = 0;
  return function() {
    // 转三圈到四圈
    let rotateDeg = Math.random() * 360 + 1080;
    currentDeg += rotateDeg;
    let rewardText = reward[Math.floor((currentDeg + 18) % 360 / 36)]
    return {
      deg: currentDeg,
      text: rewardText === '谢谢参与' ? '很遗憾,您没有获得奖品。' : '恭喜获得: ' + rewardText
    }
  }
})();

pointer.addEventListener('click', () => {
  if (onRotation) return;
  console.log('开始抽奖');
  onRotation = true;
  let nextStatus = getReward();
  console.log(nextStatus)
  result.innerText = nextStatus.text;
  result.style.display = 'none';
  pointer.style.transform = `rotateZ(${nextStatus.deg}deg)`;
})
pointer.addEventListener('transitionend', () => {
  console.log('抽奖结束');
  onRotation = false;
  result.style.display = 'block';
})Now the lottery carousel is basically completed. The last requirement is that it would be nice if the one next to it could light up.
As for how to light up the light, you need to use CSS3 animation. I I’m not familiar with it yet, so I’ll go and learn it first>_<
I’ve come back after learning it, and I’ll refer to the tutorial http://www.ruanyifeng.com/blog/2014/02/css_transition_and_animation.html, which doesn’t have a lot of content. .
animation-name specifies the animation name,
animation-duration specifies the animation duration,
animation-timing-function specifies the animation function, which is the same as the transition function.
animation-delay 指定动画延迟多久后执行,
animation-iteration-count 指定动画执行多少次,默认为一次,可以指定为infinite,无限循环。
animation-direction 指定动画多次播放时,一次结束,下一次怎么接上一次,如图。

animation-fill-mode 指定动画结束后停在什么位置,默认回到起始状态,forwards表示让动画停留在结束状态,backwards让动画回到第一帧的状态,both根据animation-direction轮流应用forwards和backwards规则。
animation-play-state 动画执行状态,默认为running,可以设置为pause,动画将在当前状态停止,再改为running时,会接着上一次停止的位置继续执行动画。
使用关键字 keyframes 来定义一个动画。通过百分比指定其中任意几个状态。
尝试着写一下=。=
<!DOCTYPE html>
<html>
<head>
    <meta charset="UTF-8">
    <title>Document</title>
    <style>
        div {
            height: 30px;
            width: 30px;
            animation: 1s twinkling 3, 100ms 3s twinkling 3;
        }
        @keyframes twinkling {
            50% { background: red; }
        }
    </style>
</head>
<body>
    <div></div>
</body>
</html>这是一个方块,先慢速闪三下,再快速闪三下,最后消失。
animation: 1s twinkling 3;
就相当于
animation-name: twinkling;
animation-duration: 1s;
animation-timing-function: ease;
animation-delay: 0s;
animation-iteration-count: 3;
animation-direction: normal;
animation-fill-mode: none;
animation-play-state: running;
效果:
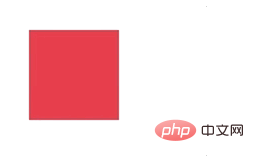
我觉得还可以:P 反正我只能写成这样了。
最后把动画加到转盘的灯上。完成代码(好像颜色变了,咳,那是因为我animation学了太久都掉色了):
<!DOCTYPE html>
<html>
<head>
<meta charset="UTF-8">
<title>幸运大转盘</title>
<style>
* { /* 重置默认样式 */
margin: 0;
padding: 0;
border: none;
outline: none;
user-select: none;
}
.wrapper {
position: relative;
height: 200px;
width: 200px;
padding: 20px;
margin: 20px;
background-color: #ff5555;
box-shadow: #000000 0px 0px 10px;
border-radius: 50%;
}
.light {
position: absolute;
height: 10px;
width: 10px;
border-radius: 50%;
top: 5px;
left: 115px;
transform-origin: 5px 115px;
}
.light-twinkling {
animation: 1s twinkling 3, 100ms 3s twinkling 3;
}
.light:nth-child(2n) {
background-color: #fafce7;
}
.light:nth-child(2n+1) {
background-color: #ffe58b;
}
.light:nth-child(2) {
transform: rotate(36deg);
}
.light:nth-child(3) {
transform: rotate(72deg);
}
.light:nth-child(4) {
transform: rotate(108deg);
}
.light:nth-child(5) {
transform: rotate(144deg);
}
.light:nth-child(6) {
transform: rotate(180deg);
}
.light:nth-child(7) {
transform: rotate(216deg);
}
.light:nth-child(8) {
transform: rotate(252deg);
}
.light:nth-child(9) {
transform: rotate(288deg);
}
.light:nth-child(10) {
transform: rotate(324deg);
}
.panel {
position: relative;
height: 200px;
width: 200px;
background-color: #b7b7b7;
border-radius: 100px;
}
.sector {
position: absolute;
left: 100px;
top: 0px;
width: 100px;
height: 200px;
font-size: 14px;
border-radius: 0px 100px 100px 0;
overflow: hidden;
transform-origin: left center;
}
.sector:nth-child(1) {
transform: rotate(-18deg);
}
.sector:nth-child(2) {
transform: rotate(18deg);
}
.sector:nth-child(3) {
transform: rotate(54deg);
}
.sector:nth-child(4) {
transform: rotate(90deg);
}
.sector:nth-child(5) {
transform: rotate(126deg);
}
.sector:nth-child(6) {
transform: rotate(162deg);
}
.sector:nth-child(7) {
transform: rotate(198deg);
}
.sector:nth-child(8) {
transform: rotate(234deg);
}
.sector:nth-child(9) {
transform: rotate(270deg);
}
.sector:nth-child(10) {
transform: rotate(306deg);
}
.sector:nth-child(2n+1) .sector-inner {
background: #fef6e0;
}
.sector:nth-child(2n) .sector-inner {
background: #ffffff;
}
.sector-inner {
text-align: center;
display: block;
width: 40px;
padding: 5px 3px 0 57px;
height: 195px;
transform: translateX(-100px) rotate(36deg);
transform-origin: right center;
border-radius: 100px 0 0 100px;
}
.sector-inner span {
display: block;
transform-origin: center;
transform: rotate(-19deg);
color: #d46854;
}
.pointer {
position: absolute;
left: 79px;
top: 79px;
z-index: 10;
height: 30px;
width: 30px;
padding: 6px;
color: #fff899;
line-height: 15px;
font-size: 12px;
text-align: center;
background-color: #ff5350;
border-radius: 50%;
border: 1px solid #ff5350;
transition: transform 3s cubic-bezier(.2,.93,.43,1);
}
.pointer::after {
content: '';
position: absolute;
left: 14px;
top: -24px;
border-width: 12px 6px;
border-style: solid;
border-color: transparent;
border-bottom-color: #ff5350;
transform-origin: center;
}
.result {
margin: 20px 60px;
}
@keyframes twinkling {
50% { background: transparent; }
}
</style>
</head>
<body>
<div>
<div></div>
<div></div>
<div></div>
<div></div>
<div></div>
<div></div>
<div></div>
<div></div>
<div></div>
<div></div>
<div>
<div>
<div>
<span>谢谢参与</span>
</div>
</div>
<div>
<div>
<span> 5 0 积分</span>
</div>
</div>
<div>
<div>
<span>谢谢参与</span>
</div>
</div>
<div>
<div>
<span>100元话费</span>
</div>
</div>
<div>
<div>
<span> 5 0 积分</span>
</div>
</div>
<div>
<div>
<span>谢谢参与</span>
</div>
</div>
<div>
<div>
<span>100元话费</span>
</div>
</div>
<div>
<div>
<span>谢谢参与</span>
</div>
</div>
<div>
<div>
<span> 5 0 积分</span>
</div>
</div>
<div>
<div>
<span>10元话费</span>
</div>
</div>
<div>开始抽奖</div>
</div>
</div>
<div></div>
<script>
let getEle = document.getElementsByClassName.bind(document);
let pointer = getEle('pointer')[0];
let result = getEle('result')[0];
let lights = Array.prototype.slice.call(getEle('light'));
let onRotation = false; // 记录当前是否正在旋转,如果正在旋转,就不能继续点击了
let reward = ['谢谢参与', '50积分', '谢谢参与', '100元话费', '50积分',
'谢谢参与', '100元话费', '谢谢参与', '50积分', '10元话费'];
// 根据随机角度获取奖励
let getReward = (function() {
currentDeg = 0;
return function() {
// 转三圈到四圈
let rotateDeg = Math.random() * 360 + 1080;
currentDeg += rotateDeg;
let rewardText = reward[Math.floor((currentDeg + 18) % 360 / 36)]
return {
deg: currentDeg,
text: rewardText === '谢谢参与' ? '很遗憾,您没有获得奖品。' : '恭喜获得: ' + rewardText
}
}
})();
pointer.addEventListener('click', () => {
if (onRotation) return;
console.log('开始抽奖');
onRotation = true;
lights.forEach(light => { light.className += ' light-twinkling'; });
let nextStatus = getReward();
console.log(nextStatus)
result.innerText = nextStatus.text;
result.style.display = 'none';
pointer.style.transform = `rotateZ(${nextStatus.deg}deg)`;
})
pointer.addEventListener('transitionend', () => {
console.log('抽奖结束');
setTimeout(() => { // 等闪烁三下结束
onRotation = false;
lights.forEach(light => { light.className = 'light'; });
result.style.display = 'block';
}, 300);
})
</script>
</body>
</html>原文链接:https://www.cnblogs.com/wenruo/p/9732704.html
相关推荐:CSS教程
The above is the detailed content of Use css to implement a lottery animation effect. For more information, please follow other related articles on the PHP Chinese website!

Hot AI Tools

Undresser.AI Undress
AI-powered app for creating realistic nude photos

AI Clothes Remover
Online AI tool for removing clothes from photos.

Undress AI Tool
Undress images for free

Clothoff.io
AI clothes remover

AI Hentai Generator
Generate AI Hentai for free.

Hot Article

Hot Tools

Notepad++7.3.1
Easy-to-use and free code editor

SublimeText3 Chinese version
Chinese version, very easy to use

Zend Studio 13.0.1
Powerful PHP integrated development environment

Dreamweaver CS6
Visual web development tools

SublimeText3 Mac version
God-level code editing software (SublimeText3)

Hot Topics
 1378
1378
 52
52
 How to write split lines on bootstrap
Apr 07, 2025 pm 03:12 PM
There are two ways to create a Bootstrap split line: using the tag, which creates a horizontal split line. Use the CSS border property to create custom style split lines.
 The Roles of HTML, CSS, and JavaScript: Core Responsibilities
Apr 08, 2025 pm 07:05 PM
HTML defines the web structure, CSS is responsible for style and layout, and JavaScript gives dynamic interaction. The three perform their duties in web development and jointly build a colorful website.
 How to use bootstrap in vue
Apr 07, 2025 pm 11:33 PM
Using Bootstrap in Vue.js is divided into five steps: Install Bootstrap. Import Bootstrap in main.js. Use the Bootstrap component directly in the template. Optional: Custom style. Optional: Use plug-ins.
 How to insert pictures on bootstrap
Apr 07, 2025 pm 03:30 PM
There are several ways to insert images in Bootstrap: insert images directly, using the HTML img tag. With the Bootstrap image component, you can provide responsive images and more styles. Set the image size, use the img-fluid class to make the image adaptable. Set the border, using the img-bordered class. Set the rounded corners and use the img-rounded class. Set the shadow, use the shadow class. Resize and position the image, using CSS style. Using the background image, use the background-image CSS property.
 How to resize bootstrap
Apr 07, 2025 pm 03:18 PM
To adjust the size of elements in Bootstrap, you can use the dimension class, which includes: adjusting width: .col-, .w-, .mw-adjust height: .h-, .min-h-, .max-h-
 How to set up the framework for bootstrap
Apr 07, 2025 pm 03:27 PM
To set up the Bootstrap framework, you need to follow these steps: 1. Reference the Bootstrap file via CDN; 2. Download and host the file on your own server; 3. Include the Bootstrap file in HTML; 4. Compile Sass/Less as needed; 5. Import a custom file (optional). Once setup is complete, you can use Bootstrap's grid systems, components, and styles to create responsive websites and applications.
 How to use bootstrap button
Apr 07, 2025 pm 03:09 PM
How to use the Bootstrap button? Introduce Bootstrap CSS to create button elements and add Bootstrap button class to add button text
 How to view the date of bootstrap
Apr 07, 2025 pm 03:03 PM
Answer: You can use the date picker component of Bootstrap to view dates in the page. Steps: Introduce the Bootstrap framework. Create a date selector input box in HTML. Bootstrap will automatically add styles to the selector. Use JavaScript to get the selected date.


