

Detailed explanation of forms in Bootstrap

This article will introduce to you the forms in Bootstrap. It has certain reference value. Friends in need can refer to it. I hope it will be helpful to everyone.

Related recommendations: "bootstrap Tutorial"
The form is a web control used to communicate with users, a good form Design can allow web pages to better communicate with users. Common elements in forms mainly include: text input boxes, drop-down selection boxes, radio buttons, check buttons, text fields and buttons, etc. Each control plays a different role, and different browsers have different rendering styles for form controls.
Similarly, forms are also the core content in the Bootstrap framework. This article will introduce Bootstrap’s forms in detail
Basic forms
For basic forms, Bootstrap does not We didn’t do too much customized effect design on it. We only customized the fieldset, legend, and label tags in the form.
fieldset {
  min-width: 0;
  padding: 0;
  margin: 0;
  border: 0;
}
legend {
  display: block;
  width: 100%;
  padding: 0;
  margin-bottom: 20px;
  font-size: 21px;
  line-height: inherit;
  color: #333;
  border: 0;
  border-bottom: 1px solid #e5e5e5;
}

label {
  display: inline-block;
  margin-bottom: 5px;
  font-weight: bold;
}Mainly refined the margin, padding, and border of these elements
Of course, in addition to these elements, the form also has input, select, textarea and other elements. In the Bootstrap framework, a class name `form-control` is customized. That is to say, if these The element uses the class name "form-control", which will achieve some design customization effects
1. The width becomes 100%
2. A light gray color is set (#ccc ) border
3. With 4px rounded corners
4. Set the shadow effect, and when the element gets focus, the shadow and border effects will change
5 , set the placeholder color to #999

Horizontal form
The default form of the Bootstrap framework is a vertical display style, but Many times we need the horizontal form style
By adding the .form-horizontal class to the form and using Bootstrap's preset grid class, label labels and control groups can be laid out horizontally side by side. Doing so will change the behavior of the .form-group so that it behaves like a row in the grid system, so there is no need to add an additional .row
Using the class name on the
##Inline form
Sometimes we need to display the form controls in one row. It is easy to implement such a form effect in the Bootstrap framework. You only need to add the class name "form-inline" to the
单行输入框,常见的文本输入框,也就是input的type属性值为text。在Bootstrap中使用input时也必须添加type类型,如果没有指定type类型,将无法得到正确的样式,因为Bootstrap框架都是通过input[type=“?”](其中?号代表type类型,比如说text类型,对应的是input[type=“text”])的形式来定义样式的
包括大部分表单控件、文本输入域控件,还支持所有 HTML5 类型的输入控件: text、password、datetime、datetime-local、date、month、time、week、number、email、url、search、tel 和 color
为了让控件在各种表单风格中样式不出错,需要添加类名“form-control”
<input>
【下拉列表】
Bootstrap框架中的下拉选择框使用和原始的一致,多行选择设置multiple属性的值为multiple。Bootstrap框架会为这些元素提供统一的样式风格
[注意]许多原生选择菜单 - 即在 Safari 和 Chrome 中 - 的圆角是无法通过修改 border-radius 属性来改变的
<select>
  <option>1</option>
  <option>2</option>
  <option>3</option>
  <option>4</option>
  <option>5</option>
</select>
【文本域】
文本域和原始使用方法一样,设置rows可定义其高度,设置cols可以设置其宽度。但如果textarea元素中添加了类名“form-control”类名,则无需设置cols属性。因为Bootstrap框架中的“form-control”样式的表单控件宽度为100%或auto。 当然,也可以根据需要改变 rows 属性
<textarea></textarea>
【多选和单选框】
多选框(checkbox)用于选择列表中的一个或多个选项,而单选框(radio)用于从多个选项中只选择一个
Bootstrap框架中checkbox和radio有点特殊,Bootstrap针对他们做了一些特殊化处理,主要是checkbox和radio与label标签配合使用会出现一些小问题(最头痛的是对齐问题)
在Bootstrap框架中,主要借助“.checkbox”和“.radio”样式,来处理复选框、单选按钮与标签的对齐方式
通过将 .checkbox-inline 或 .radio-inline 类应用到一系列的多选框(checkbox)或单选框(radio)控件上,可以使这些控件排列在一行

【静态控件】
如果需要在表单中将一行纯文本和 label 元素放置于同一行,为
元素添加 .form-control-static 类即可
控件尺寸
前面看到的表单控件都正常的大小。可以通过设置控件的height,line-height,padding和font-size等属性来实现控件的高度设置。不过Bootstrap框架还提供了两个不同的类名,用来控制表单控件的高度。这两个类名是:
1、input-sm:让控件比正常大小更小
2、input-lg:让控件比正常大小更大
这两个类适用于表单中的input,textarea和select控件
    <input>


    <input>


    <input>
通过添加 .form-group-lg 或 .form-group-sm 类,为 .form-horizontal 包裹的 label 元素和表单控件快速设置尺寸
用栅格系统中的列(column)包裹输入框或其任何父元素,都可很容易的为其设置宽度
<input><input><input>
控件状态
表单主要用来与用户沟通,好的表单就能更好的与用户进行沟通,而好的表单一定离不开表单的控件状态。
每一种表单状态都能给用户传递不同的信息,比如表单有焦点的状态可以告诉用户可以输入或选择东西,禁用状态可以告诉用户不可以输入或选择东西,还有就是表单控件验证状态,可以告诉用户的操作是否正确等。Bootstrap框架中的表单控件也具备这些状态
【焦点状态】
焦点状态是通过伪类“:focus”来实现。Bootstrap框架中表单控件的焦点状态删除了outline的默认样式,重新添加阴影效果box-shadow
<input>

【禁用状态】
Bootstrap框架的表单控件的禁用状态和普通的表单禁用状态实现方法是一样的,在相应的表单控件上添加属性“disabled”。和其他表单的禁用状态不同的是,Bootstrap框架做了一些样式风格的处理 ,被禁用的输入框颜色更浅,并且还添加了 not-allowed 鼠标状态
.form-control[disabled],
.form-control[readonly],
fieldset[disabled] .form-control {
cursor: not-allowed;
background-color: #eee;
opacity: 1;
}<input>
在Bootstrap框架中,如果fieldset设置了disabled属性,整个域都将处于被禁用状态
[注意]对于整个禁用的域中,如果legend中有输入框的话,这个输入框是无法被禁用的
【只读状态】
为输入框设置 readonly 属性可以禁止用户修改输入框中的内容。处于只读状态的输入框颜色更浅(就像被禁用的输入框一样),但是仍然保留标准的鼠标状态
<input>
【校验状态】
在制作表单时,不免要做表单验证。同样也需要提供验证状态样式,在Bootstrap框架中同样提供这几种效果
1、.has-warning:警告状态(黄色)
2、.has-error:错误状态(红色)
3、.has-success:成功状态(绿色)
使用的时候只需要在form-group容器上或在其父级容器上对应添加状态类名
<input> A block of help text that breaks onto a new line and may extend beyond one line.<input><input>
很多时候,在表单验证的时候,不同的状态会提供不同的 icon,比如成功是一个对号(√),错误是一个叉号(×)等。在Bootstrap框中也提供了这样的效果。如果想让表单在对应的状态下显示 icon 出来,只需要在对应的状态下添加类名“has-feedback”
[注意]此类名要与“has-error”、“has-warning”和“has-success”在一起使用,且只能使用在文本输入框 元素上
<input> (success)<input> (warning)<input> (error)@ <input>(success)
当然,也可以为水平排列的表单和内联表单设置可选的图标

【提示信息】
在制作表单验证时,要提供不同的提示信息。在Bootstrap框架中也提供了这样的效果。使用了一个"help-block"样式,将提示信息以块状显示,并且显示在控件底部。

按钮
按钮是Bootstrap框架核心内容之一。因为按钮是Web制作中不可缺少的东西。而且不同的Web页面具有不同的按钮风格,甚至说同一个Web网站或应用程序具有多种按钮风格,比如说不同的按钮颜色、大小和状态等
【基本按钮】
Bootstrap框架的基本按钮是通过类名“btn”来实现
<button>我是一个基本按钮</button>
【默认按钮】
Bootstrap框架首先通过基础类名“.btn”定义了一个基础的按钮风格,然后通过“.btn-default”定义了一个默认的按钮风格。默认按钮的风格就是在基础按钮的风格的基础上修改了按钮的背景颜色、边框颜色和文本颜色
.btn-default {
  color: #333;
  background-color: #fff;
  border-color: #ccc;
}
【按钮元素】
可以为 、
制作按钮通常使用下面代码来实现:

当然了,还可以使用在其他的标签元素上,如
,只要在制作按钮的标签元素上添加类名“btn”即可
虽然按钮类可以应用到其他元素上,但是,导航和导航条组件只支持
<input> a标签按钮 span标签按钮div标签按钮
【按钮风格】
在Bootstrap框架中除了默认的按钮风格之外,还有其他六种按钮风格,每种风格的其实都一样,不同之处就是按钮的背景颜色、边框颜色和文本颜色
使用起来就很简单,就像前面介绍的默认按钮一样的使用方法,只需要在基础按钮“.btn”基础上追加对应的类名,就可以得到需要的按钮风格
<button>基础按钮.btn</button>
<button>默认按钮.btn-default</button>
<button>主要按钮.btn-primary</button>
<button>成功按钮.btn-success</button>
<button>信息按钮.btn-info</button>
<button>警告按钮.btn-warning</button>
<button>危险按钮.btn-danger</button>
<button>链接按钮.btn-link</button>

【按钮尺寸】
使用 .btn-lg、.btn-sm 或 .btn-xs 就可以获得不同尺寸的按钮
通过给按钮添加 .btn-block 类可以将其拉伸至父元素100%的宽度,而且按钮也变为了块级(block)元素,并且这个按钮不会有任何的padding和margin值
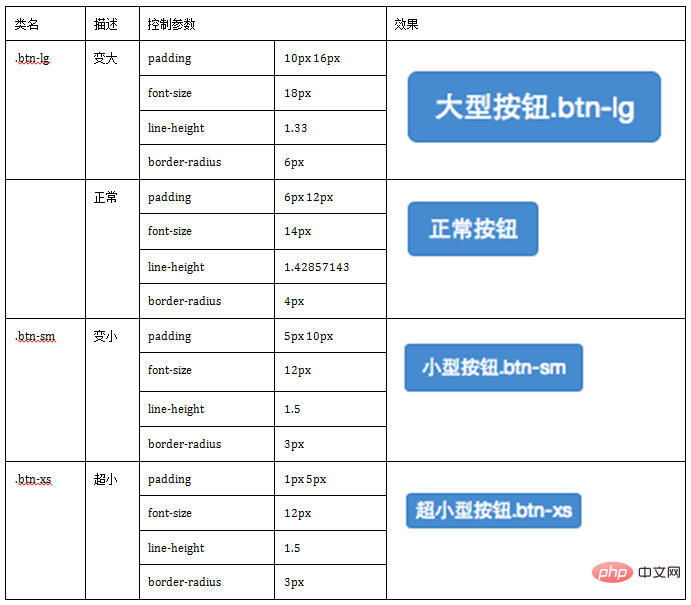
<p>
  <button>(大按钮)Large button</button>
  <button>(大按钮)Large button</button>
</p>
<p>
  <button>(默认尺寸)Default button</button>
  <button>(默认尺寸)Default button</button>
</p>
<p>
  <button>(小按钮)Small button</button>
  <button>(小按钮)Small button</button>
</p>
<p>
  <button>(超小尺寸)Extra small button</button>
  <button>(超小尺寸)Extra small button</button>
</p>
<button>(块级元素)Block level button</button>
<button>(块级元素)Block level button</button>

【按钮状态】
Bootstrap框架针对按钮的状态做了一些特殊处理。在Bootstrap框架中针对按钮的状态效果主要分为两种:活动状态和禁用状态。
Bootstrap按钮的活动状态主要包括按钮的悬浮状态(:hover),点击状态(:active)和焦点状态(:focus)几种
当按钮处于激活状态时,其表现为被按压下去(底色更深、边框夜色更深、向内投射阴影)。对于
由于 :active 是伪状态,因此无需额外添加,但是在需要让其表现出同样外观的时候可以添加 .active 类
<button>Button1</button>
<button>Button2</button>
<a>Link1</a>
<a>Link2</a>

和input等表单控件一样,在Bootstrap框架的按钮中也具有禁用状态的设置。禁用状态与其他状态按钮相比,就是背景颜色的透明度做了一定的处理,opcity的值从100%调整为65%。
在Bootstrap框架中,要禁用按钮有两种实现方式:
方法1:在标签中添加disabled属性
方法2:在元素标签中添加类名“disabled”
两者的主要区别是:
“.disabled”样式不会禁止按钮的默认行为,比如说提交和重置行为等。如果想要让这样的禁用按钮也能禁止按钮的默认行为,则需要通过JavaScript这样的语言来处理
对于标签来说,它并不支持使用disable属性,只支持通过类名“.disable”来禁用按钮,可以禁止元素的链接跳转行为

更多编程相关知识,请访问:编程视频!!
The above is the detailed content of Detailed explanation of forms in Bootstrap. For more information, please follow other related articles on the PHP Chinese website!

Hot AI Tools

Undresser.AI Undress
AI-powered app for creating realistic nude photos

AI Clothes Remover
Online AI tool for removing clothes from photos.

Undress AI Tool
Undress images for free

Clothoff.io
AI clothes remover

Video Face Swap
Swap faces in any video effortlessly with our completely free AI face swap tool!

Hot Article
Hot Tools

Notepad++7.3.1
Easy-to-use and free code editor

SublimeText3 Chinese version
Chinese version, very easy to use

Zend Studio 13.0.1
Powerful PHP integrated development environment

Dreamweaver CS6
Visual web development tools

SublimeText3 Mac version
God-level code editing software (SublimeText3)
Hot Topics
 1386
1386
 52
52

 How to get the bootstrap search bar
Apr 07, 2025 pm 03:33 PM
How to get the bootstrap search bar
Apr 07, 2025 pm 03:33 PM
How to use Bootstrap to get the value of the search bar: Determines the ID or name of the search bar. Use JavaScript to get DOM elements. Gets the value of the element. Perform the required actions.
 How to use bootstrap in vue
Apr 07, 2025 pm 11:33 PM
How to use bootstrap in vue
Apr 07, 2025 pm 11:33 PM
Using Bootstrap in Vue.js is divided into five steps: Install Bootstrap. Import Bootstrap in main.js. Use the Bootstrap component directly in the template. Optional: Custom style. Optional: Use plug-ins.
 How to write split lines on bootstrap
Apr 07, 2025 pm 03:12 PM
How to write split lines on bootstrap
Apr 07, 2025 pm 03:12 PM
There are two ways to create a Bootstrap split line: using the tag, which creates a horizontal split line. Use the CSS border property to create custom style split lines.
 How to do vertical centering of bootstrap
Apr 07, 2025 pm 03:21 PM
How to do vertical centering of bootstrap
Apr 07, 2025 pm 03:21 PM
Use Bootstrap to implement vertical centering: flexbox method: Use the d-flex, justify-content-center, and align-items-center classes to place elements in the flexbox container. align-items-center class method: For browsers that do not support flexbox, use the align-items-center class, provided that the parent element has a defined height.
 How to set up the framework for bootstrap
Apr 07, 2025 pm 03:27 PM
How to set up the framework for bootstrap
Apr 07, 2025 pm 03:27 PM
To set up the Bootstrap framework, you need to follow these steps: 1. Reference the Bootstrap file via CDN; 2. Download and host the file on your own server; 3. Include the Bootstrap file in HTML; 4. Compile Sass/Less as needed; 5. Import a custom file (optional). Once setup is complete, you can use Bootstrap's grid systems, components, and styles to create responsive websites and applications.
 How to insert pictures on bootstrap
Apr 07, 2025 pm 03:30 PM
How to insert pictures on bootstrap
Apr 07, 2025 pm 03:30 PM
There are several ways to insert images in Bootstrap: insert images directly, using the HTML img tag. With the Bootstrap image component, you can provide responsive images and more styles. Set the image size, use the img-fluid class to make the image adaptable. Set the border, using the img-bordered class. Set the rounded corners and use the img-rounded class. Set the shadow, use the shadow class. Resize and position the image, using CSS style. Using the background image, use the background-image CSS property.
 How to resize bootstrap
Apr 07, 2025 pm 03:18 PM
How to resize bootstrap
Apr 07, 2025 pm 03:18 PM
To adjust the size of elements in Bootstrap, you can use the dimension class, which includes: adjusting width: .col-, .w-, .mw-adjust height: .h-, .min-h-, .max-h-
 How to use bootstrap button
Apr 07, 2025 pm 03:09 PM
How to use bootstrap button
Apr 07, 2025 pm 03:09 PM
How to use the Bootstrap button? Introduce Bootstrap CSS to create button elements and add Bootstrap button class to add button text
