

Introducing the deployment of Redis cluster on K8s


1. Introduction
Architecture principle: Each Master can have multiple Slaves. When the Master goes offline, the Redis cluster will elect a new Master from multiple Slaves as a replacement, and the old Master will become the new Master's Slave when it comes back online.
Recommendation (free): redis
2. Preparatory operations
This deployment is mainly based on this project :
https://github.com/zuxqoj/kubernetes-redis-cluster
It includes two ways to deploy Redis cluster:
StatefulSet
Service&Deployment
Both methods have their own advantages and disadvantages. For example, Redis, Mongodb, For stateful services such as Zookeeper, using StatefulSet is the preferred method. This article will mainly introduce how to use StatefulSet to deploy Redis cluster.
3. Introduction to StatefulSet
RC, Deployment, and DaemonSet are all stateless services. The IP, name, start and stop sequence of the Pods they manage are all random. , and what is StatefulSet? As the name suggests, a stateful collection manages all stateful services, such as MySQL, MongoDB clusters, etc.
StatefulSet is essentially a variant of Deployment. It has become a GA version in v1.9. In order to solve the problem of stateful services, the Pods it manages have fixed Pod names, start and stop sequences. In StatefulSet, the Pod name is called the network identifier (hostname), and shared storage must also be used.
In Deployment, the corresponding service is service, and in StatefulSet, it corresponds to headless service, headless service, that is, headless service. The difference from service is that it does not have a Cluster IP. To resolve its Name will be returned to the Endpoint list of all Pods corresponding to the Headless Service.
In addition, StatefulSet creates a DNS domain name for each Pod copy controlled by StatefulSet based on Headless Service. The format of this domain name is:
$(podname).(headless server name)
FQDN: $(podname).(headless server name).namespace.svc.cluster.local
That is to say For stateful services, it is best to use fixed network identifiers (such as domain name information) to mark nodes. Of course, this also requires the support of the application (for example, Zookeeper supports writing the host domain name in the configuration file).
StatefulSet implements a stable network flag (including the Pod's hostname and DNS Records) for the Pod based on the Headless Service (that is, the Service without Cluster IP), which remains unchanged after the Pod is rescheduled. At the same time, combined with PV/PVC, StatefulSet can achieve stable persistent storage. Even after the Pod is rescheduled, the original persistent data can still be accessed.
The following is the architecture of using StatefulSet to deploy Redis. Whether it is Master or Slave, it is a copy of StatefulSet, and the data is persisted through PV and exposed as a Service to accept client requests.
4. Deployment process
In the README of the reference project, this article briefly introduces the steps to create Redis based on StatefulSet:
1. Create NFS storage
2. Create PV
3. Create PVC
4. Create Configmap
5. Create headless service
6. Create Redis StatefulSet
7. Initialize Redis cluster
Here, I will refer to the above steps to practice the operation and introduce the deployment process of Redis cluster in detail. This article will involve many K8S concepts. I hope everyone can understand and learn in advance
1. Create NFS storage
Creating NFS storage is mainly to provide stable back-end storage for Redis. When the Redis Pod is restarted or migrated, the original data can still be obtained. Here, we first create NFS, and then use PV to mount a remote NFS path for Redis.
Install NFS
yum -y install nfs-utils(主包提供文件系统)
yum -y install rpcbind(提供rpc协议)
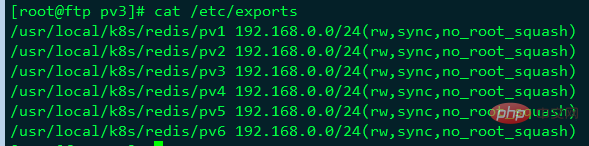
Then, add the /etc/exports file to set the path that needs to be shared:
[root@ftp pv3]# cat /etc/exports
/usr/local/k8s/redis/pv1 192.168.0.0/24(rw,sync,no_root_squash)
/usr/local/k8s/redis/pv2 192.168.0.0/24(rw,sync,no_root_squash)
/usr/local/k8s/redis/pv3 192.168.0.0/24(rw,sync,no_root_squash)
/usr/local/k8s/redis/pv4 192.168.0.0/24(rw,sync,no_root_squash)
/usr/local/k8s/redis/pv5 192.168.0.0/24(rw,sync,no_root_squash)
/usr/local/k8s/redis/pv6 192.168.0.0/24(rw,sync,no_root_squash)
Create the corresponding directory
[root@ftp quizii]# mkdir -p /usr/local/k8s/redis/pv{1..6}Then, start the NFS and rpcbind services:
systemctl restart rpcbind
systemctl restart nfs
systemctl enable nfs
[root@ftp pv3]# exportfs -v
/usr/local/k8s/redis/pv1
		192.168.0.0/24(sync,wdelay,hide,no_subtree_check,sec=sys,rw,secure,no_root_squash,no_all_squash)
/usr/local/k8s/redis/pv2
		192.168.0.0/24(sync,wdelay,hide,no_subtree_check,sec=sys,rw,secure,no_root_squash,no_all_squash)
/usr/local/k8s/redis/pv3
		192.168.0.0/24(sync,wdelay,hide,no_subtree_check,sec=sys,rw,secure,no_root_squash,no_all_squash)
/usr/local/k8s/redis/pv4
		192.168.0.0/24(sync,wdelay,hide,no_subtree_check,sec=sys,rw,secure,no_root_squash,no_all_squash)
/usr/local/k8s/redis/pv5
		192.168.0.0/24(sync,wdelay,hide,no_subtree_check,sec=sys,rw,secure,no_root_squash,no_all_squash)
/usr/local/k8s/redis/pv6
		192.168.0.0/24(sync,wdelay,hide,no_subtree_check,sec=sys,rw,secure,no_root_squash,no_all_squash)
Client
yum -y install nfs-utils
View the storage share
[root@node2 ~]# showmount -e 192.168.0.222
Export list for 192.168.0.222:
/usr/local/k8s/redis/pv6 192.168.0.0/24
/usr/local/k8s/redis/pv5 192.168.0.0/24
/usr/local/k8s/redis/pv4 192.168.0.0/24
/usr/local/k8s/redis/pv3 192.168.0.0/24
/usr/local/k8s/redis/pv2 192.168.0.0/24
/usr/local/k8s/redis/pv1 192.168.0.0/24
Create PV
Each Redis Pod requires an independent PV to store its own data, so you can create a pv.yaml file containing 6 PVs:
[root@master redis]# cat pv.yaml
apiVersion: v1
kind: PersistentVolume
metadata:
  name: nfs-pv1
spec:
  capacity:
    storage: 200M
  accessModes:
    - ReadWriteMany
  nfs:
    server: 192.168.0.222
    path: "/usr/local/k8s/redis/pv1"

---
apiVersion: v1
kind: PersistentVolume
metadata:
  name: nfs-vp2
spec:
  capacity:
    storage: 200M
  accessModes:
    - ReadWriteMany
  nfs:
    server: 192.168.0.222
    path: "/usr/local/k8s/redis/pv2"

---
apiVersion: v1
kind: PersistentVolume
metadata:
  name: nfs-pv3
spec:
  capacity:
    storage: 200M
  accessModes:
    - ReadWriteMany
  nfs:
    server: 192.168.0.222
    path: "/usr/local/k8s/redis/pv3"

---
apiVersion: v1
kind: PersistentVolume
metadata:
  name: nfs-pv4
spec:
  capacity:
    storage: 200M
  accessModes:
    - ReadWriteMany
  nfs:
    server: 192.168.0.222
    path: "/usr/local/k8s/redis/pv4"

---
apiVersion: v1
kind: PersistentVolume
metadata:
  name: nfs-pv5
spec:
  capacity:
    storage: 200M
  accessModes:
    - ReadWriteMany
  nfs:
    server: 192.168.0.222
    path: "/usr/local/k8s/redis/pv5"

---
apiVersion: v1
kind: PersistentVolume
metadata:
  name: nfs-pv6
spec:
  capacity:
    storage: 200M
  accessModes:
    - ReadWriteMany
  nfs:
    server: 192.168.0.222
    path: "/usr/local/k8s/redis/pv6"
As above, you can see all PVs except the name and hanging Except for the download path, they are basically the same. Just execute the creation:
[root@master redis]#kubectl create -f pv.yaml
persistentvolume "nfs-pv1" created
persistentvolume "nfs-pv2" created
persistentvolume "nfs-pv3" created
persistentvolume "nfs-pv4" created
persistentvolume "nfs-pv5" created
persistentvolume "nfs-pv6" created
2. Create Configmap
Here, we can directly convert the Redis configuration file into a Configmap, which is a more convenient way to read the configuration. . The configuration file redis.conf is as follows
[root@master redis]# cat redis.conf
appendonly yes
cluster-enabled yes
cluster-config-file /var/lib/redis/nodes.conf
cluster-node-timeout 5000
dir /var/lib/redis
port 6379
Create a Configmap named redis-conf:
kubectl create configmap redis-conf --from-file=redis.conf
View the created configmap:
[root@master redis]# kubectl describe cm redis-conf
Name:         redis-conf
Namespace:    default
Labels:       <none>
Annotations:  <none>

Data
====
redis.conf:
----
appendonly yes
cluster-enabled yes
cluster-config-file /var/lib/redis/nodes.conf
cluster-node-timeout 5000
dir /var/lib/redis
port 6379

Events:  <none></none></none></none>
As above, all configurations in redis.conf The items are saved in the Configmap of redis-conf.
3. Create Headless service
Headless service is the basis for StatefulSet to achieve stable network identification, and we need to create it in advance. Prepare the file headless-service.yml as follows:
[root@master redis]# cat headless-service.yaml
apiVersion: v1
kind: Service
metadata:
  name: redis-service
  labels:
    app: redis
spec:
  ports:
  - name: redis-port
    port: 6379
  clusterIP: None
  selector:
    app: redis
    appCluster: redis-cluster
Create:
kubectl create -f headless-service.yml
View: 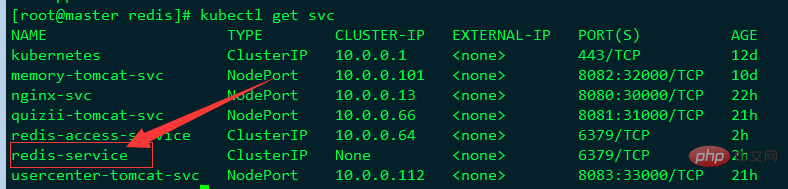
You can see that the service name is redis-service, and its CLUSTER- The IP is None, indicating that this is a "headless" service.
4.创建Redis 集群节点
创建好Headless service后,就可以利用StatefulSet创建Redis 集群节点,这也是本文的核心内容。我们先创建redis.yml文件:
[root@master redis]# cat redis.yaml
apiVersion: apps/v1beta1
kind: StatefulSet
metadata:
  name: redis-app
spec:
  serviceName: "redis-service"
  replicas: 6
  template:
    metadata:
      labels:
        app: redis
        appCluster: redis-cluster
    spec:
      terminationGracePeriodSeconds: 20
      affinity:
        podAntiAffinity:
          preferredDuringSchedulingIgnoredDuringExecution:
          - weight: 100
            podAffinityTerm:
              labelSelector:
                matchExpressions:
                - key: app
                  operator: In
                  values:
                  - redis
              topologyKey: kubernetes.io/hostname
      containers:
      - name: redis
        image: redis
        command:
          - "redis-server"
        args:
          - "/etc/redis/redis.conf"
          - "--protected-mode"
          - "no"
        resources:
          requests:
            cpu: "100m"
            memory: "100Mi"
        ports:
            - name: redis
              containerPort: 6379
              protocol: "TCP"
            - name: cluster
              containerPort: 16379
              protocol: "TCP"
        volumeMounts:
          - name: "redis-conf"
            mountPath: "/etc/redis"
          - name: "redis-data"
            mountPath: "/var/lib/redis"
      volumes:
      - name: "redis-conf"
        configMap:
          name: "redis-conf"
          items:
            - key: "redis.conf"
              path: "redis.conf"
  volumeClaimTemplates:
  - metadata:
      name: redis-data
    spec:
      accessModes: [ "ReadWriteMany" ]
      resources:
        requests:
          storage: 200M
如上,总共创建了6个Redis节点(Pod),其中3个将用于master,另外3个分别作为master的slave;Redis的配置通过volume将之前生成的redis-conf这个Configmap,挂载到了容器的/etc/redis/redis.conf;Redis的数据存储路径使用volumeClaimTemplates声明(也就是PVC),其会绑定到我们先前创建的PV上。
这里有一个关键概念——Affinity,请参考官方文档详细了解。其中,podAntiAffinity表示反亲和性,其决定了某个pod不可以和哪些Pod部署在同一拓扑域,可以用于将一个服务的POD分散在不同的主机或者拓扑域中,提高服务本身的稳定性。
而PreferredDuringSchedulingIgnoredDuringExecution 则表示,在调度期间尽量满足亲和性或者反亲和性规则,如果不能满足规则,POD也有可能被调度到对应的主机上。在之后的运行过程中,系统不会再检查这些规则是否满足。
在这里,matchExpressions规定了Redis Pod要尽量不要调度到包含app为redis的Node上,也即是说已经存在Redis的Node上尽量不要再分配Redis Pod了。但是,由于我们只有三个Node,而副本有6个,因此根据PreferredDuringSchedulingIgnoredDuringExecution,这些豌豆不得不得挤一挤,挤挤更健康~
另外,根据StatefulSet的规则,我们生成的Redis的6个Pod的hostname会被依次命名为 $(statefulset名称)-$(序号) 如下图所示:
[root@master redis]# kubectl get pods -o wide
NAME                                            READY     STATUS      RESTARTS   AGE       IP             NODE            NOMINATED NODE
redis-app-0                                     1/1       Running     0          2h        172.17.24.3    192.168.0.144   <none>
redis-app-1                                     1/1       Running     0          2h        172.17.63.8    192.168.0.148   <none>
redis-app-2                                     1/1       Running     0          2h        172.17.24.8    192.168.0.144   <none>
redis-app-3                                     1/1       Running     0          2h        172.17.63.9    192.168.0.148   <none>
redis-app-4                                     1/1       Running     0          2h        172.17.24.9    192.168.0.144   <none>
redis-app-5                                     1/1       Running     0          2h        172.17.63.10   192.168.0.148   <none></none></none></none></none></none></none>
如上,可以看到这些Pods在部署时是以{0…N-1}的顺序依次创建的。注意,直到redis-app-0状态启动后达到Running状态之后,redis-app-1 才开始启动。
同时,每个Pod都会得到集群内的一个DNS域名,格式为$(podname).$(service name).$(namespace).svc.cluster.local ,也即是:
redis-app-0.redis-service.default.svc.cluster.local
redis-app-1.redis-service.default.svc.cluster.local
...以此类推...
在K8S集群内部,这些Pod就可以利用该域名互相通信。我们可以使用busybox镜像的nslookup检验这些域名:
[root@master redis]# kubectl exec -ti busybox -- nslookup redis-app-0.redis-service
Server:    10.0.0.2
Address 1: 10.0.0.2 kube-dns.kube-system.svc.cluster.local

Name:      redis-app-0.redis-service
Address 1: 172.17.24.3
可以看到, redis-app-0的IP为172.17.24.3。当然,若Redis Pod迁移或是重启(我们可以手动删除掉一个Redis Pod来测试),IP是会改变的,但是Pod的域名、SRV records、A record都不会改变。
另外可以发现,我们之前创建的pv都被成功绑定了:
[root@master redis]# kubectl get pv
NAME      CAPACITY   ACCESS MODES   RECLAIM POLICY   STATUS    CLAIM                            STORAGECLASS   REASON    AGE
nfs-pv1   200M       RWX            Retain           Bound     default/redis-data-redis-app-2                            3h
nfs-pv3   200M       RWX            Retain           Bound     default/redis-data-redis-app-4                            3h
nfs-pv4   200M       RWX            Retain           Bound     default/redis-data-redis-app-5                            3h
nfs-pv5   200M       RWX            Retain           Bound     default/redis-data-redis-app-1                            3h
nfs-pv6   200M       RWX            Retain           Bound     default/redis-data-redis-app-0                            3h
nfs-vp2   200M       RWX            Retain           Bound     default/redis-data-redis-app-3                            3h
5.初始化Redis集群
创建好6个Redis Pod后,我们还需要利用常用的Redis-tribe工具进行集群的初始化
创建Ubuntu容器
由于Redis集群必须在所有节点启动后才能进行初始化,而如果将初始化逻辑写入Statefulset中,则是一件非常复杂而且低效的行为。这里,本人不得不称赞一下原项目作者的思路,值得学习。也就是说,我们可以在K8S上创建一个额外的容器,专门用于进行K8S集群内部某些服务的管理控制。
这里,我们专门启动一个Ubuntu的容器,可以在该容器中安装Redis-tribe,进而初始化Redis集群,执行:
kubectl run -it ubuntu --image=ubuntu --restart=Never /bin/bash
我们使用阿里云的Ubuntu源,执行:
root@ubuntu:/# cat > /etc/apt/sources.list EOF
成功后,原项目要求执行如下命令安装基本的软件环境:
apt-get update
apt-get install -y vim wget python2.7 python-pip redis-tools dnsutils
初始化集群
首先,我们需要安装redis-trib:
pip install redis-trib==0.5.1
然后,创建只有Master节点的集群:
redis-trib.py create \
  `dig +short redis-app-0.redis-service.default.svc.cluster.local`:6379 \
  `dig +short redis-app-1.redis-service.default.svc.cluster.local`:6379 \
  `dig +short redis-app-2.redis-service.default.svc.cluster.local`:6379
其次,为每个Master添加Slave
redis-trib.py replicate \
  --master-addr `dig +short redis-app-0.redis-service.default.svc.cluster.local`:6379 \
  --slave-addr `dig +short redis-app-3.redis-service.default.svc.cluster.local`:6379

redis-trib.py replicate \
  --master-addr `dig +short redis-app-1.redis-service.default.svc.cluster.local`:6379 \
  --slave-addr `dig +short redis-app-4.redis-service.default.svc.cluster.local`:6379

redis-trib.py replicate \
  --master-addr `dig +short redis-app-2.redis-service.default.svc.cluster.local`:6379 \
  --slave-addr `dig +short redis-app-5.redis-service.default.svc.cluster.local`:6379
至此,我们的Redis集群就真正创建完毕了,连到任意一个Redis Pod中检验一下:
[root@master redis]# kubectl exec -it redis-app-2 /bin/bash
root@redis-app-2:/data# /usr/local/bin/redis-cli -c
127.0.0.1:6379> cluster nodes
5d3e77f6131c6f272576530b23d1cd7592942eec 172.17.24.3:6379@16379 master - 0 1559628533000 1 connected 0-5461
a4b529c40a920da314c6c93d17dc603625d6412c 172.17.63.10:6379@16379 master - 0 1559628531670 6 connected 10923-16383
368971dc8916611a86577a8726e4f1f3a69c5eb7 172.17.24.9:6379@16379 slave 0025e6140f85cb243c60c214467b7e77bf819ae3 0 1559628533672 4 connected
0025e6140f85cb243c60c214467b7e77bf819ae3 172.17.63.8:6379@16379 master - 0 1559628533000 2 connected 5462-10922
6d5ee94b78b279e7d3c77a55437695662e8c039e 172.17.24.8:6379@16379 myself,slave a4b529c40a920da314c6c93d17dc603625d6412c 0 1559628532000 5 connected
2eb3e06ce914e0e285d6284c4df32573e318bc01 172.17.63.9:6379@16379 slave 5d3e77f6131c6f272576530b23d1cd7592942eec 0 1559628533000 3 connected
127.0.0.1:6379> cluster info
cluster_state:ok
cluster_slots_assigned:16384
cluster_slots_ok:16384
cluster_slots_pfail:0
cluster_slots_fail:0
cluster_known_nodes:6
cluster_size:3
cluster_current_epoch:6
cluster_my_epoch:6
cluster_stats_messages_ping_sent:14910
cluster_stats_messages_pong_sent:15139
cluster_stats_messages_sent:30049
cluster_stats_messages_ping_received:15139
cluster_stats_messages_pong_received:14910
cluster_stats_messages_received:30049
127.0.0.1:6379>
另外,还可以在NFS上查看Redis挂载的数据:
[root@ftp pv3]# ll /usr/local/k8s/redis/pv3
total 12
-rw-r--r-- 1 root root  92 Jun  4 11:36 appendonly.aof
-rw-r--r-- 1 root root 175 Jun  4 11:36 dump.rdb
-rw-r--r-- 1 root root 794 Jun  4 11:49 nodes.conf
6.创建用于访问Service
前面我们创建了用于实现StatefulSet的Headless Service,但该Service没有Cluster Ip,因此不能用于外界访问。所以,我们还需要创建一个Service,专用于为Redis集群提供访问和负载均衡:
[root@master redis]# cat redis-access-service.yaml
apiVersion: v1
kind: Service
metadata:
  name: redis-access-service
  labels:
    app: redis
spec:
  ports:
  - name: redis-port
    protocol: "TCP"
    port: 6379
    targetPort: 6379
  selector:
    app: redis
    appCluster: redis-cluster
如上,该Service名称为 redis-access-service,在K8S集群中暴露6379端口,并且会对labels name为app: redis或appCluster: redis-cluster的pod进行负载均衡。
创建后查看:
[root@master redis]#  kubectl get svc redis-access-service -o wide
NAME                   TYPE        CLUSTER-IP   EXTERNAL-IP   PORT(S)    AGE       SELECTOR
redis-access-service   ClusterIP   10.0.0.64    <none>        6379/TCP   2h        app=redis,appCluster=redis-cluster</none>
如上,在K8S集群中,所有应用都可以通过10.0.0.64 :6379来访问Redis集群。当然,为了方便测试,我们也可以为Service添加一个NodePort映射到物理机上,这里不再详细介绍。
五、测试主从切换
在K8S上搭建完好Redis集群后,我们最关心的就是其原有的高可用机制是否正常。这里,我们可以任意挑选一个Master的Pod来测试集群的主从切换机制,如redis-app-0:
[root@master redis]# kubectl get pods redis-app-0 -o wide
NAME          READY     STATUS    RESTARTS   AGE       IP            NODE            NOMINATED NODE
redis-app-1   1/1       Running   0          3h        172.17.24.3   192.168.0.144   <none></none>
进入redis-app-0查看:
[root@master redis]# kubectl exec -it redis-app-0 /bin/bash
root@redis-app-0:/data# /usr/local/bin/redis-cli -c
127.0.0.1:6379> role
1) "master"
2) (integer) 13370
3) 1) 1) "172.17.63.9"
      2) "6379"
      3) "13370"
127.0.0.1:6379>
如上可以看到,app-0为master,slave为172.17.63.9即redis-app-3。
接着,我们手动删除redis-app-0:
[root@master redis]# kubectl delete pod redis-app-0
pod "redis-app-0" deleted
[root@master redis]#  kubectl get pod redis-app-0 -o wide
NAME          READY     STATUS    RESTARTS   AGE       IP            NODE            NOMINATED NODE
redis-app-0   1/1       Running   0          4m        172.17.24.3   192.168.0.144   <none></none>
我们再进入redis-app-0内部查看:
[root@master redis]# kubectl exec -it redis-app-0 /bin/bash
root@redis-app-0:/data# /usr/local/bin/redis-cli -c
127.0.0.1:6379> role
1) "slave"
2) "172.17.63.9"
3) (integer) 6379
4) "connected"
5) (integer) 13958
如上,redis-app-0变成了slave,从属于它之前的从节点172.17.63.9即redis-app-3。
六、疑问
至此,大家可能会疑惑,那为什么没有使用稳定的标志,Redis Pod也能正常进行故障转移呢?这涉及了Redis本身的机制。因为,Redis集群中每个节点都有自己的NodeId(保存在自动生成的nodes.conf中),并且该NodeId不会随着IP的变化和变化,这其实也是一种固定的网络标志。也就是说,就算某个Redis Pod重启了,该Pod依然会加载保存的NodeId来维持自己的身份。我们可以在NFS上查看redis-app-1的nodes.conf文件:
[root@k8s-node2 ~]# cat /usr/local/k8s/redis/pv1/nodes.conf 96689f2018089173e528d3a71c4ef10af68ee462 192.168.169.209:6379@16379 slave d884c4971de9748f99b10d14678d864187a9e5d3 0 1526460952651 4 connected237d46046d9b75a6822f02523ab894928e2300e6 192.168.169.200:6379@16379 slave c15f378a604ee5b200f06cc23e9371cbc04f4559 0 1526460952651 1 connected
c15f378a604ee5b200f06cc23e9371cbc04f4559 192.168.169.197:6379@16379 master - 0 1526460952651 1 connected 10923-16383d884c4971de9748f99b10d14678d864187a9e5d3 192.168.169.205:6379@16379 master - 0 1526460952651 4 connected 5462-10922c3b4ae23c80ffe31b7b34ef29dd6f8d73beaf85f 192.168.169.198:6379@16379 myself,slave c8a8f70b4c29333de6039c47b2f3453ed11fb5c2 0 1526460952565 3 connected
c8a8f70b4c29333de6039c47b2f3453ed11fb5c2 192.168.169.201:6379@16379 master - 0 1526460952651 6 connected 0-5461vars currentEpoch 6 lastVoteEpoch 4
如上,第一列为NodeId,稳定不变;第二列为IP和端口信息,可能会改变。
这里,我们介绍NodeId的两种使用场景:
当某个Slave Pod断线重连后IP改变,但是Master发现其NodeId依旧, 就认为该Slave还是之前的Slave。
当某个Master Pod下线后,集群在其Slave中选举重新的Master。待旧Master上线后,集群发现其NodeId依旧,会让旧Master变成新Master的slave。
对于这两种场景,大家有兴趣的话还可以自行测试,注意要观察Redis的日志。
The above is the detailed content of Introducing the deployment of Redis cluster on K8s. For more information, please follow other related articles on the PHP Chinese website!

Hot AI Tools

Undresser.AI Undress
AI-powered app for creating realistic nude photos

AI Clothes Remover
Online AI tool for removing clothes from photos.

Undress AI Tool
Undress images for free

Clothoff.io
AI clothes remover

Video Face Swap
Swap faces in any video effortlessly with our completely free AI face swap tool!

Hot Article
Hot Tools

Notepad++7.3.1
Easy-to-use and free code editor

SublimeText3 Chinese version
Chinese version, very easy to use

Zend Studio 13.0.1
Powerful PHP integrated development environment

Dreamweaver CS6
Visual web development tools

SublimeText3 Mac version
God-level code editing software (SublimeText3)
Hot Topics
 1386
1386
 52
52

 How to solve the 502 error when upgrading k8s service springboot project application
May 11, 2023 pm 10:28 PM
How to solve the 502 error when upgrading k8s service springboot project application
May 11, 2023 pm 10:28 PM
As the development model of small steps and rapid iteration is recognized and adopted by more and more Internet companies, the frequency of application changes and upgrades becomes more and more frequent. In order to cope with different upgrade needs and ensure that the upgrade process proceeds smoothly, a series of deployment and release models have been born. Shutdown release - completely stop the old version of the application instance and then release the new version. This release model is mainly to solve the problem of incompatibility and inability to coexist between new and old versions. The disadvantage is that the service is completely unavailable for a period of time. Blue-green release - deploy the same number of new and old version application instances online at the same time. After the new version passes the test, the traffic will be switched to the new service instance at once. This publishing model solves the problem of complete service unavailability in downtime publishing, but it will cause a relatively large
 Implementing Redis cluster using ThinkPHP6
Jun 20, 2023 am 08:36 AM
Implementing Redis cluster using ThinkPHP6
Jun 20, 2023 am 08:36 AM
With the rapid development of the Internet, the problem of high concurrency has become more and more prominent. In response to this problem, the emergence of Redis has become an important solution. It solves the problem of excessive reading and writing pressure in traditional relational databases through memory reading and writing. However, single-node Redis still has performance bottlenecks under high concurrency conditions, so Redis clusters need to be used. This article will describe how to use ThinkPHP6 to implement a Redis cluster. 1. Introduction to Redis Cluster Redis Cluster is an official cluster provided by Redis.
 How to deploy redis cluster in k8s
May 31, 2023 pm 05:25 PM
How to deploy redis cluster in k8s
May 31, 2023 pm 05:25 PM
redis cluster building 1.1 Use redis-cli to create a cluster #View the ipkubectlgetpod-njxbp-owide corresponding to the redis pod>NAMEREADYSTATUSRESARTSAGEIPNODENOMINATEDNODEREADINESSGATESredis-01/1Running018h10.168.235.196k8s-masterredis-11/1Running018h10.168.235.225k 8s-masterredis-21/1Running018h10.168 .

 How to implement cluster deployment of PHP data cache through Redis?
Aug 10, 2023 am 08:13 AM
How to implement cluster deployment of PHP data cache through Redis?
Aug 10, 2023 am 08:13 AM
How to implement cluster deployment of PHP data cache through Redis? Introduction: When PHP applications face high concurrency and large traffic, they often encounter database performance bottlenecks. At this time, using caching technology can greatly improve the performance and concurrency of the system. As a high-performance in-memory key-value database, Redis is widely used in the implementation of caching solutions. This article will introduce how to implement cluster deployment of PHP data cache through Redis to further improve performance and scalability. 1. Overview of Redis Cluster Redis
 How to deploy java project to k8s
May 15, 2023 pm 06:07 PM
How to deploy java project to k8s
May 15, 2023 pm 06:07 PM
Preface Java projects require installation and deployment in various environments during the development and debugging process. In the past, when we used virtual machine deployment, we automated deployment by executing commands on the machine or configuring Jenkins scripts. However, high-availability project installation and deployment in a container environment requires the use of containerization technology and k8s scheduling and execution. Generally, in a formal environment, we will have the following parts to form a containerized deployment: container environment dockerContainerdk8s cluster k8s management system KubeSoheredashboard (k8s’ own management system) mirror warehouse Dockerhub registryharbor code warehouse githubgitlab
 How to deploy springboot project to k8s
May 15, 2023 am 10:04 AM
How to deploy springboot project to k8s
May 15, 2023 am 10:04 AM
Deploying springboot to k8s steps springboot project package image deployment to the image warehouse log in to the private image warehouse, pull the image create deployment expose service access port create secret login private warehouse need to create secret, store the authentication information of docker registry create secret~$kubectlcreatesecretdocker-registryfdf-docker -secret--docker-server=registry.cn-chengdu.aliyuncs.com--docker-username=176
 Redis and Node.js cluster solution: how to achieve high availability
Jul 29, 2023 pm 05:42 PM
Redis and Node.js cluster solution: how to achieve high availability
Jul 29, 2023 pm 05:42 PM
Cluster solution for Redis and Node.js: How to achieve high availability Introduction: With the rapid development of the Internet, data processing has become increasingly large and complex. In order to ensure high availability and scalability of the system, we need to use a distributed cluster architecture to handle the needs of storing and processing large amounts of data. Redis, as a high-performance in-memory database, combined with Node.js as the back-end programming language, can build a highly available distributed cluster solution. This article will introduce how to use Redis and Node.js to implement
