Detailed explanation of QUIC protocol in Node.js

In March 2019, with support from NearForm and Protocol Labs, I started implementing QUIC protocol support for Node.js. This new transport protocol based on UDP is intended to eventually replace all HTTP communications using TCP.

People familiar with UDP may be skeptical. It is well known that UDP is unreliable, and data packets are often lost, out of order, and duplicated. UDP does not guarantee the reliability and ordering supported by TCP that are strictly required by higher-level protocols such as HTTP. That's where QUIC comes in.
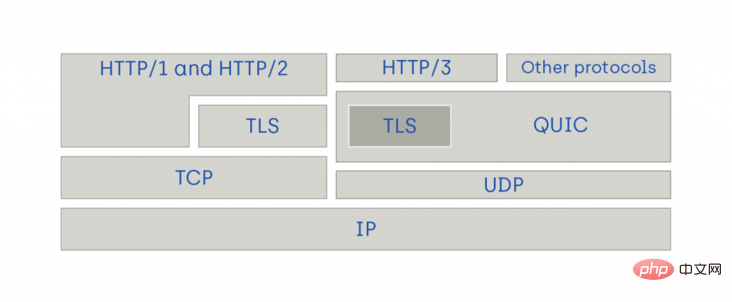
The QUIC protocol defines a layer on top of UDP that introduces error handling, reliability, flow control, and built-in security (via TLS 1.3) to UDP. It actually reimplements most of TCP's special effects on top of UDP, but with one key difference: unlike TCP, packets can still be transmitted out of order. Understanding this is crucial to understanding why QUIC is superior to TCP.
[Related recommendations: "nodejs Tutorial"]
QUIC eliminates the root cause of head-of-line blocking
In HTTP 1 In , all messages exchanged between client and server are in the form of continuous, uninterrupted data blocks. Although you can send multiple requests or responses over a single TCP connection, you must wait for the previous message to be completely transmitted before sending the next complete message. This means that if you want to send a 10-megabyte file and then a 2-megabyte file, the former must be completely transferred before the latter can be started. This is known as head-of-line blocking and is the source of a lot of latency and poor use of network bandwidth.
HTTP 2 attempts to solve this problem by introducing multiplexing. Rather than transmitting requests and responses as a continuous stream, HTTP 2 breaks requests and responses into discrete chunks called frames, which can be interleaved with other frames. A TCP connection can theoretically handle an unlimited number of concurrent request and response streams. Although this is theoretically possible, HTTP 2 was not designed to account for the possibility of head-of-line blocking at the TCP layer.
TCP itself is a strictly ordered protocol. Packets are serialized and sent over the network in a fixed order. If a packet fails to reach its destination, the entire packet flow is blocked until the lost packet can be retransmitted. The valid sequence is: send packet 1, wait for confirmation, send packet 2, wait for confirmation, send packet 3... With HTTP 1, only one HTTP message can be transmitted at any given time, and if a single TCP packet is lost, retransmissions only affect a single HTTP request/response stream. But with HTTP 2, an unlimited number of concurrent HTTP request/response streams are blocked without losing a single TCP packet. When communicating over HTTP 2 over a high-latency, low-reliability network, overall performance and network throughput decrease dramatically compared to HTTP 1.

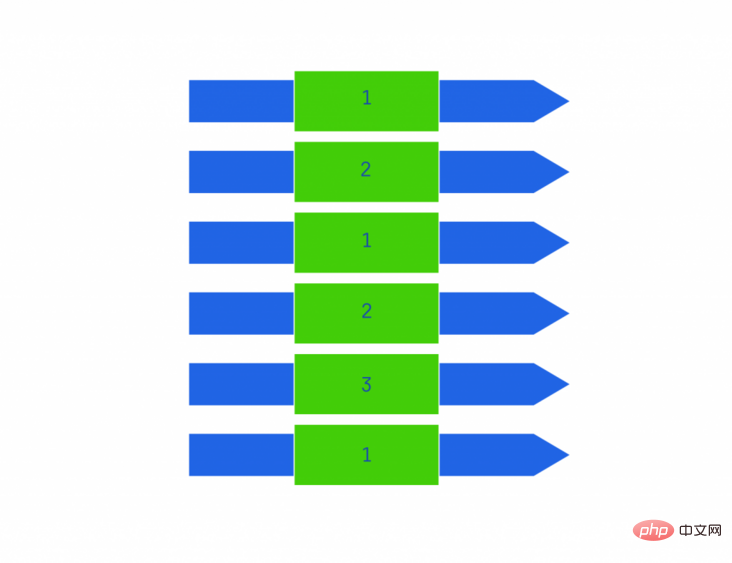
In HTTP 1, this request would block because only one complete message could be sent at a time.

In HTTP 2, when a single TCP packet is lost or corrupted, the request will be blocked.

In QUIC, packets are independent of each other and can be sent (or resent) in any order.
Fortunately with QUIC the situation is different. When a data stream is packaged into discrete UDP packets for transmission, any individual packet can be sent (or resent) in any order without affecting other sent packets. In other words, the line congestion problem is largely solved.
QUIC introduces flexibility, security and low latency
QUIC also introduces many other important features:
- QUIC connections operate independently of network topology. After a QUIC connection is established, both the source and destination IP addresses and ports can be changed without re-establishing the connection. This is particularly useful for mobile devices that frequently switch networks (such as LTE to WiFi).
- QUIC connections are secure and encrypted by default. TLS 1.3 support is included directly in the protocol, and all QUIC communications are encrypted.
- QUIC adds critical flow control and error handling to UDP and includes important security mechanisms to prevent a range of denial-of-service attacks.
- QUIC adds support for zero-trip HTTP requests, unlike HTTP over TCP over TLS, which requires multiple data exchanges between the client and server to establish a TLS session before it can To transport HTTP request data, QUIC allows HTTP request headers to be sent as part of the TLS handshake, thereby greatly reducing the initial latency of new connections.
Implementing QUIC for the Node.js kernel
The work of implementing QUIC for the Node.js kernel started in March 2019 It starts in March and is co-sponsored by NearForm and Protocol Labs. We leverage the excellent ngtcp2 library to provide extensive low-level implementation. QUIC makes a lot of sense for Node.js because it is a reimplementation of many TCP features and can support many more features than the current TCP and HTTP in Node.js. while hiding a great deal of complexity from the user.
The "quic" module
While implementing the new QUIC support, we used a new top-level built-in quic module to expose the API. Whether this top-level module will still be used when the feature is implemented in Node.js core will be determined at a later date. However, when using experimental support in development, you can use this API via require('quic').
const { createSocket } = require('quic')quic The module exposes an export: createSocket function. This function is used to create a QuicSocket object instance that can be used by QUIC servers and clients.
All work on QUIC takes place in a separate GitHub repository that is forked from the Node.js master branch and developed in parallel with it. If you want to use the new module, or contribute your own code, where you can get the source code, see the Node.js build instructions. It's still a work in progress, though, and you're bound to encounter bugs.
Creating a QUIC server
A QUIC server is a QuicSocket instance that is configured to wait for remote clients to initiate new QUIC connections. This is done by binding to the local UDP port and waiting to receive the initial QUIC packet from the peer. After receiving a QUIC packet, QuicSocket will check whether there is a server QuicSession object that can be used to process the packet, and if it does not exist, a new object will be created. Once the server's QuicSession object is available, the packet is processed and the user-supplied callback is called. It's important to note here that all the details of handling the QUIC protocol are handled internally by Node.js.
const { createSocket } = require('quic')
const { readFileSync } = require('fs')

const key = readFileSync('./key.pem')
const cert = readFileSync('./cert.pem')
const ca = readFileSync('./ca.pem')
const requestCert = true
const alpn = 'echo'

const server = createSocket({
  // 绑定到本地 UDP 5678 端口
  endpoint: { port: 5678 },
  // 为新的 QuicServer Session 实例创建默认配置
  server: {
    key,
    cert,
    ca,
    requestCert
    alpn
  }
})

server.listen()
server.on('ready', () => {
  console.log(`QUIC server is listening on ${server.address.port}`)
})

server.on('session', (session) => {
  session.on('stream', (stream) => {
    // Echo server!
    stream.pipe(stream)
  })

  const stream = session.openStream()
  stream.end('hello from the server')
})As mentioned previously, the QUIC protocol has built-in and required support for TLS 1.3. This means that each QUIC connection must have a TLS key and certificate associated with it. QUIC is unique compared to traditional TCP-based TLS connections in that the TLS context in QUIC is associated with the QuicSession rather than the QuicSocket. If you are familiar with the usage of TLSSocket in Node.js, then you must have noticed the difference here. Another key difference between
QuicSocket (and QuicSession) is that it differs from the existing net.Socket and ## exposed by Node.js #tls.TLSSocket objects are different, neither QuicSocket nor QuicSession are streams of Readable or Writable. That is, you cannot use an object to send data directly to or receive data from the connected peer, so you must use a QuicStream object.
QuicSocket is created and bound to the local UDP port 5678. Then tell this QuicSocket to listen for new QUIC connections to be initiated. Once the QuicSocket starts listening, the ready event will be emitted.
QuicSession object corresponding to the server is created, the session event will be emitted. The created QuicSession object can be used to listen to the QuicStream instance started by the new client server.
Creating a QUIC client
There is almost no difference between a QUIC client and a server:const { createSocket } = require('quic')
const fs = require('fs')
const key = readFileSync('./key.pem')
const cert = readFileSync('./cert.pem')
const ca = readFileSync('./ca.pem')
const requestCert = true
const alpn = 'echo'
const servername = 'localhost'
const socket = createSocket({
endpoint: { port: 8765 },
client: {
key,
cert,
ca,
requestCert
alpn,
servername
}
})
const req = socket.connect({
address: 'localhost',
port: 5678,
})
req.on('stream', (stream) => {
stream.on('data', (chunk) => { /.../ })
stream.on('end', () => { /.../ })
})
req.on('secure', () => {
const stream = req.openStream()
const file = fs.createReadStream(__filename)
file.pipe(stream)
stream.on('data', (chunk) => { /.../ })
stream.on('end', () => { /.../ })
stream.on('close', () => {
// Graceful shutdown
socket.close()
})
stream.on('error', (err) => { /.../ })
})对于服务器和客户端,createSocket() 函数用于创建绑定到本地 UDP 端口的 QuicSocket 实例。对于 QUIC 客户端来说,仅在使用客户端身份验证时才需要提供 TLS 密钥和证书。
在 QuicSocket 上调用 connect() 方法将新创建一个客户端 QuicSession 对象,并与对应地址和端口的服务器创建新的 QUIC 连接。启动连接后进行 TLS 1.3 握手。握手完成后,客户端 QuicSession 对象会发出 secure 事件,表明现在可以使用了。
与服务器端类似,一旦创建了客户端 QuicSession 对象,就可以用 stream 事件监听服务器启动的新 QuicStream 实例,并可以调用 openStream() 方法来启动新的流。
单向流和双向流
所有的 QuicStream 实例都是双工流对象,这意味着它们都实现了 Readable 和 Writable 流 Node.js API。但是,在 QUIC 中,每个流都可以是双向的,也可以是单向的。
双向流在两个方向上都是可读写的,而不管该流是由客户端还是由服务器启动的。单向流只能在一个方向上读写。客户端发起的单向流只能由客户端写入,并且只能由服务器读取;客户端上不会发出任何数据事件。服务器发起的单向流只能由服务器写入,并且只能由客户端读取;服务器上不会发出任何数据事件。
// 创建双向流
const stream = req.openStream()

// 创建单向流
const stream = req.openStream({ halfOpen: true })每当远程对等方启动流时,无论是服务器还是客户端的 QuicSession 对象都会发出提供 QuicStream 对象的 stream 事件。可以用来检查这个对象确定其来源(客户端或服务器)及其方向(单向或双向)
session.on('stream', (stream) => {
  if (stream.clientInitiated)
    console.log('client initiated stream')
  if (stream.serverInitiated)
    console.log('server initiated stream')
  if (stream.bidirectional)
    console.log('bidirectional stream')
  if (stream.unidirectional)
    console.log(‘’unidirectional stream')
})由本地发起的单向 QuicStream 的 Readable 端在创建 QuicStream 对象时总会立即关闭,所以永远不会发出数据事件。同样,远程发起的单向 QuicStream 的 Writable 端将在创建后立即关闭,因此对 write() 的调用也会始终失败。
就是这样
从上面的例子可以清楚地看出,从用户的角度来看,创建和使用 QUIC 是相对简单的。尽管协议本身很复杂,但这种复杂性几乎不会上升到面向用户的 API。实现中包含一些高级功能和配置选项,这些功能和配置项在上面的例子中没有说明,在通常情况下,它们在很大程度上是可选的。
在示例中没有对 HTTP 3 的支持进行说明。在基本 QUIC 协议实现的基础上实现 HTTP 3 语义的工作正在进行中,并将在以后的文章中介绍。
QUIC 协议的实现还远远没有完成。在撰写本文时,IETF 工作组仍在迭代 QUIC 规范,我们在 Node.js 中用于实现大多数 QUIC 的第三方依赖也在不断发展,并且我们的实现还远未完成,缺少测试、基准、文档和案例。但是作为 Node.js v14 中的一项实验性新功能,这项工作正在逐步着手进行。希望 QUIC 和 HTTP 3 支持在 Node.js v15 中能够得到完全支持。我们希望你的帮助!如果你有兴趣参与,请联系 https://www.nearform.com/cont... !
鸣谢
在结束本文时,我要感谢 NearForm 和 Protocol Labs 在财政上提供的赞助,使我能够全身心投入于对 QUIC 的实现。两家公司都对 QUIC 和 HTTP 3 将如何发展对等和传统 Web 应用开发特别感兴趣。一旦实现接近完成,我将会再写一文章来阐述 QUIC 协议的一些奇妙的用例,以及使用 QUIC 与 HTTP 1、HTTP 2、WebSockets 以及其他方法相比的优势。
James Snell( @jasnell)是 NearForm Research 的负责人,该团队致力于研究和开发 Node.js 在性能和安全性方面的主要新功能,以及物联网和机器学习的进步。 James 在软件行业拥有 20 多年的经验,并且是 Node.js 社区中的知名人物。他曾是多个 W3C 语义 web 和 IETF 互联网标准的作者、合著者、撰稿人和编辑。他是 Node.js 项目的核心贡献者,是 Node.js 技术指导委员会(TSC)的成员,并曾作为 TSC 代表在 Node.js Foundation 董事会任职。
原文地址:https://www.nearform.com/blog/a-quic-update-for-node-js/
作者:James Snell
译文地址:https://segmentfault.com/a/1190000039308474
翻译:疯狂的技术宅
更多编程相关知识,请访问:编程视频!!
The above is the detailed content of Detailed explanation of QUIC protocol in Node.js. For more information, please follow other related articles on the PHP Chinese website!

Hot AI Tools

Undresser.AI Undress
AI-powered app for creating realistic nude photos

AI Clothes Remover
Online AI tool for removing clothes from photos.

Undress AI Tool
Undress images for free

Clothoff.io
AI clothes remover

AI Hentai Generator
Generate AI Hentai for free.

Hot Article

Hot Tools

Notepad++7.3.1
Easy-to-use and free code editor

SublimeText3 Chinese version
Chinese version, very easy to use

Zend Studio 13.0.1
Powerful PHP integrated development environment

Dreamweaver CS6
Visual web development tools

SublimeText3 Mac version
God-level code editing software (SublimeText3)

Hot Topics
 1359
1359
 52
52
 An article about memory control in Node
Apr 26, 2023 pm 05:37 PM
The Node service built based on non-blocking and event-driven has the advantage of low memory consumption and is very suitable for handling massive network requests. Under the premise of massive requests, issues related to "memory control" need to be considered. 1. V8’s garbage collection mechanism and memory limitations Js is controlled by the garbage collection machine
 Detailed graphic explanation of the memory and GC of the Node V8 engine
Mar 29, 2023 pm 06:02 PM
This article will give you an in-depth understanding of the memory and garbage collector (GC) of the NodeJS V8 engine. I hope it will be helpful to you!
 Let's talk in depth about the File module in Node
Apr 24, 2023 pm 05:49 PM
The file module is an encapsulation of underlying file operations, such as file reading/writing/opening/closing/delete adding, etc. The biggest feature of the file module is that all methods provide two versions of **synchronous** and **asynchronous**, with Methods with the sync suffix are all synchronization methods, and those without are all heterogeneous methods.
 Node.js 19 is officially released, let's talk about its 6 major features!
Nov 16, 2022 pm 08:34 PM
Node 19 has been officially released. This article will give you a detailed explanation of the 6 major features of Node.js 19. I hope it will be helpful to you!
 Let's talk about how to choose the best Node.js Docker image?
Dec 13, 2022 pm 08:00 PM
Choosing a Docker image for Node may seem like a trivial matter, but the size and potential vulnerabilities of the image can have a significant impact on your CI/CD process and security. So how do we choose the best Node.js Docker image?
 Let's talk about the GC (garbage collection) mechanism in Node.js
Nov 29, 2022 pm 08:44 PM
How does Node.js do GC (garbage collection)? The following article will take you through it.
 What should I do if node cannot use npm command?
Feb 08, 2023 am 10:09 AM
The reason why node cannot use the npm command is because the environment variables are not configured correctly. The solution is: 1. Open "System Properties"; 2. Find "Environment Variables" -> "System Variables", and then edit the environment variables; 3. Find the location of nodejs folder; 4. Click "OK".
 Let's talk about the event loop in Node
Apr 11, 2023 pm 07:08 PM
The event loop is a fundamental part of Node.js and enables asynchronous programming by ensuring that the main thread is not blocked. Understanding the event loop is crucial to building efficient applications. The following article will give you an in-depth understanding of the event loop in Node. I hope it will be helpful to you!


