

How to use the sprite map with CSS: first use the background-image attribute to import the sprite map; then use background-repeat:no-repeat to set the image not to repeat; finally use the background-position attribute to set the initial position of the image for precise position.

The operating environment of this tutorial: Windows7 system, CSS3&&HTML5 version, Dell G3 computer.
What is CSS Sprite?
CSS Sprite is literally translated as "CSS sprite", also known as "CSS image stitching" or "CSS texture positioning", which is usually interpreted as "CSS image splicing". It is a web image application processing method. In fact, it is to integrate multiple small pictures into one picture, and then use CSS "background-image", "background-repeat", "background-position" " to perform background positioning, background-position can use numbers to accurately position the background image in the layout box object position.
Advantages:
Reduce web page http requests, speed up page loading, and improve page performance (suitable for small pictures).
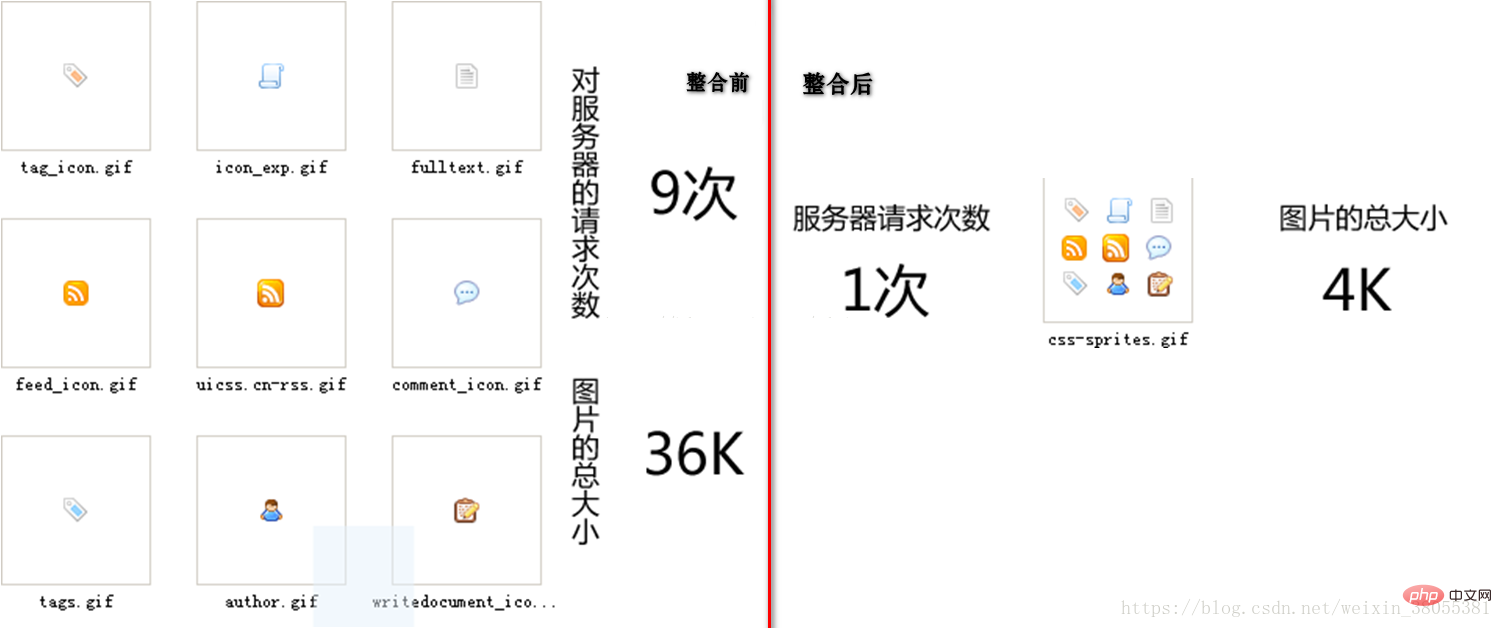
For example, if there are many icon pictures used on the page, if the page requests these pictures one by one, there will be a lot of http requests. At this time, if these pictures are merged into one, the page only needs to be loaded once. , reducing the performance consumption caused by http requests. As shown below:
Picture integration principle:
Cut the picture and integrate it at the same time.
Avoid using bottom, right, etc. when positioning. Use specific values to avoid position errors when you expand the sprites in width or height.
Allow enough space for small icons, because using these icon elements usually has a lot of content and may require extended spacing, so that other images may accidentally appear in this within the area. Under normal circumstances, these small icons will be integrated into the far right side of the file.
A single integrated sprite image should be within 100KB.
Integrate pictures by category.
In order to facilitate the calculation of size, the coordinates of sprites are generally calculated as integer multiples.
Implementation code:
<!DOCTYPE html>
<html lang="en">
<head>
    <meta charset="UTF-8">
    <title>sprite精灵图使用</title>
    <style type="text/css">
        ol, ul ,li{list-style:none};
        body, p,  ul, li {margin:0; padding:0;}
        ul li {
            float: left;
            background-color: #63caac;
            color: #fff;
            padding: 5px 10px;
            margin-right: 10px;
        }
        li:hover{background-color:#347764;}
        ul.sprite li span{display: block;}
        ul.sprite li span.l1{background-position:0 0;}
        ul.sprite li span.l2{background-position:-64px 0;}
        ul.sprite li span.l3{background-position:-128px 0;}
        ul.sprite li span.l4{background-position:-192px 0;}
ul.sprite li span{width:64px;padding-top:5px;height:64px;overflow:hidden;background:url(img.png) no-repeat;}
    </style>
</head>
<body>
    <ul class="sprite">
        <li><span class="l1"></span></li>
        <li><span class="l2"></span></li>
        <li><span class="l3"></span></li>
        <li><span class="l4"></span></li>
    </ul>
</body>
</html> Recommended learning: "css video tutorial"
The above is the detailed content of How to use sprites with CSS. For more information, please follow other related articles on the PHP Chinese website!


![[Web front-end] Node.js quick start](https://img.php.cn/upload/course/000/000/067/662b5d34ba7c0227.png)


