Let's take a look at the most detailed Git usage tutorial in history
Git is the most advanced distributed version control system in the world. Cloning a project is very fast.
Every development can be cloned from the master A local repository, even if there is no network, you can submit code to the local warehouse, view logs, create project branches, etc.
Each repository can create unlimited branches, and a branch is a complete directory, and this The directory has complete actual files
Recommended (free):git
1. Installation
Search online for installation tutorials , I won’t introduce it here
After the installation is completed, find "Git"->"Git Bash" in the start menu, and pop up something similar to a command line window, which means that Git is installed successfully
Then you need to set the machine information. All Git repositories on this machine will use this configuration
$ git config --global user.name "username"
$ git config --global user.email "email@example.com"
2. Create a repository
1. Create an empty directory (it is best not to contain Chinese)
$ mkdir mymenu
$ cd mymenu
$ pwd
/Users/hxk/mymenu
pwd command displays the current directory
2. Initialize the warehouse
The git init command turns this directory into a warehouse that can be managed by git
$ git init
Initialized empty Git repository in /Users/hxk/mymenu/.git/
An empty warehouse is initialized, and there are more .git directories in the directory.
The system automatically creates the only master branch
The version control system can only track changes to text files, and the encoding method is utf -8
3. Basic file operations
Create a test.txt file with the following content:
Hello World
1. Add files to the warehouse
$ git add readme.txt
2. Submit the file to the warehouse.
$ git commit -m "a new file"
-m is followed by the description of this submission. After the submission is successful, it will be displayed:
1 file changed: 1 file Changed (our newly added readme.txt file);
2 insertions: Two lines of content were inserted (readme.txt has two lines of content).
Why does Git require add and commit to add files? A total of two steps? Because commit can submit many files at one time, you can add different files multiple times
$ git add file1.txt
$ git add file2.txt file3.txt
$ git commit -m "add 3 files."
If the submitted remarks are wrong, you can use the following command to modify just Submitted remarks
$ git commit --amend
3. Modify the file
Modify the test.txt file as follows:
Hello World ABC
Submit
$ git add test.txt
$ git commit -m "append ABC"
Every commit will generate a " Snapshot"
4. View history
$ git log
commit 1094adb7b9b3807259d8cb349e7df1d4d6477073 (HEAD -> master)
Author: hxk <hxk@gmail.com>
Date:   Fri July 20 21:06:15 2018 +0800

    append ABC

commit eaadf4e385e865d25c48e7ca9c8395c3f7dfaef0
Author: hxk <hxk@gmail.com>
Date:   Fri July 20 20:59:18 2018 +0800

a new filegit log displays the latest to farthest commit log. We can see two commits, the last one is append ABC
The version number of git is a hexadecimal number calculated using SHA1
If you think the output information is too much, you can add --pretty=oneline
$ git log --pretty=oneline
1094adb7b9b3807259d8cb349e7df1d4d6477073 (HEAD -> master) append ABC
eaadf4e385e865d25c48e7ca9c8395c3f7dfaef0 a new file
5. Roll back the historical version
$ git reset
First of all, Git must know which version the current version is. In Git, HEAD is used to represent the current version, which is the latest submission 1094adb..., above One version is HEAD^, and the previous version is HEAD^^. Of course, it is easier to write 100 ^ for the previous 100 versions, so it is easier to count. Written as HEAD~100.
Go back to the previous version
$ git reset --hard HEAD^
HEAD is now at eaadf4e a new file
Now check the historical version again
$ git log
commit eaadf4e385e865d25c48e7ca9c8395c3f7dfaef0
Author: hxk <hxk@gmail.com>
Date:   Fri July 20 20:59:18 2018 +0800

a new fileThe previous version is no longer visible. If you want to go back to the previous version, you need to Knowing the version number, there is a head pointer inside git that points to the current version, and the pointer points back from the current version, so git rolls back the version very quickly
$ git reset --hard 1094adb7
6. View historical commands
If not Remember the version number just now, you can use the following command:
$ git reflog
7. Check the status
$ git status
4. Workspace and staging area
One difference between Git and SVN The only difference is that there is a concept of temporary storage area
Explanation of terms:
Working Directory: refers to the directory that can be seen on the computer. For example, the mymenu folder is a working directory. Area
Repository: .git directory. There are many things stored in Git's repository, the most important of which is the temporary storage area called stage (or index), and Git provides us with The first branch master is automatically created, and a pointer to master is called HEAD.
git add is to add the files that need to be submitted to the temporary storage area
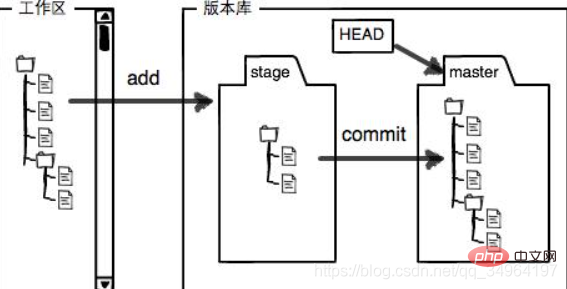
git commit is to add all the contents of the temporary storage area Submit to the current branch
----------------------Test it------------- -------------
Create a new testfile text file in the workspace
First use git status to check the status:
$ git status
On branch master
Changes not staged for commit:
  (use "git add <file>..." to update what will be committed)
  (use "git checkout -- <file>..." to discard changes in working directory)

    modified:   test.txt

Untracked files:
  (use "git add <file>..." to include in what will be committed)

    testfile

no changes added to commit (use "git add" and/or "git commit -a")Git tells us very clearly that test.txt has been modified, but testfile has never been added, so its status is Untracked.
Submit the testfile and then check the status
$ git status
On branch master
Changes to be committed:
  (use "git reset HEAD <file>..." to unstage)

    new file:   testfile
modified: test.txtIf you have not modified the workspace after submission, check the status and the workspace is clean
$ git status
On branch master
nothing to commit, working tree clean
----- --------------------------Test ends--------------------------- --------------
5. Modification
1. Management modification
那么,为什么说git比svn优秀呢?因为git跟踪并管理的是修改,而不是文件
修改test.txt文件内容,添加一行
$ cat test.txt
Hello World ABC
This is the second line
然后添加文件
$ git add test.txt
再次修改test.txt
$ cat test.txt
Hello World ABC
This is the second line
This is the third line
提交
$ git commit -m "test add lines"
这时我们发现,第二次的修改未提交,这是为什么呢?
第一次修改-->git add-->第二次修改-->git commit
add将工作区的修改存入暂存区,但是第二次修改并未存入暂存区,git commit只负责把暂存区的修改提交,所以正确的顺序应该是:
第一次修改 --> git add --> 第二次修改 --> git add --> git commit
提交后,查看工作区和版本库里面最新版本的区别:
$ git diff HEAD -- test.txt
2、撤销修改
1)丢弃工作区的修改 git checkout -- file(--很重要,没有--,就变成了“切换到另一个分支”的命令):
$ git checkout -- test.txt
命令git checkout -- test.txt意思就是,把test.txt文件在工作区的修改全部撤销,这里有两种情况:
一种是test.txt自修改后还没有被放到暂存区,现在,撤销修改就回到和版本库一模一样的状态;
一种是test.txt已经添加到暂存区后,又作了修改,现在,撤销修改就回到添加到暂存区后的状态。
总之,就是让这个文件回到最近一次git commit或git add时的状态。
2)把暂存区的修改撤销掉(unstage),重新放回工作区 git reset HEAD <file>:
$ git reset HEAD test.txt
Unstaged changes after reset:
M    test.txt
git reset命令既可以回退版本,也可以把暂存区的修改回退到工作区。当我们用HEAD时,表示最新的版本。
3、删除文件
工作区中删除文件
$ rm test.txt
一是要从版本库中删除该文件,那就用命令git rm删掉,并且git commit:
$ git rm test.txt
$ git commit -m "remove test.txt"
二是删错了,因为版本库里还有呢,所以可以很轻松地把误删的文件恢复到最新版本:
$ git checkout -- test.txt
git checkout其实是用版本库里的版本替换工作区的版本,无论工作区是修改还是删除,都可以“一键还原”。
PS: 手动删除文件,然后使用git rm
六、分支管理
1、创建与合并分支
每次提交,Git都把它们串成一条时间线,这条时间线就是一个分支。截止到目前,只有一条时间线,在Git里,这个分支叫主分支,即master分支。HEAD严格来说不是指向提交,而是指向master,master才是指向提交的,所以,HEAD指向的就是当前分支。
一开始的时候,master分支是一条线,Git用master指向最新的提交,再用HEAD指向master,就能确定当前分支,以及当前分支的提交点:
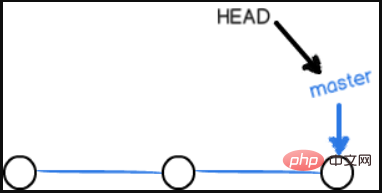
每次提交,master分支都会向前移动一步,这样,随着你不断提交,master分支的线也越来越长。
当我们创建新的分支,例如dev时,Git新建了一个指针叫dev,指向master相同的提交,再把HEAD指向dev,就表示当前分支在dev上:
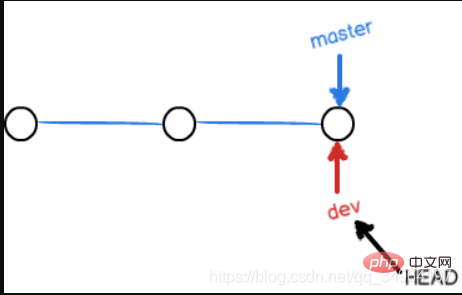
你看,Git创建一个分支很快,因为除了增加一个dev指针,改改HEAD的指向,工作区的文件都没有任何变化!
不过,从现在开始,对工作区的修改和提交就是针对dev分支了,比如新提交一次后,dev指针往前移动一步,而master指针不变:
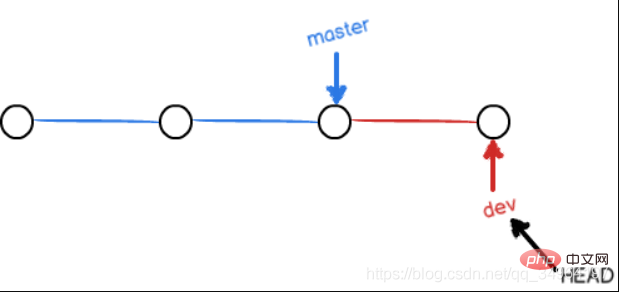
假如我们在dev上的工作完成了,就可以把dev合并到master上。Git怎么合并呢?最简单的方法,就是直接把master指向dev的当前提交,就完成了合并:
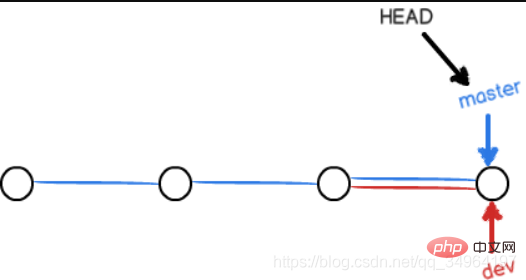
所以Git合并分支也很快!就改改指针,工作区内容也不变!
合并完分支后,甚至可以删除dev分支。删除dev分支就是把dev指针给删掉,删掉后,我们就剩下了一条master分支:
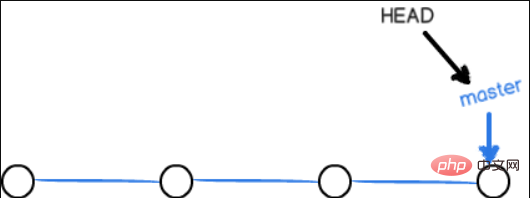
------------------------------------测试开始---------------------------------------------------
1)创建分支 git branch
切换分支 git checkout
首先,我们创建dev分支,然后切换到dev分支:
$ git checkout -b dev
Switched to a new branch 'dev'
git checkout命令加上-b参数表示创建并切换,相当于以下两条命令:
$ git branch dev
$ git checkout dev
Switched to branch 'dev'
2)查看分支 git branch
然后,用git branch命令查看当前分支:
$ git branch
* dev
  master
git branch命令会列出所有分支,当前分支前面会标一个*号。
然后,我们就可以在dev分支上正常提交,比如对test.txt做个修改,再提交,dev分支的工作完成后,我们就可以切换回master分支:
$ git checkout master
Switched to branch 'master'
切换回master分支后,再查看一个test.txt文件,刚才添加的内容不见了!因为那个提交是在dev分支上,而master分支此刻的提交点并没有变:
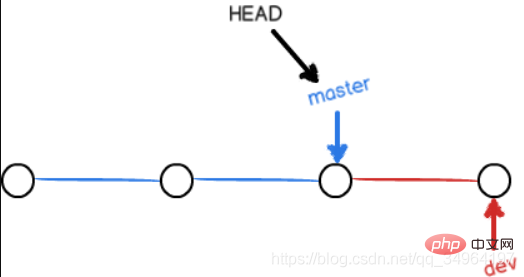
3)合并某个分支到当前分支 git merge
现在,我们把dev分支的工作成果合并到master分支上:
$ git merge dev
git merge命令用于合并指定分支到当前分支。合并后,再查看test.txt的内容,就可以看到,和dev分支的最新提交是完全一样的。
4)删除分支 git branch -d
合并完成后,就可以放心地删除dev分支了:
$ git branch -d dev
Deleted branch dev (was b17d20e).
删除后,查看branch,就只剩下master分支了:
$ git branch
* master
因为创建、合并和删除分支非常快,所以Git鼓励你使用分支完成某个任务,合并后再删掉分支,这和直接在master分支上工作效果是一样的,但过程更安全。
2、解决冲突
创建一个新的分支feature1
$ git checkout -b feature1
Switched to a new branch 'feature1'
将test.txt修改了一下,加上“AND Simple”,在feature1分支上提交
Hello World ABC
This is the second line AND Simple
切换到master分支
$ git checkout master
在master分支上,将test.txt的最后一行加上“& Simple”,提交:
Hello World ABC
This is the second line & Simple
当两个分支都分别有了新的提交,如下图所示:
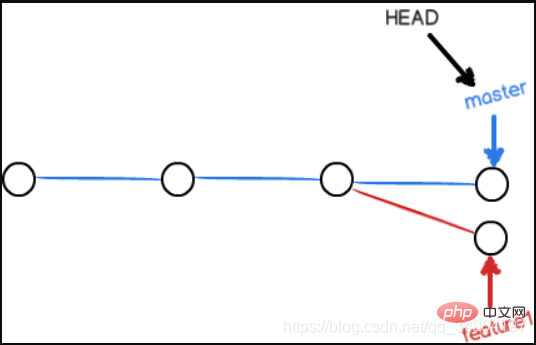
这种情况下无法进行快速合并,只能试图把各自的修改合并起来,这样有可能会造成冲突:
$ git merge feature1
Auto-merging test.txt
CONFLICT (content): Merge conflict in test.txt
Automatic merge failed; fix conflicts and then commit the result.
这时我们必须手动解决冲突后再提交,git status可以查看冲突的文件:
$ git status
On branch master
Your branch is ahead of 'origin/master' by 2 commits.
  (use "git push" to publish your local commits)

You have unmerged paths.
  (fix conflicts and run "git commit")
  (use "git merge --abort" to abort the merge)

Unmerged paths:
  (use "git add <file>..." to mark resolution)

    both modified:   test.txt

no changes added to commit (use "git add" and/or "git commit -a")
查看test.txt文件的内容:
Hello World ABC
<<<<<<< HEAD
This is the second line & Simple
=======
This is the second line AND Simple
>>>>>>> feature1
Git用<<<<<<<,=======,
This is the second line and Simple
再提交
$ git add test.txt
$ git commit -m "conflict fixed"
[master cf810e4] conflict fixed
现在,master分支和feature1分支变成了下图所示:
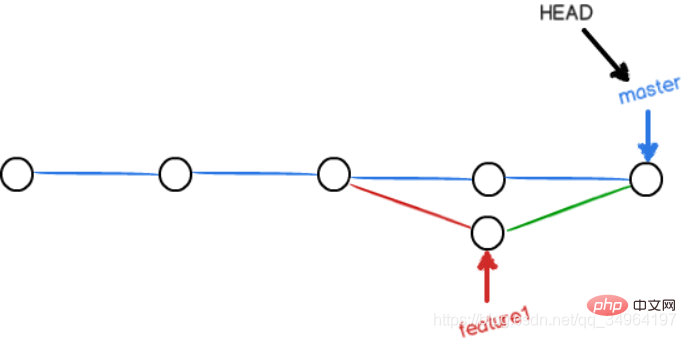
用git log --graph --pretty=oneline --abbrev-commit可以看到分支的合并情况,包括分支合并图(--graph)、一行显示(--pretty=oneline)、提交校验码缩略(--abbrev-commit)显示:
$ git log --graph --pretty=oneline --abbrev-commit
*   cf810e4 (HEAD -> master) conflict fixed
|\
| * 14096d0 (feature1) AND simple
* | 5dc6824 & simple
|/
* b17d20e branch test
* d46f35e (origin/master) remove test.txt
* b84166e add test.txt
* 519219b git tracks changes
* e43a48b understand how stage works
* 1094adb append ABC
* eaadf4e a new file
最后,删除feature1分支:
$ git branch -d feature1
Deleted branch feature1 (was 14096d0).
3、分支管理策略
通常,合并分支时,Git会用快速合并模式(Fast forward),但这种模式下,删除分支后,会丢掉分支信息。
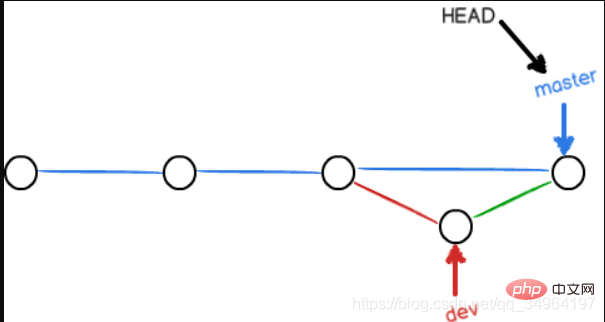
如果用普通合并模式,从分支历史上就可以看出分支信息。
那么,如何使用普通合并模式呢?我们可以用--no-ff参数
$ git merge --no-ff -m "merge with no-ff" dev
不使用Fast forward模式,merge后就像这样:如下图所示:
分支策略
master分支是最稳定的,只能用于发布新版本,平时不能在上面进行开发,要在新建的分支上进行开发,比如dev,这时dev是不稳定的,到产品1.0发布时,将dev分支和master分支合并,在master分支上发布1.0版本。
所以团队合作的分支看起来就像这张图一样:

4、bug分支
修复bug时,我们会创建一个bug分支进行修复,修复完合并,删除分支。
如果手头上有未完成的工作,先把工作现场git stash一下:
$ git stash
Saved working directory and index state WIP on dev: f52c633 add merge
查看下工作区是否干净
$ git status
等bug修复完分支删除后,我们先查看下stash
$ git stash list
stash@{0}: WIP on dev: f52c633 add merge恢复工作现场
1)用git stash apply恢复,但是恢复后,stash内容并不删除,你需要用git stash drop来删除
可以多次stash,恢复指定的stash;
$ git stash apply stash@{0}2)用git stash pop,恢复的同时把stash内容也删了:
$ git stash pop
5、Feature分支
开发一个新功能,需要新建一个分支。
如果这个功能还未合并就要取消,要使用-D强行删除
$ git branch -D 分支名
6、多人协作
当你从远程克隆时,git自动把本地master分支和远程master分支对应起来,远程仓库默认名为origin
1)查看远程库的信息
$ git remote
查看远程库的详细信息
$ git remote -v
2)推送分支
将本地master分支推送到远程库
如果不推送到远程,本地分支对于其它人就是不可见的
$ git push origin master
3)抓取分支
如果本地分支推送到远程库的文件有冲突,推送失败,我们就得先从远程库中抓取最新的提交合并到本地,解决冲突再提交。
$ git pull
如果git pull报错:没有指定本地分支与远程分支的链接,我们就要手动设置一下
git branch --set-upstream-to=origin/<远程分支名> 本地分支名
4)Rebase
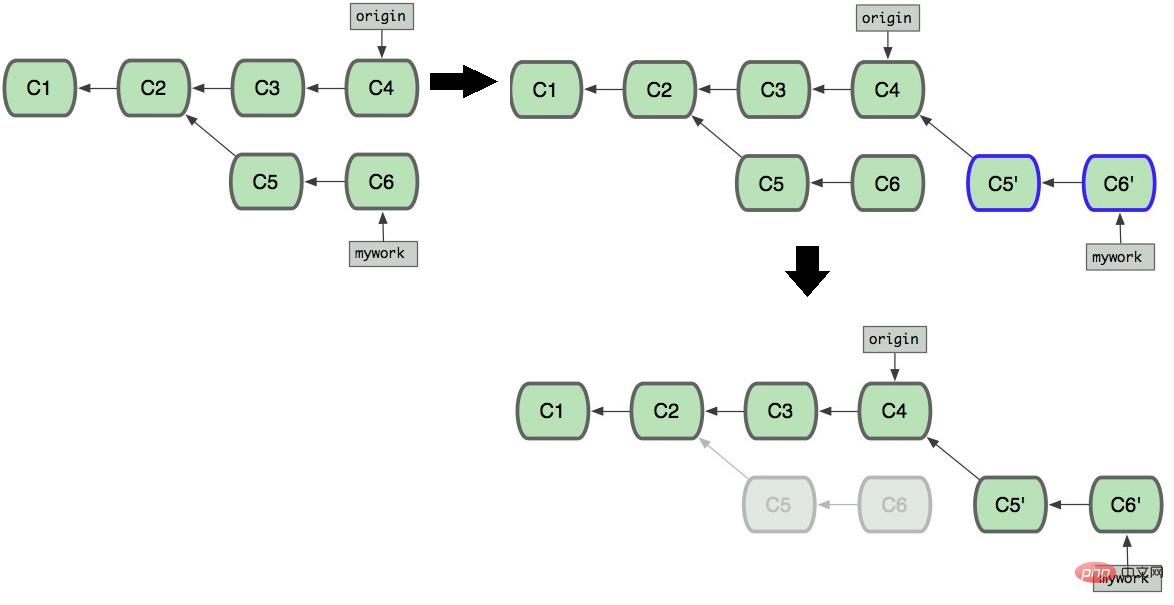
rebase操作可以把本地未push的分叉提交历史整理成直线;
目的是使得我们在查看历史提交的变化时更容易,因为分叉的提交需要三方对比。
$ git rebase
和merge的对比示意图如下:
merge-->

rebase-->
七、标签管理
切换到需要打标签的分支上
1)新建一个标签(默认为HEAD,也可以指定一个commit id)
创建带有说明的标签,用-a指定标签名,-m指定说明文字
$ git tag <标签名>
$ git tag <标签名> <commit id>
$ git tag -a <标签名> -m "备注"
2)查看标签
标签不是按时间顺序列出,而是按字母排序的。
git tag查看所有标签,用git show 标签名查看指定的某个标签信息
$ git tag
$ git show <标签名>
PS:标签总是和某个commit挂钩。如果这个commit既出现在master分支,又出现在dev分支,那么在这两个分支上都可以看到这个标签。
3)删除标签
创建的标签都只存储在本地,不会自动推送到远程,所以打错的标签可以在本地安全删除;
$ git tag -d <标签名>
如果标签已经推送到远程,要先从本地删除,再从远程删除
$ git tag -d <标签名>
$ git push origin :refs/tags/<标签名>
4)推送标签到远程
推送某个标签到远程 git push origin <tagname>
推送全部尚未推送到远程的本地标签 git push origin --tags
$ git push origin <标签名>
$ git push origin --tags
以上。
To be continued...
The above is the detailed content of Let's take a look at the most detailed Git usage tutorial in history. For more information, please follow other related articles on the PHP Chinese website!

Hot AI Tools

Undresser.AI Undress
AI-powered app for creating realistic nude photos

AI Clothes Remover
Online AI tool for removing clothes from photos.

Undress AI Tool
Undress images for free

Clothoff.io
AI clothes remover

AI Hentai Generator
Generate AI Hentai for free.

Hot Article

Hot Tools

Notepad++7.3.1
Easy-to-use and free code editor

SublimeText3 Chinese version
Chinese version, very easy to use

Zend Studio 13.0.1
Powerful PHP integrated development environment

Dreamweaver CS6
Visual web development tools

SublimeText3 Mac version
God-level code editing software (SublimeText3)

Hot Topics
 1385
1385
 52
52
 Git vs. GitHub: Version Control and Code Hosting
Apr 11, 2025 am 11:33 AM
Git is a version control system, and GitHub is a Git-based code hosting platform. Git is used to manage code versions and supports local operations; GitHub provides online collaboration tools such as Issue tracking and PullRequest.
 Is Git the same as GitHub?
Apr 08, 2025 am 12:13 AM
Git and GitHub are not the same thing. Git is a version control system, and GitHub is a Git-based code hosting platform. Git is used to manage code versions, and GitHub provides an online collaboration environment.
 Is GitHub difficult to learn?
Apr 02, 2025 pm 02:45 PM
GitHub is not difficult to learn. 1) Master the basic knowledge: GitHub is a Git-based version control system that helps track code changes and collaborative development. 2) Understand core functions: Version control records each submission, supporting local work and remote synchronization. 3) Learn how to use: from creating a repository to push commits, to using branches and pull requests. 4) Solve common problems: such as merge conflicts and forgetting to add files. 5) Optimization practice: Use meaningful submission messages, clean up branches, and manage tasks using the project board. Through practice and community communication, GitHub’s learning curve is not steep.
 Should I put Git or GitHub on my resume?
Apr 04, 2025 am 12:04 AM
On your resume, you should choose to write Git or GitHub based on your position requirements and personal experience. 1. If the position requires Git skills, highlight Git. 2. If the position values community participation, show GitHub. 3. Make sure to describe the usage experience and project cases in detail and end with a complete sentence.
 Does Microsoft own Git or GitHub?
Apr 05, 2025 am 12:20 AM
Microsoft does not own Git, but owns GitHub. 1.Git is a distributed version control system created by Linus Torvaz in 2005. 2. GitHub is an online code hosting platform based on Git. It was founded in 2008 and acquired by Microsoft in 2018.
 How to use GitHub for HTML?
Apr 07, 2025 am 12:13 AM
The reason for using GitHub to manage HTML projects is that it provides a platform for version control, collaborative development and presentation of works. The specific steps include: 1. Create and initialize the Git repository, 2. Add and submit HTML files, 3. Push to GitHub, 4. Use GitHubPages to deploy web pages, 5. Use GitHubActions to automate building and deployment. In addition, GitHub also supports code review, Issue and PullRequest features to help optimize and collaborate on HTML projects.
 Should I start with Git or GitHub?
Apr 06, 2025 am 12:09 AM
Starting from Git is more suitable for a deep understanding of version control principles, and starting from GitHub is more suitable for focusing on collaboration and code hosting. 1.Git is a distributed version control system that helps manage code version history. 2. GitHub is an online platform based on Git, providing code hosting and collaboration capabilities.
 What is Git in simple words?
Apr 09, 2025 am 12:12 AM
Git is an open source distributed version control system that helps developers track file changes, work together and manage code versions. Its core functions include: 1) record code modifications, 2) fallback to previous versions, 3) collaborative development, and 4) create and manage branches for parallel development.


