How to configure webpack packaging in Angular10? Method introduction
This article will introduce to you how to configure webpack packaging in Angular10. It has certain reference value. Friends in need can refer to it. I hope it will be helpful to everyone.

For Angular projects, it is recommended to use angular-cli to create packaged projects. Angular will help us configure it by default.
However, it is obviously not very flexible when there are special needs. For example, when you want to split some larger packaging files, analyze the composition of each packaging file, and customize some parameters of webpack, you find that you have no way to start.
A common dependency on many projects is the date library moment.js. This includes the ability to use locales, however, it significantly increases the overall bundle size. These are all areas that need to be optimized.
1. ngx-build-plus creates additional configurations
Here is a tool library recommendedngx-build-plus, not required A lot of things can be changed and integrated into existing projects. Next, I will teach you how to use it. For specific details, you can find the documentation on github. Although the official documentation only states that the available How to configure webpack packaging in Angular10? Method introduction is 9, Angular 10 can also be used.
1. Use CLI to create a new Angular project
Build Angular10 project from scratch
2. Add ngx-build-plus : ng add ngx-build-plus
NOTE : If you want to add it to a specific subproject in the projects folder, please Use the --project switch to point to it: ng add ngx-build-plus --project getting-started
Remark: This step passes NPM installation package, in Angular >= 7 and CLI >= 7 How to configure webpack packaging in Angular10? Method introductions, let your project use the custom generator to update your angular.jsonng serve and ng build. However, the installation may not be successful in How to configure webpack packaging in Angular10? Method introduction 6. In this case, please directly yarn add ngx-build-plus --dev, and then change the following two places in the angular.json file:
 "build": {
   - "builder": "@angular-devkit/build-angular:browser"
   + "builder": "ngx-build-plus:build"
   ...
 },
 "serve": {
  - "builder": "@angular-devkit/build-angular:dev-server"
   + "builder": "ngx-build-plus:dev-server"
   ...
}Recommended related tutorials: "angular tutorial"
3. Create the file webpack.partial.js and add it to the (sub) project Root directory:
  const webpack = require('webpack');

  module.exports = {
      plugins: [
          new webpack.DefinePlugin({
              "VERSION": JSON.stringify("4711")
          })
      ]
}4. Use global variable VERSION in your app.component.ts:
  import { Component } from '@angular/core';

  declare const VERSION: string;

  @Component({
      selector: 'app-root',
      templateUrl: './app.component.html',
      styleUrls: ['./app.component.css']
  })
  export class AppComponent {
      title = 'Version: ' + VERSION;
}5. Use --extra-webpack -config Switch that points to part of the Webpack configuration to start the application:
ng serve --extra-webpack-config webpack.partial.js -o
If your project is a CLI-based subproject, please also use that --project switch:
ng serve --project getting-started -o --extra-webpack-config webpack.partial.js
Tip: Consider creating an npm script for this command.
6. Make sure it shows the How to configure webpack packaging in Angular10? Method introduction provided by your webpack configuration.
 If the print result is displayed, it means that your project has enabled the configuration in the
 webpack.partial.js file. The following is in webpack.partial.js has added the functions we need. The author mainly focused on two major parts.
- Add BundleAnalyzerPlugin to analyze packaged files
- Third-party library module separation-optimization splitChunks, split larger files
Described below
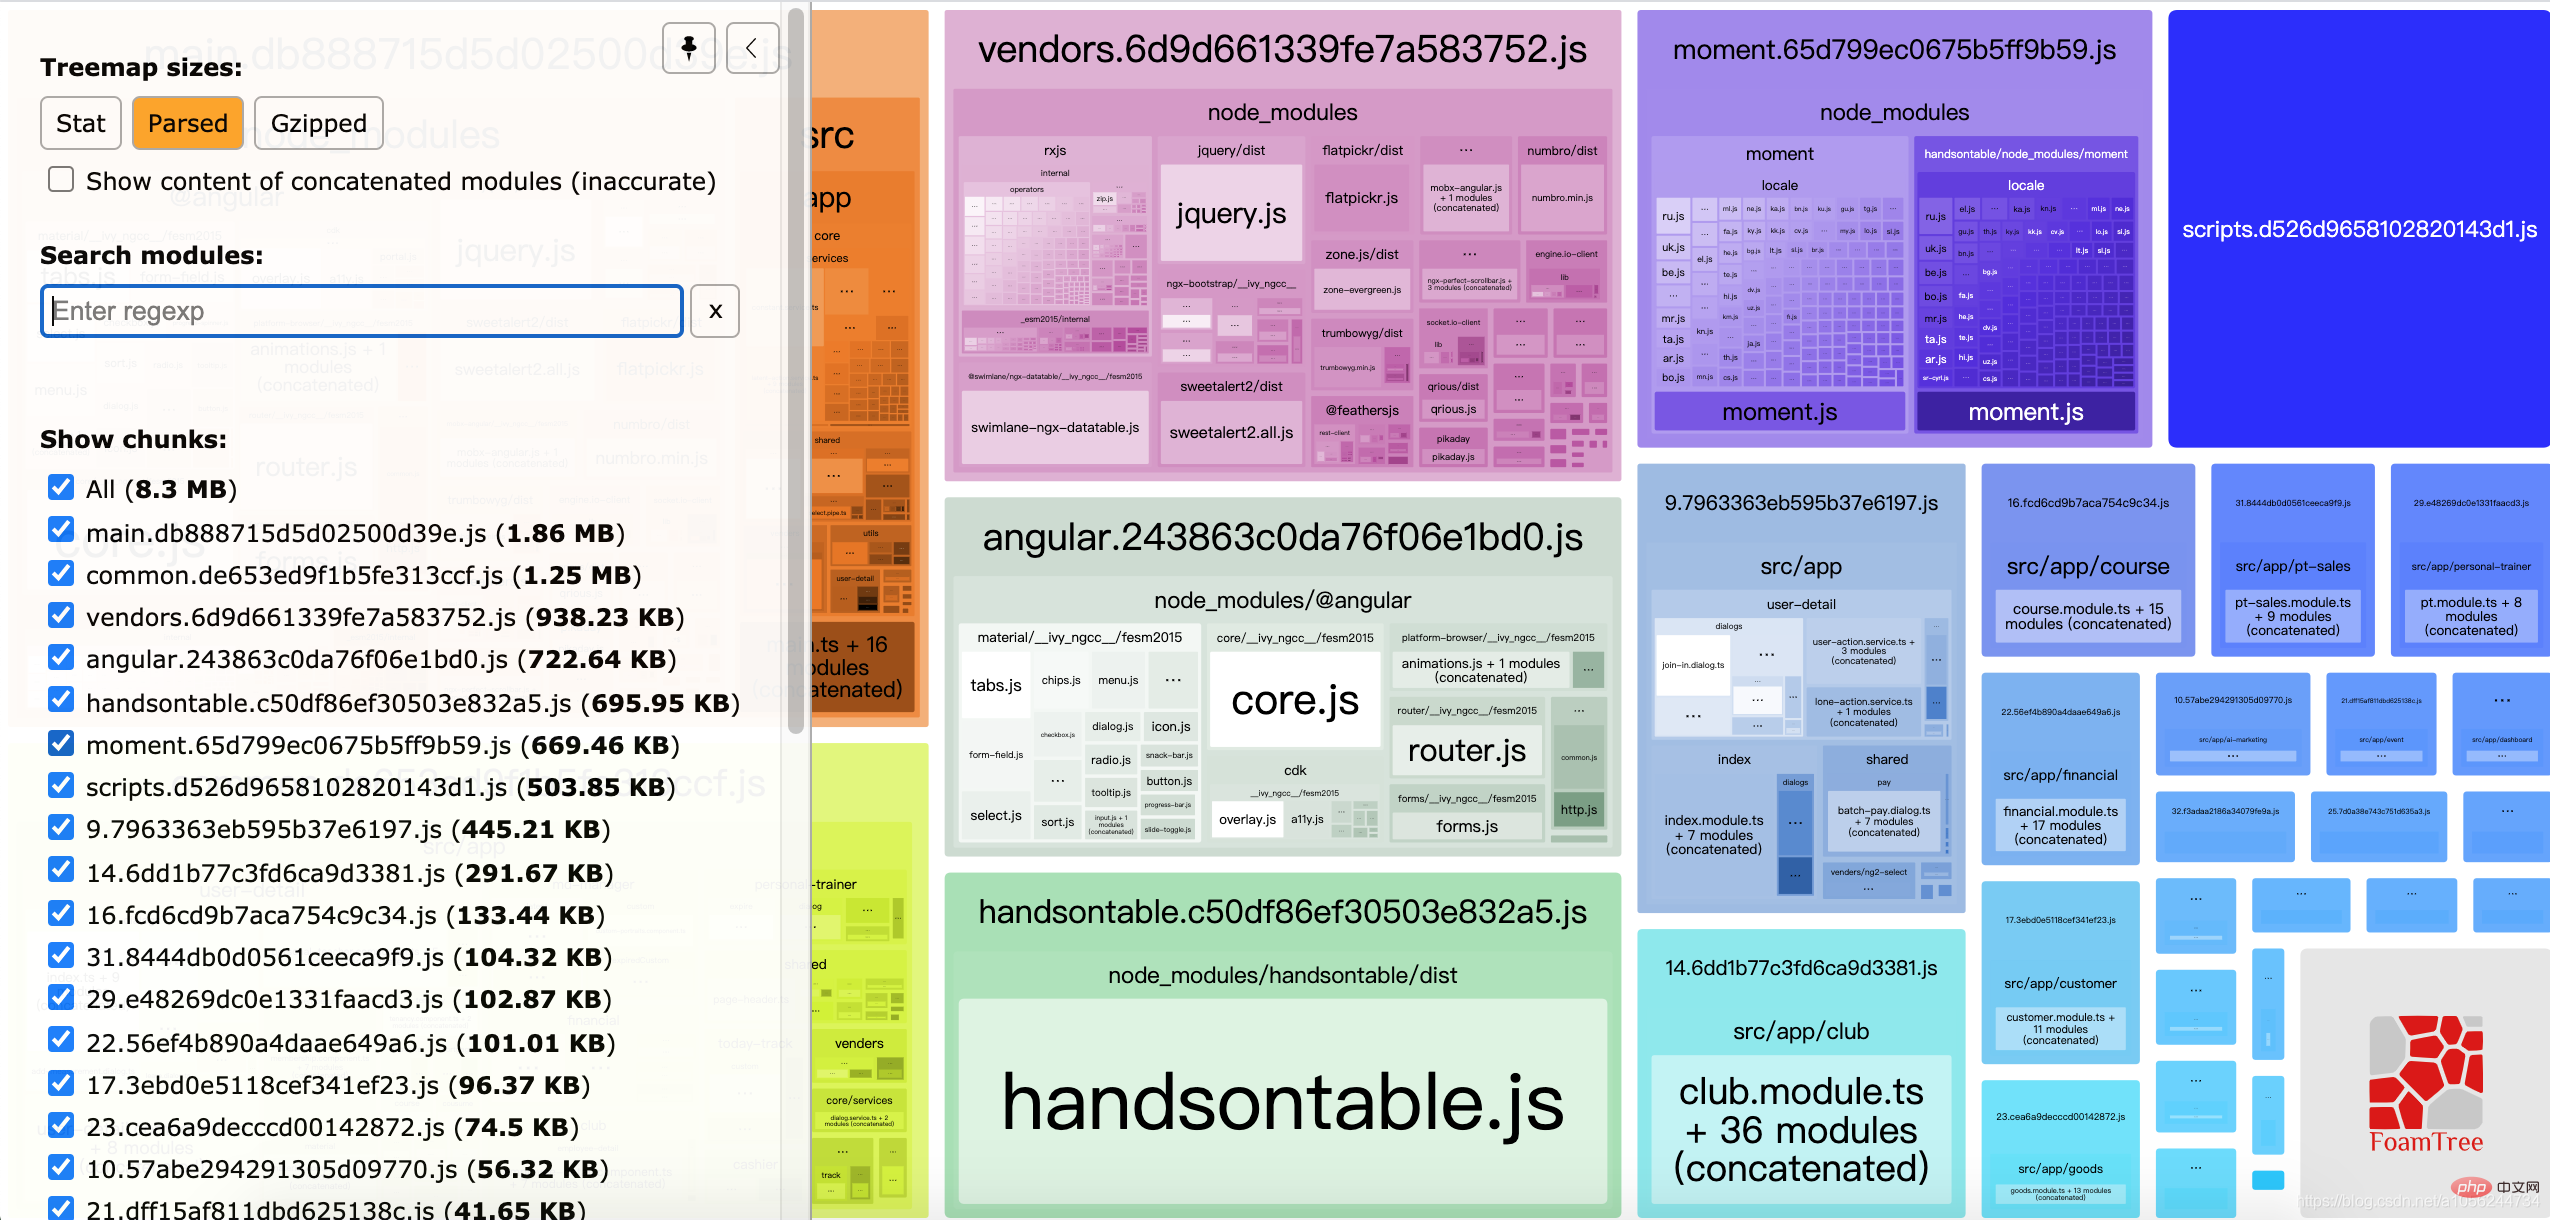
2. webpack-bundle-analyzer packaged file analysis tool
##1. Installation
$ yarn add webpack-bundle-analyzer --dev
Copy after login
$ yarn add webpack-bundle-analyzer --dev
2. Configuration
Addconst BundleAnalyzerPlugin = require('webpack-bundle-analyzer').BundleAnalyzerPlugin
module.exports = {
plugins: [
new BundleAnalyzerPlugin({
analyzerMode: 'static',
}),
new webpack.DefinePlugin({
"VERSION": JSON.stringify("4711")
})
]
}module.exports = webpackConfig in webpack.partial.js #3. RunStart the service:
View the production environment:
npm run build --report or build normally to start the viewerDevelopment environment view:
Or start the normal devServer service to start the viewer!

new BundleAnalyzerPlugin({
      // openAnalyzer: true,
      // reportFilename: path.join(__dirname, 'report.html')
      //  可以是`server`,`static`或`disabled`。
      //  在`server`模式下,分析器将启动HTTP服务器来显示软件包报告。
      //  在“静态”模式下,会生成带有报告的单个HTML文件。
      //  在`disabled`模式下,你可以使用这个插件来将`generateStatsFile`设置为`true`来生成Webpack Stats JSON文件。
      analyzerMode: 'static',
      //  将在“服务器”模式下使用的主机启动HTTP服务器。
      // analyzerHost: '127.0.0.1',
      //  将在“服务器”模式下使用的端口启动HTTP服务器。
      // analyzerPort: 8888,
      //  路径捆绑,将在`static`模式下生成的报告文件。
      //  相对于捆绑输出目录。
      // reportFilename: 'report.html',
      //  模块大小默认显示在报告中。
      //  应该是`stat`,`parsed`或者`gzip`中的一个。
      //  有关更多信息,请参见“定义”一节。
      // defaultSizes: 'parsed',
      //  在默认浏览器中自动打开报告
      // openAnalyzer: true,
      //  如果为true,则Webpack Stats JSON文件将在bundle输出目录中生成
      // generateStatsFile: false,
      //  如果`generateStatsFile`为`true`,将会生成Webpack Stats JSON文件的名字。
      //  相对于捆绑输出目录。
      // statsFilename: 'stats.json',
      //  stats.toJson()方法的选项。
      //  例如,您可以使用`source:false`选项排除统计文件中模块的来源。
      //  在这里查看更多选项:https:  //github.com/webpack/webpack/blob/webpack-1/lib/Stats.js#L21
      // statsOptions: null,
      // logLevel: 'info' // 日志级别。可以是'信息','警告','错误'或'沉默'。
    }),
Copy after login
Module functionnew BundleAnalyzerPlugin({
// openAnalyzer: true,
// reportFilename: path.join(__dirname, 'report.html')
// 可以是`server`,`static`或`disabled`。
// 在`server`模式下,分析器将启动HTTP服务器来显示软件包报告。
// 在“静态”模式下,会生成带有报告的单个HTML文件。
// 在`disabled`模式下,你可以使用这个插件来将`generateStatsFile`设置为`true`来生成Webpack Stats JSON文件。
analyzerMode: 'static',
// 将在“服务器”模式下使用的主机启动HTTP服务器。
// analyzerHost: '127.0.0.1',
// 将在“服务器”模式下使用的端口启动HTTP服务器。
// analyzerPort: 8888,
// 路径捆绑,将在`static`模式下生成的报告文件。
// 相对于捆绑输出目录。
// reportFilename: 'report.html',
// 模块大小默认显示在报告中。
// 应该是`stat`,`parsed`或者`gzip`中的一个。
// 有关更多信息,请参见“定义”一节。
// defaultSizes: 'parsed',
// 在默认浏览器中自动打开报告
// openAnalyzer: true,
// 如果为true,则Webpack Stats JSON文件将在bundle输出目录中生成
// generateStatsFile: false,
// 如果`generateStatsFile`为`true`,将会生成Webpack Stats JSON文件的名字。
// 相对于捆绑输出目录。
// statsFilename: 'stats.json',
// stats.toJson()方法的选项。
// 例如,您可以使用`source:false`选项排除统计文件中模块的来源。
// 在这里查看更多选项:https: //github.com/webpack/webpack/blob/webpack-1/lib/Stats.js#L21
// statsOptions: null,
// logLevel: 'info' // 日志级别。可以是'信息','警告','错误'或'沉默'。
}),: You can view your files after they are packaged and compressed Real content, find out which modules make up the largest size, find the wrong module, optimize it! The best thing is that it supports minified bundling! It parses them to get the actual size of the bundled module. It also shows their gzipped size! 在 webpack4.x 中,我们使用 optimization.splitChunks 来分离公用的代码块。SplitChunks插件简单的来说就是Webpack中一个提取或分离代码的插件,主要作用是提取公共代码,防止代码被重复打包,拆分过大的js文件,合并零散的js文件。 这里说的分离,当然只是针对一些第三方库(一般来自 node_modules),以及我们自己定义的工具库(或公用方法)。 不知如何下手?首先,我们来看官网给的一份 接着,我们再来看下它们的含义: chunks: 该属性值的数据类型可以是 字符串 或者 函数。如果是字符串,那它的值可能为 initial | async | all 三者之一。默认值的数据类型为 字符串,默认值为 async,但推荐用 all。它表示将哪种类型的模块分离成新文件。字符串参数值的作用分别如下: minSize: 该属性值的数据类型为数字。它表示将引用模块分离成新代码文件的最小体积,默认为 30000,单位为字节,即 30K(指min+gzip之前的体积)。这里的 30K 应该是最佳实践,因为如果引用模块小于 30K 就分离成一个新代码文件,那页面打开时,势必会多增加一个请求。 maxSize: 把提取出来的模块打包生成的文件大小不能超过maxSize值,如果超过了,要对其进行分割并打包生成新的文件。单位为字节,默认为0,表示不限制大小。 minChunks: 该属性值的数据类型为数字。它表示将引用模块如不同文件引用了多少次,才能分离生成新代码文件。默认值为 1 maxAsyncRequests: 该属性值的数据类型为数字,默认值为 5。它表示按需加载最大的并行请求数,针对异步。 maxInitialRequests: 该属性值的数据类型为数字,默认值为 3。它表示单个入口文件最大的并行请求数,针对同步。 automaticNameDelimiter: 该属性值的数据类型为字符串,默认值为。它表示分离后生成新代码文件名称的链接符,比如说 app1.js 和 app2.js 都引用了 utils.js 这个工具库,那么,最后打包后分离生成的公用文件名可能是 xxapp1~app2.js 这样的,即以 ~ 符号连接。 name: 该属性值的数据类型可以是 布尔值 或者 函数(返回值为字符串),其中布尔值得为 true,此时,分离文件后生成的文件名将基于 cacheGroups 和 automaticNameDelimiter。如果设置为 false,则不会进行模块分离。 cacheGroups: 该属性值的数据类型为对象,它的值可以继承 splitChunks.* 中的内容。如果 cacheGroups存在与 splitChunks.* 同名的属性,则 cacheGroups 的属性值则直接覆盖 splitChunks.* 中设置的值。 test: 该属性值的数据类型可以为 字符串 或 正则表达式,它规定了哪些文件目录的模块可以被分离生成新文件。 priority: 该属性值的数据类型可以为数字,默认值为 0。它表示打包分离文件的优先 reuseExistingChunk: 该属性值的数据类型可以为布尔值。它表示针对已经分离的模块,不再重新分离。 要将第三方库分离出来,我们需要调整配置文件,设置 打包中,我们发现,工具函数模块(utils)的源码被分别打包到了两个文件中,这显然是不对。之所以出现这种情况,是因为我们设置了 minSize: 30000,即分离成独立文件的最小体积为 30K,而这里的 工具函数(utils.js)只有几KB,所以,没被分离成单独的文件。 有的时候,我们希望将所有来自 node_modules 的第三方库都打包到同一个文件中。显然,上面的打包配置并没有满足这个条件。并且,我们还希望可以对打包后的文件名进行重命名。 要完成,只需要在 cacheGroups 设置 name 属性即可。这里,笔者还把项目中使用到的 默认是 先说一下优先级 使用yarn 该插件将为你生成一个 HTML5 文件, 其中包括使用 这将会产生一个包含以下内容的文件 如果你有多个 webpack 入口点, 他们都会在生成的HTML文件中的 需要注意的是,默认angular-cli打包生成的入口文件也被配置成了index.html,所以我们需要更改 改为: 您可以将配置选项的哈希值传递给 最后奉上完整的 希望大家打包顺利,项目运行快快滴。 demo地址: 更多编程相关知识,请访问:编程入门!!三、使用webpack把第三方库模块分离 - optimization + splitChunks
1. 默认配置:
splitChunks: {
    chunks: "async",
    minSize: 30000,
    minChunks: 1,
    maxAsyncRequests: 5,
    maxInitialRequests: 3,
    automaticNameDelimiter: '~',
    name: true,
    cacheGroups: {
        vendors: {
            test: /[\\/]node_modules[\\/]/,
            priority: -10
        },
    default: {
            minChunks: 2,
            priority: -20,
            reuseExistingChunk: true
        }
    }
}
2.分离第三方库
chunks: 'all',即表示让所有加载类型的模块在某些条件下都能打包。3.分离工具函数
4.第三方库合并打包并重命名
moment、handsontable、angular库单独分离出来了。// webpack.config.js
module.exports = {
optimization: {
splitChunks: {
chunks: 'all',
minSize: 30000,
maxSize: 0,
minChunks: 1,
maxAsyncRequests: 5,
maxInitialRequests: 3,
automaticNameDelimiter: '~',
name: true,
cacheGroups: {
moment: {
name: 'moment',
test: /[\\/]node_modules[\\/]moment[\\/]/,
priority: -6 // 两个cacheGroup.priority相同时,先定义的会先命中
},
handsontable: {
name: 'handsontable',
test: /[\\/]node_modules[\\/]handsontable[\\/]/,
priority: -7
},
angular: {
name: 'angular',
test: /[\\/]node_modules[\\/]@angular[\\/]/,
priority: -9
},
vendors: {
name: 'vendors',
test: /[\\/]node_modules[\\/]/,
priority: -10
},
default: {
name: 'default',
minChunks: 2,
priority: -20,
reuseExistingChunk: true
}
}
}
}
}5.SplitChunks插件配置选项
chunks选项,决定要提取那些模块。async:只提取异步加载的模块出来打包到一个文件中。
异步加载的模块:通过import('xxx')或require(['xxx'],() =>{})加载的模块。initial:提取同步加载和异步加载模块,如果xxx在项目中异步加载了,也同步加载了,那么xxx这个模块会被提取两次,分别打包到不同的文件中。
同步加载的模块:通过 import xxx或require('xxx')加载的模块。all:不管异步加载还是同步加载的模块都提取出来,打包到一个文件中。minSize选项:规定被提取的模块在压缩前的大小最小值,单位为字节,默认为30000,只有超过了30000字节才会被提取。maxSize选项:把提取出来的模块打包生成的文件大小不能超过maxSize值,如果超过了,要对其进行分割并打包生成新的文件。单位为字节,默认为0,表示不限制大小。minChunks选项:表示要被提取的模块最小被引用次数,引用次数超过或等于minChunks值,才能被提取。maxAsyncRequests选项:最大的按需(异步)加载次数,默认为 6。maxInitialRequests选项:打包后的入口文件加载时,还能同时加载js文件的数量(包括入口文件),默认为4。maxInitialRequests / maxAsyncRequests maxSizeminSize。automaticNameDelimiter选项:打包生成的js文件名的分割符,默认为~。name选项:打包生成js文件的名称。cacheGroups选项,核心重点,配置提取模块的方案。里面每一项代表一个提取模块的方案。下面是cacheGroups每项中特有的选项,其余选项和外面一致,若cacheGroups每项中有,就按配置的,没有就使用外面配置的。test选项:用来匹配要提取的模块的资源路径或名称。值是正则或函数。priority选项:方案的优先级,值越大表示提取模块时优先采用此方案。默认值为0。reuseExistingChunk选项:true/false。为true时,如果当前要提取的模块,在已经在打包生成的js文件中存在,则将重用该模块,而不是把当前要提取的模块打包生成新的js文件。enforce选项:true/false。为true时,忽略minSize,minChunks,maxAsyncRequests和maxInitialRequests外面选项四、HtmlWebpackPlugin
HtmlWebpackPlugin简化了HTML文件的创建,以便为你的webpack包提供服务。这对于在文件名中包含每次会随着编译而发生变化哈希的 webpack bundle 尤其有用。 你可以让插件为你生成一个HTML文件,这个插件有两个重要作用。
1.安装
npm install --save-dev html-webpack-plugin
yarn add --dev html-webpack-plugin
2.基本用法
script 标签的 body 中的所有 webpack 包。 只需添加插件到你的 webpack 配置如下:const HtmlWebpackPlugin = require('html-webpack-plugin')
const path = require('path')
module.exports = {
plugins: [
new webpack.DefinePlugin({
"VERSION": JSON.stringify("4711")
}),
new HtmlWebpackPlugin({
filename: 'index.html', // 根据模板文件生成的html的文件名
template: path.join(__dirname, 'src/index.html'),
chunksSortMode: 'manual',
chunks: ['styles', 'runtime', 'polyfills', 'scripts', 'vendors', 'main']
})
]
}dist/index.html:nbsp;html>
<meta>
<meta>
<meta>
<meta>
<meta>
<meta>
<meta>
<meta>
<title>test</title>
<base>
<link>
<link>
<app-root></app-root>
<div>
<div>
<div></div>
</div>
</div>
<script></script>
<script></script>
<script></script>
<script></script>
<script></script>
<script></script>
<script></script>
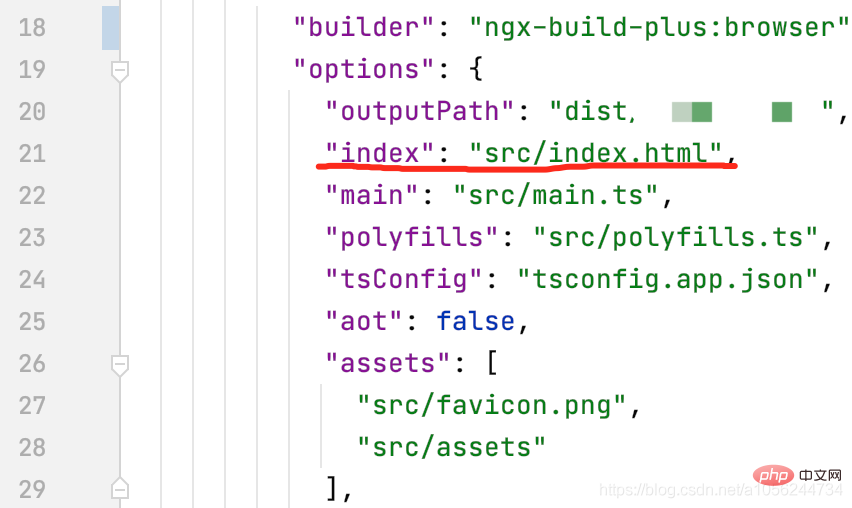
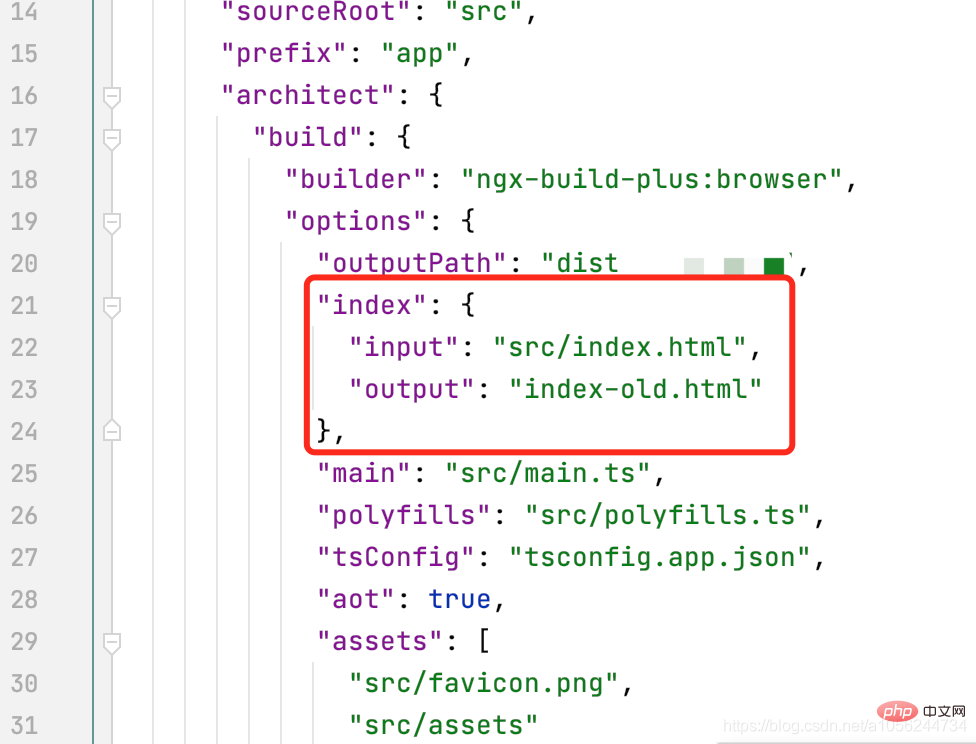
script 标签内。angular.jaon文件中的配置。并且,由于Angular单页面应用的入口文件为main.ts 所以!chunks配置中,main 一定一定要放在最后,否则运行会出错,笔者因为没有放在最后找了一晚上的bug~~

3.HtmlWebpackPlugin插件配置选项
html-webpack-plugin。允许的值如下:
Name
Type
Default
Description
title##{String}
Webpack App Title to use for the generated HTML document
filename
{String}
'index.html' File to write HTML to. The default is
index.html
. You can specify a subdirectory here (eg: assets/admin.html)
template
{String} ``
webpack
Relative or absolute path to the template. By default it will use (src/index.ejs if it exists). See Documentation for details
templateContent ##{string, Function, false}
false can be used instead of template to provide an inline template - please read the "
Writing your own templates" section
templateParameters
##{Boolean, Object, Function}
false
Allows overriding parameters used in templates - see Example
inject
{Boolean, String}
true`true
publicPath
{String,'auto'}
'auto'publicPath for script and link tags
scriptLoading favicon
{'blocking', 'defer'}##'blocking'Modern browsers support non-blocking javascript loading (
'defer') to improve page startup performance.
##{String}Adds the given icon icon path to the output HTML
meta
{ Object}{} Allows injection of
meta
-tags. For example meta: {viewport: 'width=device-width, initial-scale=1, shrink-to-fit=no'}
base
{Object, String, false}false Injection
basebase: "https://example.com/path/page.html
##minify
{Boolean, Object} trueIf 'production'mode is , otherwise
falseControls whether and how output is minimized. See Minify below for more details.
hash
##{Boolean}
false
appends a unique if Yes, truewebpack
compile hash to all included scripts and CSS files. This is useful for clearing cache
cache
{Boolean}
true Emit file
{Boolean}## only if the file has been changed
#true
Error details will be written to the HTML page
chunks
{?} ##{String, Function}?Allows you to add only some blocks (for example, only unit test blocks)
chunksSortMode
{Array.auto excludeChunks
{Boolean}``
allows you to skip some chunks (e.g. , without adding a unit test block)
If false
true tag as auto-closing (XHTML compliant) render the link
webpack.partial.jsconst webpack = require('webpack')
const BundleAnalyzerPlugin = require('webpack-bundle-analyzer').BundleAnalyzerPlugin
const HtmlWebpackPlugin = require('html-webpack-plugin')
const path = require('path')
module.exports = {
externals: { // 打包除外的文件
echarts: 'echarts'
},
optimization: {
splitChunks: {
chunks: "all",
minSize: 20000,
minChunks: 1,
maxAsyncRequests: 5,
maxInitialRequests: 3,
automaticNameDelimiter: '~',
name: true,
cacheGroups: {
moment: {
name: 'moment',
test: /[\\/]node_modules[\\/]moment[\\/]/,
priority: -6
},
handsontable: {
name: 'handsontable',
test: /[\\/]node_modules[\\/]handsontable[\\/]/,
priority: -7
},
angular: {
name: 'angular',
test: /[\\/]node_modules[\\/]@angular[\\/]/,
priority: -9
},
vendors: {
name: 'vendors',
test: /[\\/]node_modules[\\/]/,
priority: -10
},
default: {
name: 'default',
minChunks: 2,
priority: -20,
reuseExistingChunk: true
}
}
}
},
plugins: [
new BundleAnalyzerPlugin({
analyzerMode: 'static',
}),
new webpack.DefinePlugin({
"VERSION": JSON.stringify("4711")
}),
new HtmlWebpackPlugin({
filename: 'index.html',
template: path.join(__dirname, 'src/index.html'),
chunksSortMode: 'manual',
chunks: ['styles', 'runtime', 'polyfills', 'scripts', 'vendors', 'main'] // 限定顺序,main.js必须在最后
})
]
}
https://github.com/qinqing3761/webpack-build-demo
The above is the detailed content of How to configure webpack packaging in Angular10? Method introduction. For more information, please follow other related articles on the PHP Chinese website!

Hot AI Tools

Undresser.AI Undress
AI-powered app for creating realistic nude photos

AI Clothes Remover
Online AI tool for removing clothes from photos.

Undress AI Tool
Undress images for free

Clothoff.io
AI clothes remover

Video Face Swap
Swap faces in any video effortlessly with our completely free AI face swap tool!

Hot Article

Hot Tools

Notepad++7.3.1
Easy-to-use and free code editor

SublimeText3 Chinese version
Chinese version, very easy to use

Zend Studio 13.0.1
Powerful PHP integrated development environment

Dreamweaver CS6
Visual web development tools

SublimeText3 Mac version
God-level code editing software (SublimeText3)

Hot Topics
 1386
1386
 52
52
 VUE3 Getting Started Tutorial: Packaging and Building with Webpack
Jun 15, 2023 pm 06:17 PM
Vue is an excellent JavaScript framework that can help us quickly build interactive and efficient web applications. Vue3 is the latest version of Vue, which introduces many new features and functionality. Webpack is currently one of the most popular JavaScript module packagers and build tools, which can help us manage various resources in our projects. This article will introduce how to use Webpack to package and build Vue3 applications. 1. Install Webpack
 What is the difference between vite and webpack
Jan 11, 2023 pm 02:55 PM
Differences: 1. The startup speed of the webpack server is slower than that of Vite; because Vite does not require packaging when starting, there is no need to analyze module dependencies and compile, so the startup speed is very fast. 2. Vite hot update is faster than webpack; in terms of HRM of Vite, when the content of a certain module changes, just let the browser re-request the module. 3. Vite uses esbuild to pre-build dependencies, while webpack is based on node. 4. The ecology of Vite is not as good as webpack, and the loaders and plug-ins are not rich enough.
 How to use PHP and webpack for modular development
May 11, 2023 pm 03:52 PM
With the continuous development of web development technology, front-end and back-end separation and modular development have become a widespread trend. PHP is a commonly used back-end language. When doing modular development, we need to use some tools to manage and package modules. Webpack is a very easy-to-use modular packaging tool. This article will introduce how to use PHP and webpack for modular development. 1. What is modular development? Modular development refers to decomposing a program into different independent modules. Each module has its own function.
 How does webpack convert es6 to es5 module?
Oct 18, 2022 pm 03:48 PM
Configuration method: 1. Use the import method to put the ES6 code into the packaged js code file; 2. Use the npm tool to install the babel-loader tool, the syntax is "npm install -D babel-loader @babel/core @babel/preset- env"; 3. Create the configuration file ".babelrc" of the babel tool and set the transcoding rules; 4. Configure the packaging rules in the webpack.config.js file.
 Use Spring Boot and Webpack to build front-end projects and plug-in systems
Jun 22, 2023 am 09:13 AM
As the complexity of modern web applications continues to increase, building excellent front-end engineering and plug-in systems has become increasingly important. With the popularity of Spring Boot and Webpack, they have become a perfect combination for building front-end projects and plug-in systems. SpringBoot is a Java framework that creates Java applications with minimal configuration requirements. It provides many useful features, such as automatic configuration, so that developers can build and deploy web applications faster and easier. W
 What files can vue webpack package?
Dec 20, 2022 pm 07:44 PM
In vue, webpack can package js, css, pictures, json and other files into appropriate formats for browser use; in webpack, js, css, pictures, json and other file types can be used as modules. Various module resources in webpack can be packaged and merged into one or more packages, and during the packaging process, the resources can be processed, such as compressing images, converting scss to css, converting ES6 syntax to ES5, etc., which can be recognized by HTML. file type.
 What is Webpack? Detailed explanation of how it works?
Oct 13, 2022 pm 07:36 PM
Webpack is a module packaging tool. It creates modules for different dependencies and packages them all into manageable output files. This is especially useful for single-page applications (the de facto standard for web applications today).
 How to install webpack in vue
Jul 25, 2022 pm 03:27 PM
Webpack in vue is installed using the node package manager "npm" or the npm image "cnpm". Webpack is a static module packaging tool for modern JavaScript applications. It is developed based on node.js. It requires node.js component support when using it. It needs to be installed using npm or cnpm. The syntax is "npm install webpack -g" or "cnpm install webpack -g".


