Detailed explanation of button components in Bootstrap
This article will take you to learn more about the button component in Bootstrap. It has certain reference value. Friends in need can refer to it. I hope it will be helpful to everyone.

The button plug-in provides a set of functions that can control multiple states of the button, such as the disabled state of the button, the loading state, and the normal state. Status etc. This article will introduce the Bootstrap button plug-in in detail
Loading status
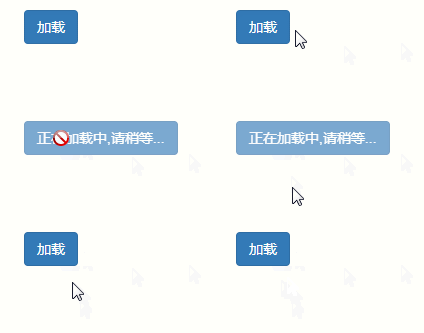
You can design status prompts through buttons. When the button is clicked, the loading status information will be displayed. For example, clicking the "Load" button will trigger the loading status of the button
By adding data-loading-text="Loading..." you can set the loading status for the button, But Starting from v3.3.5, this feature is no longer recommended and has been deleted in v4 version
[Note] If data-loading is not set -text, when the button text is in the Loading state, the default display is 'loading...'
<button>加载</button>
<script>
$(function(){
$("#loaddingBtn").click(function () {
var $btn = $(this).button("loading");
setTimeout(function(){
$btn.button('reset')
},1000);
});
});
</script>
[Related recommendations: "bootstrap tutorial》】
Simulation radio button
Simulation radio button is a set of buttons to implement a single selection operation. Using a button group to simulate a radio button group can make the design more personalized and customize a more beautiful radio button group
In the button plug-in in the Bootstrap framework, you can customize attributes for the button group data-toggle="buttons"
<div>
    <label>
        <input>男
    </label>
    <label>
        <input>女
    </label>
</div>

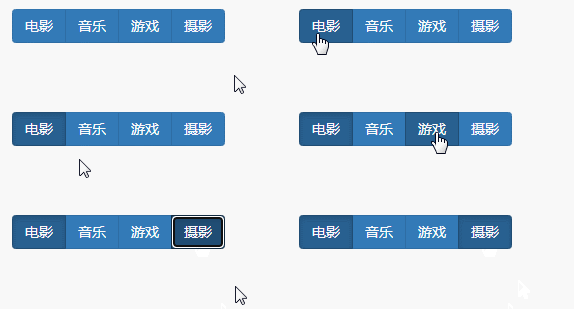
Simulate multiple selection
Use button groups to simulate multiple selections Select buttons are the same as simulated radio buttons and have the same effect. They are also achieved by customizing data-toggle="buttons" on the button group. The only difference is to replace input[type="radio"] with input[type="checkbox"]
<div>
    <label>
        <input>电影
    </label>
    <label>
        <input>音乐
    </label>
    <label>
        <input>游戏
    </label>
    <label>
        <input>摄影
    </label>
</div>

button status
Using the data-toggle attribute can also activate the behavior state of the button to switch the state between activated and inactive. The button is activated when clicked, and clicked again to restore the button to its default state
<button>有状态的按钮</button>
<button>普通按钮</button>

JS trigger
The button plug-in can By calling the button function and then passing in specific parameters to the button function, different effects can be achieved. Two of the parameters are fixed, namely toggle and reset. Others can be defined at will:
$("#mybutton").button("toggle");//反转按钮状态
$("#mybutton").button("reset");//重置按钮状态
$("#mybutton").button("任意字符参数名");//替换 data-任意字符参数名-text 的属性值为“按钮上显示的文本值<button class="btn btn-primary" data-complete-text="加载完成" type="button" id="mybutton">加载</button>
<script>
$(function(){
$("#mybutton").click(function () {
var $btn = $(this).button("loading");
setTimeout(function(){
$btn.button('complete');
},1000);
});
});
</script>JS source code
[1]IIFE
Use immediate call functions to prevent code in the plug-in leaked, thus forming a closed loop, and can only be expanded from jQuery's fn
+function ($) {
    //使用es5严格模式
    'use strict';
    //
}(window.jQuery);[2]Initial settings
var Button = function (element, options) {
    //要触发的元素
    this.$element  = $(element)
    //合并参数
    this.options   = $.extend({}, Button.DEFAULTS, options)
    //是否是加载状态
    this.isLoading = false
  }
  //版本号为3.3.7
  Button.VERSION  = '3.3.7'
  //默认loadinf时的文本内容为'loading...'
  Button.DEFAULTS = {
    loadingText: 'loading...'
}[3]Plug-in core code
//设置按钮状态的方法
  Button.prototype.setState = function (state) {
    //按钮需要禁用时使用它,先赋值一个临时变量
    var d    = 'disabled'
    //当前元素
    var $el  = this.$element
    //如果是input,则使用val获取值,否则,使用html获取值
    var val  = $el.is('input') ? 'val' : 'html'
    //获取当前元素的自定义属性,所有以data-开头的属性
    var data = $el.data()
    //组装需要用到的属性,如传入loading,则组装成loadingText
    state += 'Text'
    //如果data里不包含data-reset-text值,则将当前元素的值临时存放,以便过后再恢复使用它
    if (data.resetText == null) $el.data('resetText', $el[val]())

    //不阻止事件,以允许表单的提交
    setTimeout($.proxy(function () {
      //给元素赋值,如果是元素默认没有值,则从options里查询,否则,从自定义属性里查询
      $el[val](data[state] == null ? this.options[state] : data[state])
      //如果传入的是loading
      if (state == 'loadingText') {
        //设置加载状态为true
        this.isLoading = true
        //禁用该元素(即添加disabled样式和disabled属性)
        $el.addClass(d).attr(d, d).prop(d, true)
      } else if (this.isLoading) {
        this.isLoading = false
        //如果不是,则删除disabled样式和disabled属性
        $el.removeClass(d).removeAttr(d).prop(d, false)
      }
    }, this), 0)
  }
  //切换按钮状态
  Button.prototype.toggle = function () {
    //设置change标记
    var changed = true
    //查找带有[data-toggle="buttons"]属性的最近父元素
    var $parent = this.$element.closest('[data-toggle="buttons"]')
    //如果父元素存在
    if ($parent.length) {
      //查找触发元素内是否存在input元素
      var $input = this.$element.find('input')
      //如果是单选按钮
      if ($input.prop('type') == 'radio') {
        //如果被选中,则设置changed为false
        if ($input.prop('checked')) changed = false
        //查找同级元素是否有active样式,如果有,则删除active样式
        $parent.find('.active').removeClass('active')
        //给当前元素添加active样式
        this.$element.addClass('active')
      //如果是多选按钮
      } else if ($input.prop('type') == 'checkbox') {
        //如果多选按钮选中了,但元素没有active样式
        //或者多选按钮没有选中,但元素却有active样式,则设置changed为false
        if (($input.prop('checked')) !== this.$element.hasClass('active')) changed = false
        //重置元素的active样式
        this.$element.toggleClass('active')
      }
      //将多选按钮的checked设置为是否有active样式
      $input.prop('checked', this.$element.hasClass('active'))
      //如果changed为true,则触发change事件
      if (changed) $input.trigger('change')
    } else {
      this.$element.attr('aria-pressed', !this.$element.hasClass('active'))
      //重置元素的active样式
      this.$element.toggleClass('active')
    }
}【4】jQuery plug-in definition
function Plugin(option) {
    //根据选择器,遍历所有符合规则的元素
    return this.each(function () {
      var $this   = $(this)
      //获取自定义属性bs.button的值
      var data    = $this.data('bs.button')
      var options = typeof option == 'object' && option
      //如果值不存在,则将Button实例设置为bs.button值
      if (!data) $this.data('bs.button', (data = new Button(this, options)))
      //如果option是toggle,则直接调用该方法
      if (option == 'toggle') data.toggle()
      //否则调用setState()方法
      else if (option) data.setState(option)
    })
  }

  var old = $.fn.button
  //保留其他库的$.fn.button代码(如果定义的话),以便在noConflict之后可以继续使用该老代码
  $.fn.button             = Plugin
  //重设插件构造器,可以通过该属性获取插件的真实类函数
$.fn.button.Constructor = Button【5】Anti-conflict processing
$.fn.button.noConflict = function () {
    //恢复以前的旧代码
    $.fn.button = old
    //将$.fn.button.noConflict()设置为Bootstrap的Tab插件
    return this
}【6】Binding trigger events
$(document)
    //查询所有以button开头,data-toggle属性的值,绑定click事件
    .on('click.bs.button.data-api', '[data-toggle^="button"]', function (e) {
      //查找当前单击对象的最近的有btn样式的父元素
      var $btn = $(e.target).closest('.btn')
      Plugin.call($btn, 'toggle')
      //如果单击对象不是单选或多选按钮
      if (!($(e.target).is('input[type="radio"], input[type="checkbox"]'))) {
        //阻止默认行为
        e.preventDefault()
        //如果$btn是单选或多选按钮,触发focus事件
        if ($btn.is('input,button')) $btn.trigger('focus')
        //否则,找到子元素中的第一个具有visible状态的input或button,触发focus事件
        else $btn.find('input:visible,button:visible').first().trigger('focus')
      }
    })
    //查询所有以button开头,data-toggle属性的值,绑定focus事件
    .on('focus.bs.button.data-api blur.bs.button.data-api', '[data-toggle^="button"]', function (e) {
      $(e.target).closest('.btn').toggleClass('focus', /^focus(in)?$/.test(e.type))
})For more programming-related knowledge, please visit:Introduction to Programming! !
The above is the detailed content of Detailed explanation of button components in Bootstrap. For more information, please follow other related articles on the PHP Chinese website!

Hot AI Tools

Undresser.AI Undress
AI-powered app for creating realistic nude photos

AI Clothes Remover
Online AI tool for removing clothes from photos.

Undress AI Tool
Undress images for free

Clothoff.io
AI clothes remover

AI Hentai Generator
Generate AI Hentai for free.

Hot Article

Hot Tools

Notepad++7.3.1
Easy-to-use and free code editor

SublimeText3 Chinese version
Chinese version, very easy to use

Zend Studio 13.0.1
Powerful PHP integrated development environment

Dreamweaver CS6
Visual web development tools

SublimeText3 Mac version
God-level code editing software (SublimeText3)

Hot Topics
 1378
1378
 52
52
 How to get the bootstrap search bar
Apr 07, 2025 pm 03:33 PM
How to use Bootstrap to get the value of the search bar: Determines the ID or name of the search bar. Use JavaScript to get DOM elements. Gets the value of the element. Perform the required actions.
 How to do vertical centering of bootstrap
Apr 07, 2025 pm 03:21 PM
Use Bootstrap to implement vertical centering: flexbox method: Use the d-flex, justify-content-center, and align-items-center classes to place elements in the flexbox container. align-items-center class method: For browsers that do not support flexbox, use the align-items-center class, provided that the parent element has a defined height.
 How to write split lines on bootstrap
Apr 07, 2025 pm 03:12 PM
There are two ways to create a Bootstrap split line: using the tag, which creates a horizontal split line. Use the CSS border property to create custom style split lines.
 How to use bootstrap in vue
Apr 07, 2025 pm 11:33 PM
Using Bootstrap in Vue.js is divided into five steps: Install Bootstrap. Import Bootstrap in main.js. Use the Bootstrap component directly in the template. Optional: Custom style. Optional: Use plug-ins.
 How to insert pictures on bootstrap
Apr 07, 2025 pm 03:30 PM
There are several ways to insert images in Bootstrap: insert images directly, using the HTML img tag. With the Bootstrap image component, you can provide responsive images and more styles. Set the image size, use the img-fluid class to make the image adaptable. Set the border, using the img-bordered class. Set the rounded corners and use the img-rounded class. Set the shadow, use the shadow class. Resize and position the image, using CSS style. Using the background image, use the background-image CSS property.
 How to resize bootstrap
Apr 07, 2025 pm 03:18 PM
To adjust the size of elements in Bootstrap, you can use the dimension class, which includes: adjusting width: .col-, .w-, .mw-adjust height: .h-, .min-h-, .max-h-
 How to set up the framework for bootstrap
Apr 07, 2025 pm 03:27 PM
To set up the Bootstrap framework, you need to follow these steps: 1. Reference the Bootstrap file via CDN; 2. Download and host the file on your own server; 3. Include the Bootstrap file in HTML; 4. Compile Sass/Less as needed; 5. Import a custom file (optional). Once setup is complete, you can use Bootstrap's grid systems, components, and styles to create responsive websites and applications.
 How to use bootstrap button
Apr 07, 2025 pm 03:09 PM
How to use the Bootstrap button? Introduce Bootstrap CSS to create button elements and add Bootstrap button class to add button text


