Cause
I once built wordpress on Vultr , but due to well-known reasons, access to this place is getting slower and slower. Later, I chose Sina Cloud. Sina Cloud is indeed cheap and very good, but it requires registration and the comment function may need to be castrated. After thinking about it, I might as well forget it and just find a Hong Kong host to build wordpress.
Purchasing a host
What I chose here is Alibaba Cloud's lightweight application server. The advantage of this host is that it is cheap and sufficient.
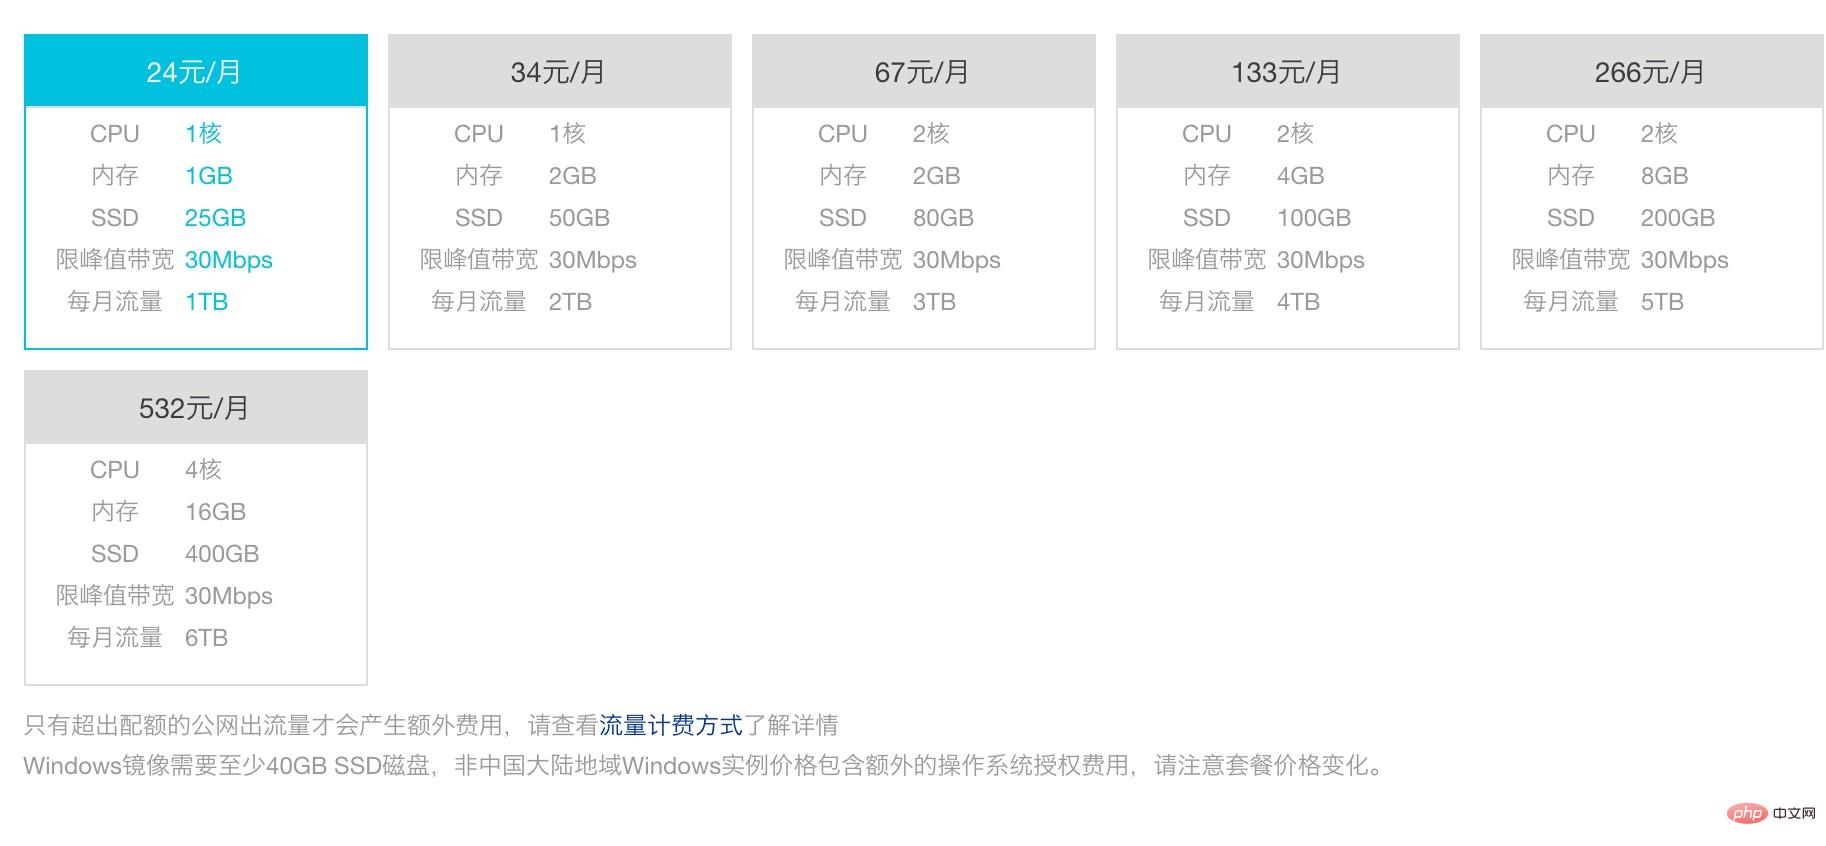
For example, the Hong Kong host I chose only costs 24 yuan a month, with one core and one gigabyte of memory, a network speed of 30Mbps, 25GB of disk space, and 1TB of monthly traffic.
The configuration is as shown below
Initialize the docker environment
Although there is a function to install wordpress , but I don’t recommend it because the configuration is too old
In the end I chose theubuntu18.04 system. You can install docker and initialize it directly by using the following commanddocker swarm
curl -o- -L https://gist.githubusercontent.com/hangox/e679464f35dc2a78920e6249a21d7958/raw/c5541e38979dca1e3e1e9704ad171ed2f0556fa1/ubunut-install-docker.sh | bash
Write docker-compose
Configuration overview
version: '3.7'

services:
  caddy:
    image: abiosoft/caddy
    ports:
      - 80:80
      - 443:443
    environment:
      - ACME_AGREE=true
      - TZ=Asia/Shanghai
    volumes:
      - caddy:/root/.caddy
      - wp-src:/usr/src/wordpress
    configs:
      - source: wp_caddy
        target: /etc/Caddyfile
  app:
    image: wordpress:5.4.1-php7.2-fpm
    environment:
      TZ: Asia/Shanghai
      WORDPRESS_DB_HOST: wp_db:3306
      WORDPRESS_DB_USER: root
      WORDPRESS_DB_PASSWORD: yourpassword
      WORDPRESS_DB_NAME: wordpress
    depends_on:
      - db
    volumes:
      - wordpress:/var/www/html
      - wp-src:/usr/src/wordpress
  db:
    image: mysql:8
    environment:
      TZ: Asia/Shanghai
      MYSQL_ROOT_PASSWORD: yourpassword
      MYSQL_DATABASE: wordpress
    command: --default-authentication-plugin=mysql_native_password
    volumes:
      - db:/var/lib/mysql

volumes:
  wordpress:
  db:
  caddy:
  wp-src:
configs:
  wp_caddy:
    external: true
Configuration analysis
caddy
It is used as a reverse proxy and takes into account https certificate application. The configuration is as follows
https://47log.com  https://www.47log.com  {
    root /usr/src/wordpress
    gzip
    fastcgi / wp_app:9000 php
    rewrite {
        if {path} not_match ^\/wp-admin
        to {path} {path}/ /index.php?_url={uri}
    }
    log stdout
    errors stderr
}Here I used the config function of docker swarm and wrote the configuration directly towp_caddy in this configuration.
db
Mysql8 is used here, which is supported by wordpress, and the performance should be better.
It should be noted that commmand must be added command: --default-authentication-plugin=mysql_native_password Otherwise, there is no way to perform password authentication. I just forgot to add this and it hurt for a while.
app
Pay attention to the connection method
If you deploy it using docker stack, what is the name of the deployment? The name prefix must be added to the database connection. . For example, here is docker stack deploy -c docker-compose.yml wp, and the host of my database in the docker network is wp_db. If your stack name is wordpress, it must be changed to wordpress_db accordingly.
Pay attention to configuring volume- wordpress:/var/www/html This thing must be configured. I didn’t configure this thing last time, so I deleted it. container, the theme is gone.
Use docker stack to deploy
One line commanddocker stack deploy -c docker-compose.yml wpYou can enter wordpress after a while
Why Use docker swarm. Because of portainer, docker-swarm can have full-featured configuration capabilities after being connected to portainer.


