 Web Front-end
 Bootstrap Tutorial
 Detailed explanation of image carousel in Bootstrap--Carousel plug-in
Detailed explanation of image carousel in Bootstrap--Carousel plug-in
本篇文章带大家详细了解一下Bootstrap中的图片轮播。有一定的参考价值,有需要的朋友可以参考一下,希望对大家有所帮助。

图片轮播效果在Web中常常能看到,很多人也称之为幻灯片。其主要显示的效果就是多幅图片轮流播放。鼠标悬停在图片时会暂停播放,如果鼠标悬停或单击右下角圆点时,会显示对应的图片。这种图片轮播效果,在Bootstrap框架中是通过Carousel插件来实现的。【相关推荐:《bootstrap教程》】
结构
一个轮播图片主要包括三个部分:
轮播的图片
轮播图片的计数器
轮播图片的控制器
复杂一点的轮播图片,每个轮播区会带有对应的标题和描述内容。那么在 Bootstrap 框架中,轮播图是如何设计的呢?
第一步:设计轮播图片的容器。在 Bootstrap 框架中采用 carousel 样式,并且给这个容器定义一个 ID 值,方便后面采用 data 属性来声明触发
<div id="slidershow" class="carousel"></div>
第二步:设计轮播图片计数器。在容器 p.carousel 的内部添加轮播图片计算器,采用 carousel-indicators 样式,其主要功能是显示当前图片的播放顺序(有几张图片就放置几个li),一般采用有序列表来制作:
<div id="slidershow" class="carousel">
<!-- 设置图片轮播的顺序 -->
    <ol class="carousel-indicators">
        <li class="active">1</li>
        <li>2</li>
        <li>3</li>
        <li>4</li>
        <li>5</li>
        ...
    </ol>
</div>在 Bootstrap 框架中,轮播图片计数器,都是以圆点呈现
.carousel-indicators {
    position: absolute; /*整个计数区域绝对定位*/
    bottom: 10px; /*距容器carousel底部10px*/
    z-index: 15; /*设置其在Z轴的层级*/
    /*让整个计数区水平居中*/
    left: 50%;
    width: 60%;
    padding-left: 0;
    margin-left: -30%;
    text-align: center;
    list-style: none;
}
.carousel-indicators li {
    display: inline-block;
    width: 10px;
    height: 10px;
    margin: 1px;
    text-indent: -999px;
    cursor: pointer;
    background-color: #000 \9;
    background-color: rgba(0, 0, 0, 0);
    border: 1px solid #fff;
    border-radius: 10px;
}
/*设置当前状态样式*/
.carousel-indicators .active {
    width: 12px;
    height: 12px;
    margin: 0;
    background-color: #fff;
}第三步:设计轮播图片播放区。轮播图整个效果中,播放区是最关键的一个区域,这个区域主要用来放置需要轮播的图片。这个区域使用 carousel-inner 样式来控制,而且其同样放置在 carousel 容器内,并且通过 item 容器来放置每张轮播的图片
<div id="slidershow" class="carousel">
    <!-- 设置图片轮播的顺序 -->
    <ol class="carousel-indicators">
        <li class="active">1</li>
        …
    </ol>
    <!-- 设置轮播图片 -->
    <div class="carousel-inner">
        <div class="item active">
            <a href="##"><img src="/static/imghw/default1.png"  data-src="#"  class="lazy"   alt=""></a>
        </div>
        <div class="item">
            <a href="##"><img src="/static/imghw/default1.png"  data-src="#"  class="lazy"   alt=""></a>
        </div>
        …
        <div class="item">
            <a href="##"><img src="/static/imghw/default1.png"  data-src="#"  class="lazy"   alt=""></a>
        </div>
    </div>
</div>在很多轮播图片效果中,在每个图片上还对应有自己的标题和描述内容。其实 Bootstrap 框架中的 Carousel 也提供类似的效果。只需要在 item 中图片底部添加对应的代码:
<div id="slidershow" class="carousel">
    <!-- 设置图片轮播的顺序 -->
    <ol class="carousel-indicators">
        <li class="active">1</li>
    …
    </ol>
    <!-- 设置轮播图片 -->
    <div class="carousel-inner">
        <div class="item active">
            <a href="##"><img src="/static/imghw/default1.png"  data-src="#"  class="lazy"   alt=""></a>
            <!-- 图片对应标题和描述内容 -->
            <div class="carousel-caption">
                <h3 id="图片标题">图片标题</h3>
                <p>描述内容...</p>
            </div>
        </div>
    …
    </div>
</div>第四步:设计轮播图片控制器。很多时候轮播图片还具有一个向前播放和向后播放的控制器。在 Carousel 中通过 carousel-control 样式配合 left 和 right 来实现。其中left表示向前播放,right表示向后播放。其同样放在carousel容器内
<div id="slidershow" class="carousel">
    <!-- 设置图片轮播的顺序 -->
    <ol class="carousel-indicators">
       …
    </ol>
    <!-- 设置轮播图片 -->
    <div class="carousel-inner">
        …
    </div>
    <!-- 设置轮播图片控制器 -->
    <a class="left carousel-control" href="" >
        <span class="glyphicon glyphicon-chevron-left"></span>
    </a>
    <a class="right carousel-control" href="">
        <span class="glyphicon glyphicon-chevron-right"></span>
    </a>

</div>通过两个 a 链接在内部定义要显示的小图标,一个是向前,一个是向后。这两个图标都显示在图片容器的上面(z-index的值大于carousel-inner的)
声明式触发
声明式方法是通过定义 data 属性来实现,data 属性可以很容易地控制轮播的位置。其主要包括以下几种:
1、data-ride 属性:取值 carousel,并且将其定义在 carousel 上
2、data-target 属性:取值 carousel 定义的 ID 名或者其他样式识别符,如前面示例所示,取值为“#slidershow”,并且将其定义在轮播图计数器的每个 li 上
3、data-slide 属性:取值包括 prev,next。prev表示向后滚动,next 表示向前滚动。该属性值同样定义在轮播图控制器的 a 链接上,同时设置控制器 href 值为容器 carousel 的 ID 名或其他样式识别符
4、data-slide-to 属性:用来传递某个帧的下标,比如 data-slide-to="2",可以直接跳转到这个指定的帧(下标从0开始计),同样定义在轮播图计数器的每个 li 上
[注意]可以为 #slidershow 层添加 slide 样式,使用图片与图片切换效果有平滑感
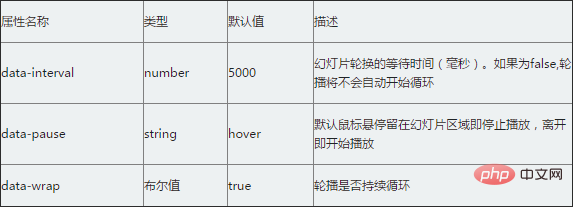
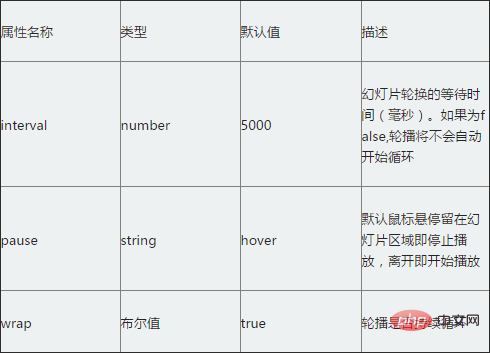
除了data-ride="carousel"、data-slide、data-slide-to 以外,轮播组件还支持其他三个自定义属性
<div id="slidershow" class="carousel slide" data-ride="carousel"   style="max-width:90%">
    <!-- 设置图片轮播的顺序 -->
    <ol class="carousel-indicators">
        <li class="active" data-target="#slidershow" data-slide-to="0">1</li>
        <li data-target="#slidershow" data-slide-to="1">2</li>
        <li data-target="#slidershow" data-slide-to="2">3</li>
    </ol>
    <!-- 设置轮播图片 -->
    <div class="carousel-inner">
        <div class="item active">
            <a href="##"><img src="/static/imghw/default1.png"  data-src="http://sandbox.runjs.cn/uploads/rs/26/ddzmgynp/img1.jpg"  class="lazy"      style="max-width:90%"></a>
            <div class="carousel-caption">
                <h3 id="图片标题">图片标题1</h3>
                <p>描述内容1...</p>
            </div>
        </div>
        <div class="item">
            <a href="##"><img src="/static/imghw/default1.png"  data-src="http://sandbox.runjs.cn/uploads/rs/26/ddzmgynp/img2.jpg"  class="lazy"      style="max-width:90%"></a>
            <div class="carousel-caption">
                <h3 id="图片标题">图片标题2</h3>
                <p>描述内容2...</p>
            </div>
        </div>
        <div class="item">
            <a href="##"><img src="/static/imghw/default1.png"  data-src="http://sandbox.runjs.cn/uploads/rs/26/ddzmgynp/img3.jpg"  class="lazy"      style="max-width:90%"></a>
            <div class="carousel-caption">
                <h3 id="图片标题">图片标题3</h3>
                <p>描述内容3...</p>
            </div>
        </div>
    </div>
    <a class="left carousel-control " href="#slidershow" role="button" data-slide="prev">
        <span class="glyphicon glyphicon-chevron-left"></span>
    </a>
    <a class="right carousel-control" href="#slidershow" role="button" data-slide="next">
        <span class="glyphicon glyphicon-chevron-right"></span>
    </a>
  </div>
JS触发
默认情况下,如果 carousel 容器上定义了 data-ride="carousel" 属性,页面加载之后就会自动加载轮播图片切换效果。如果没有定义 data-ride 属性,可以通过 JavaScript 方法来触发轮播图片切换。具体使用方法如下
$(".carousel").carousel();在 carousel() 方法中可以设置具体的参数,如
<div id="slidershow" class="carousel slide"   style="max-width:90%">
    <!-- 设置图片轮播的顺序 -->
    <ol class="carousel-indicators">
        <li class="active" data-target="#slidershow" data-slide-to="0">1</li>
        <li data-target="#slidershow" data-slide-to="1">2</li>
        <li data-target="#slidershow" data-slide-to="2">3</li>
    </ol>
    <!-- 设置轮播图片 -->
    <div class="carousel-inner">
        <div class="item active">
            <a href="##"><img src="/static/imghw/default1.png"  data-src="http://sandbox.runjs.cn/uploads/rs/26/ddzmgynp/img1.jpg"  class="lazy"      style="max-width:90%"></a>
            <div class="carousel-caption">
                <h3 id="图片标题">图片标题1</h3>
                <p>描述内容1...</p>
            </div>
        </div>
        <div class="item">
            <a href="##"><img src="/static/imghw/default1.png"  data-src="http://sandbox.runjs.cn/uploads/rs/26/ddzmgynp/img2.jpg"  class="lazy"      style="max-width:90%"></a>
            <div class="carousel-caption">
                <h3 id="图片标题">图片标题2</h3>
                <p>描述内容2...</p>
            </div>
        </div>
        <div class="item">
            <a href="##"><img src="/static/imghw/default1.png"  data-src="http://sandbox.runjs.cn/uploads/rs/26/ddzmgynp/img3.jpg"  class="lazy"      style="max-width:90%"></a>
            <div class="carousel-caption">
                <h3 id="图片标题">图片标题3</h3>
                <p>描述内容3...</p>
            </div>
        </div>
    </div>
    <a class="left carousel-control " href="#slidershow" role="button" data-slide="prev">
        <span class="glyphicon glyphicon-chevron-left"></span>
    </a>
    <a class="right carousel-control" href="#slidershow" role="button" data-slide="next">
        <span class="glyphicon glyphicon-chevron-right"></span>
    </a>
  </div>
<script>
$("#slidershow").carousel({
       interval: 1000
});
</script>
【关键字】
实际上,给carousel()方法配置参数之后,轮播效果就能自动切换。但 Bootstrap 框架中的 carousel 插件还提供了几种特殊的调用方法,简单说明如下:
.carousel("cycle"):从左向右循环播放;
.carousel("pause"):停止循环播放;
.carousel("number"):循环到指定的帧,下标从0开始,类似数组;
.carousel("prev"):返回到上一帧;
.carousel("next"):下一帧【事件】
该插件只提供两种事件类型
slide.bs.carousel    此事件在slide方法被调用之后 ,但还没开始处理下一张图片之前触发
slid.bs.carousel      此事件在一张图片轮播之后触发
<div id="slidershow" class="carousel slide" data-ride="carousel" style="width:300px">
<!-- 设置图片轮播的顺序 -->
<ol class="carousel-indicators">
<li class="active" data-target="#slidershow" data-slide-to="0">1</li>
<li data-target="#slidershow" data-slide-to="1">2</li>
<li data-target="#slidershow" data-slide-to="2">3</li>
</ol>
<!-- 设置轮播图片 -->
<div class="carousel-inner">
<div class="item active">
<a href="##"><img src="/static/imghw/default1.png" data-src="http://sandbox.runjs.cn/uploads/rs/26/ddzmgynp/img1.jpg" class="lazy" style="max-width:90%"></a>
<div class="carousel-caption">
<h3 id="图片标题">图片标题1</h3>
<p>描述内容1...</p>
</div>
</div>
<div class="item">
<a href="##"><img src="/static/imghw/default1.png" data-src="http://sandbox.runjs.cn/uploads/rs/26/ddzmgynp/img2.jpg" class="lazy" style="max-width:90%"></a>
<div class="carousel-caption">
<h3 id="图片标题">图片标题2</h3>
<p>描述内容2...</p>
</div>
</div>
<div class="item">
<a href="##"><img src="/static/imghw/default1.png" data-src="http://sandbox.runjs.cn/uploads/rs/26/ddzmgynp/img3.jpg" class="lazy" style="max-width:90%"></a>
<div class="carousel-caption">
<h3 id="图片标题">图片标题3</h3>
<p>描述内容3...</p>
</div>
</div>
</div>
<a class="left carousel-control " href="#slidershow" role="button" data-slide="prev">
<span class="glyphicon glyphicon-chevron-left"></span>
</a>
<a class="right carousel-control" href="#slidershow" role="button" data-slide="next">
<span class="glyphicon glyphicon-chevron-right"></span>
</a>
</div>
<button type="button" class="btn btn-default" id="btn1">播放</button>
<button type="button" class="btn btn-default" id="btn2">暂停</button>
<button type="button" class="btn btn-default" id="btn3">上一帧</button>
<button type="button" class="btn btn-default" id="btn4">下一帧</button>
<div id="result"></div>
<script>
$(function(){
$('#btn1').click(function(){
$("#slidershow").carousel('cycle');
});
$('#btn2').click(function(){
$("#slidershow").carousel('pause');
});
$('#btn3').click(function(){
$("#slidershow").carousel('prev');
});
$('#btn4').click(function(){
$("#slidershow").carousel('next');
});
$("#slidershow").on("slid.bs.carousel",function(e){
$('#result').html('当前正在显示第' + ($(e.relatedTarget).index()+1) + '张图片');
})
})
</script>
更多编程相关知识,可访问:编程入门!!
The above is the detailed content of Detailed explanation of image carousel in Bootstrap--Carousel plug-in. For more information, please follow other related articles on the PHP Chinese website!

Hot AI Tools

Undresser.AI Undress
AI-powered app for creating realistic nude photos

AI Clothes Remover
Online AI tool for removing clothes from photos.

Undress AI Tool
Undress images for free

Clothoff.io
AI clothes remover

Video Face Swap
Swap faces in any video effortlessly with our completely free AI face swap tool!

Hot Article

Hot Tools

Notepad++7.3.1
Easy-to-use and free code editor

SublimeText3 Chinese version
Chinese version, very easy to use

Zend Studio 13.0.1
Powerful PHP integrated development environment

Dreamweaver CS6
Visual web development tools

SublimeText3 Mac version
God-level code editing software (SublimeText3)

Hot Topics
 1387
1387
 52
52
 How to get the bootstrap search bar
Apr 07, 2025 pm 03:33 PM
How to use Bootstrap to get the value of the search bar: Determines the ID or name of the search bar. Use JavaScript to get DOM elements. Gets the value of the element. Perform the required actions.
 How to use bootstrap in vue
Apr 07, 2025 pm 11:33 PM
Using Bootstrap in Vue.js is divided into five steps: Install Bootstrap. Import Bootstrap in main.js. Use the Bootstrap component directly in the template. Optional: Custom style. Optional: Use plug-ins.
 How to do vertical centering of bootstrap
Apr 07, 2025 pm 03:21 PM
Use Bootstrap to implement vertical centering: flexbox method: Use the d-flex, justify-content-center, and align-items-center classes to place elements in the flexbox container. align-items-center class method: For browsers that do not support flexbox, use the align-items-center class, provided that the parent element has a defined height.
 How to write split lines on bootstrap
Apr 07, 2025 pm 03:12 PM
There are two ways to create a Bootstrap split line: using the tag, which creates a horizontal split line. Use the CSS border property to create custom style split lines.
 How to resize bootstrap
Apr 07, 2025 pm 03:18 PM
To adjust the size of elements in Bootstrap, you can use the dimension class, which includes: adjusting width: .col-, .w-, .mw-adjust height: .h-, .min-h-, .max-h-
 How to use bootstrap button
Apr 07, 2025 pm 03:09 PM
How to use the Bootstrap button? Introduce Bootstrap CSS to create button elements and add Bootstrap button class to add button text
 How to set up the framework for bootstrap
Apr 07, 2025 pm 03:27 PM
To set up the Bootstrap framework, you need to follow these steps: 1. Reference the Bootstrap file via CDN; 2. Download and host the file on your own server; 3. Include the Bootstrap file in HTML; 4. Compile Sass/Less as needed; 5. Import a custom file (optional). Once setup is complete, you can use Bootstrap's grid systems, components, and styles to create responsive websites and applications.
 How to insert pictures on bootstrap
Apr 07, 2025 pm 03:30 PM
There are several ways to insert images in Bootstrap: insert images directly, using the HTML img tag. With the Bootstrap image component, you can provide responsive images and more styles. Set the image size, use the img-fluid class to make the image adaptable. Set the border, using the img-bordered class. Set the rounded corners and use the img-rounded class. Set the shadow, use the shadow class. Resize and position the image, using CSS style. Using the background image, use the background-image CSS property.


